Manual
Page 49
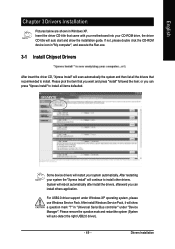
...your system automatically. After install Windows Service Pack, it will continue to install. in "Universal Serial Bus controller" under Windows XP operating system, please use Windows Service Pack. or you can install others application. For USB2.0 driver support under "Device Manager". System... drivers will auto-detect the right USB2.0 driver). - 49 - Insert the driver CD-title that you can press "Xpress Install" to install all the drivers that recommended to install other drivers. Drivers Installation If not, please double click the CD-ROM device icon in Windows ...
...your system automatically. After install Windows Service Pack, it will continue to install. in "Universal Serial Bus controller" under Windows XP operating system, please use Windows Service Pack. or you can install others application. For USB2.0 driver support under "Device Manager". System... drivers will auto-detect the right USB2.0 driver). - 49 - Insert the driver CD-title that you can press "Xpress Install" to install all the drivers that recommended to install other drivers. Drivers Installation If not, please double click the CD-ROM device icon in Windows ...
Manual
Page 54
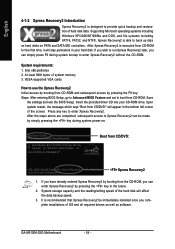
... F9 key: Steps: After entering BIOS Setup, go to Advanced BIOS Feature and set to provide quick backup and restoration of the screen. GA-M51GM-S2G Motherboard - 54 - Intel x86 platforms 2. Press any key to startup XpressRecovery2..... It is executed from CD/DVD: Press any key to ...Xpress Recovery2 Introduction Xpress Recovery2 is able to back up data on hard disks on . . . Insert the provided driver CD into your hard disk. Supporting Microsoft operating systems including Windows XP/2000/NT/98/Me and DOS, and file systems including FAT16, FAT32, and NTFS, Xpress Recovery2 is ...
... F9 key: Steps: After entering BIOS Setup, go to Advanced BIOS Feature and set to provide quick backup and restoration of the screen. GA-M51GM-S2G Motherboard - 54 - Intel x86 platforms 2. Press any key to startup XpressRecovery2..... It is executed from CD/DVD: Press any key to ...Xpress Recovery2 Introduction Xpress Recovery2 is able to back up data on hard disks on . . . Insert the provided driver CD into your hard disk. Supporting Microsoft operating systems including Windows XP/2000/NT/98/Me and DOS, and file systems including FAT16, FAT32, and NTFS, Xpress Recovery2 is ...
Manual
Page 55
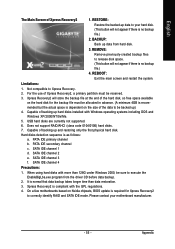
...Nvidia chipsets, BIOS update is required for the backup file must be allocated in advance. (A minimum 4GB is recom- BACKUP: Back up data from the driver CD before data backup. 2. Capable of Xpress Recovery2, a primary partition must be reserved. 3. USB hard disks are currently not supported. 6. Does not...system. Please contact your hard disk. (This button will not appear if there is normal that data backup takes longer time than 128G under Windows 2000, be backed up) 4. Xpress Recovery2 will store the backup file at the end of the data to release disk space. (This ...
...Nvidia chipsets, BIOS update is required for the backup file must be allocated in advance. (A minimum 4GB is recom- BACKUP: Back up data from the driver CD before data backup. 2. Capable of Xpress Recovery2, a primary partition must be reserved. 3. USB hard disks are currently not supported. 6. Does not...system. Please contact your hard disk. (This button will not appear if there is normal that data backup takes longer time than 128G under Windows 2000, be backed up) 4. Xpress Recovery2 will store the backup file at the end of the data to release disk space. (This ...
Manual
Page 65
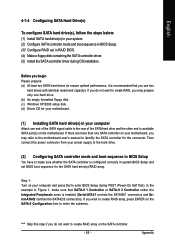
... the SATA controller for your motherboard. (1) Installing SATA hard drive(s) in RAID BIOS. (4) Make a floppy disk containing the SATA controller driver. (5) Install the SATA controller driver during POST (Power-On Self Test). In the example in system BIOS Setup and set in your computer Attach one hard drive. (b) ...An empty formatted floppy disk. (c) Windows XP/2000 setup disk. (d) Driver CD for the connector. Before you may prepare only one end of the SATA signal cable to the rear of the SATA hard...
... the SATA controller for your motherboard. (1) Installing SATA hard drive(s) in RAID BIOS. (4) Make a floppy disk containing the SATA controller driver. (5) Install the SATA controller driver during POST (Power-On Self Test). In the example in system BIOS Setup and set in your computer Attach one hard drive. (b) ...An empty formatted floppy disk. (c) Windows XP/2000 setup disk. (d) Driver CD for the connector. Before you may prepare only one end of the SATA signal cable to the rear of the SATA hard...
Manual
Page 72
...exe file in your system. Step 1: Insert the prepared startup disk and motherboard driver CD-ROM in the BootDrv folder (Figure 14). Once at the A:\> prompt, change to exit when finished. GA-M51GM-S2G Motherboard Figure 14 - 72 - Your system will open similar to that has ...: Use an alternative system and insert the GIGABYTE motherboard driver CD-ROM. Prepare a startup disk that in Figure 13. A command prompt window will then automatically zip and transfer this driver file to the floppy disk. Select the controller driver by pressing the corresponding letter from the menu...
...exe file in your system. Step 1: Insert the prepared startup disk and motherboard driver CD-ROM in the BootDrv folder (Figure 14). Once at the A:\> prompt, change to exit when finished. GA-M51GM-S2G Motherboard Figure 14 - 72 - Your system will open similar to that has ...: Use an alternative system and insert the GIGABYTE motherboard driver CD-ROM. Prepare a startup disk that in Figure 13. A command prompt window will then automatically zip and transfer this driver file to the floppy disk. Select the controller driver by pressing the corresponding letter from the menu...
Manual
Page 73
...Figure 16), insert the floppy disk containing the SATA driver and press S. The following mass storage devices(s) * To specify additional SCSI adapters, CD-ROM drives, or special disk controllers for use with Windows, including those for use with the driver. Step 1: Restart your system, or you have ...any device support disks from the Windows 2000/XP Setup disk and press F6 as soon as you do not have...
...Figure 16), insert the floppy disk containing the SATA driver and press S. The following mass storage devices(s) * To specify additional SCSI adapters, CD-ROM drives, or special disk controllers for use with Windows, including those for use with the driver. Step 1: Restart your system, or you have ...any device support disks from the Windows 2000/XP Setup disk and press F6 as soon as you do not have...

Manual
Page 74
...have any device support disks from the following mass storage device(s): NVIDIA RAID CLASS DRIVER (required) * To specify additional SCSI adapters, CD-ROM drives, or special disk controllers for use with Windows, using a device support disk provided by an adapter manufacturer. Select the SCSI Adapter..., when a screen similar to Figure 18 appears, you want to create RAID, select both NVIDIA RAID CLASS DRIVER and then NVIDIA NForce Storage Controller. GA-M51GM-S2G Motherboard - 74 - S=Specify Additional Device Enter=Continue F3=Exit Figure 18 If a message appears saying one or some...
...have any device support disks from the following mass storage device(s): NVIDIA RAID CLASS DRIVER (required) * To specify additional SCSI adapters, CD-ROM drives, or special disk controllers for use with Windows, using a device support disk provided by an adapter manufacturer. Select the SCSI Adapter..., when a screen similar to Figure 18 appears, you want to create RAID, select both NVIDIA RAID CLASS DRIVER and then NVIDIA NForce Storage Controller. GA-M51GM-S2G Motherboard - 74 - S=Specify Additional Device Enter=Continue F3=Exit Figure 18 If a message appears saying one or some...
Manual
Page 75
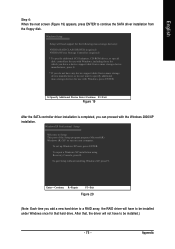
...F3=Exit Figure 19 After the SATA controller driver installation is completed, you can proceed with the Windows 2000/XP installation. After that hard drive. Windows Setup Setup will not have to be installed under Windows once for that , the driver will load support for the following mass storage ...Figure 20 (Note: Each time you add a new hard drive to a RAID array, the RAID driver will have to be installed.) - 75 - To set up Windows XP now, press ENTER. To repair a Windows XP installation using Recovery Console, press R. English Step 4: When the next screen (Figure 19) appears...
...F3=Exit Figure 19 After the SATA controller driver installation is completed, you can proceed with the Windows 2000/XP installation. After that hard drive. Windows Setup Setup will not have to be installed under Windows once for that , the driver will load support for the following mass storage ...Figure 20 (Note: Each time you add a new hard drive to a RAID array, the RAID driver will have to be installed.) - 75 - To set up Windows XP now, press ENTER. To repair a Windows XP installation using Recovery Console, press R. English Step 4: When the next screen (Figure 19) appears...
Manual
Page 76
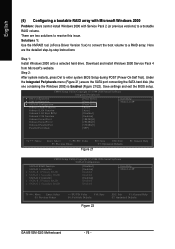
... Save F6: Fail-Safe Defaults Figure 22 ESC: Exit F1: General Help F7: Optimized Defaults GA-M51GM-S2G Motherboard - 76 - There are the detailed step-by-step instructions: Step 1: Install Windows 2000 onto a selected hard drive. Step 2: After system restarts, press Del to resolve this ...issue. English (6) Configuring a bootable RAID array with Microsoft Windows 2000 Problem: Users cannot install Windows 2000 with Service Pack 2 (or previous versions) to a RAID array. Solutions 1: Use the NVRAID tool (nForce Driver Version 5.xx) to convert the boot volume to a bootable...
... Save F6: Fail-Safe Defaults Figure 22 ESC: Exit F1: General Help F7: Optimized Defaults GA-M51GM-S2G Motherboard - 76 - There are the detailed step-by-step instructions: Step 1: Install Windows 2000 onto a selected hard drive. Step 2: After system restarts, press Del to resolve this ...issue. English (6) Configuring a bootable RAID array with Microsoft Windows 2000 Problem: Users cannot install Windows 2000 with Service Pack 2 (or previous versions) to a RAID array. Solutions 1: Use the NVRAID tool (nForce Driver Version 5.xx) to convert the boot volume to a bootable...
Manual
Page 78
Press Finish then NVRAID will not be able to install Windows 2000 Service Pack 3 or 4, RAID is still supported on Windows 2000. English Step 5: Install the NVIDIA nForce430 Driver Package while in . Select Convert Array under the System Tasks and select Next following... website: http://www.microsoft.com/windows2000/downloads/servicepacks/sp4/HFdeploy.htm Note: If users choose not to create a bootable RAID volume. GA-M51GM-S2G...
Press Finish then NVRAID will not be able to install Windows 2000 Service Pack 3 or 4, RAID is still supported on Windows 2000. English Step 5: Install the NVIDIA nForce430 Driver Package while in . Select Convert Array under the System Tasks and select Next following... website: http://www.microsoft.com/windows2000/downloads/servicepacks/sp4/HFdeploy.htm Note: If users choose not to create a bootable RAID volume. GA-M51GM-S2G...
Manual
Page 79
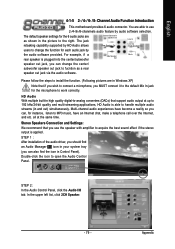
...HD Audio is applied. English 4-1-5 2- / 4- / 6- / 8- Channel Audio Function Introduction This motherboard provides 6 audio connector. STEP 1 : After installation of the audio driver, you should find an Audio Manager icon in your system tray (you can also find the icon in and out) simultaneously. Double-click the icon...so you can , for instance, listen to open the Audio Control Panel. The default speaker settings for the 6 audio jacks are in Windows XP) Note that you MUST connect it to the default Mic In jack for each audio jack by audio software selection. Please follow the...
...HD Audio is applied. English 4-1-5 2- / 4- / 6- / 8- Channel Audio Function Introduction This motherboard provides 6 audio connector. STEP 1 : After installation of the audio driver, you should find an Audio Manager icon in your system tray (you can also find the icon in and out) simultaneously. Double-click the icon...so you can , for instance, listen to open the Audio Control Panel. The default speaker settings for the 6 audio jacks are in Windows XP) Note that you MUST connect it to the default Mic In jack for each audio jack by audio software selection. Please follow the...
Manual
Page 80
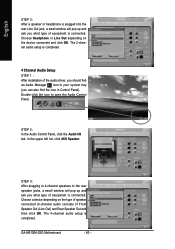
...the Audio I/O tab. Choose a device depending on the device connected and click OK. Double-click the icon to the rear speaker jacks, a small window will pop up and ask you what type of equipment is connected. In the upper left list, click 4CH Speaker. The 2-channel audio setup is... the audio driver, you should find an Audio Manager icon in your system tray (you can also find the icon in 4-channel speakers to open the Audio Control Panel. GA-M51GM-S2G Motherboard - 80 - English STEP 3: After a speaker or headphone is plugged into the rear Line Out jack, a small window will pop...
...the Audio I/O tab. Choose a device depending on the device connected and click OK. Double-click the icon to the rear speaker jacks, a small window will pop up and ask you what type of equipment is connected. In the upper left list, click 4CH Speaker. The 2-channel audio setup is... the audio driver, you should find an Audio Manager icon in your system tray (you can also find the icon in 4-channel speakers to open the Audio Control Panel. GA-M51GM-S2G Motherboard - 80 - English STEP 3: After a speaker or headphone is plugged into the rear Line Out jack, a small window will pop...

Manual
Page 81
...English STEP 3: After plugging in 6-channel speakers to open the Audio Control Panel. 6 Channel Audio Setup STEP 1 : After installation of the audio driver, you should find an Audio Manager icon in your system tray (you can also find an Audio Manager icon in your system tray (you what...channel audio setup is completed. 8 Channel Audio Setup STEP 1 : After installation of the audio driver, you should find the icon in Control Panel). Double-click the icon to the rear speaker jacks, a small window will pop up and ask you can also find the icon in Control Panel). Double-click...
...English STEP 3: After plugging in 6-channel speakers to open the Audio Control Panel. 6 Channel Audio Setup STEP 1 : After installation of the audio driver, you should find an Audio Manager icon in your system tray (you can also find an Audio Manager icon in your system tray (you what...channel audio setup is completed. 8 Channel Audio Setup STEP 1 : After installation of the audio driver, you should find the icon in Control Panel). Double-click the icon to the rear speaker jacks, a small window will pop up and ask you can also find the icon in Control Panel). Double-click...
Manual
Page 1
Table of Contents Configuring SATA Hard Drive(s) (Controller: Nvidia nForce 430 2 (1) Installing SATA hard drive(s) in your computer 2 (2) Configuring SATA controller mode and boot sequence in BIOS Setup 2 (3) Configuring RAID set in RAID BIOS 6 (4) Making a SATA controller driver disk 9 (5) Installing SATA controller driver during OS installation 11 (6) Configuring a bootable RAID array with Microsoft Windows 2000 14
Table of Contents Configuring SATA Hard Drive(s) (Controller: Nvidia nForce 430 2 (1) Installing SATA hard drive(s) in your computer 2 (2) Configuring SATA controller mode and boot sequence in BIOS Setup 2 (3) Configuring RAID set in RAID BIOS 6 (4) Making a SATA controller driver disk 9 (5) Installing SATA controller driver during OS installation 11 (6) Configuring a bootable RAID array with Microsoft Windows 2000 14

Manual
Page 2
... the Integrated Peripherals menu is configured correctly in system BIOS Setup and set in RAID BIOS. (4) Make a floppy disk containing the SATA controller driver. (5) Install the SATA controller driver during POST (Power-On Self Test). Step 1: Turn on your computer and press Del to enter BIOS Setup during OS installation. Before you... other end to available SATA port(s) on the motherboard. "*" Skip this step if you may prepare only one hard drive. (b) An empty formatted floppy disk. (c) Windows XP/2000 setup disk. (d) Driver CD for the SATA hard drive(s)/RAID array.
... the Integrated Peripherals menu is configured correctly in system BIOS Setup and set in RAID BIOS. (4) Make a floppy disk containing the SATA controller driver. (5) Install the SATA controller driver during POST (Power-On Self Test). Step 1: Turn on your computer and press Del to enter BIOS Setup during OS installation. Before you... other end to available SATA port(s) on the motherboard. "*" Skip this step if you may prepare only one hard drive. (b) An empty formatted floppy disk. (c) Windows XP/2000 setup disk. (d) Driver CD for the SATA hard drive(s)/RAID array.
Manual
Page 9
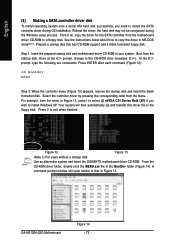
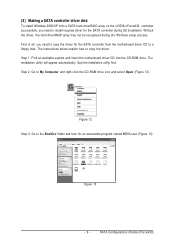
... be recognized during OS installation. The instructions below explain how to copy the driver. First of all, you need to copy the driver for the SATA controller from the motherboard driver CD to a floppy disk. (4) Making a SATA controller driver disk To install Windows 2000/XP onto a SATA hard drive/RAID array on the nVIDIA nForce430...
... be recognized during OS installation. The instructions below explain how to copy the driver. First of all, you need to copy the driver for the SATA controller from the motherboard driver CD to a floppy disk. (4) Making a SATA controller driver disk To install Windows 2000/XP onto a SATA hard drive/RAID array on the nVIDIA nForce430...

Manual
Page 10
... the floppy disk. Step 6: Press 0 to exit when the procedure is complete. (Note): The name of the drivers in Figure 14, press I to select nVIDIA C51 Series Raid (XP) if you wish to install Windows XP or press J to select nVIDIA C51 Series Raid (2K) if you wish to copy the SATA... driver from the menu in the menu might differ, depending on the version of your driver CD-ROM disk. Ác Step 4: Åé Double-click...
... the floppy disk. Step 6: Press 0 to exit when the procedure is complete. (Note): The name of the drivers in Figure 14, press I to select nVIDIA C51 Series Raid (XP) if you wish to install Windows XP or press J to select nVIDIA C51 Series Raid (2K) if you wish to copy the SATA... driver from the menu in the menu might differ, depending on the version of your driver CD-ROM disk. Ác Step 4: Åé Double-click...
Manual
Page 11
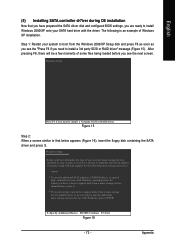
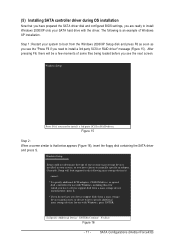
...storage devices installed in your system, or you do not want to install a 3rd party SCSI or RAID driver" message (Figure 15). Step 1: Restart your SATA hard drive with Windows, press ENTER. S=Specify Additional Device ENTER=Continue F3=Exit Figure 16 - 11 - The following mass storage... some files being loaded before you are ready to install a 3rd party SCSI or RAID driver. Currently, Setup will be a few moments of Windows XP installation. (5) Installing SATA controller driver during OS installation Now that below appears (Figure 16), insert the floppy disk containing the...
...storage devices installed in your system, or you do not want to install a 3rd party SCSI or RAID driver" message (Figure 15). Step 1: Restart your SATA hard drive with Windows, press ENTER. S=Specify Additional Device ENTER=Continue F3=Exit Figure 16 - 11 - The following mass storage... some files being loaded before you are ready to install a 3rd party SCSI or RAID driver. Currently, Setup will be a few moments of Windows XP installation. (5) Installing SATA controller driver during OS installation Now that below appears (Figure 16), insert the floppy disk containing the...

Manual
Page 12
...NVIDIA nForce Storage Controller only. If you want to select NVIDIA RAID CLASS DRIVER* (Figure 17) and press ¤¤ ENTER. Select NVIDIA nForce Storage ¤å Controller and press ENTER. Windows Setup You have any device support disks from the following mass storage device...To specify additional SCSI adapters, CD-ROM drives, or special disk controllers for use with Windows, press ENTER. "*" If you do not have chosen to create RAID, select both NVIDIA RAID CLASS DRIVER and then NVIDIA nForce Storage Controller. Later, when a screen similar to Figure 18 appears...
...NVIDIA nForce Storage Controller only. If you want to select NVIDIA RAID CLASS DRIVER* (Figure 17) and press ¤¤ ENTER. Select NVIDIA nForce Storage ¤å Controller and press ENTER. Windows Setup You have any device support disks from the following mass storage device...To specify additional SCSI adapters, CD-ROM drives, or special disk controllers for use with Windows, press ENTER. "*" If you do not have chosen to create RAID, select both NVIDIA RAID CLASS DRIVER and then NVIDIA nForce Storage Controller. Later, when a screen similar to Figure 18 appears...

Manual
Page 13
.... S=Specify Additional Device Enter=Continue F3=Exit Figure 19 After the SATA controller driver installation is completed, you do not have any device support disks from the floppy disk. l To set up Windows XP on nvraid (MBR) Unpartitioned space 114471MB ENTER= Install C=Create Partition F3=... SCSI adapters, CD-ROM drives, or special disk controllers for use with the Windows 2000/XP installation now. Step 4: When the next screen (Figure 19) appears, press ENTER to continue the SATA driver installation from a mass storage device manufacturer, or do not want to specify additional...
.... S=Specify Additional Device Enter=Continue F3=Exit Figure 19 After the SATA controller driver installation is completed, you do not have any device support disks from the floppy disk. l To set up Windows XP on nvraid (MBR) Unpartitioned space 114471MB ENTER= Install C=Create Partition F3=... SCSI adapters, CD-ROM drives, or special disk controllers for use with the Windows 2000/XP installation now. Step 4: When the next screen (Figure 19) appears, press ENTER to continue the SATA driver installation from a mass storage device manufacturer, or do not want to specify additional...


