User Manual
Page 1
... assumes no responsibility for any labels on motherboard, this manual may void the warranty of their respective owners. GA-K8NS Ultra-939 AMD Socket 939 Processor Motherboard User's Manual Rev. 1002 12ME-K8NSU939-1002 Copyright © 2004 GIGABYTE TECHNOLOGY CO., LTD Copyright by GIGA-BYTE TECHNOLOGY CO., LTD. ("GBT"). No part of this may be reproduced...
... assumes no responsibility for any labels on motherboard, this manual may void the warranty of their respective owners. GA-K8NS Ultra-939 AMD Socket 939 Processor Motherboard User's Manual Rev. 1002 12ME-K8NSU939-1002 Copyright © 2004 GIGABYTE TECHNOLOGY CO., LTD Copyright by GIGA-BYTE TECHNOLOGY CO., LTD. ("GBT"). No part of this may be reproduced...

User Manual
Page 2
Mother Board GA-K8NS Ultra-939 Oct. 7, 2004
Mother Board GA-K8NS Ultra-939 Oct. 7, 2004

User Manual
Page 3
Motherboard GA-K8NS Ultra-939 Oct. 7, 2004
Motherboard GA-K8NS Ultra-939 Oct. 7, 2004

User Manual
Page 4
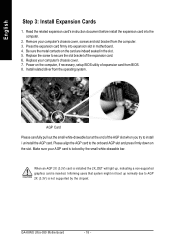
If your AGP card is not supported by nVIDIA® nForce3TM Ultra. You might experience system unable to boot up normally. English Read Me First! AGP 4X/8X notch Caution: AGP 2X card is AGP 4X/8X. GA-K8NS Ultra-939 Motherboard - 4 - Please insert an AGP 4X/8X card. When you installing AGP card, please make sure your AGP card has "AGP 4X/8X (1.5V) notch" (show below), please make sure the following notice is fully understood and practiced.
If your AGP card is not supported by nVIDIA® nForce3TM Ultra. You might experience system unable to boot up normally. English Read Me First! AGP 4X/8X notch Caution: AGP 2X card is AGP 4X/8X. GA-K8NS Ultra-939 Motherboard - 4 - Please insert an AGP 4X/8X card. When you installing AGP card, please make sure your AGP card has "AGP 4X/8X (1.5V) notch" (show below), please make sure the following notice is fully understood and practiced.

User Manual
Page 6
English Table of Contents Read Me First 4 Chapter 1 Introduction 8 Features Summary 8 GA-K8NS Ultra-939 Motherboard Layout 10 Block Diagram 11 Chapter 2 Hardware Installation Process 13 Step 1: Install the Central Processing Unit (CPU 14 Step 2: Install Memory Modules 16 Step 3: ... Features 38 Advanced BIOS Features 40 Integrated Peripherals 42 Power Management Setup 46 PnP/PCI Configurations 48 PC Health Status 49 MB Intelligent Tweaker(M.I.T 50 GA-K8NS Ultra-939 Motherboard - 6 -
English Table of Contents Read Me First 4 Chapter 1 Introduction 8 Features Summary 8 GA-K8NS Ultra-939 Motherboard Layout 10 Block Diagram 11 Chapter 2 Hardware Installation Process 13 Step 1: Install the Central Processing Unit (CPU 14 Step 2: Install Memory Modules 16 Step 3: ... Features 38 Advanced BIOS Features 40 Integrated Peripherals 42 Power Management Setup 46 PnP/PCI Configurations 48 PC Health Status 49 MB Intelligent Tweaker(M.I.T 50 GA-K8NS Ultra-939 Motherboard - 6 -
User Manual
Page 8
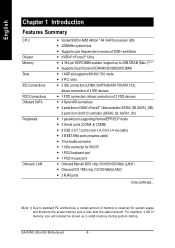
GA-K8NS Ultra-939 Motherboard - 8 - English Chapter 1 Introduction Features Summary CPU Chipset Memory Slots IDE Connections FDD Connections Onboard SATA Peripherals Onboard LAN y Socket 939 for system usage and therefore the actual memory size is less than the stated amount. For example, 4 GB of memory size will instead be continued... (...
GA-K8NS Ultra-939 Motherboard - 8 - English Chapter 1 Introduction Features Summary CPU Chipset Memory Slots IDE Connections FDD Connections Onboard SATA Peripherals Onboard LAN y Socket 939 for system usage and therefore the actual memory size is less than the stated amount. For example, 4 GB of memory size will instead be continued... (...

User Manual
Page 14
... properly and firmly attached. Move the socket lever to a triangle on the processor by the motherboard. 2. First, check the processor pins to inserting the processor. GA-K8NS Ultra-939 Motherboard - 14 - The pin 1 location is designated on the socket as shown in four main steps: Step1-1. Whether your processor's specifications. The processor will cause...
... properly and firmly attached. Move the socket lever to a triangle on the processor by the motherboard. 2. First, check the processor pins to inserting the processor. GA-K8NS Ultra-939 Motherboard - 14 - The pin 1 location is designated on the socket as shown in four main steps: Step1-1. Whether your processor's specifications. The processor will cause...
User Manual
Page 16
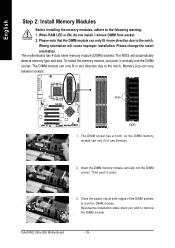
... DIMM sockets to the following warning: 1. The motherboard has 4 dual inline memory module (DIMM) sockets. Reverse the installation steps when you wish to the notch. GA-K8NS Ultra-939 Motherboard - 16 - Memory size can only fit in one direction due to remove the DIMM module. Wrong orientation will automatically detects memory type and size...
... DIMM sockets to the following warning: 1. The motherboard has 4 dual inline memory module (DIMM) sockets. Reverse the installation steps when you wish to the notch. GA-K8NS Ultra-939 Motherboard - 16 - Memory size can only fit in one direction due to remove the DIMM module. Wrong orientation will automatically detects memory type and size...

User Manual
Page 17
...Double Side, SS: Single Side) DDR 1 DDR 3 1 memory module DS/SS X X DS/SS 2 memory module DS/SS DS/SS The GA-K8NS Ultra-939 doesn't support 3 memory modules. If 3 memory modules are inserted into DDR 1, 2 and another pair into DDR 3,4. One, DDR memory module is...will not operate when one ,with DDR 2 and DDR 3, 4). GA-K8NS Ultra-939 includes four DIMM slots, and each Channel has 2 DIMMs as Single Channel. 2. Hardware Installation Process English Dual Channel DDR: GA-K8NS Ultra-939 supports Dual Channel Technology. When Dual Channel Technology is installed and it...
...Double Side, SS: Single Side) DDR 1 DDR 3 1 memory module DS/SS X X DS/SS 2 memory module DS/SS DS/SS The GA-K8NS Ultra-939 doesn't support 3 memory modules. If 3 memory modules are inserted into DDR 1, 2 and another pair into DDR 3,4. One, DDR memory module is...will not operate when one ,with DDR 2 and DDR 3, 4). GA-K8NS Ultra-939 includes four DIMM slots, and each Channel has 2 DIMMs as Single Channel. 2. Hardware Installation Process English Dual Channel DDR: GA-K8NS Ultra-939 supports Dual Channel Technology. When Dual Channel Technology is installed and it...
User Manual
Page 18
... supported by the small white-drawable bar. AGP Card Please carefully pull out the small white-drawable bar at the end of the expansion card. 6. GA-K8NS Ultra-939 Motherboard - 18 - Remove your computer's chassis cover, screws and slot bracket from the operating system. Read the related expansion card's instruction document before install the...
... supported by the small white-drawable bar. AGP Card Please carefully pull out the small white-drawable bar at the end of the expansion card. 6. GA-K8NS Ultra-939 Motherboard - 18 - Remove your computer's chassis cover, screws and slot bracket from the operating system. Read the related expansion card's instruction document before install the...
User Manual
Page 20
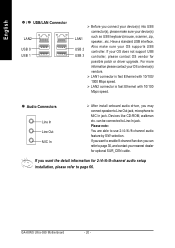
For more information please contact your OS supports USB controller. If you may connect speaker to Line Out jack, microphone to MIC In jack. GA-K8NS Ultra-939 Motherboard - 20 - Also make sure your nearest dealer for optional SUR_CEN cable. Devices like CD-ROM, walkman etc. If you want the detail information for ...
For more information please contact your OS supports USB controller. If you may connect speaker to Line Out jack, microphone to MIC In jack. GA-K8NS Ultra-939 Motherboard - 20 - Also make sure your nearest dealer for optional SUR_CEN cable. Devices like CD-ROM, walkman etc. If you want the detail information for ...
User Manual
Page 22
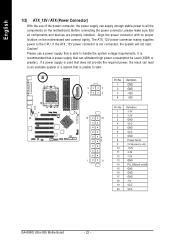
Align the power connector with its proper location on /off) 15 GND 16 GND 17 GND 18 -5V 19 VCC 20 VCC GA-K8NS Ultra-939 Motherboard - 22 - Caution! If a power supply is not connected, the system will not start . Before connecting the power connector, please make sure that all the ...
Align the power connector with its proper location on /off) 15 GND 16 GND 17 GND 18 -5V 19 VCC 20 VCC GA-K8NS Ultra-939 Motherboard - 22 - Caution! If a power supply is not connected, the system will not start . Before connecting the power connector, please make sure that all the ...
User Manual
Page 24
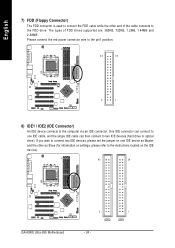
... connect the FDD cable while the other as Slave (for information on settings, please refer to the instructions located on the IDE device). 40 39 GA-K8NS Ultra-939 Motherboard 2 IDE2 1 IDE1 - 24 - The types of the cable connects to the FDD drive. If you wish to connect two IDE devices, please set the...
... connect the FDD cable while the other as Slave (for information on settings, please refer to the instructions located on the IDE device). 40 39 GA-K8NS Ultra-939 Motherboard 2 IDE2 1 IDE1 - 24 - The types of the cable connects to the FDD drive. If you wish to connect two IDE devices, please set the...

User Manual
Page 26
... 2- Pin 3: NC Pin 4: Data(-) Open: Normal Operation Close: Reset Hardware System Open: Normal Operation Close: Power On/Off Pin 1: LED anode(+) Pin 2: LED cathode(-) NC GA-K8NS Ultra-939 Motherboard - 26 - English 12) F_PANEL (Front Panel Jumper) Please connect the power LED, PC speaker, reset switch and power switch etc. of your chassis front...
... 2- Pin 3: NC Pin 4: Data(-) Open: Normal Operation Close: Reset Hardware System Open: Normal Operation Close: Power On/Off Pin 1: LED anode(+) Pin 2: LED cathode(-) NC GA-K8NS Ultra-939 Motherboard - 26 - English 12) F_PANEL (Front Panel Jumper) Please connect the power LED, PC speaker, reset switch and power switch etc. of your chassis front...
User Manual
Page 28
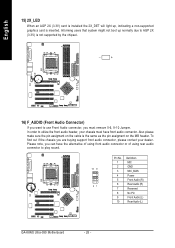
... order to play sound. 10 9 21 Pin No. 1 2 3 4 5 6 7 8 9 10 Definition MIC GND MIC_BIAS Power Front Audio (R) Rear Audio (R) Reserved No Pin Front Audio (L) Rear Audio (L) GA-K8NS Ultra-939 Motherboard - 28 - English 15) 2X_LED When an AGP 2X (3.3V) card is installed the 2X_DET will light up normally due to AGP 2X (3.3V) is...
... order to play sound. 10 9 21 Pin No. 1 2 3 4 5 6 7 8 9 10 Definition MIC GND MIC_BIAS Power Front Audio (R) Rear Audio (R) Reserved No Pin Front Audio (L) Rear Audio (L) GA-K8NS Ultra-939 Motherboard - 28 - English 15) 2X_LED When an AGP 2X (3.3V) card is installed the 2X_DET will light up normally due to AGP 2X (3.3V) is...
User Manual
Page 30
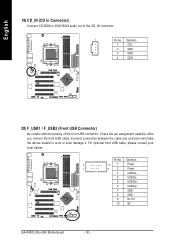
Definition 2 10 1 Power 1 9 2 Power 3 USB Dx- 4 USB Dy- 5 USB Dx+ 6 USB Dy+ 7 GND 8 GND 9 No Pin 10 NC GA-K8NS Ultra-939 Motherboard - 30 - Definition 1 CD-L 2 GND 3 GND 4 CD-R 20) F_USB1 / F_USB2 (Front USB Connector) Be careful with the polarity of the front USB connector. Pin No. ...
Definition 2 10 1 Power 1 9 2 Power 3 USB Dx- 4 USB Dy- 5 USB Dx+ 6 USB Dy+ 7 GND 8 GND 9 No Pin 10 NC GA-K8NS Ultra-939 Motherboard - 30 - Definition 1 CD-L 2 GND 3 GND 4 CD-R 20) F_USB1 / F_USB2 (Front USB Connector) Be careful with the polarity of the front USB connector. Pin No. ...

User Manual
Page 32
... No. Please contact your nearest dealer for optional external device cable. Definition 1 SMBCLK 2 VCC 2 10 3 SMBDATA 1 9 4 GPIO 5 GND 6 GND 7 No Pin 8 NC 9 +12V 10 +12V GA-K8NS Ultra-939 Motherboard - 32 - Definition 1 VCC 2 GRX1_R 2 16 3 GND 1 15 4 GPSA2 5 VCC 6 GPX2_R 7 GPY2_R 8 MSI_R 9 GPSA1 10 GND 11 GPY1_R 12 VCC 13 GPSB1 14 MSO_R 15...
... No. Please contact your nearest dealer for optional external device cable. Definition 1 SMBCLK 2 VCC 2 10 3 SMBDATA 1 9 4 GPIO 5 GND 6 GND 7 No Pin 8 NC 9 +12V 10 +12V GA-K8NS Ultra-939 Motherboard - 32 - Definition 1 VCC 2 GRX1_R 2 16 3 GND 1 15 4 GPSA2 5 VCC 6 GPX2_R 7 GPY2_R 8 MSI_R 9 GPSA1 10 GND 11 GPY1_R 12 VCC 13 GPSB1 14 MSO_R 15...
User Manual
Page 36
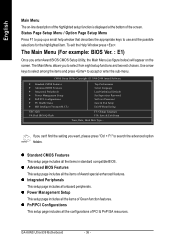
..., please press "Ctrl + F1" to accept or enter the sub-menu. z Integrated Peripherals This setup page includes all the items of Award special enhanced features. GA-K8NS Ultra-939 Motherboard - 36 - Use arrow keys to select among the items and press to search the advanced option hidden. z Power Management Setup This setup page includes...
..., please press "Ctrl + F1" to accept or enter the sub-menu. z Integrated Peripherals This setup page includes all the items of Award special enhanced features. GA-K8NS Ultra-939 Motherboard - 36 - Use arrow keys to select among the items and press to search the advanced option hidden. z Power Management Setup This setup page includes...
User Manual
Page 38
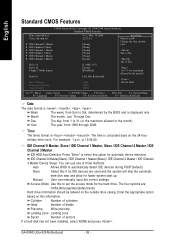
... this information. For example, 1 p.m. The four options are used and the system will skip the automatic detection step and allow for faster system start up. GA-K8NS Ultra-939 Motherboard - 38 - Jan. The time is displayed only. Cylinder Number of cylinders Head Number of heads Precomp Write precomp Landing Zone Landing zone Sector Number...
... this information. For example, 1 p.m. The four options are used and the system will skip the automatic detection step and allow for faster system start up. GA-K8NS Ultra-939 Motherboard - 38 - Jan. The time is displayed only. Cylinder Number of cylinders Head Number of heads Precomp Write precomp Landing Zone Landing zone Sector Number...

User Manual
Page 40
.... Boot Up Floppy Seek During POST, BIOS will determine the floppy disk drive installed is 40 or 80 tracks. 360K type is 360K. (Default value) GA-K8NS Ultra-939 Motherboard - 40 - First / Second / Third Boot Device Floppy Select your boot device priority by ZIP. Disabled Select your boot device priority by USB-FDD. English...
.... Boot Up Floppy Seek During POST, BIOS will determine the floppy disk drive installed is 40 or 80 tracks. 360K type is 360K. (Default value) GA-K8NS Ultra-939 Motherboard - 40 - First / Second / Third Boot Device Floppy Select your boot device priority by ZIP. Disabled Select your boot device priority by USB-FDD. English...
