User Manual
Page 1
GA-K8NF-9 AMD Socket 939 Processor Motherboard User's Manual Rev. 1005 12ME-K8NF9-1005
GA-K8NF-9 AMD Socket 939 Processor Motherboard User's Manual Rev. 1005 12ME-K8NF9-1005

User Manual
Page 3
..., please carefully read or download the information you need. Copyright © 2005 GIGA-BYTE TECHNOLOGY CO., LTD. Product Manual Classification In order to assist in the use of this product, Gigabyte has categorized the user manual in the following: „ For quick installation, please refer to the "Hardware Installation Guide" included with this...
..., please carefully read or download the information you need. Copyright © 2005 GIGA-BYTE TECHNOLOGY CO., LTD. Product Manual Classification In order to assist in the use of this product, Gigabyte has categorized the user manual in the following: „ For quick installation, please refer to the "Hardware Installation Guide" included with this...
User Manual
Page 9
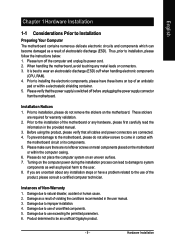
...Turning on the motherboard or within a electrostatic shielding container. 5. Damage as a result of violating the conditions recommended in the provided manual. 3. Damage due to natural disaster, accident or human cause. 2. If you are connected. 4. Please turn off before unplugging ... power supply connector from the motherboard. Please make sure there are required for warranty validation. 2. Thus, prior to be an unofficial Gigabyte product. - 9 - Prior to wear an electrostatic discharge (ESD) cuff when handling electronic components (CPU, RAM). 4. These stickers...
...Turning on the motherboard or within a electrostatic shielding container. 5. Damage as a result of violating the conditions recommended in the provided manual. 3. Damage due to natural disaster, accident or human cause. 2. If you are connected. 4. Please turn off before unplugging ... power supply connector from the motherboard. Please make sure there are required for warranty validation. 2. Thus, prior to be an unofficial Gigabyte product. - 9 - Prior to wear an electrostatic discharge (ESD) cuff when handling electronic components (CPU, RAM). 4. These stickers...
User Manual
Page 13
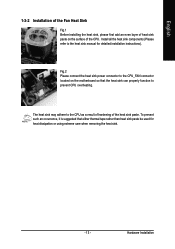
... power connector to the CPU_FAN connector located on the surface of the CPU. Install all the heat sink components (Please refer to the heat sink manual for heat dissipation or using extreme care when removing the heat sink. - 13 - English 1-3-2 Installation of the Fan Heat Sink Fig.1 Before installing the heat...
... power connector to the CPU_FAN connector located on the surface of the CPU. Install all the heat sink components (Please refer to the heat sink manual for heat dissipation or using extreme care when removing the heat sink. - 13 - English 1-3-2 Installation of the Fan Heat Sink Fig.1 Before installing the heat...

User Manual
Page 32
... the system will skip the automatic • Manual detection step and allow for faster system start up . IDE Channel 2/3/4/5 Master IDE HDD Auto-Detection Press "Enter" to select this to Sat, determined by the BIOS and is calculated base on the 24-hour military- GA-K8NF-9 Motherboard - 32 - is , , , . Drive A Drive B Halt On... no IDE devices are used and the system will skip the automatic detection step and allow for the hard drive. Extended IDE Drive You can manually input the correct settings.
... the system will skip the automatic • Manual detection step and allow for faster system start up . IDE Channel 2/3/4/5 Master IDE HDD Auto-Detection Press "Enter" to select this to Sat, determined by the BIOS and is calculated base on the 24-hour military- GA-K8NF-9 Motherboard - 32 - is , , , . Drive A Drive B Halt On... no IDE devices are used and the system will skip the automatic detection step and allow for the hard drive. Extended IDE Drive You can manually input the correct settings.

User Manual
Page 37
... your SATA hard drive is 3BC/IRQ7. (Note) When using driver version 1.2, please enable "NV IDE/SATA RAID function" if you wish to 0104. And manually set "NV SATA1 class code" to create RAID data drive or install O.S. BIOS Setup Enable onboard Serial port 1 and address is 3F8/IRQ4. (Default value...
... your SATA hard drive is 3BC/IRQ7. (Note) When using driver version 1.2, please enable "NV IDE/SATA RAID function" if you wish to 0104. And manually set "NV SATA1 class code" to create RAID data drive or install O.S. BIOS Setup Enable onboard Serial port 1 and address is 3F8/IRQ4. (Default value...

User Manual
Page 41
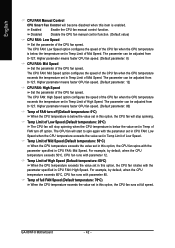
... 80oC / 176oF. 90oC / 194oF Monitor CPU temperature at the FAQ section on GIGABYTE's website. - 41 - Disabled Disable this function is supported will run at full speed when both CPU Smart FAN Control and CPU FAN Manual Control are disabled. For more detailed information please check at 90oC / 194oF. Current... Current CPU Temperature Current CPU FAN Speed Current SYSTEM FAN Speed CPU Warning Temperature CPU FAN Fail Warning CPU Smart FAN Control (Note) CPU FAN Manual Control x CPU FAN: Low speed x CPU FAN: Mid speed x CPU FAN: High speed x Temp of FAN turn off x Temp Limit of Low ...
... 80oC / 176oF. 90oC / 194oF Monitor CPU temperature at the FAQ section on GIGABYTE's website. - 41 - Disabled Disable this function is supported will run at full speed when both CPU Smart FAN Control and CPU FAN Manual Control are disabled. For more detailed information please check at 90oC / 194oF. Current... Current CPU Temperature Current CPU FAN Speed Current SYSTEM FAN Speed CPU Warning Temperature CPU FAN Fail Warning CPU Smart FAN Control (Note) CPU FAN Manual Control x CPU FAN: Low speed x CPU FAN: Mid speed x CPU FAN: High speed x Temp of FAN turn off x Temp Limit of Low ...
User Manual
Page 42
... CPU fan speed. (Default parameter: 12) CPU FAN: High Speed Set the parameter of the CPU fan speed. Disabled Disable the CPU fan manual control function. (Default value) CPU FAN: Low Speed Set the parameter of Mid Speed (Default temperature: 50oC) When the CPU temperature exceeds the...of Mid Speed. Temp Limit of the CPU fan speed. The parameter can be adjusted from 0~127. Enabled Enable the CPU fan manual control function. The parameter can be adjusted from 0~127. The CPU fan will stop spinning. The parameter can be adjusted from 0~127. GA-K8NF-9 Motherboard - 42 -
... CPU fan speed. (Default parameter: 12) CPU FAN: High Speed Set the parameter of the CPU fan speed. Disabled Disable the CPU fan manual control function. (Default value) CPU FAN: Low Speed Set the parameter of Mid Speed (Default temperature: 50oC) When the CPU temperature exceeds the...of Mid Speed. Temp Limit of the CPU fan speed. The parameter can be adjusted from 0~127. Enabled Enable the CPU fan manual control function. The parameter can be adjusted from 0~127. The CPU fan will stop spinning. The parameter can be adjusted from 0~127. GA-K8NF-9 Motherboard - 42 -

User Manual
Page 73
...: Please connect the devices to MIC In jack. Please note that 3D audio function will appear as above. Appendix Jack-Sensing includes 2 parts: AUTO and MANUAL. English Jack-Sensing Introduction Jack-Sensing provides audio connectors error-detection function. (Note) Install Microsoft DirectX8.1 or later version before to enable Jack-Sensing support...
...: Please connect the devices to MIC In jack. Please note that 3D audio function will appear as above. Appendix Jack-Sensing includes 2 parts: AUTO and MANUAL. English Jack-Sensing Introduction Jack-Sensing provides audio connectors error-detection function. (Note) Install Microsoft DirectX8.1 or later version before to enable Jack-Sensing support...

User Manual
Page 74
Manual setting: If the device picture shows different from what you set . GA-K8NF-9 Motherboard - 74 - English If you set, please press "Manual Selection" to set wrong with the connectors, the warning message will come out as right picture.
Manual setting: If the device picture shows different from what you set . GA-K8NF-9 Motherboard - 74 - English If you set, please press "Manual Selection" to set wrong with the connectors, the warning message will come out as right picture.
User Manual
Page 75
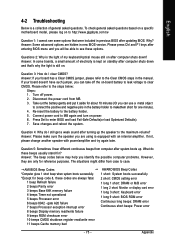
...updating BIOS. Please refer to the steps below may help you can use a metal object to connect the positive and negative pins in the manual. Answer: If your board doesn't have such jumper, you identify the possible computer problems. However, they are always fatal. 1 beep ...). 7. English 4-2 Troubleshooting Below is a collection of general asked questions based on a specific motherboard model, please log on to http://www.gigabyte.com.tw Question 1: I cannot see these options. Connect power cord to MB again and turn on standby after system boots up the speaker...
...updating BIOS. Please refer to the steps below may help you can use a metal object to connect the positive and negative pins in the manual. Answer: If your board doesn't have such jumper, you identify the possible computer problems. However, they are always fatal. 1 beep ...). 7. English 4-2 Troubleshooting Below is a collection of general asked questions based on a specific motherboard model, please log on to http://www.gigabyte.com.tw Question 1: I cannot see these options. Connect power cord to MB again and turn on standby after system boots up the speaker...


