User Manual
Page 71
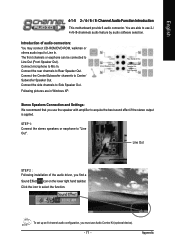
... 71 - You are in Windows XP. Connect the Center/Subwoofer channels to select the function. Following pictures are able to acquire the best sound effect if the stereo output is applied. Click the icon to Center/ Subwoofer Speaker Out. The front channels or earphone can be connected to ... to Line Out (Front Speaker Out). STEP 1: Connect the stereo speakers or earphone to Line In. Appendix Introduction of the audio driver, you find a Sound Effect icon on the lower right hand taskbar. Connect microphone to Rear Speaker Out. Connect the rear channels to Mic In. Line ...
... 71 - You are in Windows XP. Connect the Center/Subwoofer channels to select the function. Following pictures are able to acquire the best sound effect if the stereo output is applied. Click the icon to Center/ Subwoofer Speaker Out. The front channels or earphone can be connected to ... to Line Out (Front Speaker Out). STEP 1: Connect the stereo speakers or earphone to Line In. Appendix Introduction of the audio driver, you find a Sound Effect icon on the lower right hand taskbar. Connect microphone to Rear Speaker Out. Connect the rear channels to Mic In. Line ...
User Manual
Page 72
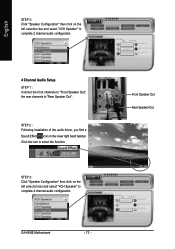
... STEP 3: Click "Speaker Configuration" then click on the left selection bar and select "4CH Speaker" to "Rear Speaker Out". GA-K8NE Motherboard - 72 - Front Speaker Out Rear Speaker Out Click the icon to select the function. STEP 2 : Following installation of the audio driver, you find a Sound Effect icon on the lower right hand taskbar.
... STEP 3: Click "Speaker Configuration" then click on the left selection bar and select "4CH Speaker" to "Rear Speaker Out". GA-K8NE Motherboard - 72 - Front Speaker Out Rear Speaker Out Click the icon to select the function. STEP 2 : Following installation of the audio driver, you find a Sound Effect icon on the lower right hand taskbar.
User Manual
Page 73
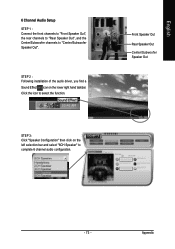
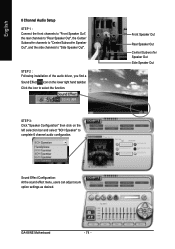
Front Speaker Out Rear Speaker Out Center/Subwoofer Speaker Out - 73 - STEP 3: Click "Speaker Configuration" then click on the lower right hand taskbar. English 6 Channel Audio Setup STEP 1 : Connect the front channels to "Front Speaker Out", the rear channels to "Rear Speaker Out", and the Center/Subwoofer channels to select the function. Appendix Click the icon to "Center/Subwoofer Speaker Out". STEP 2 : Following installation of the audio driver, you find a Sound Effect icon on the left selection bar and select "6CH Speaker" to complete 6 channel audio configuration.
Front Speaker Out Rear Speaker Out Center/Subwoofer Speaker Out - 73 - STEP 3: Click "Speaker Configuration" then click on the lower right hand taskbar. English 6 Channel Audio Setup STEP 1 : Connect the front channels to "Front Speaker Out", the rear channels to "Rear Speaker Out", and the Center/Subwoofer channels to select the function. Appendix Click the icon to "Center/Subwoofer Speaker Out". STEP 2 : Following installation of the audio driver, you find a Sound Effect icon on the left selection bar and select "6CH Speaker" to complete 6 channel audio configuration.
User Manual
Page 74
...driver, you find a Sound Effect icon on the left selection bar and select "6CH Speaker" to complete 6 channel audio configuration. Click the icon to "Side Speaker Out". STEP 3: Click "Speaker Configuration" then click on the lower right hand taskbar. Front Speaker Out Rear Speaker Out Center/Subwoofer Speaker Out Side Speaker Out GA-K8NE... Motherboard - 74 - Sound Effect Configuration: At the sound effect menu, users can adjust sound option settings as desired. English 8 Channel Audio Setup STEP 1 :...
...driver, you find a Sound Effect icon on the left selection bar and select "6CH Speaker" to complete 6 channel audio configuration. Click the icon to "Side Speaker Out". STEP 3: Click "Speaker Configuration" then click on the lower right hand taskbar. Front Speaker Out Rear Speaker Out Center/Subwoofer Speaker Out Side Speaker Out GA-K8NE... Motherboard - 74 - Sound Effect Configuration: At the sound effect menu, users can adjust sound option settings as desired. English 8 Channel Audio Setup STEP 1 :...


