
User Manual
Page 10
... / 6 / 8 channel audio Š Supports Line In ; Supports data striping (RAID 0), mirroring (RAID 1) function O.S Support Š Microsoft Windows 2000/XP Memory Š 2 DDR DIMM memory slots Š Supports DDR 400/333/266/200 DIMMs Š Supports 2.5V DDR DIMMs Expanstion Slots ...Š 2 USB 2.0/1.1 connectors for additional 4 USB 2.0/1.1 ports by cable Š 1 SPDIF In/Out connector Š 1 power LED connector GA-K8N51GMF(-RH) Motherboard - 10 - MIC ; Center/Subwoofer Speaker Out ; English 1-2 Feature Summary CPU Š Socket 754 for additional 1 port by cables...
... / 6 / 8 channel audio Š Supports Line In ; Supports data striping (RAID 0), mirroring (RAID 1) function O.S Support Š Microsoft Windows 2000/XP Memory Š 2 DDR DIMM memory slots Š Supports DDR 400/333/266/200 DIMMs Š Supports 2.5V DDR DIMMs Expanstion Slots ...Š 2 USB 2.0/1.1 connectors for additional 4 USB 2.0/1.1 ports by cable Š 1 SPDIF In/Out connector Š 1 power LED connector GA-K8N51GMF(-RH) Motherboard - 10 - MIC ; Center/Subwoofer Speaker Out ; English 1-2 Feature Summary CPU Š Socket 754 for additional 1 port by cables...

User Manual
Page 27
...Exit current page and return to Main Menu Increase the numeric value or make changes Decrease the numeric value or make changes General help window that does not require users to boot to its original settings. Because BIOS flashing is potentially risky, please do it is...use and the possible selections for the highlighted item. CONTROL KEYS Move to a new BIOS, either GIGABYTE's Q-Flash or @BIOS utility can enter the BIOS setup screen by pressing "Ctrl + F1". To exit the Help Window press . When setting up a small help , only for the first time, it with caution...
...Exit current page and return to Main Menu Increase the numeric value or make changes Decrease the numeric value or make changes General help window that does not require users to boot to its original settings. Because BIOS flashing is potentially risky, please do it is...use and the possible selections for the highlighted item. CONTROL KEYS Move to a new BIOS, either GIGABYTE's Q-Flash or @BIOS utility can enter the BIOS setup screen by pressing "Ctrl + F1". To exit the Help Window press . When setting up a small help , only for the first time, it with caution...

User Manual
Page 47
... will reboot automatically after install the drivers, afterward you automatically. For USB2.0 driver support under "Device Manager". After install Windows Service Pack, it will auto start and show a question mark "?" Insert the driver CD-title that recommended to install the...auto-detect the right USB2.0 driver). - 47 - in Windows XP. Drivers Installation English Chapter 3 Drivers Installation Pictures below are shown in "Universal Serial Bus controller" under Windows XP operating system, please use Windows Service Pack. Please remove the question mark and restart the...
... will reboot automatically after install the drivers, afterward you automatically. For USB2.0 driver support under "Device Manager". After install Windows Service Pack, it will auto start and show a question mark "?" Insert the driver CD-title that recommended to install the...auto-detect the right USB2.0 driver). - 47 - in Windows XP. Drivers Installation English Chapter 3 Drivers Installation Pictures below are shown in "Universal Serial Bus controller" under Windows XP operating system, please use Windows Service Pack. Please remove the question mark and restart the...

User Manual
Page 52
... most convenient Windows based system performance enhancement and manageability utility. and M.I .A. Smart-Fan 4. PC Health 5. GIGABYTE Logo 10. Exit or Minimize button Description Enters the Overclocking setting page Enters the C.I.A./2 and M.I .B.2 3. Featuring several powerful yet easy to GIGABYTE website Display ... cooling fan, 4) PC health for enhancing system performance, 2) C.I .B. Function display LEDs 9. Display screen 8. GO 6. GA-K8N51GMF(-RH) Motherboard - 52 - for special enhancement for CPU and Memory, 3) Smart-Fan control for managing fan speed control ...
... most convenient Windows based system performance enhancement and manageability utility. and M.I .A. Smart-Fan 4. PC Health 5. GIGABYTE Logo 10. Exit or Minimize button Description Enters the Overclocking setting page Enters the C.I.A./2 and M.I .B.2 3. Featuring several powerful yet easy to GIGABYTE website Display ... cooling fan, 4) PC health for enhancing system performance, 2) C.I .B. Function display LEDs 9. Display screen 8. GO 6. GA-K8N51GMF(-RH) Motherboard - 52 - for special enhancement for CPU and Memory, 3) Smart-Fan control for managing fan speed control ...

User Manual
Page 53
Supporting Microsoft operating systems including Windows XP/2000/NT/98/Me and DOS, and file systems including FAT16, FAT32, and NTFS, Xpress Recovery2 is able to boot from CD/DVD: Award ... in the bottom left corner of OS and all required drivers as well as software. - 53 - Appendix Save the settings and exit the BIOS Setup. GA-K8N51GMF-9-RH F3a . . . . :BIOS Setup/Q-Flash, : Xpress Recovery2, For Boot Menu 01/16/2006-C51-MCP51-6A61HG0BC-00 Xpress Recovery2 1. Insert the provided driver CD into...
Supporting Microsoft operating systems including Windows XP/2000/NT/98/Me and DOS, and file systems including FAT16, FAT32, and NTFS, Xpress Recovery2 is able to boot from CD/DVD: Award ... in the bottom left corner of OS and all required drivers as well as software. - 53 - Appendix Save the settings and exit the BIOS Setup. GA-K8N51GMF-9-RH F3a . . . . :BIOS Setup/Q-Flash, : Xpress Recovery2, For Boot Menu 01/16/2006-C51-MCP51-6A61HG0BC-00 Xpress Recovery2 1. Insert the provided driver CD into...
User Manual
Page 54
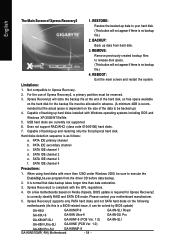
...system. Limitations: 1. Xpress Recovery2 will store the backup file at the end of backing up hard disks installed with Windows operating systems including DOS and Windows XP/2000/NT/9x/Me. 5. Capable of the hard disk, so free space available on the following motherboards (...time than 128G under Windows 2000, be solved by BIOS update) GA-K8U GA-K8NXP-9 GA-K8U-9 GA-K8N Ultra-9 GA-K8NXP-SLI GA-K8NF-9 (PCB Ver. 1.0) GA-K8N Ultra-SLI GA-K8NE (PCB Ver. 1.0) GA-K8N Pro-SLI GA-K8NMF-9 GA-K8N51GMF(-RH) Motherboard - 54 - GA-8N-SLI Royal GA-8N-SLI Pro GA-8N-SLI RESTORE: ...
...system. Limitations: 1. Xpress Recovery2 will store the backup file at the end of backing up hard disks installed with Windows operating systems including DOS and Windows XP/2000/NT/9x/Me. 5. Capable of the hard disk, so free space available on the following motherboards (...time than 128G under Windows 2000, be solved by BIOS update) GA-K8U GA-K8NXP-9 GA-K8U-9 GA-K8N Ultra-9 GA-K8NXP-SLI GA-K8NF-9 (PCB Ver. 1.0) GA-K8N Ultra-SLI GA-K8NE (PCB Ver. 1.0) GA-K8N Pro-SLI GA-K8NMF-9 GA-K8N51GMF(-RH) Motherboard - 54 - GA-8N-SLI Royal GA-8N-SLI Pro GA-8N-SLI RESTORE: ...

User Manual
Page 55
...a BIOS flash utility embedded in the BIOS menu when they want to a floppy disk. 3. Please note that Gigabyte Technology Co., Ltd is in Single Channel Primary Master : FUJITSU MPE3170AT ED-03-08 Primary Slave : None Secondary ... you start updating BIOS with the Q-FlashTM utility, please follow the steps below are combined in DOS or Windows. Before You Begin: Before you how to flash BIOS from Fa3 to enter SETUP / Dual BIOS / ...Memory Frequency 266 MHz in the BIOS menu. In the following sections, we take GA-8KNXP Ultra as the example to avoid any utility in the same screen.
...a BIOS flash utility embedded in the BIOS menu when they want to a floppy disk. 3. Please note that Gigabyte Technology Co., Ltd is in Single Channel Primary Master : FUJITSU MPE3170AT ED-03-08 Primary Slave : None Secondary ... you start updating BIOS with the Q-FlashTM utility, please follow the steps below are combined in DOS or Windows. Before You Begin: Before you how to flash BIOS from Fa3 to enter SETUP / Dual BIOS / ...Memory Frequency 266 MHz in the BIOS menu. In the following sections, we take GA-8KNXP Ultra as the example to avoid any utility in the same screen.

User Manual
Page 62
... New BIOS" Fig 4. Select the desired @BIOS server 1. Click "Internet Update" icon b. Click "Update New BIOS" icon c. GA-K8N51GMF(-RH) Motherboard - 62 - Fig 1. Installation Complete and Run @BIOS Select @BIOS item Click Sart/ Programs/ GIGABYTE/@BIOS Fig 3. Click "Update New BIOS" c. Please search for BIOS unzip file, downloading from internet or any other... BIOS. Update BIOS NOT through Internet a. Select the exact model name on your motherboard e. Just select the desired @BIOS server to update their BIOS under Windows. Do not click "Internet Update" icon b. e.
... New BIOS" Fig 4. Select the desired @BIOS server 1. Click "Internet Update" icon b. Click "Update New BIOS" icon c. GA-K8N51GMF(-RH) Motherboard - 62 - Fig 1. Installation Complete and Run @BIOS Select @BIOS item Click Sart/ Programs/ GIGABYTE/@BIOS Fig 3. Click "Update New BIOS" c. Please search for BIOS unzip file, downloading from internet or any other... BIOS. Update BIOS NOT through Internet a. Select the exact model name on your motherboard e. Just select the desired @BIOS server to update their BIOS under Windows. Do not click "Internet Update" icon b. e.
User Manual
Page 64
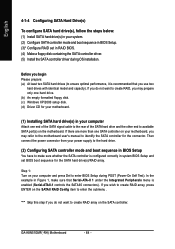
... only one hard drive. (b) An empty formatted floppy disk. (c) Windows XP/2000 setup disk. (d) Driver CD for your motherboard. (1) Installing SATA hard drive(s) in your computer Attach one SATA controller on your computer and press Del to enter BIOS Setup during OS installation. GA-K8N51GMF(-RH) Motherboard - 64 - "*" Skip this step if you...
... only one hard drive. (b) An empty formatted floppy disk. (c) Windows XP/2000 setup disk. (d) Driver CD for your motherboard. (1) Installing SATA hard drive(s) in your computer Attach one SATA controller on your computer and press Del to enter BIOS Setup during OS installation. GA-K8N51GMF(-RH) Motherboard - 64 - "*" Skip this step if you...

User Manual
Page 66
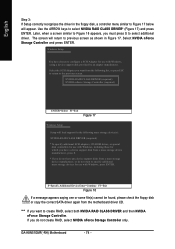
You should see a screen similar to install Microsoft Windows 2000/XP. In the Hard Disk Boot Priority submenu, select the model of the SATA hard drive onto which you wish to Figure 3 below. CH2 M. : 2. ... it up , or to install Microsoft Windows 2000/XP (Figure 4). Press to set hard disk boot priority before OS installation. CMOS Setup Utility-Copyright (C) 1984-2006 Award Software Hard Disk Boot Priority 1. Press to exit this menu. : Move PU/PD/+/-: Change Priority F10: Save Figure 4 GA-K8N51GMF(-RH) Motherboard - 66 - CH3 M. : 3. ESC: Exit...
You should see a screen similar to install Microsoft Windows 2000/XP. In the Hard Disk Boot Priority submenu, select the model of the SATA hard drive onto which you wish to Figure 3 below. CH2 M. : 2. ... it up , or to install Microsoft Windows 2000/XP (Figure 4). Press to set hard disk boot priority before OS installation. CMOS Setup Utility-Copyright (C) 1984-2006 Award Software Hard Disk Boot Priority 1. Press to exit this menu. : Move PU/PD/+/-: Change Priority F10: Save Figure 4 GA-K8N51GMF(-RH) Motherboard - 66 - CH3 M. : 3. ESC: Exit...

User Manual
Page 67
.... +/-/PU/PD: Value F10: Save F6: Fail-Safe Defaults Figure 5 ESC: Exit F1: General Help F7: Optimized Defaults - 67 - Appendix English Step 3: To boot from Windows installation CD-ROM, set First Boot Device under the Advanced BIOS Features menu to CDROM (Figure 5).
.... +/-/PU/PD: Value F10: Save F6: Fail-Safe Defaults Figure 5 ESC: Exit F1: General Help F7: Optimized Defaults - 67 - Appendix English Step 3: To boot from Windows installation CD-ROM, set First Boot Device under the Advanced BIOS Features menu to CDROM (Figure 5).

User Manual
Page 72
... motherboard driver CD-ROM to install the SATA controller driver during the Windows setup process. A command prompt window will then automatically zip and transfer this driver file to that has ...formatted disk. Select the controller driver by pressing the corresponding letter from the startup disk. GA-K8N51GMF(-RH) Motherboard Figure 14 - 72 - Step 1: Insert the prepared startup disk and motherboard...(Note 1) For users without a startup disk: Use an alternative system and insert the GIGABYTE motherboard driver CD-ROM. First of all, copy the driver for the SATA controller from...
... motherboard driver CD-ROM to install the SATA controller driver during the Windows setup process. A command prompt window will then automatically zip and transfer this driver file to that has ...formatted disk. Select the controller driver by pressing the corresponding letter from the startup disk. GA-K8N51GMF(-RH) Motherboard Figure 14 - 72 - Step 1: Insert the prepared startup disk and motherboard...(Note 1) For users without a startup disk: Use an alternative system and insert the GIGABYTE motherboard driver CD-ROM. First of all, copy the driver for the SATA controller from...

User Manual
Page 73
...73 - The following mass storage devices(s) * To specify additional SCSI adapters, CD-ROM drives, or special disk controllers for use with Windows, including those for use with the SATA driver. Appendix After pressing F6, there will load support for the following is an example ... * If you need to manually specify an adapter. Step 1: Restart your SATA hard drive with Windows, press ENTER. Windows Setup Setup could not determine the type of Windows XP installation. Windows Setup Press F6 if you see the next screen. English (5) Installing SATA controller driver during OS ...
...73 - The following mass storage devices(s) * To specify additional SCSI adapters, CD-ROM drives, or special disk controllers for use with Windows, including those for use with the SATA driver. Appendix After pressing F6, there will load support for the following is an example ... * If you need to manually specify an adapter. Step 1: Restart your SATA hard drive with Windows, press ENTER. Windows Setup Setup could not determine the type of Windows XP installation. Windows Setup Press F6 if you see the next screen. English (5) Installing SATA controller driver during OS ...
User Manual
Page 74
... create RAID, select both NVIDIA RAID CLASS DRIVER and then NVIDIA nForce Storage Controller. GA-K8N51GMF(-RH) Motherboard - 74 - Later, when a screen similar to Figure 18 appears, you want to configure a SCSI Adapter for use with Windows, press ENTER. Windows Setup You have any device support disks from the following list, or press ESC...
... create RAID, select both NVIDIA RAID CLASS DRIVER and then NVIDIA nForce Storage Controller. GA-K8N51GMF(-RH) Motherboard - 74 - Later, when a screen similar to Figure 18 appears, you want to configure a SCSI Adapter for use with Windows, press ENTER. Windows Setup You have any device support disks from the following list, or press ESC...

User Manual
Page 75
... Enter= Continue R=Repair F3=Exit Figure 20 (Note: Each time you can proceed with Windows, press ENTER. This port of the Setup program prepares Microsoft(R) Windows (R) XP to Setup. To set up Windows XP now, press ENTER. After that hard drive. S=Specify Additional Device ENTER=Continue F3...the SATA driver installation from a mass storage device manufacturer, or do not want to specify additional mass storage devices for use with Windows, including those for which you have a device support disk from a mass storage device manufacturer, press S. * If you do not have ...
... Enter= Continue R=Repair F3=Exit Figure 20 (Note: Each time you can proceed with Windows, press ENTER. This port of the Setup program prepares Microsoft(R) Windows (R) XP to Setup. To set up Windows XP now, press ENTER. After that hard drive. S=Specify Additional Device ENTER=Continue F3...the SATA driver installation from a mass storage device manufacturer, or do not want to specify additional mass storage devices for use with Windows, including those for which you have a device support disk from a mass storage device manufacturer, press S. * If you do not have ...

User Manual
Page 76
...F7: Optimized Defaults Under the Integrated Peripherals menu (Figure 21) assure the SATA port connecting the SATA hard disk (the one containing the Windows 2000) is Enabled (Figure 21/22). Here are two solutions to a bootable RAID volume. CMOS Setup Utility-Copyright (C) 1984-2005 Award... [Disabled] Disabled Disabled Item Help Menu Level : Move Enter: Select F5: Previous Values +/-/PU/PD: Value F10: Save F6: Fail-Safe Defaults GA-K8N51GMF(-RH) Motherboard Figure 22 - 76 - Solutions 1: Use the NVRAID tool (nForce Driver Version 5.xx) to convert the boot volume to enter system ...
...F7: Optimized Defaults Under the Integrated Peripherals menu (Figure 21) assure the SATA port connecting the SATA hard disk (the one containing the Windows 2000) is Enabled (Figure 21/22). Here are two solutions to a bootable RAID volume. CMOS Setup Utility-Copyright (C) 1984-2005 Award... [Disabled] Disabled Disabled Item Help Menu Level : Move Enter: Select F5: Previous Values +/-/PU/PD: Value F10: Save F6: Fail-Safe Defaults GA-K8N51GMF(-RH) Motherboard Figure 22 - 76 - Solutions 1: Use the NVRAID tool (nForce Driver Version 5.xx) to convert the boot volume to enter system ...

User Manual
Page 77
... ST3120026AS Capacity 111.79G 111.79G [ ] Del [ESC] Quit [F6] Back [F7] Finish [TAB] Navigate [ ] Select [ENTER] Popup Figure 24 - 77 - Move to boot into Windows 2000. Select the desired disk and use the RIGHT ARROW key to add it to enter the NVIDIA RAID setup utility. RAID Mode: Striping MediaShield...
... ST3120026AS Capacity 111.79G 111.79G [ ] Del [ESC] Quit [F6] Back [F7] Finish [TAB] Navigate [ ] Select [ENTER] Popup Figure 24 - 77 - Move to boot into Windows 2000. Select the desired disk and use the RIGHT ARROW key to add it to enter the NVIDIA RAID setup utility. RAID Mode: Striping MediaShield...
User Manual
Page 78
... the single disk RAID array into a multi-disk RAID array in striping mode) that includes Windows 2000 and Service Pack 3 or Service Pack 4 fixes integrated in Windows 2000 and reboot the system. Select Convert Array under the System Tasks and select Next following website... still supported on Windows 2000. You are prompted to select the desired Free Disk(s) to add to the bootable RAID array. Solutions 2: Users must create a combination installation CD that was created from the boot disk. Note: Conversion may take 1~2 hours depending on it. GA-K8N51GMF(-RH) Motherboard -...
... the single disk RAID array into a multi-disk RAID array in striping mode) that includes Windows 2000 and Service Pack 3 or Service Pack 4 fixes integrated in Windows 2000 and reboot the system. Select Convert Array under the System Tasks and select Next following website... still supported on Windows 2000. You are prompted to select the desired Free Disk(s) to add to the bootable RAID array. Solutions 2: Users must create a combination installation CD that was created from the boot disk. Note: Conversion may take 1~2 hours depending on it. GA-K8N51GMF(-RH) Motherboard -...
User Manual
Page 79
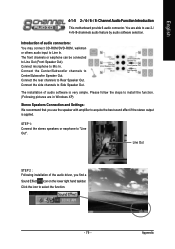
... connected to Mic In. STEP 1: Connect the stereo speakers or earphone to Rear Speaker Out. Connect the rear channels to "Line Out". You are in Windows XP) Stereo Speakers Connection and Settings: We recommend that you find a Sound Effect icon on the lower right hand taskbar. Line In Line Out (Front...
... connected to Mic In. STEP 1: Connect the stereo speakers or earphone to Rear Speaker Out. Connect the rear channels to "Line Out". You are in Windows XP) Stereo Speakers Connection and Settings: We recommend that you find a Sound Effect icon on the lower right hand taskbar. Line In Line Out (Front...


