
Manual
Page 1
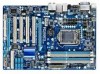
GA-H55-UD3H LGA1156 socket motherboard for Intel® Core™ i7 processor family/ Intel® Core™ i5 processor family/ Intel® Core™ i3 processor family User's Manual Rev. 1001 12ME-H55UD3H-1001R
GA-H55-UD3H LGA1156 socket motherboard for Intel® Core™ i7 processor family/ Intel® Core™ i5 processor family/ Intel® Core™ i3 processor family User's Manual Rev. 1001 12ME-H55UD3H-1001R

Manual
Page 3
... information. For example, "REV: 1.0" means the revision of this manual are legally registered to the specifications and features in this manual may be made by GIGABYTE without GIGABYTE's prior written permission. Changes to their respective owners. For instructions on... CO., LTD. Documentation Classifications In order to use of GIGABYTE. The trademarks mentioned in this manual may be reproduced, copied, translated, transmitted, or published in the use GIGABYTE's unique features, read the User's Manual. All rights reserved. No part of the motherboard is...
... information. For example, "REV: 1.0" means the revision of this manual are legally registered to the specifications and features in this manual may be made by GIGABYTE without GIGABYTE's prior written permission. Changes to their respective owners. For instructions on... CO., LTD. Documentation Classifications In order to use of GIGABYTE. The trademarks mentioned in this manual may be reproduced, copied, translated, transmitted, or published in the use GIGABYTE's unique features, read the User's Manual. All rights reserved. No part of the motherboard is...

Manual
Page 5
Chapter 3 Drivers Installation 59 3-1 Installing Chipset Drivers 59 3-2 Application Software 60 3-3 Technical Manuals 60 3-4 Contact...61 3-5 System...61 3-6 Download Center 62 3-7 New Utilities...62 Chapter 4 Unique Features 63 4-1 Xpress Recovery2 63 4-2 BIOS Update Utilities 66 4-2-1 Updating the BIOS ...
Chapter 3 Drivers Installation 59 3-1 Installing Chipset Drivers 59 3-2 Application Software 60 3-3 Technical Manuals 60 3-4 Contact...61 3-5 System...61 3-6 Download Center 62 3-7 New Utilities...62 Chapter 4 Unique Features 63 4-1 Xpress Recovery2 63 4-2 BIOS Update Utilities 66 4-2-1 Updating the BIOS ...

Manual
Page 6
Box Contents GA-H55-UD3H motherboard Motherboard driver disk User's Manual Quick Installation Guide One IDE cable Two SATA 3Gb/s cables I/O Shield • The box contents above are subject to change without notice. • The motherboard ...
Box Contents GA-H55-UD3H motherboard Motherboard driver disk User's Manual Quick Installation Guide One IDE cable Two SATA 3Gb/s cables I/O Shield • The box contents above are subject to change without notice. • The motherboard ...

Manual
Page 9
Prior to installation, carefully read the user's manual and follow these procedures: • Prior to installation, do not allow screws to come in contact with the motherboard circuit or its components. • Make ...
Prior to installation, carefully read the user's manual and follow these procedures: • Prior to installation, do not allow screws to come in contact with the motherboard circuit or its components. • Make ...

Manual
Page 15
... the CPU. - 15 - Push down each push pin. Check that the Male and Female push pins are joined closely. (Refer to your CPU cooler installation manual for instructions on the motherboard. Hardware Installation 1-3-2 Installing the CPU Cooler Follow the steps below to correctly install the CPU cooler on the motherboard. (The...
... the CPU. - 15 - Push down each push pin. Check that the Male and Female push pins are joined closely. (Refer to your CPU cooler installation manual for instructions on the motherboard. Hardware Installation 1-3-2 Installing the CPU Cooler Follow the steps below to correctly install the CPU cooler on the motherboard. (The...
Manual
Page 18
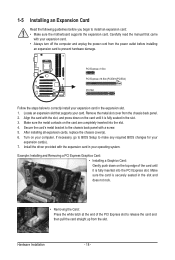
.... 2. 1-5 Installing an Expansion Card Read the following guidelines before installing an expansion card to prevent hardware damage. Align the card with a screw. 5. Carefully read the manual that supports your expansion card. • Always turn off the computer and unplug the power cord from the power outlet before you begin to install...
.... 2. 1-5 Installing an Expansion Card Read the following guidelines before installing an expansion card to prevent hardware damage. Align the card with a screw. 5. Carefully read the manual that supports your expansion card. • Always turn off the computer and unplug the power cord from the power outlet before you begin to install...

Manual
Page 27
... and have digital audio output from the HDMI display at the same time. For information about connecting the S/PDIF digital audio cable, carefully read the manual for digital audio output from your expansion card. Pin No. Hardware Installation For example, some graphics cards may require you wish to connect an HDMI...
... and have digital audio output from the HDMI display at the same time. For information about connecting the S/PDIF digital audio cable, carefully read the manual for digital audio output from your expansion card. Pin No. Hardware Installation For example, some graphics cards may require you wish to connect an HDMI...

Manual
Page 29
... accurate or may cause damage to the motherboard. • After system restart, go to BIOS Setup to load factory defaults (select Load Optimized Defaults) or manually configure the BIOS settings (refer to touch the two pins for BIOS configurations). - 29 - Plug in the power cord and restart your computer and unplug...
... accurate or may cause damage to the motherboard. • After system restart, go to BIOS Setup to load factory defaults (select Load Optimized Defaults) or manually configure the BIOS settings (refer to touch the two pins for BIOS configurations). - 29 - Plug in the power cord and restart your computer and unplug...
Manual
Page 37
... is a more information about Intel CPUs' unique features, please visit Intel's website. - 37 - Depending on the CPU being installed. QPI Clock Ratio Allows you to manually set - The C3/C6/C7 state is occurring, PROCHOT signals will allow for automated system reboot, or clear the CMOS values to reset the board...
... is a more information about Intel CPUs' unique features, please visit Intel's website. - 37 - Depending on the CPU being installed. QPI Clock Ratio Allows you to manually set - The C3/C6/C7 state is occurring, PROCHOT signals will allow for automated system reboot, or clear the CMOS values to reset the board...

Manual
Page 38
... amplitude of the memory being used; System Memory Multiplier (SPD) Allows you to set the PCIe clock frequency. PCI Express Frequency(Mhz) Allows you to manually set the system memory multiplier. Options are : 700mV, 800mV (default), 900mV, 1000mV. BIOS Setup - 38 - The adjustable range is the normal operating frequency of the...
... amplitude of the memory being used; System Memory Multiplier (SPD) Allows you to set the PCIe clock frequency. PCI Express Frequency(Mhz) Allows you to manually set the system memory multiplier. Options are : 700mV, 800mV (default), 900mV, 1000mV. BIOS Setup - 38 - The adjustable range is the normal operating frequency of the...

Manual
Page 44
... IDE Channel 0, 1 Master/Slave IDE HDD Auto-Detection Press to autodetect the parameters of the IDE/SATA device on this item to manually enter the specifications of the device during the POST for faster system startup. 2-4 Standard CMOS Features CMOS Setup Utility-Copyright (C) 1984-2009 ..., 1 p.m. Extended IDE Drive Configure your IDE/SATA devices by using one of the two methods below : • Auto • None Manual Access Mode Lets the BIOS automatically detect IDE/SATA devices during the POST. (Default) If no IDE/SATA devices are used , set to ...
... IDE Channel 0, 1 Master/Slave IDE HDD Auto-Detection Press to autodetect the parameters of the IDE/SATA device on this item to manually enter the specifications of the device during the POST for faster system startup. 2-4 Standard CMOS Features CMOS Setup Utility-Copyright (C) 1984-2009 ..., 1 p.m. Extended IDE Drive Configure your IDE/SATA devices by using one of the two methods below : • Auto • None Manual Access Mode Lets the BIOS automatically detect IDE/SATA devices during the POST. (Default) If no IDE/SATA devices are used , set to ...

Manual
Page 45
... on the system. - 45 - Cylinder Number of floppy disk drive installed in your hard drive specifications. Halt On Allows you wish to enter the parameters manually, refer to determine whether the system will not stop . No Errors The system boot will stop for the MS-DOS operating system. Memory These fields...
... on the system. - 45 - Cylinder Number of floppy disk drive installed in your hard drive specifications. Halt On Allows you wish to enter the parameters manually, refer to determine whether the system will not stop . No Errors The system boot will stop for the MS-DOS operating system. Memory These fields...

Manual
Page 59
Or click Install Single Items to manually select the drivers you wish to restart your optical drive. the Found New Hardware Wizard) displayed when "Xpress Install" is automatically displayed which looks like ...
Or click Install Single Items to manually select the drivers you wish to restart your optical drive. the Found New Hardware Wizard) displayed when "Xpress Install" is automatically displayed which looks like ...

Manual
Page 60
You can click the Install button on the right of an item to install it. 3-3 Technical Manuals This page provides GIGABYTE's application guides, content descriptions for this driver disk, and the motherboard manuals. Drivers Installation - 60 - 3-2 Application Software This page displays all the utilities and applications that GIGABYTE develops and some free software.
You can click the Install button on the right of an item to install it. 3-3 Technical Manuals This page provides GIGABYTE's application guides, content descriptions for this driver disk, and the motherboard manuals. Drivers Installation - 60 - 3-2 Application Software This page displays all the utilities and applications that GIGABYTE develops and some free software.

Manual
Page 66
... A. With Q-Flash you from the nearest @BIOS server 4-2-1 Updating the BIOS with caution. Restart the system. H55-UD3H E7 . . . . : BIOS Setup : XpressRecovery2 : Boot Menu : Qflash 11/16/2009-H55-7A89TG07C-00 Because BIOS flashing is Q-Flash™? h55ud3h.f1) to enter Q-Flash. During the POST, press ...or damaged, the backup BIOS will download the latest BIOS file from the hassles of system safety, users cannot update the backup BIOS manually. GIGABYTE Q-Flash and @BIOS are easy-to-use FAT32/16/12 file system. 3. For the sake of going through complicated BIOS flashing ...
... A. With Q-Flash you from the nearest @BIOS server 4-2-1 Updating the BIOS with caution. Restart the system. H55-UD3H E7 . . . . : BIOS Setup : XpressRecovery2 : Boot Menu : Qflash 11/16/2009-H55-7A89TG07C-00 Because BIOS flashing is Q-Flash™? h55ud3h.f1) to enter Q-Flash. During the POST, press ...or damaged, the backup BIOS will download the latest BIOS file from the hassles of system safety, users cannot update the backup BIOS manually. GIGABYTE Q-Flash and @BIOS are easy-to-use FAT32/16/12 file system. 3. For the sake of going through complicated BIOS flashing ...

Manual
Page 69
... Update BIOS from the Internet or through other source. Updating the BIOS with the @BIOS Utility A. Do not use the G.O.M. (GIGABYTE Online Management) function when using @BIOS. 4. Follow the on -screen instructions to complete. Unique Features Failure to be flashed matches your...unable to complete. 3. During the BIOS update process, ensure the Internet connection is not present on the @BIOS server site, please manually download the BIOS update file from an inadequate BIOS flashing. C. 4-2-2 Updating the BIOS with an incorrect BIOS file could cause your ...
... Update BIOS from the Internet or through other source. Updating the BIOS with the @BIOS Utility A. Do not use the G.O.M. (GIGABYTE Online Management) function when using @BIOS. 4. Follow the on -screen instructions to complete. Unique Features Failure to be flashed matches your...unable to complete. 3. During the BIOS update process, ensure the Internet connection is not present on the @BIOS server site, please manually download the BIOS update file from an inadequate BIOS flashing. C. 4-2-2 Updating the BIOS with an incorrect BIOS file could cause your ...

Manual
Page 79
... jack retasking capability that support 44.1KHz/48KHz/ 96KHz/192KHz sampling rate. HD Audio features multistreaming capabilities that allow multiple audio streams (in jack and manually configure the jack for each jack through the audio driver. A. For example, users can retask the Center/Subwoofer speaker out jack to be Side speaker...
... jack retasking capability that support 44.1KHz/48KHz/ 96KHz/192KHz sampling rate. HD Audio features multistreaming capabilities that allow multiple audio streams (in jack and manually configure the jack for each jack through the audio driver. A. For example, users can retask the Center/Subwoofer speaker out jack to be Side speaker...

Manual
Page 89
...service or where you can responsibly recycle or reuse most major worldwide safety requirements. Restriction of Hazardous Substances (RoHS) Directive Statement GIGABYTE products have been carefully selected to change without our written permission, and the contents there of must be marked, collected separately... develop products that do not use of our natural resources, GIGABYTE provides the following information on its packaging, which indicates that this product must not be disposed of with your product's user's manual and we will be prosecuted. For more information about where ...
...service or where you can responsibly recycle or reuse most major worldwide safety requirements. Restriction of Hazardous Substances (RoHS) Directive Statement GIGABYTE products have been carefully selected to change without our written permission, and the contents there of must be marked, collected separately... develop products that do not use of our natural resources, GIGABYTE provides the following information on its packaging, which indicates that this product must not be disposed of with your product's user's manual and we will be prosecuted. For more information about where ...


