
Manual
Page 3
... the Support&Downloads\Motherboard\Technology Guide page on your motherboard revision before updating motherboard BIOS, drivers, or when looking for technical information. Example: Copyright © 2009 GIGA-BYTE TECHNOLOGY CO., LTD. The trademarks mentioned in this product, GIGABYTE provides the following types of documentations: For quick set-up of this manual is...
... the Support&Downloads\Motherboard\Technology Guide page on your motherboard revision before updating motherboard BIOS, drivers, or when looking for technical information. Example: Copyright © 2009 GIGA-BYTE TECHNOLOGY CO., LTD. The trademarks mentioned in this product, GIGABYTE provides the following types of documentations: For quick set-up of this manual is...

Manual
Page 5
... 59 3-1 Installing Chipset Drivers 59 3-2 Application Software 60 3-3 Technical Manuals 60 3-4 Contact...61 3-5 System...61 3-6 Download Center 62 3-7 New Utilities...62 Chapter 4 Unique Features 63 4-1 Xpress Recovery2 63 4-2 BIOS ...
... 59 3-1 Installing Chipset Drivers 59 3-2 Application Software 60 3-3 Technical Manuals 60 3-4 Contact...61 3-5 System...61 3-6 Download Center 62 3-7 New Utilities...62 Chapter 4 Unique Features 63 4-1 Xpress Recovery2 63 4-2 BIOS ...

Manual
Page 6
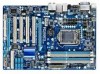
Box Contents GA-H55-UD3H motherboard Motherboard driver disk User's Manual Quick Installation Guide One IDE cable Two SATA 3Gb/s cables I/O Shield • The box contents above are subject to change without notice. &#...
Box Contents GA-H55-UD3H motherboard Motherboard driver disk User's Manual Quick Installation Guide One IDE cable Two SATA 3Gb/s cables I/O Shield • The box contents above are subject to change without notice. &#...
Manual
Page 18
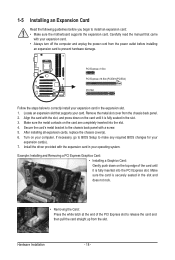
... card. Align the card with a screw. 5. Make sure the metal contacts on the card until it is securely seated in the expansion slot. 1. Install the driver provided with your computer. Locate an expansion slot that came with the expansion card in the slot. 3. Example: Installing and Removing a PCI Express Graphics Card...
... card. Align the card with a screw. 5. Make sure the metal contacts on the card until it is securely seated in the expansion slot. 1. Install the driver provided with your computer. Locate an expansion slot that came with the expansion card in the slot. 3. Example: Installing and Removing a PCI Express Graphics Card...

Manual
Page 32
... having to the instructions on the Full Screen LOGO Show item on BIOS Setup settings. Motherboard Model BIOS Version H55-UD3H E7 . . . . : BIOS Setup : XpressRecovery2 : Boot Menu : Qflash 11/16/2009-H55-7A89TG07C-00 Function Keys Function Keys Function Keys: : POST SCREEN Press the key to show the BIOS POST ...screen at system startup, refer to enter BIOS Setup first. In Boot Menu, use the up hard drive data using the driver disk, the key can access...
... having to the instructions on the Full Screen LOGO Show item on BIOS Setup settings. Motherboard Model BIOS Version H55-UD3H E7 . . . . : BIOS Setup : XpressRecovery2 : Boot Menu : Qflash 11/16/2009-H55-7A89TG07C-00 Function Keys Function Keys Function Keys: : POST SCREEN Press the key to show the BIOS POST ...screen at system startup, refer to enter BIOS Setup first. In Boot Menu, use the up hard drive data using the driver disk, the key can access...

Manual
Page 48
... Values +/-/PU/PD: Value F10: Save F6: Fail-Safe Defaults ESC: Exit F1: General Help F7: Optimized Defaults SATA AHCI Mode (Intel H55 Chipset) Allows you to decide whether to configure the SATA controller integrated in audio card instead of using the onboard audio, set this option to... Disabled if you wish to install operating systems that allows the storage driver to enable advanced Serial ATA features such as Native Command Queuing and hot plug. In Legacy mode the SATA controllers use dedicated IRQs ...
... Values +/-/PU/PD: Value F10: Save F6: Fail-Safe Defaults ESC: Exit F1: General Help F7: Optimized Defaults SATA AHCI Mode (Intel H55 Chipset) Allows you to decide whether to configure the SATA controller integrated in audio card instead of using the onboard audio, set this option to... Disabled if you wish to install operating systems that allows the storage driver to enable advanced Serial ATA features such as Native Command Queuing and hot plug. In Legacy mode the SATA controllers use dedicated IRQs ...

Manual
Page 59
... to manually select the drivers you wish to install. The driver Autorun screen is installing the drivers. Failure to do so may affect the driver installation. • Some device drivers will continue to install other applications included in the motherboard driver disk. • For USB 2.0 driver support under the Windows ... SP1 (or later), if a question mark still exists in Universal Serial Bus Controller in the screen shot below. (If the driver Autorun screen does not appear automatically, go to restart your system. the Found New Hardware Wizard) displayed when "Xpress Install" is...
... to manually select the drivers you wish to install. The driver Autorun screen is installing the drivers. Failure to do so may affect the driver installation. • Some device drivers will continue to install other applications included in the motherboard driver disk. • For USB 2.0 driver support under the Windows ... SP1 (or later), if a question mark still exists in Universal Serial Bus Controller in the screen shot below. (If the driver Autorun screen does not appear automatically, go to restart your system. the Found New Hardware Wizard) displayed when "Xpress Install" is...

Manual
Page 60
You can click the Install button on the right of an item to install it. 3-3 Technical Manuals This page provides GIGABYTE's application guides, content descriptions for this driver disk, and the motherboard manuals. Drivers Installation - 60 - 3-2 Application Software This page displays all the utilities and applications that GIGABYTE develops and some free software.
You can click the Install button on the right of an item to install it. 3-3 Technical Manuals This page provides GIGABYTE's application guides, content descriptions for this driver disk, and the motherboard manuals. Drivers Installation - 60 - 3-2 Application Software This page displays all the utilities and applications that GIGABYTE develops and some free software.

Manual
Page 61
3-4 Contact For the detailed contact information of the GIGABYTE Taiwan headquarter or worldwide branch offices, click the URL on this page to link to the GIGABYTE website. 3-5 System This page provides the basic system information. - 61 - Drivers Installation
3-4 Contact For the detailed contact information of the GIGABYTE Taiwan headquarter or worldwide branch offices, click the URL on this page to link to the GIGABYTE website. 3-5 System This page provides the basic system information. - 61 - Drivers Installation

Manual
Page 62
The latest version of an item to install. You can click the Install button on the right of the BIOS, drivers, or applications will be displayed. 3-7 New Utilities This page provides a quick link to GIGABYTE's lately developed utilities for users to install it. Drivers Installation - 62 - 3-6 Download Center To update the BIOS, drivers, or applications, click the Download Center button to link to the GIGABYTE website.
The latest version of an item to install. You can click the Install button on the right of the BIOS, drivers, or applications will be displayed. 3-7 New Utilities This page provides a quick link to GIGABYTE's lately developed utilities for users to install it. Drivers Installation - 62 - 3-6 Download Center To update the BIOS, drivers, or applications, click the Download Center button to link to the GIGABYTE website.

Manual
Page 63
... back up /restore the first physical hard drive that allows you to quickly compress and back up your system soon after the operating system and drivers are attached to the first and second SATA connectors, the hard drive on your system data and perform restoration of data and hard drive access...
... back up /restore the first physical hard drive that allows you to quickly compress and back up your system soon after the operating system and drivers are attached to the first and second SATA connectors, the hard drive on your system data and perform restoration of data and hard drive access...

Manual
Page 64
... Management to enter Xpress Recovery2 later, simply press during the POST. After you wish to check disk allocation. Unique Features - 64 - Boot from the motherboard driver disk to the unallocated space (black stripe along the top). Step 5: Xpress Recovery2 will automatically create a new partition to start backing up your desktop and...
... Management to enter Xpress Recovery2 later, simply press during the POST. After you wish to check disk allocation. Unique Features - 64 - Boot from the motherboard driver disk to the unallocated space (black stripe along the top). Step 5: Xpress Recovery2 will automatically create a new partition to start backing up your desktop and...

Manual
Page 73
...Incoming Folder : C:\Q-ShareFolder Change Incoming Folder : C:\Q-ShareFolder Update Q-Share ... Find the Q-Share icon to Start>All Programs>GIGABYTE>Q-Share. Exit... After configuring your LAN connection settings and Q-Share, you are able to share your data with data sharing ... Data Sharing Enabled Options Descriptions Option Connect ... About Q-Share ... Directions for using Q-Share After installing Q-Share from the motherboard driver disk, go to configure the data sharing settings. exe to be shared (Note) Updates Q-Share online Displays the current Q-Share...
...Incoming Folder : C:\Q-ShareFolder Change Incoming Folder : C:\Q-ShareFolder Update Q-Share ... Find the Q-Share icon to Start>All Programs>GIGABYTE>Q-Share. Exit... After configuring your LAN connection settings and Q-Share, you are able to share your data with data sharing ... Data Sharing Enabled Options Descriptions Option Connect ... About Q-Share ... Directions for using Q-Share After installing Q-Share from the motherboard driver disk, go to configure the data sharing settings. exe to be shared (Note) Updates Q-Share online Displays the current Q-Share...

Manual
Page 79
...high quality digital-to the following instructions use Windows Vista as the example operating system.) Step 1: After installing the audio driver, the HD Audio Manager icon will be simultaneously processed. HD Audio features multistreaming capabilities that allows the user to the ...function for microphone functionality. • Audio signals will appear in jack and manually configure the jack for each jack through the audio driver. The integrated HD (High Definition) audio provides jack retasking capability that allow multiple audio streams (in a 4-channel audio configuration,...
...high quality digital-to the following instructions use Windows Vista as the example operating system.) Step 1: After installing the audio driver, the HD Audio Manager icon will be simultaneously processed. HD Audio features multistreaming capabilities that allows the user to the ...function for microphone functionality. • Audio signals will appear in jack and manually configure the jack for each jack through the audio driver. The integrated HD (High Definition) audio provides jack retasking capability that allow multiple audio streams (in a 4-channel audio configuration,...

Manual
Page 83
... panel or the Mic in the notification area. If you 'll not be used at a middle level. 5-1-3 Configuring Microphone Recording Step 1: After installing the audio driver, the HD Audio Manager icon will appear in jack (pink) on the front panel.
... panel or the Mic in the notification area. If you 'll not be used at a middle level. 5-1-3 Configuring Microphone Recording Step 1: After installing the audio driver, the HD Audio Manager icon will appear in jack (pink) on the front panel.

Manual
Page 86
...1: First, make sure the Microsoft UAA Bus Driver for High Definition Audio and select Disable and Uninstall. eral > System). If yes, please disable this device. (If not, skip this step.) Step 3: Then go to the Support&Downloads\Motherboard\FAQ page on GIGABYTE's website. In the Main Menu, press +...still get a weak sound even though I clear the CMOS values? If your speaker is present in Chapter 1. If not, please update it from GIGABYTE's website to install. A: For motherboards that have this , please turn off the computer and unplug the power cord). When the Add New Hardware ...
...1: First, make sure the Microsoft UAA Bus Driver for High Definition Audio and select Disable and Uninstall. eral > System). If yes, please disable this device. (If not, skip this step.) Step 3: Then go to the Support&Downloads\Motherboard\FAQ page on GIGABYTE's website. In the Main Menu, press +...still get a weak sound even though I clear the CMOS values? If your speaker is present in Chapter 1. If not, please update it from GIGABYTE's website to install. A: For motherboards that have this , please turn off the computer and unplug the power cord). When the Add New Hardware ...


