

Manual
Page 1
GA-G33M-DS2R/ GA-G33M-S2 LGA775 socket motherboard for Intel® CoreTM processor family/ Intel® Pentium® processor family/Intel® Celeron® processor family User's Manual Rev. 1003 12ME-G33MD2R-1003R * The WEEE marking on the product indicates this product must not be disposed of with user's other household waste and must be handed over to a designated collection point for the recycling of waste electrical and electronic equipment!! * The WEEE marking applies only in European Union's member states.
GA-G33M-DS2R/ GA-G33M-S2 LGA775 socket motherboard for Intel® CoreTM processor family/ Intel® Pentium® processor family/Intel® Celeron® processor family User's Manual Rev. 1003 12ME-G33MD2R-1003R * The WEEE marking on the product indicates this product must not be disposed of with user's other household waste and must be handed over to a designated collection point for the recycling of waste electrical and electronic equipment!! * The WEEE marking applies only in European Union's member states.

Manual
Page 4
... or by any means without prior notice. The logo is designated by GIGABYTE without GIGABYTE's prior written permission. GIGABYTE UNITED INC. Check your motherboard looks like this: "REV: X.X." Example: by copyright laws and is 1.0. No part of GIGABYTE branded motherboards. Disclaimer Information in this manual may be reproduced, copied, translated, transmitted, or published in this...
... or by any means without prior notice. The logo is designated by GIGABYTE without GIGABYTE's prior written permission. GIGABYTE UNITED INC. Check your motherboard looks like this: "REV: X.X." Example: by copyright laws and is 1.0. No part of GIGABYTE branded motherboards. Disclaimer Information in this manual may be reproduced, copied, translated, transmitted, or published in this...
Manual
Page 7
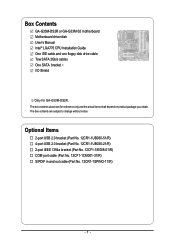
.... The box contents above are subject to change without notice. Box Contents GA-G33M-DS2R or GA-G33M-S2 motherboard Motherboard driver disk User's Manual Intel® LGA775 CPU Installation Guide One IDE cable and one floppy disk drive cable Tow SATA 3Gb/s cables One SATA bracket I/O Shield Only for ...
.... The box contents above are subject to change without notice. Box Contents GA-G33M-DS2R or GA-G33M-S2 motherboard Motherboard driver disk User's Manual Intel® LGA775 CPU Installation Guide One IDE cable and one floppy disk drive cable Tow SATA 3Gb/s cables One SATA bracket I/O Shield Only for ...

Manual
Page 11
.... • Make sure there are required for warranty validation. • Always remove the AC power by your dealer. Prior to installation, carefully read the user's manual and follow these procedures: • Prior to wear an electrostatic discharge (ESD) wrist strap when handling electronic components such as a result of the product, please...
.... • Make sure there are required for warranty validation. • Always remove the AC power by your dealer. Prior to installation, carefully read the user's manual and follow these procedures: • Prior to wear an electrostatic discharge (ESD) wrist strap when handling electronic components such as a result of the product, please...

Manual
Page 17
Check that the Male and Female push pins are joined closely. (Refer to your CPU cooler installation manual for instructions on the motherboard. Direction of the Arrow Sign on the Male Push Pin Male Push Pin The Top of Female Push Pin Female ...
Check that the Male and Female push pins are joined closely. (Refer to your CPU cooler installation manual for instructions on the motherboard. Direction of the Arrow Sign on the Male Push Pin Male Push Pin The Top of Female Push Pin Female ...
Manual
Page 20
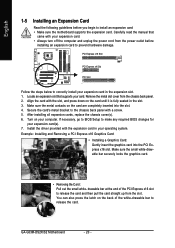
Carefully read the manual that supports your expansion card(s). 7. After installing all expansion cards, replace the chassis cover(s). 6. If necessary, go to BIOS Setup to make any required BIOS ... slot cover from the chassis back panel. 2. Make sure the metal contacts on the card until it is fully seated in the expansion slot. 1. GA-G33M-DS2R/S2 Motherboard - 20 - PCI Express x16 Slot PCI Express x4 Slot PCI Slot Follow the steps below to correctly install your operating system. Install the driver...
Carefully read the manual that supports your expansion card(s). 7. After installing all expansion cards, replace the chassis cover(s). 6. If necessary, go to BIOS Setup to make any required BIOS ... slot cover from the chassis back panel. 2. Make sure the metal contacts on the card until it is fully seated in the expansion slot. 1. GA-G33M-DS2R/S2 Motherboard - 20 - PCI Express x16 Slot PCI Express x4 Slot PCI Slot Follow the steps below to correctly install your operating system. Install the driver...

Manual
Page 34
... do so may cause damage to the motherboard. • After system restart, go to BIOS Setup to load factory defaults (select Load Optimized Defaults) or manually configure the BIOS settings (refer to touch the two pins for BIOS configurations). To clear the CMOS values, place a jumper cap on your computer, be... use a metal object like a screwdriver to Chapter 2, "BIOS Setup," for a few seconds. date information and BIOS configurations) and reset the CMOS values to factory defaults. GA-G33M-DS2R/S2 Motherboard - 34 -
... do so may cause damage to the motherboard. • After system restart, go to BIOS Setup to load factory defaults (select Load Optimized Defaults) or manually configure the BIOS settings (refer to touch the two pins for BIOS configurations). To clear the CMOS values, place a jumper cap on your computer, be... use a metal object like a screwdriver to Chapter 2, "BIOS Setup," for a few seconds. date information and BIOS configurations) and reset the CMOS values to factory defaults. GA-G33M-DS2R/S2 Motherboard - 34 -

Manual
Page 39
... on this item to None so the system will skip the detection of the hard drive when the hard drive access mode is set to manually enter the specifications of the device during the POST. (Default) • None If no IDE/SATA devices are used , set the date. IDE Channel 0/1 Master... devices using one of the two methods below : • Auto Lets BIOS automatically detect IDE/SATA devices during the POST for faster system startup. • Manual Allows you to CHS. is week (read-only), month, date and year.
... on this item to None so the system will skip the detection of the hard drive when the hard drive access mode is set to manually enter the specifications of the device during the POST. (Default) • None If no IDE/SATA devices are used , set the date. IDE Channel 0/1 Master... devices using one of the two methods below : • Auto Lets BIOS automatically detect IDE/SATA devices during the POST for faster system startup. • Manual Allows you to CHS. is week (read-only), month, date and year.

Manual
Page 40
... or a floppy disk drive error but stop for an error during the POST. Base Memory Also called conventional memory. GA-G33M-DS2R/S2 Motherboard - 40 - Drive A Allows you wish to enter the parameters manually, refer to determine whether the system will stop for all other errors. Options are determined by the BIOS POST. All...
... or a floppy disk drive error but stop for an error during the POST. Base Memory Also called conventional memory. GA-G33M-DS2R/S2 Motherboard - 40 - Drive A Allows you wish to enter the parameters manually, refer to determine whether the system will stop for all other errors. Options are determined by the BIOS POST. All...

Manual
Page 53
... Voltage Control DDR2 OverVoltage Control FSB OverVoltage Control (G)MCH OverVoltage Control CPU Voltage Control Normal CPU Vcore [Auto] [16X] [Disabled] 266 [Auto] [Auto] 533 [Option 1] [Manual] [Normal] [Normal] [Normal] [Normal] 1.40000V Item Help Menu Level` KLJI: Move Enter: Select F5: Previous Values +/-/PU/PD: Value F10: Save F6: Fail-Safe Defaults...
... Voltage Control DDR2 OverVoltage Control FSB OverVoltage Control (G)MCH OverVoltage Control CPU Voltage Control Normal CPU Vcore [Auto] [16X] [Disabled] 266 [Auto] [Auto] 533 [Option 1] [Manual] [Normal] [Normal] [Normal] [Normal] 1.40000V Item Help Menu Level` KLJI: Move Enter: Select F5: Previous Values +/-/PU/PD: Value F10: Save F6: Fail-Safe Defaults...

Manual
Page 54
...For a 1333 MHz FSB CPU, set this item to 200 MHz. the second is enabled. Manual allows all voltage control items below to be set the PCIe clock frequency. GA-G33M-DS2R/S2 Motherboard - 54 - The adjustable range is the normal operating frequency of the memory being used; ...System Voltage Control Determines whether to manually set this item to 266 MHz. English CPU Host Frequency (Mhz...
...For a 1333 MHz FSB CPU, set this item to 200 MHz. the second is enabled. Manual allows all voltage control items below to be set the PCIe clock frequency. GA-G33M-DS2R/S2 Motherboard - 54 - The adjustable range is the normal operating frequency of the memory being used; ...System Voltage Control Determines whether to manually set this item to 266 MHz. English CPU Host Frequency (Mhz...

Manual
Page 61
English 3-4 Hardware Information This page provides information about the hardware devices on this motherboard. 3-5 Contact Us Check the contacts information of the GIGABYTE headquarter in Taiwan and the overseas branch offices on the last page of this manual. - 61 - Drivers Installation
English 3-4 Hardware Information This page provides information about the hardware devices on this motherboard. 3-5 Contact Us Check the contacts information of the GIGABYTE headquarter in Taiwan and the overseas branch offices on the last page of this manual. - 61 - Drivers Installation

Manual
Page 72
...dialog box, select All Files (*.*) in an unbootable system. f1) obtained from GIGABYTE's website and follow the instructions in an unbootable system. • If the BIOS update file for your motherboard model. GA-G33M-DS2R/S2 Motherboard - 72 - Upon completion, restart your system. • If more... than one model is correct, then click OK. Upon completion, restart your motherboard model. English Step 3: First make sure the model name on the @BIOS server site, please manually download...
...dialog box, select All Files (*.*) in an unbootable system. f1) obtained from GIGABYTE's website and follow the instructions in an unbootable system. • If the BIOS update file for your motherboard model. GA-G33M-DS2R/S2 Motherboard - 72 - Upon completion, restart your system. • If more... than one model is correct, then click OK. Upon completion, restart your motherboard model. English Step 3: First make sure the model name on the @BIOS server site, please manually download...

Manual
Page 82
...do not have chosen to install a 3rd party SCSI or RAID driver" (Figure 1). S=Specify Additional Device ENTER=Continue F3=Exit Figure 2 GA-G33M-DS2R/S2 Motherboard - 82 - Windows Setup Press F6 if you are ready to install a third party SCSI or RAID driver. English 5-1-3 Installing the...2: When a screen similar to that you have prepared the SATA RAID/AHCI driver diskette and configured the required BIOS settings, you need to manually specify an adapter. The following mass storage devices(s) * To specify additional SCSI adapters, CD-ROM drives, or special disk controllers for use...
...do not have chosen to install a 3rd party SCSI or RAID driver" (Figure 1). S=Specify Additional Device ENTER=Continue F3=Exit Figure 2 GA-G33M-DS2R/S2 Motherboard - 82 - Windows Setup Press F6 if you are ready to install a third party SCSI or RAID driver. English 5-1-3 Installing the...2: When a screen similar to that you have prepared the SATA RAID/AHCI driver diskette and configured the required BIOS settings, you need to manually specify an adapter. The following mass storage devices(s) * To specify additional SCSI adapters, CD-ROM drives, or special disk controllers for use...

Manual
Page 85
... following instructions use Windows XP as the example operating system.) Step 1: After installing the audio driver, the Audio Manager icon will appear in jack and manually configure the jack for microphone functionality. • If your front panel audio supports Intel HD Audio standard, you can have an Internet chat, make sure...
... following instructions use Windows XP as the example operating system.) Step 1: After installing the audio driver, the Audio Manager icon will appear in jack and manually configure the jack for microphone functionality. • If your front panel audio supports Intel HD Audio standard, you can have an Internet chat, make sure...


