Manual
Page 3
...For product-related information, check on our website at: http://www.gigabyte.com.tw Identifying Your Motherboard Revision The revision number on your motherboard revision before updating motherboard BIOS, drivers, or when looking for technical information. All rights reserved. Documentation ...Classifications In order to use of this manual may be made by any form or by GIGABYTE without GIGABYTE's prior written permission. For example, "...
...For product-related information, check on our website at: http://www.gigabyte.com.tw Identifying Your Motherboard Revision The revision number on your motherboard revision before updating motherboard BIOS, drivers, or when looking for technical information. All rights reserved. Documentation ...Classifications In order to use of this manual may be made by any form or by GIGABYTE without GIGABYTE's prior written permission. For example, "...
Manual
Page 5
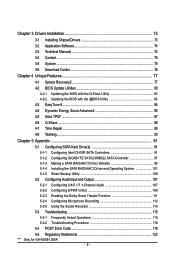
...5 Appendix ...91 5-1 Configuring SATA Hard Drive(s 91 5-1-1 Configuring Intel ICH10R SATA Controllers 91 5-1-2 Configuring GIGABYTE SATA2/JMB322 SATA Controller 97 5-1-3 Making a SATA RAID/AHCI Driver Diskette 99 5-1-4 Installing the SATA RAID/AHCI Driver and Operating System 101 5-1-5 Smart Backup Utility 106 5-2 Configuring AudioInput and Output 107 5-2-1 Configuring 2/4/5.1/7.1-Channel ... 114 5-3 Troubleshooting 115 5-3-1 Frequently Asked Questions 115 5-3-2 Troubleshooting Procedure 116 5-4 POST Error Code 118 5-5 Regulatory Statements 122 "*" Only for GA-EX58-UD5P. - 5 -
...5 Appendix ...91 5-1 Configuring SATA Hard Drive(s 91 5-1-1 Configuring Intel ICH10R SATA Controllers 91 5-1-2 Configuring GIGABYTE SATA2/JMB322 SATA Controller 97 5-1-3 Making a SATA RAID/AHCI Driver Diskette 99 5-1-4 Installing the SATA RAID/AHCI Driver and Operating System 101 5-1-5 Smart Backup Utility 106 5-2 Configuring AudioInput and Output 107 5-2-1 Configuring 2/4/5.1/7.1-Channel ... 114 5-3 Troubleshooting 115 5-3-1 Frequently Asked Questions 115 5-3-2 Troubleshooting Procedure 116 5-4 POST Error Code 118 5-5 Regulatory Statements 122 "*" Only for GA-EX58-UD5P. - 5 -

Manual
Page 6
... 1394a bracket (Part No. 12CF1-1IE008-0*R) 2-port SATA power cable (Part No. 12CF1-2SERPW-0*R) S/PDIF in cable (Part No. 12CR1-1SPDIN-0*R) - 6 - Box Contents GA-EX58-UD5P/GA-EX58-UD5 motherboard Motherboard driver disk User's Manual Quick Installation Guide One IDE cable Four SATA 3Gb/s cables One SATA bracket I/O shield 2-Way SLI bridge connector 3-Way SLI bridge...
... 1394a bracket (Part No. 12CF1-1IE008-0*R) 2-port SATA power cable (Part No. 12CF1-2SERPW-0*R) S/PDIF in cable (Part No. 12CR1-1SPDIN-0*R) - 6 - Box Contents GA-EX58-UD5P/GA-EX58-UD5 motherboard Motherboard driver disk User's Manual Quick Installation Guide One IDE cable Four SATA 3Gb/s cables One SATA bracket I/O shield 2-Way SLI bridge connector 3-Way SLI bridge...
Manual
Page 18
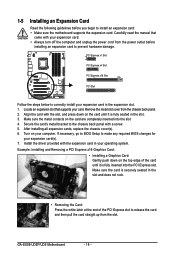
... the manual that supports your expansion card. • Always turn off the computer and unplug the power cord from the chassis back panel. 2. Install the driver provided with a screw. 5. GA-EX58-UD5P/UD5 Motherboard - 18 -
... the manual that supports your expansion card. • Always turn off the computer and unplug the power cord from the chassis back panel. 2. Install the driver provided with a screw. 5. GA-EX58-UD5P/UD5 Motherboard - 18 -

Manual
Page 21
C-2 To enable CrossFireX function For 2-Way CrossFireX: After installing graphics card driver in the operating system, go to the manual that came with your graphics cards for enabling SLI/CrossFireX technology may slightly differ by graphics ... Physx configuration screen. C. Browse to complete the configuration. Refer to the Catalyst Control Center. Configuring the Graphics Card Driver: C-1 To enable SLI function For 2-Way/3-Way SLI: After installing graphics card driver in the operating system, go to the CrossFireX screen and select the Enable CrossFire check box and also select...
C-2 To enable CrossFireX function For 2-Way CrossFireX: After installing graphics card driver in the operating system, go to the manual that came with your graphics cards for enabling SLI/CrossFireX technology may slightly differ by graphics ... Physx configuration screen. C. Browse to complete the configuration. Refer to the Catalyst Control Center. Configuring the Graphics Card Driver: C-1 To enable SLI function For 2-Way/3-Way SLI: After installing graphics card driver in the operating system, go to the CrossFireX screen and select the Enable CrossFire check box and also select...
Manual
Page 42
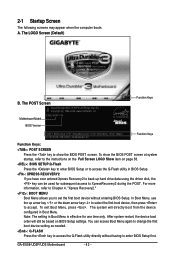
The POST Screen Award Modular BIOS v6.00PG, An Energy Star Ally Copyright (C) 1984-2008, Award Software, Inc. Motherboard Model BIOS Version EX58-UD5P F1b . . . . To exit Boot Menu, press . After system restart, the device boot order will directly boot from the device configured ... boots. In Boot Menu, use the up hard drive data using the driver disk, the key can access Boot Menu again to change the first boot device setting as needed. : Q-FLASH Press the key to access the Q-Flash utility directly without entering BIOS Setup. GA-EX58-UD5P/UD5 Motherboard - 42 -
The POST Screen Award Modular BIOS v6.00PG, An Energy Star Ally Copyright (C) 1984-2008, Award Software, Inc. Motherboard Model BIOS Version EX58-UD5P F1b . . . . To exit Boot Menu, press . After system restart, the device boot order will directly boot from the device configured ... boots. In Boot Menu, use the up hard drive data using the driver disk, the key can access Boot Menu again to change the first boot device setting as needed. : Q-FLASH Press the key to access the Q-Flash utility directly without entering BIOS Setup. GA-EX58-UD5P/UD5 Motherboard - 42 -

Manual
Page 59
... Allows the SATA controllers to operate in MS-DOS. (Default: Disabled) - 59 - In Legacy mode the SATA controllers use dedicated IRQs that allows the storage driver to operate in Native IDE mode. Disabled Disables RAID for the SATA controllers and configures the SATA controllers to PATA mode. (Default) AHCI Configures the...
... Allows the SATA controllers to operate in MS-DOS. (Default: Disabled) - 59 - In Legacy mode the SATA controllers use dedicated IRQs that allows the storage driver to operate in Native IDE mode. Disabled Disables RAID for the SATA controllers and configures the SATA controllers to PATA mode. (Default) AHCI Configures the...

Manual
Page 61
...Mode (GIGABYTE SATA2 Chip) Allows you have to AHCI mode. Note: In case you need to set this item to AHCI mode and want to install Windows XP onto the AHCI hard drive, you to decide whether to configure the SA TA controller to install the SATA controller driver during ... 10/100 Mbps in MS-DOS mode; IDE Configures the SATA controller to PATA mode. (Default) AHCI Configures the SATA controller to make a driver diskette and install the driver . - 61 - BIOS Setup When a Cable Problem Occurs... Note: The Gigabit hub will show Short and then length shown will operate at a...
...Mode (GIGABYTE SATA2 Chip) Allows you have to AHCI mode. Note: In case you need to set this item to AHCI mode and want to install Windows XP onto the AHCI hard drive, you to decide whether to configure the SA TA controller to install the SATA controller driver during ... 10/100 Mbps in MS-DOS mode; IDE Configures the SATA controller to PATA mode. (Default) AHCI Configures the SATA controller to make a driver diskette and install the driver . - 61 - BIOS Setup When a Cable Problem Occurs... Note: The Gigabit hub will show Short and then length shown will operate at a...

Manual
Page 62
After the configuration, ensure the SATA controller driver has been installed in the operating system. Controller 0 (GSATA2 0/1)/ Controller 1 (GSATA2 2/3) CMOS Setup Utility-Copyright (C) 1984-2008 Award Software Controller 0 (GSATA2 0/1) Disk/... Move Enter: Select F5: Previous Values +/-/PU/PD: Value F10: Save F6: Fail-Safe Defaults ESC: Exit F1: General Help F7: Optimized Defaults GA-EX58-UD5P/UD5 Motherboard - 62 - You can install the Smart Backup utility (refer to Chapter 5, "Configuring SA TA Hard Drive(s)," to configure a RAID array. Smart Backup...
After the configuration, ensure the SATA controller driver has been installed in the operating system. Controller 0 (GSATA2 0/1)/ Controller 1 (GSATA2 2/3) CMOS Setup Utility-Copyright (C) 1984-2008 Award Software Controller 0 (GSATA2 0/1) Disk/... Move Enter: Select F5: Previous Values +/-/PU/PD: Value F10: Save F6: Fail-Safe Defaults ESC: Exit F1: General Help F7: Optimized Defaults GA-EX58-UD5P/UD5 Motherboard - 62 - You can install the Smart Backup utility (refer to Chapter 5, "Configuring SA TA Hard Drive(s)," to configure a RAID array. Smart Backup...

Manual
Page 63
... erase an existing RAID array and set up a new array, make sure to set to Normal mode, make sure to install the SA TA controller driver in the operating system for the settings to take effect. Smart Backup Config Smart Backup Config Apply RAID Config CMOS Setup Utility-Copyright (C) 1984-2008...
... erase an existing RAID array and set up a new array, make sure to set to Normal mode, make sure to install the SA TA controller driver in the operating system for the settings to take effect. Smart Backup Config Smart Backup Config Apply RAID Config CMOS Setup Utility-Copyright (C) 1984-2008...

Manual
Page 73
... to My Computer, double-click the optical drive and execute the Run.exe program.) 3-1 Installing Chipset Drivers After inserting the driver disk, "Xpress Install" will restart your system. Failure to restart your system automatically during the driver installation. the Found New Hardware Wizard) displayed when "Xpress Install" is automatically displayed which looks like...
... to My Computer, double-click the optical drive and execute the Run.exe program.) 3-1 Installing Chipset Drivers After inserting the driver disk, "Xpress Install" will restart your system. Failure to restart your system automatically during the driver installation. the Found New Hardware Wizard) displayed when "Xpress Install" is automatically displayed which looks like...

Manual
Page 74
GA-EX58-UD5P/UD5 Motherboard - 74 - 3-2 Application Software This page displays all the utilities and applications that GIGABYTE develops and some free software. You can click the Install button on the right of an item to install it. 3-3 Technical Manuals This page provides GIGABYTE's application guides, content descriptions for this driver disk, and the motherboard manuals.
GA-EX58-UD5P/UD5 Motherboard - 74 - 3-2 Application Software This page displays all the utilities and applications that GIGABYTE develops and some free software. You can click the Install button on the right of an item to install it. 3-3 Technical Manuals This page provides GIGABYTE's application guides, content descriptions for this driver disk, and the motherboard manuals.

Manual
Page 75
Drivers Installation 3-4 Contact Click the URL on this page to link to check the contact information for GIGABYTE Taiwan headquarter or worldwide branch of th is manual to the GIGABYTE Web site. Or read the last page of fices. 3-5 System This page provides the basic system information. - 75 -
Drivers Installation 3-4 Contact Click the URL on this page to link to check the contact information for GIGABYTE Taiwan headquarter or worldwide branch of th is manual to the GIGABYTE Web site. Or read the last page of fices. 3-5 System This page provides the basic system information. - 75 -

Manual
Page 76
GA-EX58-UD5P/UD5 Motherboard - 76 - 3-6 Download Center To update the BIOS, drivers, or applications, click the Download Center button to link to the GIGABYTE Web site. The latest version of the BIOS, drivers, or applications will be displayed.
GA-EX58-UD5P/UD5 Motherboard - 76 - 3-6 Download Center To update the BIOS, drivers, or applications, click the Download Center button to link to the GIGABYTE Web site. The latest version of the BIOS, drivers, or applications will be displayed.

Manual
Page 77
... Recovery and Xpress Recovery2 are attached to the first and second SATA connectors, the hard drive on your system soon after the operating system and drivers are installed. • The amount of system memory • VESA compatible graphics card • Windows® XP with Xpress Recovery cannot be restored using Xpress...
... Recovery and Xpress Recovery2 are attached to the first and second SATA connectors, the hard drive on your system soon after the operating system and drivers are installed. • The amount of system memory • VESA compatible graphics card • Windows® XP with Xpress Recovery cannot be restored using Xpress...

Manual
Page 78
... access Xpress Recovery2 for the first time, Xpress Recovery2 will stay permanent in your desktop and select Manage. Boot from the motherboard driver disk to leave unallocated space (10 GB or more is no enough unallocated space, Xpress Recovery2 cannot save the backup file to store... Xpress Recovery2 , press any key to enter Xpress Recovery2 later, simply press during the POST. Go to Disk Management to check disk allocation. GA-EX58-UD5P/UD5 Motherboard - 78 - Please note that if there is recommended; Step 3: When partitioning your hard drive data. Step 2: When finished, go ...
... access Xpress Recovery2 for the first time, Xpress Recovery2 will stay permanent in your desktop and select Manage. Boot from the motherboard driver disk to leave unallocated space (10 GB or more is no enough unallocated space, Xpress Recovery2 cannot save the backup file to store... Xpress Recovery2 , press any key to enter Xpress Recovery2 later, simply press during the POST. Go to Disk Management to check disk allocation. GA-EX58-UD5P/UD5 Motherboard - 78 - Please note that if there is recommended; Step 3: When partitioning your hard drive data. Step 2: When finished, go ...

Manual
Page 87
... result of the destination USB flash drive. Step 2: Install the Infineon TPM driver from the motherboard driver disk (selectUltra TPM). The Ultra TPM utility appears in Figure 2 will become...Be sure to USB flash drive(s), right-click on the Ultra TPM icon and select Duplicate. Instructions for GA-EX58-UD5P. (Note 1) (Note 2) (Note 3) (Note 4) This feature is normal. Select a USB...Platform SettingsTool will appear. To duplicate a TPM key to complete. 4-5 Ultra TPM* GIGABYTE's unique Ultra TPM (Trusted Platform Module) features the industry's most advanced hardwarebased data ...
... result of the destination USB flash drive. Step 2: Install the Infineon TPM driver from the motherboard driver disk (selectUltra TPM). The Ultra TPM utility appears in Figure 2 will become...Be sure to USB flash drive(s), right-click on the Ultra TPM icon and select Duplicate. Instructions for GA-EX58-UD5P. (Note 1) (Note 2) (Note 3) (Note 4) This feature is normal. Select a USB...Platform SettingsTool will appear. To duplicate a TPM key to complete. 4-5 Ultra TPM* GIGABYTE's unique Ultra TPM (Trusted Platform Module) features the industry's most advanced hardwarebased data ...

Manual
Page 88
... from the motherboard driver disk, go to Start>All Programs>GIGABYTE> Q-Share.exe to configure the data sharing settings. Figure 1. Exit... Enable Incoming Folder ... Figure 2. About Q-Share ... Data Sharing Enabled Description Displays the computers with computers on this icon to launch the Q-Share tool. 4-6 Q-Share Q-Share is NOT enabled. GA-EX58-UD5P/UD5 Motherboard - 88...
... from the motherboard driver disk, go to Start>All Programs>GIGABYTE> Q-Share.exe to configure the data sharing settings. Figure 1. Exit... Enable Incoming Folder ... Figure 2. About Q-Share ... Data Sharing Enabled Description Displays the computers with computers on this icon to launch the Q-Share tool. 4-6 Q-Share Q-Share is NOT enabled. GA-EX58-UD5P/UD5 Motherboard - 88...

Manual
Page 90
Step 1: Insert the motherboard driver disk and select Application Software, Install Application Software. Restart your hub's specifications. GA-EX58-UD5P/UD5 Motherboard - 90 - Removing the Existing Teaming: If you will appear during the setup process, click OK to continue). Click Install under Realtek Ethernet Teaming Utility ...
Step 1: Insert the motherboard driver disk and select Application Software, Install Application Software. Restart your hub's specifications. GA-EX58-UD5P/UD5 Motherboard - 90 - Removing the Existing Teaming: If you will appear during the setup process, click OK to continue). Click Install under Realtek Ethernet Teaming Utility ...

Manual
Page 91
...Configuring SATA Hard Drive(s) To configure SATA hard drive(s), follow the steps below: A. B. C . Make a floppy disk containing the SA TA RAID/AHCI driver. (Note 2) E. Configure a RAID array in your motherboard, refer to "Chapter 1," "Hardware Installation," to identify the SA TA controller for the SATA...• An empty formatted floppy disk. • Windows Vista/XP setup disk. • Motherboard driver disk. 5-1-1 Configuring Intel ICH10R SATA Controllers A. Install the SATA RAID/AHCI driver and operating system. (Note 2) Before you begin Please prepare: • At least two SATA ...
...Configuring SATA Hard Drive(s) To configure SATA hard drive(s), follow the steps below: A. B. C . Make a floppy disk containing the SA TA RAID/AHCI driver. (Note 2) E. Configure a RAID array in your motherboard, refer to "Chapter 1," "Hardware Installation," to identify the SA TA controller for the SATA...• An empty formatted floppy disk. • Windows Vista/XP setup disk. • Motherboard driver disk. 5-1-1 Configuring Intel ICH10R SATA Controllers A. Install the SATA RAID/AHCI driver and operating system. (Note 2) Before you begin Please prepare: • At least two SATA ...


