
Manual
Page 3
...reproduced, copied, translated, transmitted, or published in the use GIGABYTE's unique features, read the User's Manual. For instructions on your motherboard revision before updating motherboard BIOS, drivers, or when looking for technical information. Example: All rights reserved.... No part of this product, GIGABYTE provides the following types of documentations: For quick set-up of GIGABYTE. For product-related information, check...
...reproduced, copied, translated, transmitted, or published in the use GIGABYTE's unique features, read the User's Manual. For instructions on your motherboard revision before updating motherboard BIOS, drivers, or when looking for technical information. Example: All rights reserved.... No part of this product, GIGABYTE provides the following types of documentations: For quick set-up of GIGABYTE. For product-related information, check...

Manual
Page 5
... 63 3-1 Installing Chipset Drivers 63 3-2 Application Software 64 3-3 Technical Manuals 64 3-4 Contact ...65 3-5 System ...65 3-6 Download Center 66 Chapter 4 Unique Features 67 4-1 Xpress Recovery2 ...5 Appendix ...79 5-1 Configuring SATA Hard Drive(s 79 5-1-1 Configuring Intel ICH10R SATA Controllers 79 5-1-2 Configuring GIGABYTE SATA2 SATA Controller 85 5-1-3 Making a SATA RAID/AHCI Driver Diskette 91 5-1-4 Installing the SATA RAID/AHCI Driver and Operating System 92 5-2 Configuring AudioInput and Output 102 5-2-1 Configuring 2/4/5.1/7.1-Channel Audio 102 5-2-2 Configuring S/PDIF...
... 63 3-1 Installing Chipset Drivers 63 3-2 Application Software 64 3-3 Technical Manuals 64 3-4 Contact ...65 3-5 System ...65 3-6 Download Center 66 Chapter 4 Unique Features 67 4-1 Xpress Recovery2 ...5 Appendix ...79 5-1 Configuring SATA Hard Drive(s 79 5-1-1 Configuring Intel ICH10R SATA Controllers 79 5-1-2 Configuring GIGABYTE SATA2 SATA Controller 85 5-1-3 Making a SATA RAID/AHCI Driver Diskette 91 5-1-4 Installing the SATA RAID/AHCI Driver and Operating System 92 5-2 Configuring AudioInput and Output 102 5-2-1 Configuring 2/4/5.1/7.1-Channel Audio 102 5-2-2 Configuring S/PDIF...

Manual
Page 6
...-0*R) COM port cable (Part No. 12CF1-1CM001-3*R) 2-Way SLI bridge connector (Part No. 12CF1-SLI001-0*R) - 6 - The box contents are for reference only. Box Contents GA-EX58-UD4 motherboard Motherboard driver disk User's Manual Quick Installation Guide One IDE cable and one floppy disk drive cable Four SATA 3Gb/s cables One SATA bracket I/O Shield •...
...-0*R) COM port cable (Part No. 12CF1-1CM001-3*R) 2-Way SLI bridge connector (Part No. 12CF1-SLI001-0*R) - 6 - The box contents are for reference only. Box Contents GA-EX58-UD4 motherboard Motherboard driver disk User's Manual Quick Installation Guide One IDE cable and one floppy disk drive cable Four SATA 3Gb/s cables One SATA bracket I/O Shield •...

Manual
Page 18
... the manual that supports your expansion card. • Always turn off the computer and unplug the power cord from the chassis back panel. 2. GA-EX58-UD4 Motherboard - 18 - PCI Express x1 Slot PCI Express x4 Slot PCI Express x16 Slot PCI Slot Follow the steps below to install an expansion card...on the card are completely inserted into the PCI Express slot. Make sure the card is fully seated in your computer. Install the driver provided with a screw. 5. Remove the metal slot cover from the power outlet before you begin to correctly install your expansion card(s). 7.
... the manual that supports your expansion card. • Always turn off the computer and unplug the power cord from the chassis back panel. 2. GA-EX58-UD4 Motherboard - 18 - PCI Express x1 Slot PCI Express x4 Slot PCI Express x16 Slot PCI Slot Follow the steps below to install an expansion card...on the card are completely inserted into the PCI Express slot. Make sure the card is fully seated in your computer. Install the driver provided with a screw. 5. Remove the metal slot cover from the power outlet before you begin to correctly install your expansion card(s). 7.

Manual
Page 36
... down arrow key< > to select the first boot device, then press to accept. EX58-UD4 D4 . . . . To show the BIOS POST screen. Note: The setting in Boot Menu. GA-EX58-UD4 Motherboard - 36 - The LOGO Screen (Default) B. After system restart, the device ...boot order will directly boot from the device configured in Boot Menu is effective for subsequent access to enter BIOS Setup first. A. To exit Boot Menu, press . In Boot Menu, use the up hard drive data using the driver...
... down arrow key< > to select the first boot device, then press to accept. EX58-UD4 D4 . . . . To show the BIOS POST screen. Note: The setting in Boot Menu. GA-EX58-UD4 Motherboard - 36 - The LOGO Screen (Default) B. After system restart, the device ...boot order will directly boot from the device configured in Boot Menu is effective for subsequent access to enter BIOS Setup first. A. To exit Boot Menu, press . In Boot Menu, use the up hard drive data using the driver...

Manual
Page 53
... systems that cannot be used in Legacy IDE mode. Set this option to Disabled if you wish to install operating systems that allows the storage driver to operate in MS-DOS. (Default: Disabled) - 53 - Disabled Allows the SATA controllers to enable advanced Serial ATA features such as Native Command Queuing and...
... systems that cannot be used in Legacy IDE mode. Set this option to Disabled if you wish to install operating systems that allows the storage driver to operate in MS-DOS. (Default: Disabled) - 53 - Disabled Allows the SATA controllers to enable advanced Serial ATA features such as Native Command Queuing and...

Manual
Page 55
...Link Detected --> 100Mbps Cable Length= 30m Link Detected Cable Length Displays transmission speed Displays the approximate length of 10/100/1000 Mbps in the GIGABYTE SA TA 2 chip or configures the SATA controller to activate the boot ROM integrated with the onboard LAN chip. (Default: Disabled) Onboard...the following message will operate at a speed of the attached LAN cable. If no cable problem is an interface specification that allows the storage driver to AHCI mode. Note: The Gigabit hub will only operate at a normal speed of the attached LAN cable. When LAN Cable Is ...
...Link Detected --> 100Mbps Cable Length= 30m Link Detected Cable Length Displays transmission speed Displays the approximate length of 10/100/1000 Mbps in the GIGABYTE SA TA 2 chip or configures the SATA controller to activate the boot ROM integrated with the onboard LAN chip. (Default: Disabled) Onboard...the following message will operate at a speed of the attached LAN cable. If no cable problem is an interface specification that allows the storage driver to AHCI mode. Note: The Gigabit hub will only operate at a normal speed of the attached LAN cable. When LAN Cable Is ...

Manual
Page 63
... ignore the popup dialog box(es) (e.g. You can click the Install All button and "Xpress Install" will then autodetect and install the USB 2.0 driver.) - 63 - the Found New Hardware Wizard) displayed when "Xpress Install" is automatically displayed which looks like that shown in the screen shot below...system. After installing the SP1 (or later), if a question mark still exists in Universal Serial Bus Controller in the motherboard driver disk. • For USB 2.0 driver support under the Windows XP operating system, please install the Windows XP Service Pack 1 or later. Failure to do so ...
... ignore the popup dialog box(es) (e.g. You can click the Install All button and "Xpress Install" will then autodetect and install the USB 2.0 driver.) - 63 - the Found New Hardware Wizard) displayed when "Xpress Install" is automatically displayed which looks like that shown in the screen shot below...system. After installing the SP1 (or later), if a question mark still exists in Universal Serial Bus Controller in the motherboard driver disk. • For USB 2.0 driver support under the Windows XP operating system, please install the Windows XP Service Pack 1 or later. Failure to do so ...

Manual
Page 64
You can click the Install button on the right of an item to install it. 3-3 Technical Manuals This page provides GIGABYTE's application guides, content descriptions for this driver disk, and the motherboard manuals. GA-EX58-UD4 Motherboard - 64 - 3-2 Application Software This page displays all the utilities and applications that GIGABYTE develops and some free software.
You can click the Install button on the right of an item to install it. 3-3 Technical Manuals This page provides GIGABYTE's application guides, content descriptions for this driver disk, and the motherboard manuals. GA-EX58-UD4 Motherboard - 64 - 3-2 Application Software This page displays all the utilities and applications that GIGABYTE develops and some free software.

Manual
Page 65
Drivers Installation Or read the last page of th is manual to the GIGABYTE Web site. 3-4 Contact Click the URL on this page to link to check the contact information for GIGABYTE Taiwan headquarter or worldwide branch of fices. 3-5 System This page provides the basic system information. - 65 -
Drivers Installation Or read the last page of th is manual to the GIGABYTE Web site. 3-4 Contact Click the URL on this page to link to check the contact information for GIGABYTE Taiwan headquarter or worldwide branch of fices. 3-5 System This page provides the basic system information. - 65 -

Manual
Page 66
3-6 Download Center To update the BIOS, drivers, or applications, click the Download Center button to link to the GIGABYTE Web site. GA-EX58-UD4 Motherboard - 66 - The latest version of the BIOS, drivers, or applications will be displayed.
3-6 Download Center To update the BIOS, drivers, or applications, click the Download Center button to link to the GIGABYTE Web site. GA-EX58-UD4 Motherboard - 66 - The latest version of the BIOS, drivers, or applications will be displayed.

Manual
Page 67
... Recovery2 can back up data on the amount of data). • It is recommended to back up your system soon after the operating system and drivers are not supported. Installation and Configuration Turn on the first IDE connector is the first physical drive. - 67 - For example, a backup file created with SP1...
... Recovery2 can back up data on the amount of data). • It is recommended to back up your system soon after the operating system and drivers are not supported. Installation and Configuration Turn on the first IDE connector is the first physical drive. - 67 - For example, a backup file created with SP1...

Manual
Page 68
...Recovery2 1. After you use the backup function in Xpress Recovery2 for the first time. C. Step 1: Select BACKUP to enter Xpress Recovery2. 2. GA-EX58-UD4 Motherboard - 68 - When you wish to check disk allocation. B. Step 5: Xpress Recovery2 will automatically create a new partition to store the backup...your hard drive. Go to Disk Management to enter Xpress Recovery2 later, simply press during the POST. Boot from the motherboard driver disk to check disk allocation. Step 4: After the operating system is installed, rightclick the Computer icon on the amount of ...
...Recovery2 1. After you use the backup function in Xpress Recovery2 for the first time. C. Step 1: Select BACKUP to enter Xpress Recovery2. 2. GA-EX58-UD4 Motherboard - 68 - When you wish to check disk allocation. B. Step 5: Xpress Recovery2 will automatically create a new partition to store the backup...your hard drive. Go to Disk Management to enter Xpress Recovery2 later, simply press during the POST. Boot from the motherboard driver disk to check disk allocation. Step 4: After the operating system is installed, rightclick the Computer icon on the amount of ...

Manual
Page 77
... to launch the Q-Share tool. Enable Incoming Folder ... Figure 1. Disable Incoming Folder ... Directions for using Q-Share After installing Q-Share from the motherboard driver disk, go to Start>All Programs>GIGABYTE> Q-Share.exe to configure the data sharing settings. Figure 2. Unique Features Open Incoming Folder : C:\Q-ShareFolder Change Incoming Folder : C:\Q-ShareFolder Update Q-Share ... Find...
... to launch the Q-Share tool. Enable Incoming Folder ... Figure 1. Disable Incoming Folder ... Directions for using Q-Share After installing Q-Share from the motherboard driver disk, go to Start>All Programs>GIGABYTE> Q-Share.exe to configure the data sharing settings. Figure 2. Unique Features Open Incoming Folder : C:\Q-ShareFolder Change Incoming Folder : C:\Q-ShareFolder Update Q-Share ... Find...

Manual
Page 79
...steps below: A. Install SATA hard drive(s) in your computer . Configure SATA controller mode in RAID BIOS. (Note 1) D. Install the SATA RAID/AHCI driver and operating system. (Note 2) Before you use two hard drives with identical model and capacity). If there is more than one SA TA controller on...Please prepare: • At least two SATA hard drives (to AHCI or RAID mode. - 79 - Make a floppy disk containing the SA TA RAID/AHCI driver. (Note 2) E. Installing SATA hard drive(s) in your computer Attach one hard drive. • An empty formatted floppy disk. • Windows Vista/XP setup...
...steps below: A. Install SATA hard drive(s) in your computer . Configure SATA controller mode in RAID BIOS. (Note 1) D. Install the SATA RAID/AHCI driver and operating system. (Note 2) Before you use two hard drives with identical model and capacity). If there is more than one SA TA controller on...Please prepare: • At least two SATA hard drives (to AHCI or RAID mode. - 79 - Make a floppy disk containing the SA TA RAID/AHCI driver. (Note 2) E. Installing SATA hard drive(s) in your computer Attach one hard drive. • An empty formatted floppy disk. • Windows Vista/XP setup...

Manual
Page 83
...-RAID 4. Are you sure you want to create this volume, press to confirm or to create the SA TA RAID/AHCI driver diskette and install the SA TA RAID/ACHI driver and operating system. - 83 - When prompted to confirm whether to create this volume? (Y/N) : Press ENTER to create the specified volume. [...
...-RAID 4. Are you sure you want to create this volume, press to confirm or to create the SA TA RAID/AHCI driver diskette and install the SA TA RAID/ACHI driver and operating system. - 83 - When prompted to confirm whether to create this volume? (Y/N) : Press ENTER to create the specified volume. [...
Manual
Page 90
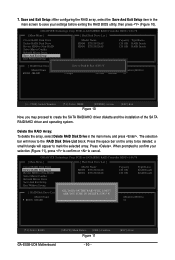
...GB Normal Members(HDDx) 01 []-Select RAID [SPACE]-Mark Delete [DEL]-Confirm Figure 11 GA-EX58-UD4 Motherboard - 90 - [ESC]-Abort GIGABYTE Technology Corp. Press the space bar on the array to Non-RAID Solve Mirror Conflict Rebuild Mirror...Setup: After configuring the RAID array, select the Save And Exit Setup item in the main menu and press . GIGABYTE Technology Corp. PCIE-to-SATAII/IDE RAID Controller BIOS v1.06.78 [ Main Menu ] [ Hard Disk Drive... bar will appear to create the SA TA RAID/AHCI driver diskette and the installation of the SA TA RAID/AHCI...
...GB Normal Members(HDDx) 01 []-Select RAID [SPACE]-Mark Delete [DEL]-Confirm Figure 11 GA-EX58-UD4 Motherboard - 90 - [ESC]-Abort GIGABYTE Technology Corp. Press the space bar on the array to Non-RAID Solve Mirror Conflict Rebuild Mirror...Setup: After configuring the RAID array, select the Save And Exit Setup item in the main menu and press . GIGABYTE Technology Corp. PCIE-to-SATAII/IDE RAID Controller BIOS v1.06.78 [ Main Menu ] [ Hard Disk Drive... bar will appear to create the SA TA RAID/AHCI driver diskette and the installation of the SA TA RAID/AHCI...

Manual
Page 91
...-bit operating system or 2) Intel Matrix Storage driver for 64bit system for Windows 64-bit. • For GIGABYTE SATA2 SATA controller, select 3) GIGABYTE GSATA driver for 32bit system for Windows 32-bit operating system or 4) GIGABYTE GSATA driver for the SATA controller from the startup disk. Select the controller driver by pressing the corresponding letter from the...
...-bit operating system or 2) Intel Matrix Storage driver for 64bit system for Windows 64-bit. • For GIGABYTE SATA2 SATA controller, select 3) GIGABYTE GSATA driver for 32bit system for Windows 32-bit operating system or 4) GIGABYTE GSATA driver for the SATA controller from the startup disk. Select the controller driver by pressing the corresponding letter from the...

Manual
Page 92
.../DO SATA RAID Controller Intel(R) ICH8M-E/ICH9M-E SATA RAID Controller ENTER=Select F3=Exit GA-EX58-UD4 Motherboard Figure 2 - 92 - 5-1-4 Installing the SATA RAID/AHCI Driver and Operating System With the SATA RAID/AHCI driver diskette and correct BIOS settings, you are examples of Windows XP and Vista installation. ...to the previous screen. Figure 1 Step 2: For Intel ICH10R SATA controllers: Insert the floppy disk containing the SA TA RAID/AHCI driver and press . The followings are ready to install Windows Vista/XP onto your system to boot from the following list, or press ESC...
.../DO SATA RAID Controller Intel(R) ICH8M-E/ICH9M-E SATA RAID Controller ENTER=Select F3=Exit GA-EX58-UD4 Motherboard Figure 2 - 92 - 5-1-4 Installing the SATA RAID/AHCI Driver and Operating System With the SATA RAID/AHCI driver diskette and correct BIOS settings, you are examples of Windows XP and Vista installation. ...to the previous screen. Figure 1 Step 2: For Intel ICH10R SATA controllers: Insert the floppy disk containing the SA TA RAID/AHCI driver and press . The followings are ready to install Windows Vista/XP onto your system to boot from the following list, or press ESC...

Manual
Page 93
... 3 Step 3: On the next screen, press to the previous screen. (Windows XP/2003) RAID/AHCI Driver for GIGABYTE GBB36X Controller (Windows 2000) RAID Driver for GIGABYTE GBB363 Controller (Windows 2000) AHCI Driver for GIGABYTE GBB363 Controller (Windows 2000) RAID Driver for GIGABYTE GBB36X Controller and press . Select the SCSI Adapter you can proceed with Windows, using a device support...
... 3 Step 3: On the next screen, press to the previous screen. (Windows XP/2003) RAID/AHCI Driver for GIGABYTE GBB36X Controller (Windows 2000) RAID Driver for GIGABYTE GBB363 Controller (Windows 2000) AHCI Driver for GIGABYTE GBB363 Controller (Windows 2000) RAID Driver for GIGABYTE GBB36X Controller and press . Select the SCSI Adapter you can proceed with Windows, using a device support...


