Manual
Page 3
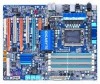
... this : "REV: X.X." All rights reserved. For product-related information, check on our website at: http://www.gigabyte.com.tw Identifying Your Motherboard Revision The revision number on your motherboard revision before updating motherboard BIOS, drivers, or when looking for technical information. Check your motherboard looks like this manual may be made by...
... this : "REV: X.X." All rights reserved. For product-related information, check on our website at: http://www.gigabyte.com.tw Identifying Your Motherboard Revision The revision number on your motherboard revision before updating motherboard BIOS, drivers, or when looking for technical information. Check your motherboard looks like this manual may be made by...
Manual
Page 5
... 63 3-1 Installing Chipset Drivers 63 3-2 Application Software 64 3-3 Technical Manuals 64 3-4 Contact ...65 3-5 System ...65 3-6 Download Center 66 Chapter 4 Unique Features 67 4-1 Xpress Recovery2 ...5 Appendix ...79 5-1 Configuring SATA Hard Drive(s 79 5-1-1 Configuring Intel ICH10R SATA Controllers 79 5-1-2 Configuring GIGABYTE SATA2 SATA Controller 85 5-1-3 Making a SATA RAID/AHCI Driver Diskette 86 5-1-4 Installing the SATA RAID/AHCI Driver and Operating System 87 5-2 ConfiguringAudio Input and Output 92 5-2-1 Configuring 2/4/5.1/7.1-Channel Audio 92 5-2-2 Configuring S/PDIF ...
... 63 3-1 Installing Chipset Drivers 63 3-2 Application Software 64 3-3 Technical Manuals 64 3-4 Contact ...65 3-5 System ...65 3-6 Download Center 66 Chapter 4 Unique Features 67 4-1 Xpress Recovery2 ...5 Appendix ...79 5-1 Configuring SATA Hard Drive(s 79 5-1-1 Configuring Intel ICH10R SATA Controllers 79 5-1-2 Configuring GIGABYTE SATA2 SATA Controller 85 5-1-3 Making a SATA RAID/AHCI Driver Diskette 86 5-1-4 Installing the SATA RAID/AHCI Driver and Operating System 87 5-2 ConfiguringAudio Input and Output 92 5-2-1 Configuring 2/4/5.1/7.1-Channel Audio 92 5-2-2 Configuring S/PDIF ...
Manual
Page 6
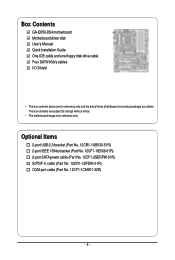
... cable (Part No. 12CF1-2SERPW-01R) S/PDIF in cable (Part No. 12CR1-1SPDIN-01R) COM port cable (Part No. 12CF1-1CM001-32R) - 6 - Box Contents GA-EX58-DS4 motherboard Motherboard driver disk User's Manual Quick Installation Guide One IDE cable and one floppy disk drive cable Four SATA 3Gb/s cables I/O Shield • The box contents...
... cable (Part No. 12CF1-2SERPW-01R) S/PDIF in cable (Part No. 12CR1-1SPDIN-01R) COM port cable (Part No. 12CF1-1CM001-32R) - 6 - Box Contents GA-EX58-DS4 motherboard Motherboard driver disk User's Manual Quick Installation Guide One IDE cable and one floppy disk drive cable Four SATA 3Gb/s cables I/O Shield • The box contents...
Manual
Page 18
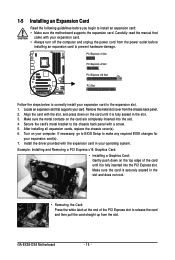
... inserted into the slot. 4. Secure the card's metal bracket to install an expansion card: • Make sure the motherboard supports the expansion card. Install the driver provided with the slot, and press down on your operating system. Locate an expansion slot that came with a screw. 5. After installing all expansion cards, replace... does not rock. • Removing the Card: Press the white latch at the end of the card until it is fully seated in your computer. GA-EX58-DS4 Motherboard - 18 - Remove the metal slot cover from the slot.
... inserted into the slot. 4. Secure the card's metal bracket to install an expansion card: • Make sure the motherboard supports the expansion card. Install the driver provided with the slot, and press down on your operating system. Locate an expansion slot that came with a screw. 5. After installing all expansion cards, replace... does not rock. • Removing the Card: Press the white latch at the end of the card until it is fully seated in your computer. GA-EX58-DS4 Motherboard - 18 - Remove the metal slot cover from the slot.
Manual
Page 36
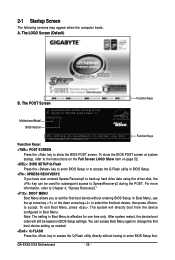
... BIOS Setup first. 2-1 Startup Screen The following screens may appear when the computer boots. The system will still be used for one time only. GA-EX58-DS4 Motherboard - 36 - For more information, refer to Chapter 4, "Xpress Recovery2." : BOOT MENU Boot Menu allows you have ever entered Xpress Recovery2 ... the first boot device, then press to accept. The LOGO Screen (Default) B. In Boot Menu, use the up hard drive data using the driver disk, the key can access Boot Menu again to change the first boot device setting as needed. : Q-FLASH Press the key to access the ...
... BIOS Setup first. 2-1 Startup Screen The following screens may appear when the computer boots. The system will still be used for one time only. GA-EX58-DS4 Motherboard - 36 - For more information, refer to Chapter 4, "Xpress Recovery2." : BOOT MENU Boot Menu allows you have ever entered Xpress Recovery2 ... the first boot device, then press to accept. The LOGO Screen (Default) B. In Boot Menu, use the up hard drive data using the driver disk, the key can access Boot Menu again to change the first boot device setting as needed. : Q-FLASH Press the key to access the ...

Manual
Page 53
.... (Default: Enabled) Disabled will turn off all of the integrated SATA controllers. In Legacy mode the SATA controllers use dedicated IRQs that allows the storage driver to be shared with other device. Disabled Disables RAID for the SATA controllers and configures the SATA controllers to AHCI mode. 2-6 Integrated Peripherals CMOS Setup...
.... (Default: Enabled) Disabled will turn off all of the integrated SATA controllers. In Legacy mode the SATA controllers use dedicated IRQs that allows the storage driver to be shared with other device. Disabled Disables RAID for the SATA controllers and configures the SATA controllers to AHCI mode. 2-6 Integrated Peripherals CMOS Setup...

Manual
Page 55
... interrupt. Link Detected --> 100Mbps Cable Length= 30m Link Detected Cable Length Displays transmission speed Displays the approximate length of 10/100/1000 Mbps in the GIGABYTE SATA 2 chip or configures the SATA controller to enable advanced Serial ATA features such as Native Command Queuing and RAID/IDE hot plug. Note: Part... Normally... Enables RAID for the SATA controller integrated in Windows mode or when the LAN Boot ROM is an interface specification that allows the storage driver to AHCI mode. Advanced Host Controller Interface (AHCI) is activated.
... interrupt. Link Detected --> 100Mbps Cable Length= 30m Link Detected Cable Length Displays transmission speed Displays the approximate length of 10/100/1000 Mbps in the GIGABYTE SATA 2 chip or configures the SATA controller to enable advanced Serial ATA features such as Native Command Queuing and RAID/IDE hot plug. Note: Part... Normally... Enables RAID for the SATA controller integrated in Windows mode or when the LAN Boot ROM is an interface specification that allows the storage driver to AHCI mode. Advanced Host Controller Interface (AHCI) is activated.
Manual
Page 63
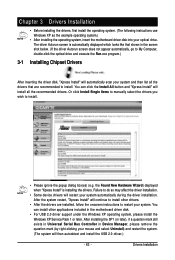
... in Universal Serial Bus Controller in the screen shot below. (If the driver Autorun screen does not appear automatically, go to restart your system automatically during the driver installation. the Found New Hardware Wizard) displayed when "Xpress Install" is ...exe program.) 3-1 Installing Chipset Drivers After inserting the driver disk, "Xpress Install" will restart your system. Drivers Installation The driver Autorun screen is installing the drivers. Failure to do so may affect the driver installation. • Some device drivers will automatically scan your system...
... in Universal Serial Bus Controller in the screen shot below. (If the driver Autorun screen does not appear automatically, go to restart your system automatically during the driver installation. the Found New Hardware Wizard) displayed when "Xpress Install" is ...exe program.) 3-1 Installing Chipset Drivers After inserting the driver disk, "Xpress Install" will restart your system. Drivers Installation The driver Autorun screen is installing the drivers. Failure to do so may affect the driver installation. • Some device drivers will automatically scan your system...
Manual
Page 64
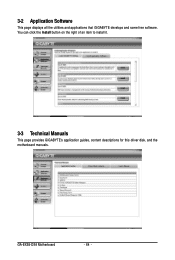
GA-EX58-DS4 Motherboard - 64 - 3-2 Application Software This page displays all the utilities and applications that GIGABYTE develops and some free software. You can click the Install button on the right of an item to install it. 3-3 Technical Manuals This page provides GIGABYTE's application guides, content descriptions for this driver disk, and the motherboard manuals.
GA-EX58-DS4 Motherboard - 64 - 3-2 Application Software This page displays all the utilities and applications that GIGABYTE develops and some free software. You can click the Install button on the right of an item to install it. 3-3 Technical Manuals This page provides GIGABYTE's application guides, content descriptions for this driver disk, and the motherboard manuals.

Manual
Page 65
Or read the last page of this page to link to check the contact information for GIGABYTE Taiwan headquarter or worldwide branch offices. 3-5 System This page provides the basic system information. - 65 - Drivers Installation 3-4 Contact Click the URL on this manual to the GIGABYTE Web site.
Or read the last page of this page to link to check the contact information for GIGABYTE Taiwan headquarter or worldwide branch offices. 3-5 System This page provides the basic system information. - 65 - Drivers Installation 3-4 Contact Click the URL on this manual to the GIGABYTE Web site.

Manual
Page 66
The latest version of the BIOS, drivers, or applications will be displayed. 3-6 Download Center To update the BIOS, drivers, or applications, click the Download Center button to link to the GIGABYTE Web site. GA-EX58-DS4 Motherboard - 66 -
The latest version of the BIOS, drivers, or applications will be displayed. 3-6 Download Center To update the BIOS, drivers, or applications, click the Download Center button to link to the GIGABYTE Web site. GA-EX58-DS4 Motherboard - 66 -

Manual
Page 67
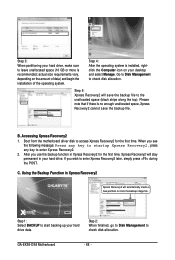
... at which the data is backed up/restored. • It takes longer to back up data on your system soon after the operating system and drivers are attached to the first and second SATA connectors, the hard drive on the first IDE connector is the first physical drive. "*" Xpress Recovery2 checks...
... at which the data is backed up/restored. • It takes longer to back up data on your system soon after the operating system and drivers are attached to the first and second SATA connectors, the hard drive on the first IDE connector is the first physical drive. "*" Xpress Recovery2 checks...
Manual
Page 68
... 1. If you see the following message: Press any key to startup Xpress Recovery2 , press any key to store the backup image file. GA-EX58-DS4 Motherboard - 68 - Boot from the motherboard driver disk to check disk allocation. Step 3: When partitioning your hard drive data. Go to Disk Management to access Xpress Recovery2 for the...
... 1. If you see the following message: Press any key to startup Xpress Recovery2 , press any key to store the backup image file. GA-EX58-DS4 Motherboard - 68 - Boot from the motherboard driver disk to check disk allocation. Step 3: When partitioning your hard drive data. Go to Disk Management to access Xpress Recovery2 for the...
Manual
Page 77
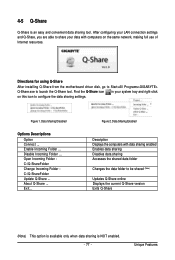
... - Open Incoming Folder : C:\Q-ShareFolder Change Incoming Folder : C:\Q-ShareFolder Update Q-Share ... About Q-Share ... Directions for using Q-Share After installing Q-Share from the motherboard driver disk, go to Start>All Programs>GIGABYTE> Q-Share.exe to share your data with data sharing enabled Enables data sharing Disables data sharing Accesses the shared data folder Changes...
... - Open Incoming Folder : C:\Q-ShareFolder Change Incoming Folder : C:\Q-ShareFolder Update Q-Share ... About Q-Share ... Directions for using Q-Share After installing Q-Share from the motherboard driver disk, go to Start>All Programs>GIGABYTE> Q-Share.exe to share your data with data sharing enabled Enables data sharing Disables data sharing Accesses the shared data folder Changes...
Manual
Page 79
... and the other end to create RAID, you use two hard drives with identical model and capacity). Make a floppy disk containing the SATA RAID/AHCI driver. (Note 2) E. If you do not want to available SATA port on the SATA controller. (Note 2) For ICH10R SATA controller only. - 79 - B. Chapter...computer. Installing SATA hard drive(s) in BIOS Setup. Install SATA hard drive(s) in RAID BIOS. (Note 1)(Note 2) D. Install the SATA RAID/AHCI driver and operating system. (Note 2) Before you begin Please prepare: • At least two SATA hard drives (to ensure optimal performance, it is more...
... and the other end to create RAID, you use two hard drives with identical model and capacity). Make a floppy disk containing the SATA RAID/AHCI driver. (Note 2) E. If you do not want to available SATA port on the SATA controller. (Note 2) For ICH10R SATA controller only. - 79 - B. Chapter...computer. Installing SATA hard drive(s) in BIOS Setup. Install SATA hard drive(s) in RAID BIOS. (Note 1)(Note 2) D. Install the SATA RAID/AHCI driver and operating system. (Note 2) Before you begin Please prepare: • At least two SATA hard drives (to ensure optimal performance, it is more...

Manual
Page 83
... Copyright(C) 2003-08 Intel Corporation. Now, you want to create this volume, press to confirm or to create the SATA RAID/AHCI driver diskette and install the SATA RAID/ACHI driver and operating system. - 83 - When prompted to confirm whether to create this volume? (Y/N) : Press ENTER to create the specified volume. [...
... Copyright(C) 2003-08 Intel Corporation. Now, you want to create this volume, press to confirm or to create the SATA RAID/AHCI driver diskette and install the SATA RAID/ACHI driver and operating system. - 83 - When prompted to confirm whether to create this volume? (Y/N) : Press ENTER to create the specified volume. [...

Manual
Page 86
... your system. GA-EX58-DS4 Motherboard Figure 3 - 86 - Step 1: Insert the prepared startup disk and motherboard driver disk in Figure 2: • For Intel ICH10R SATA controllers, select 1) Intel Matrix Storage driver for 32bit system for Windows 32-bit operating system or 2) Intel Matrix Storage driver for 64bit system for Windows 64-bit. • For GIGABYTE SATA2 SATA...
... your system. GA-EX58-DS4 Motherboard Figure 3 - 86 - Step 1: Insert the prepared startup disk and motherboard driver disk in Figure 2: • For Intel ICH10R SATA controllers, select 1) Intel Matrix Storage driver for 32bit system for Windows 32-bit operating system or 2) Intel Matrix Storage driver for 64bit system for Windows 64-bit. • For GIGABYTE SATA2 SATA...

Manual
Page 87
...to Figure 2 below will then appear asking you need to install a 3rd party SCSI or RAID driver" (Figure 1). Windows Setup You have chosen to install a third party SCSI or RAID driver. Select the SCSI Adapter you need to configure a SCSI Adapter for use with the Windows XP installation.... 5-1-4 Installing the SATA RAID/AHCI Driver and Operating System With the SATA RAID/AHCI driver diskette and correct BIOS settings, you can proceed with Windows, using a device support disk provided by an adapter ...
...to Figure 2 below will then appear asking you need to install a 3rd party SCSI or RAID driver" (Figure 1). Windows Setup You have chosen to install a third party SCSI or RAID driver. Select the SCSI Adapter you need to configure a SCSI Adapter for use with the Windows XP installation.... 5-1-4 Installing the SATA RAID/AHCI Driver and Operating System With the SATA RAID/AHCI driver diskette and correct BIOS settings, you can proceed with Windows, using a device support disk provided by an adapter ...
Manual
Page 88
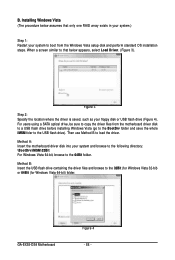
.... Installing Windows Vista (The procedure below appears, select Load Driver. (Figure 3). For users using a SATA optical drive, be sure to copy the driver files from the Windows Vista setup disk and perform standard OS installation steps. GA-EX58-DS4 Motherboard Figure 4 - 88 - Figure 3 Step 2: Specify... the location where the driver is saved, such as your floppy disk or USB flash drive...
.... Installing Windows Vista (The procedure below appears, select Load Driver. (Figure 3). For users using a SATA optical drive, be sure to copy the driver files from the Windows Vista setup disk and perform standard OS installation steps. GA-EX58-DS4 Motherboard Figure 4 - 88 - Figure 3 Step 2: Specify... the location where the driver is saved, such as your floppy disk or USB flash drive...

Manual
Page 89
Figure 5 Step 4: After the driver is loaded, select the RAID/AHCI drive(s) where you want to install the operating system and then click Next to continue the OS installation (Figure 6). Appendix Step 3: When a screen as shown in Figure 5 appears, select Intel(R) ICH8R/ICH9R/ICH10R/DO SATA RAID Controller and click Next. Figure 6 - 89 -
Figure 5 Step 4: After the driver is loaded, select the RAID/AHCI drive(s) where you want to install the operating system and then click Next to continue the OS installation (Figure 6). Appendix Step 3: When a screen as shown in Figure 5 appears, select Intel(R) ICH8R/ICH9R/ICH10R/DO SATA RAID Controller and click Next. Figure 6 - 89 -


