Manual
Page 3
...this manual may be reproduced, copied, translated, transmitted, or published in this product, GIGABYTE provides the following types of documentations: „ For quick set-up of GIGABYTE. All rights reserved. The trademarks mentioned in any form or by any means without ...prior notice. Documentation Classifications In order to use GIGABYTE's unique features, read or download the information on/from the Support\Motherboard\Technology Guide page on your motherboard revision before updating motherboard BIOS, drivers, or when looking for technical information.
...this manual may be reproduced, copied, translated, transmitted, or published in this product, GIGABYTE provides the following types of documentations: „ For quick set-up of GIGABYTE. All rights reserved. The trademarks mentioned in any form or by any means without ...prior notice. Documentation Classifications In order to use GIGABYTE's unique features, read or download the information on/from the Support\Motherboard\Technology Guide page on your motherboard revision before updating motherboard BIOS, drivers, or when looking for technical information.
Manual
Page 5
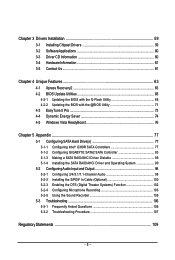
... 59 3-1 Installing Chipset Drivers 59 3-2 SoftwareApplications 60 3-3 Driver CD Information 60 3-4 Hardware Information 61 3-5 Contact Us ...61 Chapter 4 Unique Features 63 4-1 Xpress Recovery2 63 4-2 BIOS......77 5-1 Configuring SATA Hard Drive(s 77 5-1-1 Configuring Intel® ICH9R SATA Controllers 77 5-1-2 Configuring GIGABYTE SATA2 SATA Controller 83 5-1-3 Making a SATA RAID/AHCI Driver Diskette 89 5-1-4 Installing the SATA RAID/AHCI Driver and Operating System 90 5-2 ConfiguringAudio Input and Output 98 5-2-1 5-2-2 5-2-3 5-2-4 Configuring 2/4/5.1/7.1-Channel Audio 98...
... 59 3-1 Installing Chipset Drivers 59 3-2 SoftwareApplications 60 3-3 Driver CD Information 60 3-4 Hardware Information 61 3-5 Contact Us ...61 Chapter 4 Unique Features 63 4-1 Xpress Recovery2 63 4-2 BIOS......77 5-1 Configuring SATA Hard Drive(s 77 5-1-1 Configuring Intel® ICH9R SATA Controllers 77 5-1-2 Configuring GIGABYTE SATA2 SATA Controller 83 5-1-3 Making a SATA RAID/AHCI Driver Diskette 89 5-1-4 Installing the SATA RAID/AHCI Driver and Operating System 90 5-2 ConfiguringAudio Input and Output 98 5-2-1 5-2-2 5-2-3 5-2-4 Configuring 2/4/5.1/7.1-Channel Audio 98...

Manual
Page 6
... port cable (Part No. 12CF1-1CM001-32R) LPT port cable (Part No. 12CF1-1LP001-01R) - 6 - The box contents are for reference only. Box Contents GA-EP35-DS4 motherboard Motherboard driver disk User's Manual Quick Installation Guide Intel® LGA775 CPU Installation Guide One IDE cable and one floppy disk drive cable Four SATA 3Gb...
... port cable (Part No. 12CF1-1CM001-32R) LPT port cable (Part No. 12CF1-1LP001-01R) - 6 - The box contents are for reference only. Box Contents GA-EP35-DS4 motherboard Motherboard driver disk User's Manual Quick Installation Guide Intel® LGA775 CPU Installation Guide One IDE cable and one floppy disk drive cable Four SATA 3Gb...

Manual
Page 12
... Easytune may differ by 0.05V to 0.35V with 0.05V increment - Adjust CPU host frequency from 90 MHz to 150 MHz with 1 MHz increment - GA-EP35-DS4 Motherboard - 12 - Increase (G)MCH voltage by 0.05V to 700 MHz with 1 MHz increment Š Support for Dynamic Energy Saver Š Norton Internet... fan speed control function is supported will depend on the CPU being used. (Note 6) Due to chipset limitation, Intel ICH9R RAID driver does not support Windows 2000 operating system. Increase CPU voltage (Note 5) - Increase DDR2 voltage by 0.025V to 0.375V with 0.05V increment -
... Easytune may differ by 0.05V to 0.35V with 0.05V increment - Adjust CPU host frequency from 90 MHz to 150 MHz with 1 MHz increment - GA-EP35-DS4 Motherboard - 12 - Increase (G)MCH voltage by 0.05V to 700 MHz with 1 MHz increment Š Support for Dynamic Energy Saver Š Norton Internet... fan speed control function is supported will depend on the CPU being used. (Note 6) Due to chipset limitation, Intel ICH9R RAID driver does not support Windows 2000 operating system. Increase CPU voltage (Note 5) - Increase DDR2 voltage by 0.025V to 0.375V with 0.05V increment -
Manual
Page 18
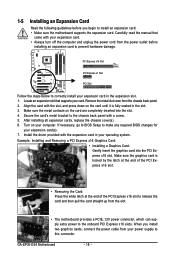
... the metal slot cover from your power supply to this connector. Secure the card's metal bracket to the onboard PCI Express x16 slots. Install the driver provided with a screw. 5. Make sure the graphics card is fully seated in the expansion slot. 1. Align the card with your computer. Locate an expansion slot... installing all expansion cards, replace the chassis cover(s). 6. When you begin to install an expansion card: • Make sure the motherboard supports the expansion card. GA-EP35-DS4 Motherboard - 18 -
... the metal slot cover from your power supply to this connector. Secure the card's metal bracket to the onboard PCI Express x16 slots. Install the driver provided with a screw. 5. Make sure the graphics card is fully seated in the expansion slot. 1. Align the card with your computer. Locate an expansion slot... installing all expansion cards, replace the chassis cover(s). 6. When you begin to install an expansion card: • Make sure the motherboard supports the expansion card. GA-EP35-DS4 Motherboard - 18 -

Manual
Page 36
... show the BIOS POST screen. Note: The setting in Boot Menu. In Boot Menu, use the up hard drive data using the motherboard driver disk, the key can access Boot Menu again to change the first boot device setting as needed. : Q-Flash Press the key to access... in Boot Menu is effective for subsequent access to enter BIOS Setup first. 2-1 Startup Screen The following screens may appear when the computer boots. GA-EP35-DS4 Motherboard - 36 - For more information, refer to Chapter 4, "Xpress Recovery2." : Boot Menu Boot Menu allows you have ever entered Xpress Recovery2...
... show the BIOS POST screen. Note: The setting in Boot Menu. In Boot Menu, use the up hard drive data using the motherboard driver disk, the key can access Boot Menu again to change the first boot device setting as needed. : Q-Flash Press the key to access... in Boot Menu is effective for subsequent access to enter BIOS Setup first. 2-1 Startup Screen The following screens may appear when the computer boots. GA-EP35-DS4 Motherboard - 36 - For more information, refer to Chapter 4, "Xpress Recovery2." : Boot Menu Boot Menu allows you have ever entered Xpress Recovery2...

Manual
Page 43
... Interface (AHCI) is an interface specification that do not support Native mode, e.g. Disabled Allows the SATA controllers to install operating systems that allows the storage driver to AHCI mode. Set this option to Disabled if you wish to operate in Legacy IDE mode.
... Interface (AHCI) is an interface specification that do not support Native mode, e.g. Disabled Allows the SATA controllers to install operating systems that allows the storage driver to AHCI mode. Set this option to Disabled if you wish to operate in Legacy IDE mode.

Manual
Page 45
...is the approximate length of 10/100/1000Mbps in Windows mode or when the LAN Boot ROM is an interface specification that allows the storage driver to enable advanced Serial ATA features such as Native Command Queuing and hot plug. Example: Part1-2 Status = Short / Length = 2m Explanation... so their Status fields will show Short and thenlength shown will operate at about 2m on a specified pair of 10/100Mbps in the GIGABYTE SATA 2 chip or configures the SATA controller to the fault or short. Advanced Host Controller Interface (AHCI) is activated. Options are not...
...is the approximate length of 10/100/1000Mbps in Windows mode or when the LAN Boot ROM is an interface specification that allows the storage driver to enable advanced Serial ATA features such as Native Command Queuing and hot plug. Example: Part1-2 Status = Short / Length = 2m Explanation... so their Status fields will show Short and thenlength shown will operate at about 2m on a specified pair of 10/100Mbps in the GIGABYTE SATA 2 chip or configures the SATA controller to the fault or short. Advanced Host Controller Interface (AHCI) is activated. Options are not...

Manual
Page 59
.... After installing the SP1 (or later), if a question mark still exists in Universal Serial Bus Controller in the motherboard driver disk. • For USB 2.0 driver support under the Windows XP operating system, please install the Windows XP Service Pack 1 or later. You can press Xpress...the Install button following instructions use Windows XP as the example operating system.) • After installing the operating system, insert the motherboard driver disk into your mouse and select Uninstall) and restart the system. (The system will restart your system. Or you wish to ...
.... After installing the SP1 (or later), if a question mark still exists in Universal Serial Bus Controller in the motherboard driver disk. • For USB 2.0 driver support under the Windows XP operating system, please install the Windows XP Service Pack 1 or later. You can press Xpress...the Install button following instructions use Windows XP as the example operating system.) • After installing the operating system, insert the motherboard driver disk into your mouse and select Uninstall) and restart the system. (The system will restart your system. Or you wish to ...

Manual
Page 60
You may press the Install button following an item to install it. 3-3 Driver CD Information This page provides information about the drivers, applications and tools in this driver disk. GA-EP35-DS4 Motherboard - 60 - 3-2 Software Applications This page displays all the tools and applications that GIGABYTE develops and some free software.
You may press the Install button following an item to install it. 3-3 Driver CD Information This page provides information about the drivers, applications and tools in this driver disk. GA-EP35-DS4 Motherboard - 60 - 3-2 Software Applications This page displays all the tools and applications that GIGABYTE develops and some free software.

Manual
Page 61
Drivers Installation 3-4 Hardware Information This page provides information about the hardware devices on this motherboard. 3-5 Contact Us Check the contacts information of the GIGABYTE headquarter in Taiwan and the overseas branch offices on the last page of this manual. - 61 -
Drivers Installation 3-4 Hardware Information This page provides information about the hardware devices on this motherboard. 3-5 Contact Us Check the contacts information of the GIGABYTE headquarter in Taiwan and the overseas branch offices on the last page of this manual. - 61 -

Manual
Page 63
... backup file at which the data is backed up/restored. • It takes longer to back up your system soon after the operating system and drivers are attached to the first IDE and the first SATA connectors, the hard drive on the amount of system memory • VESA compatible graphics card...
... backup file at which the data is backed up/restored. • It takes longer to back up your system soon after the operating system and drivers are attached to the first IDE and the first SATA connectors, the hard drive on the amount of system memory • VESA compatible graphics card...

Manual
Page 66
... the first physical hard drive as the target drive and detect whether this hard drive contains the Windows operating system. Figure 12 GA-EP35-DS4 Motherboard Xpress Recovery2 will begin to startup XpressRecovery2..... B. Boot from CD/DVD: Press any key to store the backup image file...Select BACKUP to enter Xpress Recovery2 later, simply press during the POST (Figure 9). Accessing Xpress Recovery2 1. Boot from the motherboard driver disk to check disk allocation. When finished, go to Disk Management to access Xpress Recovery2 for the first time, Xpress Recovery2 ...
... the first physical hard drive as the target drive and detect whether this hard drive contains the Windows operating system. Figure 12 GA-EP35-DS4 Motherboard Xpress Recovery2 will begin to startup XpressRecovery2..... B. Boot from CD/DVD: Press any key to store the backup image file...Select BACKUP to enter Xpress Recovery2 later, simply press during the POST (Figure 9). Accessing Xpress Recovery2 1. Boot from the motherboard driver disk to check disk allocation. When finished, go to Disk Management to access Xpress Recovery2 for the first time, Xpress Recovery2 ...

Manual
Page 71
...Update New BIOS. Do not use the C.O.M. (Corporate Online Management) function when using @BIOS. 4. Installing and Using @BIOS: Use the motherboard driver disk included with the @BIOS Utility A. C. B. Save the Current BIOS File In the main dialog box of @BIOS, Save Current BIOS ... the Internet connection (for example, avoid a power loss or switching off the Internet). Before You Begin: 1. Options and Instructions: 1. GIGABYTE product warranty does not cover any BIOS damage or system failure resulting from an inadequate BIOS flashing. 4-2-2 Updating the BIOS with the motherboard ...
...Update New BIOS. Do not use the C.O.M. (Corporate Online Management) function when using @BIOS. 4. Installing and Using @BIOS: Use the motherboard driver disk included with the @BIOS Utility A. C. B. Save the Current BIOS File In the main dialog box of @BIOS, Save Current BIOS ... the Internet connection (for example, avoid a power loss or switching off the Internet). Before You Begin: 1. Options and Instructions: 1. GIGABYTE product warranty does not cover any BIOS damage or system failure resulting from an inadequate BIOS flashing. 4-2-2 Updating the BIOS with the motherboard ...

Manual
Page 77
..., it is set to AHCI or RAID mode. (Note 3) Due to create RAID array on the motherboard. Appendix Install the SATA RAID/AHCI driver and operating system. (Note 2) Before you begin Please prepare: • At least two SATA hard drives (to create RAID, you use two...on your motherboard, refer to "Chapter 1," "Hardware Installation," to identify the SATA controller for the SATA port. (For example, on the GA-EP35-DS4 motherboard, the SATAII0, SATAII1, SATAII2, SATAII3, SATAII4 and SATAII5 ports are supported by ICH9R Southbridge.) Then connect the power connector from your computer.
..., it is set to AHCI or RAID mode. (Note 3) Due to create RAID array on the motherboard. Appendix Install the SATA RAID/AHCI driver and operating system. (Note 2) Before you begin Please prepare: • At least two SATA hard drives (to create RAID, you use two...on your motherboard, refer to "Chapter 1," "Hardware Installation," to identify the SATA controller for the SATA port. (For example, on the GA-EP35-DS4 motherboard, the SATAII0, SATAII1, SATAII2, SATAII3, SATAII4 and SATAII5 ports are supported by ICH9R Southbridge.) Then connect the power connector from your computer.

Manual
Page 81
... create this volume, press to confirm or to cancel (Figure 6). Finally press on the Create Volume item to create the SATA RAID/AHCI driver diskette and the installation of the SATA RAID/ACHI driver and operating system. - 81 - When prompted to confirm whether to create this volume? (Y/N) : Press ENTER to Non-RAID 4.
... create this volume, press to confirm or to cancel (Figure 6). Finally press on the Create Volume item to create the SATA RAID/AHCI driver diskette and the installation of the SATA RAID/ACHI driver and operating system. - 81 - When prompted to confirm whether to create this volume? (Y/N) : Press ENTER to Non-RAID 4.

Manual
Page 88
Press the space bar on the array to create the SATA RAID/AHCI driver diskette and the installation of the SATA RAID/AHCI driver and operating system. ARE YOU SURE TO DELETE (Y/N)? 7. PCIE-to-SATAII/IDE RAID Controller BIOSv1.06.59 [ Main Menu ] [ Hard Disk ... RAID Level Capacity Status 0-Stripe 240 GB Normal Members(HDDx) 01 [KL]-Select RAID [SPACE]-Mark Delete [DEL]-Confirm Figure 11 GA-EP35-DS4 Motherboard - 88 - [ESC]-Abort GIGABYTE Technology Corp. Delete the RAID Array: To delete the array, select Delete RAID Disk Drive in the main screen to save your ...
Press the space bar on the array to create the SATA RAID/AHCI driver diskette and the installation of the SATA RAID/AHCI driver and operating system. ARE YOU SURE TO DELETE (Y/N)? 7. PCIE-to-SATAII/IDE RAID Controller BIOSv1.06.59 [ Main Menu ] [ Hard Disk ... RAID Level Capacity Status 0-Stripe 240 GB Normal Members(HDDx) 01 [KL]-Select RAID [SPACE]-Mark Delete [DEL]-Confirm Figure 11 GA-EP35-DS4 Motherboard - 88 - [ESC]-Abort GIGABYTE Technology Corp. Delete the RAID Array: To delete the array, select Delete RAID Disk Drive in the main screen to save your ...

Manual
Page 89
... 32-bit operating system or 8) Intel Matrix Storage Manager 64 bit for Windows 64-bit. • For GIGABYTE SATA2 SATA controller, select E) GIGABYTE SATA-RAID Driver 32Bit for Windows 32-bit operating system or F) GIGABYTE SATA-RAID Driver 64Bit for Windows 64-bit. Boot from the menu. Once at the A:\> prompt, change to your system...
... 32-bit operating system or 8) Intel Matrix Storage Manager 64 bit for Windows 64-bit. • For GIGABYTE SATA2 SATA controller, select E) GIGABYTE SATA-RAID Driver 32Bit for Windows 32-bit operating system or F) GIGABYTE SATA-RAID Driver 64Bit for Windows 64-bit. Boot from the menu. Once at the A:\> prompt, change to your system...

Manual
Page 90
...press ENTER. Windows Setup Press F6 if you do not have chosen to install a third party SCSI or RAID driver. S=Specify Additional Device ENTER=Continue F3=Exit Figure 2 GA-EP35-DS4 Motherboard - 90 - A. The following mass storage devices(s) * To specify additional SCSI adapters, CD-ROM drives,... the type of Windows XP and Vista installation. 5-1-4 Installing the SATA RAID/AHCI Driver and Operating System Now that below appears, insert the floppy disk containing the SATA RAID/AHCI driver and press (Figure 2). Installing Windows XP Step 1: Restart your system to boot ...
...press ENTER. Windows Setup Press F6 if you do not have chosen to install a third party SCSI or RAID driver. S=Specify Additional Device ENTER=Continue F3=Exit Figure 2 GA-EP35-DS4 Motherboard - 90 - A. The following mass storage devices(s) * To specify additional SCSI adapters, CD-ROM drives,... the type of Windows XP and Vista installation. 5-1-4 Installing the SATA RAID/AHCI Driver and Operating System Now that below appears, insert the floppy disk containing the SATA RAID/AHCI driver and press (Figure 2). Installing Windows XP Step 1: Restart your system to boot ...

Manual
Page 91
...you do not have chosen to configure a SCSI Adapter for use with Windows, press ENTER. When the screen as shown below will appear. The driver installation will load support for the following list, or press ESC to return to specify additional mass storage devices for use with Windows, using a ... below appears, press to select one or some file(s) cannot be found, please check the floppy disk or copy the correct SATA RAID/AHCI driver again from the floppy disk. Step 3: For Intel ICH9R SATA controllers: When Setup correctly recognizes the Intel ICH9R SATA RAID/AHCI...
...you do not have chosen to configure a SCSI Adapter for use with Windows, press ENTER. When the screen as shown below will appear. The driver installation will load support for the following list, or press ESC to return to specify additional mass storage devices for use with Windows, using a ... below appears, press to select one or some file(s) cannot be found, please check the floppy disk or copy the correct SATA RAID/AHCI driver again from the floppy disk. Step 3: For Intel ICH9R SATA controllers: When Setup correctly recognizes the Intel ICH9R SATA RAID/AHCI...


