
Manual
Page 3
..., translated, transmitted, or published in the use of this manual are legally registered to their respective owners. Example: Documentation Classifications In order to the specifications and features in this : "REV: X.X." No part of GIGABYTE. Changes to assist in any form or by GIGABYTE without GIGABYTE's prior written permission. Copyright © 2011 GIGA-BYTE TECHNOLOGY...
..., translated, transmitted, or published in the use of this manual are legally registered to their respective owners. Example: Documentation Classifications In order to the specifications and features in this : "REV: X.X." No part of GIGABYTE. Changes to assist in any form or by GIGABYTE without GIGABYTE's prior written permission. Copyright © 2011 GIGA-BYTE TECHNOLOGY...
Manual
Page 5
Chapter 3 Drivers Installation 57 3-1 Installing Chipset Drivers 57 3-2 Application Software 58 3-3 Technical Manuals 58 3-4 Contact...59 3-5 System...59 3-6 Download Center 60 3-7 New Utilities...60 Chapter 4 Unique Features 61 4-1 Xpress Recovery2 61 4-2 BIOS Update Utilities 64 4-2-1 Updating the BIOS ...
Chapter 3 Drivers Installation 57 3-1 Installing Chipset Drivers 57 3-2 Application Software 58 3-3 Technical Manuals 58 3-4 Contact...59 3-5 System...59 3-6 Download Center 60 3-7 New Utilities...60 Chapter 4 Unique Features 61 4-1 Xpress Recovery2 61 4-2 BIOS Update Utilities 64 4-2-1 Updating the BIOS ...
Manual
Page 6
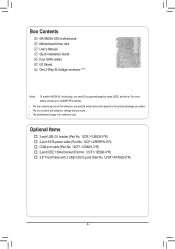
Box Contents GA-990XA-UD3 motherboard Motherboard driver disk User's Manual Quick Installation Guide Four SATA cables I/O Shield One 2-Way SLI bridge connector (Note) (Note) To enable NVIDIA SLI technology, you obtain. The box contents are ... 12CF1-1CM001-3*R) 2-port IEEE 1394a bracket (Part No. 12CF1-1IE008-0*R) 3.5" Front Panel with 2 USB 3.0/2.0 ports (Part No. 12CR1-FPX582-0*R) - 6 - For more details, please go to GIGABYTE's website. • The box contents above are subject to change without notice. • The motherboard image is for reference only and the actual items shall...
Box Contents GA-990XA-UD3 motherboard Motherboard driver disk User's Manual Quick Installation Guide Four SATA cables I/O Shield One 2-Way SLI bridge connector (Note) (Note) To enable NVIDIA SLI technology, you obtain. The box contents are ... 12CF1-1CM001-3*R) 2-port IEEE 1394a bracket (Part No. 12CF1-1IE008-0*R) 3.5" Front Panel with 2 USB 3.0/2.0 ports (Part No. 12CR1-FPX582-0*R) - 6 - For more details, please go to GIGABYTE's website. • The box contents above are subject to change without notice. • The motherboard image is for reference only and the actual items shall...

Manual
Page 9
... voltage standard. • Before using the product, please verify that all cables and power connectors of your dealer. Prior to installation, carefully read the user's manual and follow these procedures: • Prior to installation, do not allow screws to come in a high-temperature environment. • Turning on the power, make sure...
... voltage standard. • Before using the product, please verify that all cables and power connectors of your dealer. Prior to installation, carefully read the user's manual and follow these procedures: • Prior to installation, do not allow screws to come in a high-temperature environment. • Turning on the power, make sure...

Manual
Page 15
... to hook it to correctly install the CPU cooler on the CPU. (The following procedure uses the GIGABYTE cooler as the picture above shows) to lock into place. (Refer to your CPU cooler installation manual for instructions on installing the cooler.) Step 5: Finally, attach the power connector of the CPU cooler to...
... to hook it to correctly install the CPU cooler on the CPU. (The following procedure uses the GIGABYTE cooler as the picture above shows) to lock into place. (Refer to your CPU cooler installation manual for instructions on installing the cooler.) Step 5: Finally, attach the power connector of the CPU cooler to...
Manual
Page 18
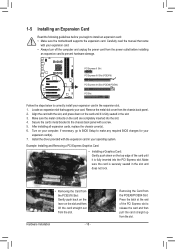
.... 5. Make sure the metal contacts on the top edge of the PCI Express slot to the chassis back panel with your card. Carefully read the manual that supports your expansion card. • Always turn off the computer and unplug the power cord from the slot. Secure the card's metal bracket to...
.... 5. Make sure the metal contacts on the top edge of the PCI Express slot to the chassis back panel with your card. Carefully read the manual that supports your expansion card. • Always turn off the computer and unplug the power cord from the slot. Secure the card's metal bracket to...

Manual
Page 19
... version. C. Configuring the Graphics Card Driver To Enable CrossFireX Function: After installing the graphics card driver in the operating system, go to the manual of the two cards. Refer to Performance\AMD CrossFireX Configurations and ensure the Enable CrossFireX™ check box is recommended (Refer to the Catalyst...enabling CrossFireX technology may be needed or not depending on the PCIEX16 slot. Hardware Installation CrossFireX bridge connector(s) (Note) - Browse to the manual that came with two PCI Express x16 slots and correct driver - System Requirements -
... version. C. Configuring the Graphics Card Driver To Enable CrossFireX Function: After installing the graphics card driver in the operating system, go to the manual of the two cards. Refer to Performance\AMD CrossFireX Configurations and ensure the Enable CrossFireX™ check box is recommended (Refer to the Catalyst...enabling CrossFireX technology may be needed or not depending on the PCIEX16 slot. Hardware Installation CrossFireX bridge connector(s) (Note) - Browse to the manual that came with two PCI Express x16 slots and correct driver - System Requirements -
Manual
Page 26
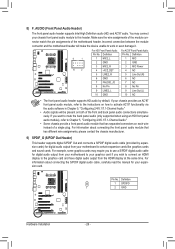
... 2/4/5.1/7.1-Channel Audio." • Audio signals will make the device unable to this header. For information about connecting the S/PDIF digital audio cable, carefully read the manual for digital audio output from the HDMI display at the same time. For HD Front Panel Audio: For AC'97 Front Panel Audio: Pin No...
... 2/4/5.1/7.1-Channel Audio." • Audio signals will make the device unable to this header. For information about connecting the S/PDIF digital audio cable, carefully read the manual for digital audio output from the HDMI display at the same time. For HD Front Panel Audio: For AC'97 Front Panel Audio: Pin No...
Manual
Page 30
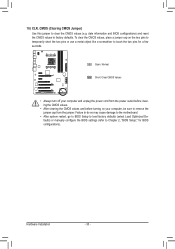
... so may cause damage to the motherboard. •• After system restart, go to BIOS Setup to load factory defaults (select Load Optimized Defaults) or manually configure the BIOS settings (refer to remove the jumper cap from the power outlet before clearing the CMOS values. •• After clearing the CMOS...
... so may cause damage to the motherboard. •• After system restart, go to BIOS Setup to load factory defaults (select Load Optimized Defaults) or manually configure the BIOS settings (refer to remove the jumper cap from the power outlet before clearing the CMOS values. •• After clearing the CMOS...
Manual
Page 36
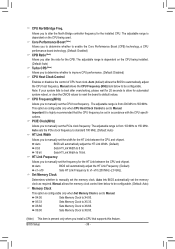
...Auto) Turbo CPB (Note) Allows you install a CPU that the CPU frequency be configurable. The adjustable range is from 100 MHz to 150 MHz. Manual allows the CPU Frequency (MHz) item below to 500 MHz. BIOS Setup - 36 - Important It is dependent on the CPU being used. Auto ... X4.00. PCIE Clock(MHz) Allows you to allow for the CPB. HT Link Frequency Allows you to manually set to Manual. Auto lets BIOS automatically set to Manual. Manual allows the memory clock control item below to alter the North Bridge controller frequency for the HT Link between the...
...Auto) Turbo CPB (Note) Allows you install a CPU that the CPU frequency be configurable. The adjustable range is from 100 MHz to 150 MHz. Manual allows the CPU Frequency (MHz) item below to 500 MHz. BIOS Setup - 36 - Important It is dependent on the CPU being used. Auto ... X4.00. PCIE Clock(MHz) Allows you to allow for the CPB. HT Link Frequency Allows you to manually set to Manual. Auto lets BIOS automatically set to Manual. Manual allows the memory clock control item below to alter the North Bridge controller frequency for the HT Link between the...
Manual
Page 37
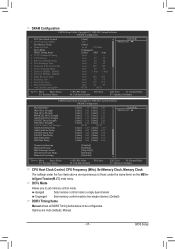
... control mode to be configurable. Options are synchronous to those under the four items above are : Auto (default), Manual. - 37 - Unganged Sets memory control mode to two single-channel. (Default) DDR3 Timing Items Manual allows all DDR3 Timing items below to single dual-channel. DCTs Mode Allows you to RAS Delay **DCTs...
... control mode to be configurable. Options are synchronous to those under the four items above are : Auto (default), Manual. - 37 - Unganged Sets memory control mode to two single-channel. (Default) DDR3 Timing Items Manual allows all DDR3 Timing items below to single dual-channel. DCTs Mode Allows you to RAS Delay **DCTs...

Manual
Page 39
... the system voltages. **DCTs Addr/Cmd Timing** Addr/Cmd Setup Time Options are : Auto (default), 1/2T, 2T. Enabled allows the system to manually set the CPU PLL voltage. Note: Increasing CPU voltage may result in CPU C3 or Alt VID mode. (Default: Disabled) ******** System Voltage Optimized...2T. CKE Fine Delay Options are : Auto (default), 0/64~31/64. Addr/Cmd Fine Delay Options are : Auto (default), 0/64~31/64. Manual allows all voltage control items below to be configurable. (Default: Auto) CPU PLL Voltage Control Allows you to increase memory performance and stability. (Default: Enabled...
... the system voltages. **DCTs Addr/Cmd Timing** Addr/Cmd Setup Time Options are : Auto (default), 1/2T, 2T. Enabled allows the system to manually set the CPU PLL voltage. Note: Increasing CPU voltage may result in CPU C3 or Alt VID mode. (Default: Disabled) ******** System Voltage Optimized...2T. CKE Fine Delay Options are : Auto (default), 0/64~31/64. Addr/Cmd Fine Delay Options are : Auto (default), 0/64~31/64. Manual allows all voltage control items below to be configurable. (Default: Auto) CPU PLL Voltage Control Allows you to increase memory performance and stability. (Default: Enabled...

Manual
Page 43
... Disables this feature. - 43 - If not, the BIOS will automatically enable the hardware C1E function. Auto Lets the BIOS to manually enable/disable CPU Core 1/2/3/4/5. Capability Away Mode Full Screen LOGO Show IOMMU support Init Display First [Auto] [Disabled] [Auto] [...Hard Disk Boot Priority EFI CD/DVD Boot Option First Boot Device Second Boot Device Third Boot Device Password Check HDD S.M.A.R.T. Manual Allows you to determine whether to enable all CPU cores (number of cores available depends on the CPU being used). When...
... Disables this feature. - 43 - If not, the BIOS will automatically enable the hardware C1E function. Auto Lets the BIOS to manually enable/disable CPU Core 1/2/3/4/5. Capability Away Mode Full Screen LOGO Show IOMMU support Init Display First [Auto] [Disabled] [Auto] [...Hard Disk Boot Priority EFI CD/DVD Boot Option First Boot Device Second Boot Device Third Boot Device Password Check HDD S.M.A.R.T. Manual Allows you to determine whether to enable all CPU cores (number of cores available depends on the CPU being used). When...

Manual
Page 57
... 57 - Drivers Installation The driver Autorun screen is installing the drivers. Or click Install Single Items to manually select the drivers you want to manually select the utilities to do so may affect the driver installation. • Some device drivers will restart ...Drivers After inserting the driver disk, "Xpress Install" will appear asking whether to automatically install the utilities. Click Yes to install new GIGABYTE utilities. Chapter 3 Drivers Installation • Before installing the drivers, first install the operating system. • After installing the operating...
... 57 - Drivers Installation The driver Autorun screen is installing the drivers. Or click Install Single Items to manually select the drivers you want to manually select the utilities to do so may affect the driver installation. • Some device drivers will restart ...Drivers After inserting the driver disk, "Xpress Install" will appear asking whether to automatically install the utilities. Click Yes to install new GIGABYTE utilities. Chapter 3 Drivers Installation • Before installing the drivers, first install the operating system. • After installing the operating...

Manual
Page 58
Drivers Installation - 58 - You can click the Install button on the right of an item to install it. 3-3 Technical Manuals This page provides GIGABYTE's application guides, content descriptions for this driver disk, and the motherboard manuals. 3-2 Application Software This page displays all the utilities and applications that GIGABYTE develops and some free software.
Drivers Installation - 58 - You can click the Install button on the right of an item to install it. 3-3 Technical Manuals This page provides GIGABYTE's application guides, content descriptions for this driver disk, and the motherboard manuals. 3-2 Application Software This page displays all the utilities and applications that GIGABYTE develops and some free software.
Manual
Page 64
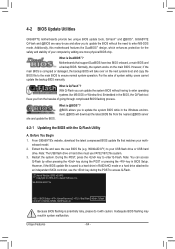
...use the key during the POST or pressing the key in BIOS Setup. From GIGABYTE's website, download the latest compressed BIOS update file that support DualBIOS have two...You Begin 1. However, if the BIOS update file is potentially risky, please do it with the Q-Flash Utility A. GA-990XA-UD3 F1a . . . . : BIOS Setup : XpressRecovery2 : Boot Menu : Qflash 04/22/2011-RD990-SB950-7A66FG02C...download the latest BIOS file from the hassles of system safety, users cannot update the backup BIOS manually. Restart the system. Note: The USB flash drive or hard drive must use FAT32/16/...
...use the key during the POST or pressing the key in BIOS Setup. From GIGABYTE's website, download the latest compressed BIOS update file that support DualBIOS have two...You Begin 1. However, if the BIOS update file is potentially risky, please do it with the Q-Flash Utility A. GA-990XA-UD3 F1a . . . . : BIOS Setup : XpressRecovery2 : Boot Menu : Qflash 04/22/2011-RD990-SB950-7A66FG02C...download the latest BIOS file from the hassles of system safety, users cannot update the backup BIOS manually. Restart the system. Note: The USB flash drive or hard drive must use FAT32/16/...

Manual
Page 67
... the BIOS with an incorrect BIOS file could cause your motherboard is not present on the @BIOS server site, please manually download the BIOS update file from GIGABYTE's website and follow the instructions in a corrupted BIOS or a system that is stable and do NOT interrupt the Internet...to start. 3. During the BIOS update process, ensure the Internet connection is unable to boot. - 67 - B. C. Do not use the G.O.M. (GIGABYTE Online Management) function when using @BIOS. 4. If the BIOS update file for example, avoid a power loss or switching off the Internet). Follow the on...
... the BIOS with an incorrect BIOS file could cause your motherboard is not present on the @BIOS server site, please manually download the BIOS update file from GIGABYTE's website and follow the instructions in a corrupted BIOS or a system that is stable and do NOT interrupt the Internet...to start. 3. During the BIOS update process, ensure the Internet connection is unable to boot. - 67 - B. C. Do not use the G.O.M. (GIGABYTE Online Management) function when using @BIOS. 4. If the BIOS update file for example, avoid a power loss or switching off the Internet). Follow the on...
Manual
Page 78
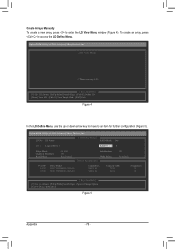
... Devices, Inc. LD No LD Name LD 1 Logical Drive 1 [ LD Define Menu ] RAID Mode Drv RAID 0 0 Stripe Block Gigabyte Boundary Read Policy 64 KB ON Read Ahead Initialization ON Write Policy WriteBack [ Drives Assignments ] Port:ID 01:00 02:00 Drive Model WDC... [[KKeeyyssAAvvaailialabblele]] [h] Up [i] Down [PaUp/PaDn] Switch Page [Space] Change Option [Ctrl+Y] Save [ESC] Exit Figure 5 Appendix - 78 - Create Arrays Manually To create a new array, press to access the LD Define Menu. Option ROM Utility (c) 2011 Advanced Micro Devices, Inc. [ LD View Menu ] < There...
... Devices, Inc. LD No LD Name LD 1 Logical Drive 1 [ LD Define Menu ] RAID Mode Drv RAID 0 0 Stripe Block Gigabyte Boundary Read Policy 64 KB ON Read Ahead Initialization ON Write Policy WriteBack [ Drives Assignments ] Port:ID 01:00 02:00 Drive Model WDC... [[KKeeyyssAAvvaailialabblele]] [h] Up [i] Down [PaUp/PaDn] Switch Page [Space] Change Option [Ctrl+Y] Save [ESC] Exit Figure 5 Appendix - 78 - Create Arrays Manually To create a new array, press to access the LD Define Menu. Option ROM Utility (c) 2011 Advanced Micro Devices, Inc. [ LD View Menu ] < There...
Manual
Page 85
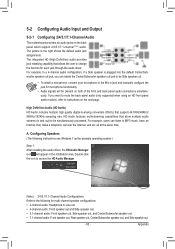
... Manager icon will be Side speaker out. • To install a microphone, connect your microphone to instructions on the next page. For example, in jack and manually configure the jack for microphone functionality. • Audio signals will appear in and out) to be simultaneously processed. woofer speaker out jack, you want to...
... Manager icon will be Side speaker out. • To install a microphone, connect your microphone to instructions on the next page. For example, in jack and manually configure the jack for microphone functionality. • Audio signals will appear in and out) to be simultaneously processed. woofer speaker out jack, you want to...


