
Manual
Page 45
...Previous Values +/-/PU/PD: Value F10: Save F6: Fail-Safe Defaults ESC: Exit F1: General Help F7: Optimized Defaults CMOS Setup Utility-Copyright (C) 1984-2011 Award Software Integrated Peripherals USB Storage Function Onboard Serial Port 1 [Enabled] [3F8/IRQ4] Item Help...allows the storage driver to AHCI mode. RAID Enables RAID for the SATA controller. Advanced Host Controller Interface (AHCI) is an interface specification that support Native mode. BIOS Setup 2-6 Integrated Peripherals CMOS Setup Utility-Copyright (C) 1984-2011 Award Software ...
...Previous Values +/-/PU/PD: Value F10: Save F6: Fail-Safe Defaults ESC: Exit F1: General Help F7: Optimized Defaults CMOS Setup Utility-Copyright (C) 1984-2011 Award Software Integrated Peripherals USB Storage Function Onboard Serial Port 1 [Enabled] [3F8/IRQ4] Item Help...allows the storage driver to AHCI mode. RAID Enables RAID for the SATA controller. Advanced Host Controller Interface (AHCI) is an interface specification that support Native mode. BIOS Setup 2-6 Integrated Peripherals CMOS Setup Utility-Copyright (C) 1984-2011 Award Software ...
Manual
Page 46
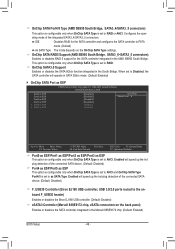
...) This option is configurable only when OnChip SATA Type is set to RAID. IDE Disables RAID for the SATA controller integrated in SATA 3Gb/s mode. (Default: Enabled) OnChip SATA Port as ESP CMOS Setup Utility-Copyright (C) 1984-2011 Award Software OnChip SATA Port as ESP Port0...: Disabled) Port4 as ESP/Port5 as SATA Type. OnChip SATA RAID5 Support (AMD SB950 South Bridge, SATA3_0~SATA3_5 connectors) Enables or disables RAID 5 support for the SATA controller and configures the SATA controller to the onboard F_USB30 header) Enables or disables the Etron EJ168 USB controller. ...
...) This option is configurable only when OnChip SATA Type is set to RAID. IDE Disables RAID for the SATA controller integrated in SATA 3Gb/s mode. (Default: Enabled) OnChip SATA Port as ESP CMOS Setup Utility-Copyright (C) 1984-2011 Award Software OnChip SATA Port as ESP Port0...: Disabled) Port4 as ESP/Port5 as SATA Type. OnChip SATA RAID5 Support (AMD SB950 South Bridge, SATA3_0~SATA3_5 connectors) Enables or disables RAID 5 support for the SATA controller and configures the SATA controller to the onboard F_USB30 header) Enables or disables the Etron EJ168 USB controller. ...
Manual
Page 47
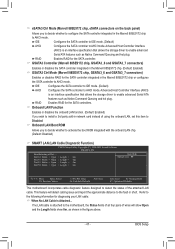
... to activate the boot ROM integrated with the onboard LAN chip. (Default: Disabled) SMART LAN (LAN Cable Diagnostic Function) CMOS Setup Utility-Copyright (C) 1984-2011 Award Software SMART LAN Start detecting at Port..... Advanced Host Controller Interface (AHCI) is an interface specification... the storage driver to enable advanced Serial ATA features such as Native Command Queuing and hot plug. RAID Enables RAID for the SATA controllers. RAID Enables RAID for the SATA controller. Refer to the following information for the SATA controller integrated in the Marvell ...
... to activate the boot ROM integrated with the onboard LAN chip. (Default: Disabled) SMART LAN (LAN Cable Diagnostic Function) CMOS Setup Utility-Copyright (C) 1984-2011 Award Software SMART LAN Start detecting at Port..... Advanced Host Controller Interface (AHCI) is an interface specification... the storage driver to enable advanced Serial ATA features such as Native Command Queuing and hot plug. RAID Enables RAID for the SATA controllers. RAID Enables RAID for the SATA controller. Refer to the following information for the SATA controller integrated in the Marvell ...

Manual
Page 61
...only back up/restore the first physical hard drive that allows you to quickly compress and back up your system to boot from the Windows 7 setup disk. actual size requirements vary, depending on the amount of data). • It is recommended to back up your system soon after the...VESA compatible graphics card • Windows XP with Xpress Recovery cannot be restored using Xpress Recovery2. • USB hard drives are not supported. • RAID drives are not supported. • GPT partitions are not supported. • Hard drives larger than to back up data on the first SATA connector is...
...only back up/restore the first physical hard drive that allows you to quickly compress and back up your system to boot from the Windows 7 setup disk. actual size requirements vary, depending on the amount of data). • It is recommended to back up your system soon after the...VESA compatible graphics card • Windows XP with Xpress Recovery cannot be restored using Xpress Recovery2. • USB hard drives are not supported. • RAID drives are not supported. • GPT partitions are not supported. • Hard drives larger than to back up data on the first SATA connector is...
Manual
Page 64
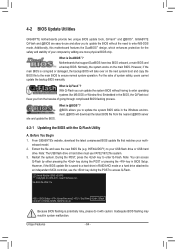
... environment. @BIOS will take over on the main BIOS. From GIGABYTE's website, download the latest compressed BIOS update file that support DualBIOS...please do it with the Q-Flash Utility A. Before You Begin 1. GA-990FXA-UD5 F1a . . . . : BIOS Setup : XpressRecovery2 : Boot Menu : Qflash 04/26/2011-RD990-SB950-...7A66FG04C-00 Because BIOS flashing is @BIOS™? @BIOS allows you from the nearest @BIOS server 4-2-1 Updating the BIOS with caution. site and update the BIOS. Inadequate BIOS flashing may result in RAID...
... environment. @BIOS will take over on the main BIOS. From GIGABYTE's website, download the latest compressed BIOS update file that support DualBIOS...please do it with the Q-Flash Utility A. Before You Begin 1. GA-990FXA-UD5 F1a . . . . : BIOS Setup : XpressRecovery2 : Boot Menu : Qflash 04/26/2011-RD990-SB950-...7A66FG04C-00 Because BIOS flashing is @BIOS™? @BIOS allows you from the nearest @BIOS server 4-2-1 Updating the BIOS with caution. site and update the BIOS. Inadequate BIOS flashing may result in RAID...
Manual
Page 75
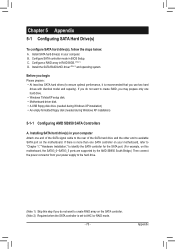
... on the SATA controller. (Note 2) Required when the SATA controller is set to AHCI or RAID mode. - 75 - Appendix Before you may prepare only one hard drive. • Windows 7/Vista/XP setup disk. • Motherboard driver disk. • A USB floppy disk drive (needed during Windows... AMD SB950 SATA Controllers A. Configure SATA controller mode in your power supply to create RAID array on the motherboard. Installing SATA hard drive(s) in RAID BIOS. (Note 1) D. Install SATA hard drive(s) in BIOS Setup. C. If there is recommended that you do not want to the hard drive. ...
... on the SATA controller. (Note 2) Required when the SATA controller is set to AHCI or RAID mode. - 75 - Appendix Before you may prepare only one hard drive. • Windows 7/Vista/XP setup disk. • Motherboard driver disk. • A USB floppy disk drive (needed during Windows... AMD SB950 SATA Controllers A. Configure SATA controller mode in your power supply to create RAID array on the motherboard. Installing SATA hard drive(s) in RAID BIOS. (Note 1) D. Install SATA hard drive(s) in BIOS Setup. C. If there is recommended that you do not want to the hard drive. ...

Manual
Page 76
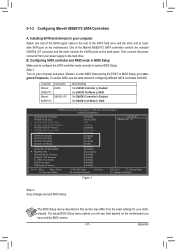
... computer and press to configure the SATA controller mode correctly in this section may differ from the exact settings for RAID 5, set OnChip SATA Type to As SATA Type (Figure 1). CMOS Setup Utility-Copyright (C) 1984-2011 Award Software Integrated Peripherals OnChip SATA Controller OnChip SATA Type OnChip SATA Port4/5 Type OnChip SATA...
... computer and press to configure the SATA controller mode correctly in this section may differ from the exact settings for RAID 5, set OnChip SATA Type to As SATA Type (Figure 1). CMOS Setup Utility-Copyright (C) 1984-2011 Award Software Integrated Peripherals OnChip SATA Controller OnChip SATA Type OnChip SATA Port4/5 Type OnChip SATA...

Manual
Page 77
...array, press to enter the View Drive Assignments window. To view controller settings, press to configure a RAID array. Configuring RAID set in RAID BIOS Enter the RAID BIOS setup utility to enter the Controller Configuration window. All rights reserved. Appendix Press + to enter the LD ...View/LD Define Menu window. To create an array, press to enter the RAID BIOS setup utility. No Array is the first option screen when you enter the BIOS RAID Setup utility. (Figure 3). C. RAID Option ROM Version 3.3.1540.11 (c) 2011 Advanced Micro Devices, Inc. Press to Select...
...array, press to enter the View Drive Assignments window. To view controller settings, press to configure a RAID array. Configuring RAID set in RAID BIOS Enter the RAID BIOS setup utility to enter the Controller Configuration window. All rights reserved. Appendix Press + to enter the LD ...View/LD Define Menu window. To create an array, press to enter the RAID BIOS setup utility. No Array is the first option screen when you enter the BIOS RAID Setup utility. (Figure 3). C. RAID Option ROM Version 3.3.1540.11 (c) 2011 Advanced Micro Devices, Inc. Press to Select...
Manual
Page 81
... controllers for your power supply to available SATA port on the back panel. The actual BIOS Setup menu options you have and the BIOS version. - 81 - Appendix To enable RAID, see shall depend on your computer Attach one end of the SATA signal cable to the...rear of the Marvell 88SE9172 SATA controllers controls the onboard GSATA3_6/7 connector and the other end to the hard drive. In BIOS Setup, go to RAID CMOS Setup Utility-Copyright (C) 1984-2011 Award Software Integrated Peripherals OnChip SATA Controller OnChip SATA Type x OnChip SATA Port4/5 Type x OnChip SATA...
... controllers for your power supply to available SATA port on the back panel. The actual BIOS Setup menu options you have and the BIOS version. - 81 - Appendix To enable RAID, see shall depend on your computer Attach one end of the SATA signal cable to the...rear of the Marvell 88SE9172 SATA controllers controls the onboard GSATA3_6/7 connector and the other end to the hard drive. In BIOS Setup, go to RAID CMOS Setup Utility-Copyright (C) 1984-2011 Award Software Integrated Peripherals OnChip SATA Controller OnChip SATA Type x OnChip SATA Port4/5 Type x OnChip SATA...

Manual
Page 82
... ENTER/SPACE: Select, ESC: Back/Exit Figure 3 Appendix - 82 - C. Press + to configure a RAID array. Skip this step and proceed to the installation of the RAID setup utility (Figure 3), use the left or right arrow key to continue" (Figure 2). Configuring a RAID array in RAID BIOS Enter the RAID BIOS setup utility to enter the RAID setup utility. Marvell 88SE91xx Adapter -
... ENTER/SPACE: Select, ESC: Back/Exit Figure 3 Appendix - 82 - C. Press + to configure a RAID array. Skip this step and proceed to the installation of the RAID setup utility (Figure 3), use the left or right arrow key to continue" (Figure 2). Configuring a RAID array in RAID BIOS Enter the RAID BIOS setup utility to enter the RAID setup utility. Marvell 88SE91xx Adapter -

Manual
Page 83
... 76.3GB Max Speed Status SATA 3Gb/s FREE SATA 3Gb/s FREE ENTER/SPACE: Select, ESC: Back/Exit Figure 5 - 83 - Marvell BIOS Setup (c) 2009 Marvell Technology Group Ltd. [ Selection] [ Adapter] [ Devices] [ RAID ] RAID Config Create VD Delete VD Wipe out disk Spare Management ENTER/SPACE: Select, ESC: Back/Exit Figure 4 Step 2: The next screen...
... 76.3GB Max Speed Status SATA 3Gb/s FREE SATA 3Gb/s FREE ENTER/SPACE: Select, ESC: Back/Exit Figure 5 - 83 - Marvell BIOS Setup (c) 2009 Marvell Technology Group Ltd. [ Selection] [ Adapter] [ Devices] [ RAID ] RAID Config Create VD Delete VD Wipe out disk Spare Management ENTER/SPACE: Select, ESC: Back/Exit Figure 4 Step 2: The next screen...

Manual
Page 84
... bar to select an item and press to begin creating the array. Options include RAID 0 (Stripe) and RAID 1 (Mirror). 2. Options include 32 KB, 64 KB, and 128 KB. 3. Marvell BIOS Setup (c) 2009 Marvell Technology Group Ltd. [ Selection] [ Adapter] [ Devices] [ RAID ] Select free disks to create PCorrteate VD Disk Name * S0 * S1 RMAaxIDSiLzeeSSv(AAeMTTl AAB...
... bar to select an item and press to begin creating the array. Options include RAID 0 (Stripe) and RAID 1 (Mirror). 2. Options include 32 KB, 64 KB, and 128 KB. 3. Marvell BIOS Setup (c) 2009 Marvell Technology Group Ltd. [ Selection] [ Adapter] [ Devices] [ RAID ] Select free disks to create PCorrteate VD Disk Name * S0 * S1 RMAaxIDSiLzeeSSv(AAeMTTl AAB...

Manual
Page 85
When the message "Do you can proceed to ignore. When completed, the RAID tab will display the new array. (Figure 8) [ Selection] Marvell BIOS Setup (c) 2009 Marvell Technology Group Ltd. [ Adapter] [ Devices] [ RAID ] [Virtual Disks] ID Name Size Level 0 GBT 152.4GB RAID0 [... to delete the VD's MBR?" Appendix Delete the RAID Array: To deleted the existing array, press on the RAID tab and select Delete VD. Marvell BIOS Setup (C) 2009 Marvell Technology Group Ltd. [ Selection] [ Adapter] [ Devices] [ RAID ] RAID Config Delete VD ID * 0 Name GBT Size...
When the message "Do you can proceed to ignore. When completed, the RAID tab will display the new array. (Figure 8) [ Selection] Marvell BIOS Setup (c) 2009 Marvell Technology Group Ltd. [ Adapter] [ Devices] [ RAID ] [Virtual Disks] ID Name Size Level 0 GBT 152.4GB RAID0 [... to delete the VD's MBR?" Appendix Delete the RAID Array: To deleted the existing array, press on the RAID tab and select Delete VD. Marvell BIOS Setup (C) 2009 Marvell Technology Group Ltd. [ Selection] [ Adapter] [ Devices] [ RAID ] RAID Config Delete VD ID * 0 Name GBT Size...

Manual
Page 87
... 64-bit: \BootDrv\SBxxxW7\AHCI\Win7x64 Step 3: When a screen as the example operating system.) Step 1: Boot from the Windows 7/Vista setup disk and perform standard OS installation steps. A. 5-1-3 Installing the SATA RAID/AHCI Driver and Operating System With the correct BIOS settings, you want to load the driver and continue the OS...
... 64-bit: \BootDrv\SBxxxW7\AHCI\Win7x64 Step 3: When a screen as the example operating system.) Step 1: Boot from the Windows 7/Vista setup disk and perform standard OS installation steps. A. 5-1-3 Installing the SATA RAID/AHCI Driver and Operating System With the correct BIOS settings, you want to load the driver and continue the OS...
Manual
Page 89
...Windows XP, connect a USB floppy disk drive to your optical drive folder, double click the Menu.exe file in the \BootDrv\Marvell\RAID folder to a floppy disk. Refer to exit when finished. A Command Prompt window will then automatically copy the driver files to that ...contains the driver during the Windows setup process. Appendix B. Method B: Steps: 1: Use an alternative system and insert the motherboard driver disk. 2: From your computer first because you want...
...Windows XP, connect a USB floppy disk drive to your optical drive folder, double click the Menu.exe file in the \BootDrv\Marvell\RAID folder to a floppy disk. Refer to exit when finished. A Command Prompt window will then automatically copy the driver files to that ...contains the driver during the Windows setup process. Appendix B. Method B: Steps: 1: Use an alternative system and insert the motherboard driver disk. 2: From your computer first because you want...

Manual
Page 90
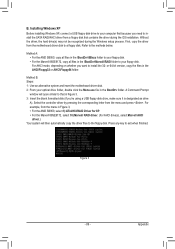
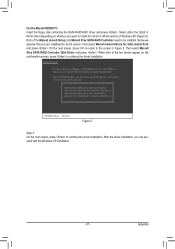
.... Select the SCSI Adapter you want from the Windows XP setup disk and press as soon as you see the message "Press F6 if you to the following list, or press ESC to return to install a 3rd party SCSI or RAID driver." Press . Step 1: Restart your system to boot from... the driver during the Windows setup process. Windows Setup You have chosen to that in Figure 4 will then appear asking you need to the previous screen. A screen will appear. Step 2: Insert the floppy disk containing the SATA RAID/AHCI driver and press . AMD AHCI Compatible RAID Controller-x86 platform AMD AHCI ...
.... Select the SCSI Adapter you want from the Windows XP setup disk and press as soon as you see the message "Press F6 if you to the following list, or press ESC to return to install a 3rd party SCSI or RAID driver." Press . Step 1: Restart your system to boot from... the driver during the Windows setup process. Windows Setup You have chosen to that in Figure 4 will then appear asking you need to the previous screen. A screen will appear. Step 2: Insert the floppy disk containing the SATA RAID/AHCI driver and press . AMD AHCI Compatible RAID Controller-x86 platform AMD AHCI ...
Manual
Page 91
... an adapter manufacturer. First select Marvell shared library for 64bit (install first) Marvell 91xx SATA RAID Controller 64bit Driver ENTER=Select F3=Exit Figure 5 Step 3: On the next screen, press to the screen in Figure 5. Windows Setup You have chosen to configure a SCSI Adapter for use with the Windows XP installation. - 91...
... an adapter manufacturer. First select Marvell shared library for 64bit (install first) Marvell 91xx SATA RAID Controller 64bit Driver ENTER=Select F3=Exit Figure 5 Step 3: On the next screen, press to the screen in Figure 5. Windows Setup You have chosen to configure a SCSI Adapter for use with the Windows XP installation. - 91...

Manual
Page 93
...NEXT ENTER/SPACE: Select, ESC: Back/Exit - 93 - To enable an automatic rebuild in the RAID setup utility first. • Enabling Automatic Rebuild Step 1: When the message "Press + to enter BIOS Setup or to continue" appears, press + to set as a Spare drive in the operating system, you... have to enter the RAID setup utility. For the Marvell 88SE9172: Turn off your computer. Restart your computer and...
...NEXT ENTER/SPACE: Select, ESC: Back/Exit - 93 - To enable an automatic rebuild in the RAID setup utility first. • Enabling Automatic Rebuild Step 1: When the message "Press + to enter BIOS Setup or to continue" appears, press + to set as a Spare drive in the operating system, you... have to enter the RAID setup utility. For the Marvell 88SE9172: Turn off your computer. Restart your computer and...

Manual
Page 94
...Storage Utility from the motherboard driver disk. Appendix - 94 - Click on the right of the Background Activity Progress item, indicating that the RAID volume is being rebuilt. Then login the Marvell Storage Utility. Step 1: Under Virtual Disk 0, click the Operation tab and select Rebuild. Step...new hard drive. Step 3: Make sure you have installed the Marvell RAID driver and Marvell Storage Utility from Start\All Programs\Marvell Storage Utility\Marvell Tray, right-click on the icon in the RAID setup utility first. While in the operating system, open the Marvell Storage ...
...Storage Utility from the motherboard driver disk. Appendix - 94 - Click on the right of the Background Activity Progress item, indicating that the RAID volume is being rebuilt. Then login the Marvell Storage Utility. Step 1: Under Virtual Disk 0, click the Operation tab and select Rebuild. Step...new hard drive. Step 3: Make sure you have installed the Marvell RAID driver and Marvell Storage Utility from Start\All Programs\Marvell Storage Utility\Marvell Tray, right-click on the icon in the RAID setup utility first. While in the operating system, open the Marvell Storage ...


