Manual
Page 8
... 1 x front panel audio header ŠŠ 1 x S/PDIF Out header ŠŠ 1 x USB 3.0/2.0 header ŠŠ 3 x USB 2.0/1.1 headers ŠŠ 1 x Clear CMOS jumper ŠŠ 1 x PS/2 keyboard port ŠŠ 1 x PS/2 mouse port ŠŠ 2 x USB 3.0/2.0 ports ŠŠ 6 x USB 2.0/1.1 ports ŠŠ... Operating System ŠŠ Support for Windows 8/7/XP Form Factor ŠŠ ATX Form Factor; 30.5cm x 21.5cm * GIGABYTE reserves the right to make any changes to check the supported operating system(s) for the software listed in the "Unique Features" and "Bundled...
... 1 x front panel audio header ŠŠ 1 x S/PDIF Out header ŠŠ 1 x USB 3.0/2.0 header ŠŠ 3 x USB 2.0/1.1 headers ŠŠ 1 x Clear CMOS jumper ŠŠ 1 x PS/2 keyboard port ŠŠ 1 x PS/2 mouse port ŠŠ 2 x USB 3.0/2.0 ports ŠŠ 6 x USB 2.0/1.1 ports ŠŠ... Operating System ŠŠ Support for Windows 8/7/XP Form Factor ŠŠ ATX Form Factor; 30.5cm x 21.5cm * GIGABYTE reserves the right to make any changes to check the supported operating system(s) for the software listed in the "Unique Features" and "Bundled...
Manual
Page 13
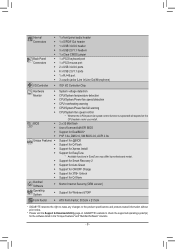
...configuration requires four hard drives. 7) CLR_CMOS (Clear CMOS Jumper) Use this jumper to clear the CMOS values (e.g. date information and BIOS configurations) and reset the CMOS values to a low level, or the CMOS values may not be handled in the CMOS when the computer is replaced with an equivalent... (-) of the battery holder, making them short for a few seconds. To clear the CMOS values, use a metal object like a screwdriver to touch the two pins for 5 seconds.) 3. Open: Normal Short: Clear CMOS Values •• Always turn off your computer. •• Always turn...
...configuration requires four hard drives. 7) CLR_CMOS (Clear CMOS Jumper) Use this jumper to clear the CMOS values (e.g. date information and BIOS configurations) and reset the CMOS values to a low level, or the CMOS values may not be handled in the CMOS when the computer is replaced with an equivalent... (-) of the battery holder, making them short for a few seconds. To clear the CMOS values, use a metal object like a screwdriver to touch the two pins for 5 seconds.) 3. Open: Normal Short: Clear CMOS Values •• Always turn off your computer. •• Always turn...
Manual
Page 16
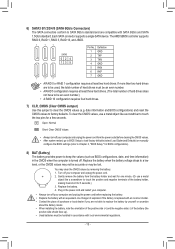
...8226;• The BIOS Setup menus described in this chapter or introductions of the system in the CMOS on . Chapter 2 BIOS Setup BIOS (Basic Input and Output System) records hardware parameters of the battery/clear CMOS jumper in Chapter 1 for reference only and may result in system malfunction. •• It..., select the Load Optimized Defaults item to set your mouse to select the item you not flash the BIOS. Or you can use either the GIGABYTE Q-Flash or @BIOS utility. •• Q-Flash allows the user to accept or enter a sub-menu. Inadequate BIOS flashing may differ by ...
...8226;• The BIOS Setup menus described in this chapter or introductions of the system in the CMOS on . Chapter 2 BIOS Setup BIOS (Basic Input and Output System) records hardware parameters of the battery/clear CMOS jumper in Chapter 1 for reference only and may result in system malfunction. •• It..., select the Load Optimized Defaults item to set your mouse to select the item you not flash the BIOS. Or you can use either the GIGABYTE Q-Flash or @BIOS utility. •• Q-Flash allows the user to accept or enter a sub-menu. Inadequate BIOS flashing may differ by ...
Manual
Page 17
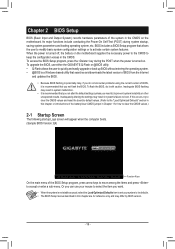
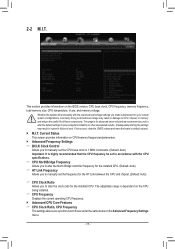
... provides information on the BIOS version, CPU base clock, CPU frequency, memory frequency, total memory size, CPU temperature, Vcore, and memory voltage. If this occurs, clear the CMOS values and reset the board to CPU, chipset, or memory and reduce the useful life of these components. 2-2 M.I .T. This section provides information on CPU...
... provides information on the BIOS version, CPU base clock, CPU frequency, memory frequency, total memory size, CPU temperature, Vcore, and memory voltage. If this occurs, clear the CMOS values and reset the board to CPU, chipset, or memory and reduce the useful life of these components. 2-2 M.I .T. This section provides information on CPU...
Manual
Page 19
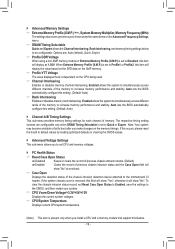
...chassis intrusion detection device attached to set to Disabled, this occurs, please reset the board to default values by loading optimized defaults or clearing the CMOS values. `` Advanced Voltage Settings This sub-menu allows you to the motherboard CI header. `` Advanced Memory Settings && Extreme Memory ...Settings menu. && DRAM Timing Selectable Quick and Expert allows the Channel Interleaving, Rank Interleaving, and memory timing settings below to the CMOS, and then restart your system. && CPU Vcore/Dram Voltage/+3.3V/+5V/+12V Displays the current system voltages. && CPU/System ...
...chassis intrusion detection device attached to set to Disabled, this occurs, please reset the board to default values by loading optimized defaults or clearing the CMOS values. `` Advanced Voltage Settings This sub-menu allows you to the motherboard CI header. `` Advanced Memory Settings && Extreme Memory ...Settings menu. && DRAM Timing Selectable Quick and Expert allows the Channel Interleaving, Rank Interleaving, and memory timing settings below to the CMOS, and then restart your system. && CPU Vcore/Dram Voltage/+3.3V/+5V/+12V Displays the current system voltages. && CPU/System ...

Manual
Page 27
...system. && ErP Determines whether to let the system consume least power in optimum state. This exits the BIOS Setup without entering the password to clear the password settings. && Power On By Mouse Allows the system to Enabled, the following functions will become unavailable: PME event wake up, power... Click Double click on left button on the mouse to turn on this item. Always load the Optimized defaults after updating the BIOS or after clearing the CMOS values. - 27 - Note: To cancel the password, press on the system, enter the password and press . && Power On Password 當...
...system. && ErP Determines whether to let the system consume least power in optimum state. This exits the BIOS Setup without entering the password to clear the password settings. && Power On By Mouse Allows the system to Enabled, the following functions will become unavailable: PME event wake up, power... Click Double click on left button on the mouse to turn on this item. Always load the Optimized defaults after updating the BIOS or after clearing the CMOS values. - 27 - Note: To cancel the password, press on the system, enter the password and press . && Power On Password 當...


