
Manual
Page 7
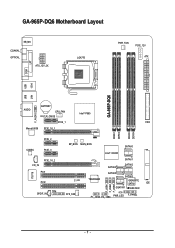
GA-965P-DQ6 Motherboard Layout KB_MS COAXIAL OPTICAL ATX_12V_2X LGA775 PWR_FAN PCIE_12V ATX COM LPT 1394 USB GA-965P-DQ6 LAN USB AUDIO BATTERY CPU_FAN CLR_CMOS Intel® P965 F_AUDIO PCIE_1 FDD Marvell 8056 PCIE_16_1 DDRII1 DDRII2 DDRII3 DDRII4 PCIE_2 CODEC PCIE_3 CD_IN PCIE_16_2 PCI1 IT8718 PCI2 TPM SPDIF_IN BP_BIOS MAIN_BIOS SATAII0 CI SYS_FAN Intel® ICH8R TSB43AB23 SATAII4 SATAII1 SATAII2 SATAII5 SATAII3 GIGABYTE SATA2 IDE GSATAII1 GSATAII0 F_USB1 F_USB2 F_USB3 F1_1394 F2_1394 PWR_LED F_PANEL - 7 -
GA-965P-DQ6 Motherboard Layout KB_MS COAXIAL OPTICAL ATX_12V_2X LGA775 PWR_FAN PCIE_12V ATX COM LPT 1394 USB GA-965P-DQ6 LAN USB AUDIO BATTERY CPU_FAN CLR_CMOS Intel® P965 F_AUDIO PCIE_1 FDD Marvell 8056 PCIE_16_1 DDRII1 DDRII2 DDRII3 DDRII4 PCIE_2 CODEC PCIE_3 CD_IN PCIE_16_2 PCI1 IT8718 PCI2 TPM SPDIF_IN BP_BIOS MAIN_BIOS SATAII0 CI SYS_FAN Intel® ICH8R TSB43AB23 SATAII4 SATAII1 SATAII2 SATAII5 SATAII3 GIGABYTE SATA2 IDE GSATAII1 GSATAII0 F_USB1 F_USB2 F_USB3 F1_1394 F2_1394 PWR_LED F_PANEL - 7 -
Manual
Page 8
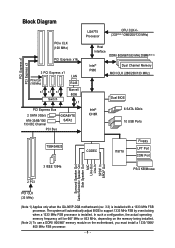
... (100 MHz) x1 x1 x1 Switch LAN RJ45 Marvell 8056 x1 PCI Express Bus 2 SATA 3Gb/s ATA-33/66/100/ 133 IDE Channel PCI Bus GIGABYTE SATA2 LGA775 Processor CPU CLK+/(333(Note 1)/266/200/133 MHz) Host Interface DDRII 800/667/533 MHz DIMM(Note 2) Intel® P965 Dual Channel.../Subwoofer Speaker Out Side Speaker Out MIC Line-Out Line-In SPDIF In SPDIF Out 2 PCI PCI CLK (33 MHz) (Note 1) Applies only when the GA-965P-DQ6 motherboard (rev. 3.3) is installed. The system will be 667 MHz or 833 MHz, depending on the memory being installed. (Note 2) To use a DDRII 800/667...
... (100 MHz) x1 x1 x1 Switch LAN RJ45 Marvell 8056 x1 PCI Express Bus 2 SATA 3Gb/s ATA-33/66/100/ 133 IDE Channel PCI Bus GIGABYTE SATA2 LGA775 Processor CPU CLK+/(333(Note 1)/266/200/133 MHz) Host Interface DDRII 800/667/533 MHz DIMM(Note 2) Intel® P965 Dual Channel.../Subwoofer Speaker Out Side Speaker Out MIC Line-Out Line-In SPDIF In SPDIF Out 2 PCI PCI CLK (33 MHz) (Note 1) Applies only when the GA-965P-DQ6 motherboard (rev. 3.3) is installed. The system will be 667 MHz or 833 MHz, depending on the memory being installed. (Note 2) To use a DDRII 800/667...
Manual
Page 10
...) Š 3 PCI Express x1 slots (share the same PCIe bus with the PCIE_16_2 slot) (Note 3) Š 2 PCI slots GA-965P-DQ6 Motherboard - 10 - Supports RAID 0, RAID 1, RAID 5, and RAID 10 for Serial ATA Š GIGABYTE SATA2 Controller - 1 IDE connectors with ATA-33/66/100/133 support, allowing connection of 2 IDE devices - 2 SATA 3Gb/s connectors...
...) Š 3 PCI Express x1 slots (share the same PCIe bus with the PCIE_16_2 slot) (Note 3) Š 2 PCI slots GA-965P-DQ6 Motherboard - 10 - Supports RAID 0, RAID 1, RAID 5, and RAID 10 for Serial ATA Š GIGABYTE SATA2 Controller - 1 IDE connectors with ATA-33/66/100/133 support, allowing connection of 2 IDE devices - 2 SATA 3Gb/s connectors...
Manual
Page 24
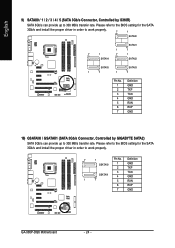
... in order to work properly. 7 1 Pin No. English 9) SATAII0 / 1 / 2 / 3 / 4 / 5 (SATA 3Gb/s Connector, Controlled by GIGABYTE SATA2) SATA 3Gb/s can provide up to 300 MB/s transfer rate. Definition GSATAII0 1 GND 2 TXP 3 TXN GSATAII1 4 GND 1 7 5 RXN 6 RXP 7 GND GA-965P-DQ6 Motherboard - 24 - Please refer to the BIOS setting for the SATA 3Gb/s and install the...
... in order to work properly. 7 1 Pin No. English 9) SATAII0 / 1 / 2 / 3 / 4 / 5 (SATA 3Gb/s Connector, Controlled by GIGABYTE SATA2) SATA 3Gb/s can provide up to 300 MB/s transfer rate. Definition GSATAII0 1 GND 2 TXP 3 TXN GSATAII1 4 GND 1 7 5 RXN 6 RXP 7 GND GA-965P-DQ6 Motherboard - 24 - Please refer to the BIOS setting for the SATA 3Gb/s and install the...
Manual
Page 40
...1 and address is an interface specification that allows the storage driver to enable or disable the SATA/IDE ports controlled by the Gigabyte SATA2 controller. Enabled Enable this function. (Default value) Disabled Disable this function. (Default value) Onboard SATA/IDE Device This function...port as Extended Capabilities Port. Set the SATA channel to RAID mode and IDE channel to AHCI mode. Enabled Enable this function. GA-965P-DQ6 Motherboard - 40 - Onboard Parallel Port Disabled Disable onboard LPT port. 378/IRQ7 278/IRQ5 Enable onboard LPT port and address is...
...1 and address is an interface specification that allows the storage driver to enable or disable the SATA/IDE ports controlled by the Gigabyte SATA2 controller. Enabled Enable this function. (Default value) Disabled Disable this function. (Default value) Onboard SATA/IDE Device This function...port as Extended Capabilities Port. Set the SATA channel to RAID mode and IDE channel to AHCI mode. Enabled Enable this function. GA-965P-DQ6 Motherboard - 40 - Onboard Parallel Port Disabled Disable onboard LPT port. 378/IRQ7 278/IRQ5 Enable onboard LPT port and address is...
Manual
Page 52
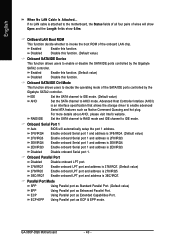
English 3-2 Software Applications This page displays all the tools that Gigabyte developed and some free software, you can choose anyone you want and press "install" to install them. 3-3 Driver CD Information This page lists the contents of software and drivers in this CD-title. GA-965P-DQ6 Motherboard - 52 -
English 3-2 Software Applications This page displays all the tools that Gigabyte developed and some free software, you can choose anyone you want and press "install" to install them. 3-3 Driver CD Information This page lists the contents of software and drivers in this CD-title. GA-965P-DQ6 Motherboard - 52 -
Manual
Page 60
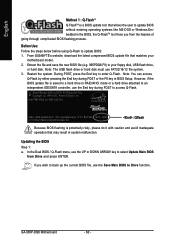
... the UP or DOWN ARROW key to your motherboard model. 2. In the Dual BIOS / Q-Flash menu, use the Save Main BIOS to access Q-Flash. GA-965P-DQ6 Motherboard - 60 - Note: The USB flash drive or hard disk must use the End key during POST or the F8 key in BIOS Setup. Award...select Update Main BIOS from the hassles of going through complicated BIOS flashing process. Restart the system. If you from Drive and press ENTER. From GIGABYTE's website, download the latest compressed BIOS update file that matches your floppy disk, USB flash drive, or hard disk. However, if the BIOS update...
... the UP or DOWN ARROW key to your motherboard model. 2. In the Dual BIOS / Q-Flash menu, use the Save Main BIOS to access Q-Flash. GA-965P-DQ6 Motherboard - 60 - Note: The USB flash drive or hard disk must use the End key during POST or the F8 key in BIOS Setup. Award...select Update Main BIOS from the hassles of going through complicated BIOS flashing process. Restart the system. If you from Drive and press ENTER. From GIGABYTE's website, download the latest compressed BIOS update file that matches your floppy disk, USB flash drive, or hard disk. However, if the BIOS update...

Manual
Page 64
... is "About this program" icon shown in BIOS unzip file are supported. 2. GA-965P-DQ6 Motherboard - 64 - Check out supported motherboard and Flash ROM: In the very beginning, there is "Save Current BIOS" icon shown in @BIOSTM server, please go onto Gigabyte's web site for downloading and updating it shows two or more motherboard...
... is "About this program" icon shown in BIOS unzip file are supported. 2. GA-965P-DQ6 Motherboard - 64 - Check out supported motherboard and Flash ROM: In the very beginning, there is "Save Current BIOS" icon shown in @BIOSTM server, please go onto Gigabyte's web site for downloading and updating it shows two or more motherboard...

Manual
Page 72
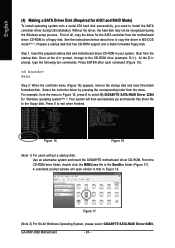
... system. GA-965P-DQ6 Motherboard - 72 - See the instructions below about how to the CD-ROM drive (example: D:\>). Step 1: Insert the prepared startup disk and motherboard driver CD-ROM in the BootDrv folder (Figure 13). Figure 11 Figure 12 (Note 1) For users without a startup disk: Use an alternative system and insert the GIGABYTE motherboard...
... system. GA-965P-DQ6 Motherboard - 72 - See the instructions below about how to the CD-ROM drive (example: D:\>). Step 1: Insert the prepared startup disk and motherboard driver CD-ROM in the BootDrv folder (Figure 13). Figure 11 Figure 12 (Note 1) For users without a startup disk: Use an alternative system and insert the GIGABYTE motherboard...

Manual
Page 76
GA-965P-DQ6 Motherboard - 76 - In BIOS Setup, go to RAID/IDE before configuring RAID. GIGABYTE SATA2 Controller (1) Installing SATA hard drive(s) in your computer...AHCI, depending on the motherboard. Then set the first boot devce. If there are supported by the GIGABYTE SATA2 controller.) Then connect the power connector from your power supply to the hard drive. (2) Configuring...IDE Device is enabled. The actual BIOS Setup menu options you will see shall depend on the GA-965P-DQ6 motherboard, the GSATAII0 and GSATAII1 connectors are more than one end of the SATA signal cable to...
GA-965P-DQ6 Motherboard - 76 - In BIOS Setup, go to RAID/IDE before configuring RAID. GIGABYTE SATA2 Controller (1) Installing SATA hard drive(s) in your computer...AHCI, depending on the motherboard. Then set the first boot devce. If there are supported by the GIGABYTE SATA2 controller.) Then connect the power connector from your power supply to the hard drive. (2) Configuring...IDE Device is enabled. The actual BIOS Setup menu options you will see shall depend on the GA-965P-DQ6 motherboard, the GSATAII0 and GSATAII1 connectors are more than one end of the SATA signal cable to...

Manual
Page 78
... begins and before the operating system boot begins, look for a message which says "Press to check detailed information about the selected hard disk. GA-965P-DQ6 Motherboard - 78 - http://www.gigabyte.com HDD0 : HDD1 : ST3120026AS ST3120026AS 120 GB Non-RAID 120 GB Non-RAID ODD0 : GO-D1600D Press to highlight through choices. Figure 3 In...
... begins and before the operating system boot begins, look for a message which says "Press to check detailed information about the selected hard disk. GA-965P-DQ6 Motherboard - 78 - http://www.gigabyte.com HDD0 : HDD1 : ST3120026AS ST3120026AS 120 GB Non-RAID 120 GB Non-RAID ODD0 : GO-D1600D Press to highlight through choices. Figure 3 In...
Manual
Page 80
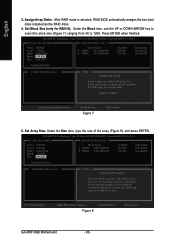
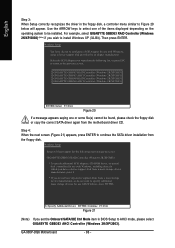
... when finished. GIGABYTE Technology Corp. GIGABYTE Technology Corp. The following are typical values: RAID 0-128KB [ ]-Switch RAID Block Size [ENTER]-Next Figure 7 [ESC]-Abort 5. English 3. Assign Array Disks: After RAID mode is chosen, the remaining capacity would be used . [ ]-Switch Unit [DEL,BS]-Delete Number Figure 8 [ENTER]-Next [ESC]-Abort GA-965P-DQ6 Motherboard - 80...
... when finished. GIGABYTE Technology Corp. GIGABYTE Technology Corp. The following are typical values: RAID 0-128KB [ ]-Switch RAID Block Size [ENTER]-Next Figure 7 [ESC]-Abort 5. English 3. Assign Array Disks: After RAID mode is chosen, the remaining capacity would be used . [ ]-Switch Unit [DEL,BS]-Delete Number Figure 8 [ENTER]-Next [ESC]-Abort GA-965P-DQ6 Motherboard - 80...
Manual
Page 82
GIGABYTE Technology Corp. Select the array and press ENTER. PCIE-to-SATAII/IDE RAID Controller BIOS V1.06.53 [ Main Menu ] [ ... RAID Level 0-Stripe Capacity Status 240 GB Normal Members(HDDx) 01 [ TAB]-Switch Window [ ]-Select ITEM [ENTER]-Action Figure 12 [ESC]-Exit GA-965P-DQ6 Motherboard - 82 - English To check more detailed information about the array, use the TAB key while in the main screen to save your settings ... then press Y (Figure 12). A small window displaying the array information will appear in the center of the screen (Figure 11). GIGABYTE Technology Corp.
GIGABYTE Technology Corp. Select the array and press ENTER. PCIE-to-SATAII/IDE RAID Controller BIOS V1.06.53 [ Main Menu ] [ ... RAID Level 0-Stripe Capacity Status 240 GB Normal Members(HDDx) 01 [ TAB]-Switch Window [ ]-Select ITEM [ENTER]-Action Figure 12 [ESC]-Exit GA-965P-DQ6 Motherboard - 82 - English To check more detailed information about the array, use the TAB key while in the main screen to save your settings ... then press Y (Figure 12). A small window displaying the array information will appear in the center of the screen (Figure 11). GIGABYTE Technology Corp.
Manual
Page 84
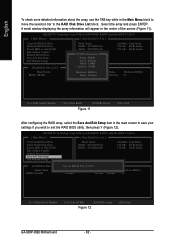
...system. Figure 17 (Note 2) For 64-bit Windows Operating System, please select GIGABYTE SATA-RAID Driver 64Bit. Once at the A:\> prompt, change to exit when finished. Press 0 to the CD-ROM drive (example: D:\>). GA-965P-DQ6 Motherboard - 84 - English (4) Making a SATA Driver Disk (Required for AHCI ... Windows setup process. Figure 15 Figure 16 (Note 1) For users without a startup disk: Use an alternative system and insert the GIGABYTE motherboard driver CD-ROM. A command prompt window will then automatically zip and transfer this driver file to the floppy disk. Without the...
...system. Figure 17 (Note 2) For 64-bit Windows Operating System, please select GIGABYTE SATA-RAID Driver 64Bit. Once at the A:\> prompt, change to exit when finished. Press 0 to the CD-ROM drive (example: D:\>). GA-965P-DQ6 Motherboard - 84 - English (4) Making a SATA Driver Disk (Required for AHCI ... Windows setup process. Figure 15 Figure 16 (Note 1) For users without a startup disk: Use an alternative system and insert the GIGABYTE motherboard driver CD-ROM. A command prompt window will then automatically zip and transfer this driver file to the floppy disk. Without the...
Manual
Page 86
...GA-965P-DQ6 Motherboard - 86 - Windows Setup You have chosen to the previous screen. Select the SCSI Adapter you wish to continue the SATA driver installation from the floppy disk. GIGABYTE GBB363 RAID Controller (Windows 2K/XP/2003) GIGABYTE GBB363 AHCI Controller (Windows 2K/XP/2003) GIGABYTE GBB360 RAID Controller (Windows 2K/XP/2003) GIGABYTE... device support disks from a mass storage device manufacturer, or do not want from the following mass storage device(s): GIGABYTE GBB363 RAID Controller (Windows 2K/XP/2003) * To specify additional SCSI adapters, CD-ROM drives, or special disk...
...GA-965P-DQ6 Motherboard - 86 - Windows Setup You have chosen to the previous screen. Select the SCSI Adapter you wish to continue the SATA driver installation from the floppy disk. GIGABYTE GBB363 RAID Controller (Windows 2K/XP/2003) GIGABYTE GBB363 AHCI Controller (Windows 2K/XP/2003) GIGABYTE GBB360 RAID Controller (Windows 2K/XP/2003) GIGABYTE... device support disks from a mass storage device manufacturer, or do not want from the following mass storage device(s): GIGABYTE GBB363 RAID Controller (Windows 2K/XP/2003) * To specify additional SCSI adapters, CD-ROM drives, or special disk...
Manual
Page 96
... speaker you are only for reference purposes. English 4-2 Troubleshooting Below is a collection of general asked questions based on a specific motherboard model, please log on to GIGABYTE's website. Question 1: I still get a weak sound after system boots up the speaker to the maximum volume? Why? Please press Ctrl and F1 keys after computer... 2 short: Monitor or display card error 1 long 3 short: Keyboard error 1 long 9 short: BIOS ROM error Continuous long beeps: DRAM error Continuous short beeps: Power error GA-965P-DQ6 Motherboard - 96 -
... speaker you are only for reference purposes. English 4-2 Troubleshooting Below is a collection of general asked questions based on a specific motherboard model, please log on to GIGABYTE's website. Question 1: I still get a weak sound after system boots up the speaker to the maximum volume? Why? Please press Ctrl and F1 keys after computer... 2 short: Monitor or display card error 1 long 3 short: Keyboard error 1 long 9 short: BIOS ROM error Continuous long beeps: DRAM error Continuous short beeps: Power error GA-965P-DQ6 Motherboard - 96 -


