Manual
Page 51
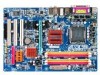
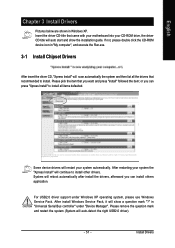
... your system automatically. After install Windows Service Pack, it will auto-detect the right USB2.0 driver). - 51 - English Chapter 3 Install Drivers Pictures below are shown in "Universal Serial Bus controller" under Windows XP operating system, please use Windows Service Pack. Please remove the ...-ROM device icon in "My computer", and execute the Run.exe. 3-1 Install Chipset Drivers After insert the driver CD, "Xpress Install" will auto start and show a question mark "?" Install Drivers in Windows XP. Insert the driver CD-title that you can install others application.
... your system automatically. After install Windows Service Pack, it will auto-detect the right USB2.0 driver). - 51 - English Chapter 3 Install Drivers Pictures below are shown in "Universal Serial Bus controller" under Windows XP operating system, please use Windows Service Pack. Please remove the ...-ROM device icon in "My computer", and execute the Run.exe. 3-1 Install Chipset Drivers After insert the driver CD, "Xpress Install" will auto start and show a question mark "?" Install Drivers in Windows XP. Insert the driver CD-title that you can install others application.
Manual
Page 56
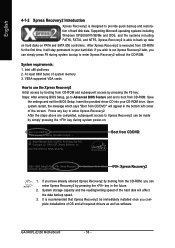
... access to Xpress Recovery2 can simply press F9 during system power-on PATA and SATA IDE controllers. GA-945PL-(D)S3 Motherboard - 56 - After Xpress Recovery2 is executed from CD/DVD: Award Modular BIOS v6.00PG, An... the first time, it will stay permanent in the future. 2. Supporting Microsoft operating systems including Windows XP/2000/NT/98/Me and DOS, and file systems including FAT16, FAT32, and NTFS, ...once you wish to back up data on hard disks on . . . Insert the provided driver CD into your hard disk. VESA-supported VGA cards How to use the Xpress Recovery2 Initial...
... access to Xpress Recovery2 can simply press F9 during system power-on PATA and SATA IDE controllers. GA-945PL-(D)S3 Motherboard - 56 - After Xpress Recovery2 is executed from CD/DVD: Award Modular BIOS v6.00PG, An... the first time, it will stay permanent in the future. 2. Supporting Microsoft operating systems including Windows XP/2000/NT/98/Me and DOS, and file systems including FAT16, FAT32, and NTFS, ...once you wish to back up data on hard disks on . . . Insert the provided driver CD into your hard disk. VESA-supported VGA cards How to use the Xpress Recovery2 Initial...
Manual
Page 57
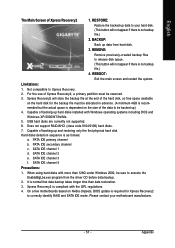
Not compatible to correctly identify RAID and SATA IDE mode. Hard disks detection sequence is normal that data backup takes longer time than 128G under Windows 2000, be allocated in advance. (A minimum 4GB is no backup file.) 2. On a few motherboards based on Nvidia chipsets, BIOS update is required for the ...Capable of Xpress Recovery2 1. Does not support RAID/AHCI (class code 0104/0106) hard disks. 7. English The Main Screen of backing up data from the driver CD before data backup. 2. BACKUP: Back up and restoring only the first physical hard disk.
Not compatible to correctly identify RAID and SATA IDE mode. Hard disks detection sequence is normal that data backup takes longer time than 128G under Windows 2000, be allocated in advance. (A minimum 4GB is no backup file.) 2. On a few motherboards based on Nvidia chipsets, BIOS update is required for the ...Capable of Xpress Recovery2 1. Does not support RAID/AHCI (class code 0104/0106) hard disks. 7. English The Main Screen of backing up data from the driver CD before data backup. 2. BACKUP: Back up and restoring only the first physical hard disk.
Manual
Page 62
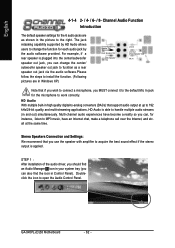
... and out) simultaneously. GA-945PL-(D)S3 Motherboard - 62 - For example, if a rear speaker is applied. Multi-channel audio experiences have become a reality so you can , for each audio jack by the audio software provided. English 4-1-4 2- / 4- / 6- / 8- HD Audio With multiple built-in Control Panel). STEP 1 : After installation of the audio driver, you should find the...
... and out) simultaneously. GA-945PL-(D)S3 Motherboard - 62 - For example, if a rear speaker is applied. Multi-channel audio experiences have become a reality so you can , for each audio jack by the audio software provided. English 4-1-4 2- / 4- / 6- / 8- HD Audio With multiple built-in Control Panel). STEP 1 : After installation of the audio driver, you should find the...

Manual
Page 63
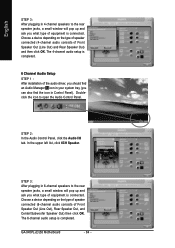
... is completed. 4 Channel Audio Setup STEP 1 : After installation of equipment is plugged into the rear Line Out jack, a small window will pop up and ask you what type of the audio driver, you should find an Audio Manager icon in your system tray (you can also find the icon in Control Panel...
... is completed. 4 Channel Audio Setup STEP 1 : After installation of equipment is plugged into the rear Line Out jack, a small window will pop up and ask you what type of the audio driver, you should find an Audio Manager icon in your system tray (you can also find the icon in Control Panel...
Manual
Page 64
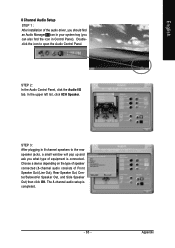
... Audio I/O tab. GA-945PL-(D)S3 Motherboard - 64 - The 6-channel audio setup is completed. 6 Channel Audio Setup STEP 1 : After installation of the audio driver, you should find the icon in Control Panel). English STEP 3: After plugging in 4-channel speakers to the rear speaker jacks, a small window will pop up and... on the type of speaker connected (4-channel audio consists of equipment is connected. Doubleclick the icon to the rear speaker jacks, a small window will pop up and ask you what type of Front Speaker Out (Line Out) and Rear Speaker Out) and then click OK. The...
... Audio I/O tab. GA-945PL-(D)S3 Motherboard - 64 - The 6-channel audio setup is completed. 6 Channel Audio Setup STEP 1 : After installation of the audio driver, you should find the icon in Control Panel). English STEP 3: After plugging in 4-channel speakers to the rear speaker jacks, a small window will pop up and... on the type of speaker connected (4-channel audio consists of equipment is connected. Doubleclick the icon to the rear speaker jacks, a small window will pop up and ask you what type of Front Speaker Out (Line Out) and Rear Speaker Out) and then click OK. The...
Manual
Page 65
Doubleclick the icon to the rear speaker jacks, a small window will pop up and ask you can also find the icon in 8-channel speakers to open the Audio Control Panel. Appendix English STEP 3: After plugging ... speaker connected (8-channel audio consists of equipment is completed. - 65 - The 8-channel audio setup is connected. 8 Channel Audio Setup STEP 1 : After installation of the audio driver, you should find an Audio Manager icon in your system tray (you what type of Front Speaker Out (Line Out), Rear Speaker Out, Center/Subwoofer...
Doubleclick the icon to the rear speaker jacks, a small window will pop up and ask you can also find the icon in 8-channel speakers to open the Audio Control Panel. Appendix English STEP 3: After plugging ... speaker connected (8-channel audio consists of equipment is completed. - 65 - The 8-channel audio setup is connected. 8 Channel Audio Setup STEP 1 : After installation of the audio driver, you should find an Audio Manager icon in your system tray (you what type of Front Speaker Out (Line Out), Rear Speaker Out, Center/Subwoofer...


