Manual
Page 14
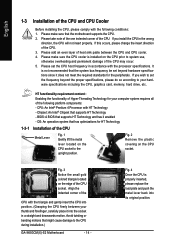
... place it enabled - Fig. 3 Notice the small gold colored triangle located on the CPU socket to the CPU during installation.) GA-945GCM(X)-S2 Motherboard - 14 - It is not recommended that the motherboard supports the CPU. 2. OS: An operation system that supports HT ... twisting or bending motions that supports HT Technology - BIOS: A BIOS that has optimizations for your hardware specifications including the CPU, graphics card, memory, hard drive, etc. Please set beyond the proper specifications, please do so according to system use, otherwise overheating and permanent...
... place it enabled - Fig. 3 Notice the small gold colored triangle located on the CPU socket to the CPU during installation.) GA-945GCM(X)-S2 Motherboard - 14 - It is not recommended that the motherboard supports the CPU. 2. OS: An operation system that supports HT ... twisting or bending motions that supports HT Technology - BIOS: A BIOS that has optimizations for your hardware specifications including the CPU, graphics card, memory, hard drive, etc. Please set beyond the proper specifications, please do so according to system use, otherwise overheating and permanent...
Manual
Page 18
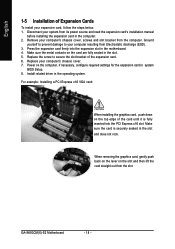
... GA-945GCM(X)-S2 Motherboard - 18 - Ground yourself to prevent damage to secure the slot bracket of the expansion card. 6. Replace the screw to your expansion card, follow the steps below. 1. When removing the graphics card, gently push back on the lever on the top edge of the card ...For example: Installing a PCI Express x16 VGA card: When installing the graphics card, push down on the slot and then lift the card straight out from its power source and read the expansion card's installation manual before installing the expansion card in the motherboard. 4. Install related driver in...
... GA-945GCM(X)-S2 Motherboard - 18 - Ground yourself to prevent damage to secure the slot bracket of the expansion card. 6. Replace the screw to your expansion card, follow the steps below. 1. When removing the graphics card, gently push back on the lever on the top edge of the card ...For example: Installing a PCI Express x16 VGA card: When installing the graphics card, push down on the slot and then lift the card straight out from its power source and read the expansion card's installation manual before installing the expansion card in the motherboard. 4. Install related driver in...
Manual
Page 37
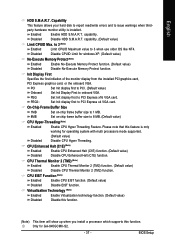
.... PCI Set Init display first to PCI. (Default value) Onboard PEG PEG2 Set Init Display First to PCI Express x4 VGA card. Only for GA-945GCMX-S2. - 37 - party hardware monitor utility is only working for windows XP. (Default value) No-Execute Memory Protect (Note) ... Disabled Disable EIST function. Enabled Enable HDD S.M.A.R.T. Init Display First Specifies the first initiation of the monitor display from the installed PCI graphics card, PCI Express graphics card, or the onboard VGA. Set Init display first to 8 MB. (Default value) CPU Hyper-Threading (Note) Enabled Enable CPU ...
.... PCI Set Init display first to PCI. (Default value) Onboard PEG PEG2 Set Init Display First to PCI Express x4 VGA card. Only for GA-945GCMX-S2. - 37 - party hardware monitor utility is only working for windows XP. (Default value) No-Execute Memory Protect (Note) ... Disabled Disable EIST function. Enabled Enable HDD S.M.A.R.T. Init Display First Specifies the first initiation of the monitor display from the installed PCI graphics card, PCI Express graphics card, or the onboard VGA. Set Init display first to 8 MB. (Default value) CPU Hyper-Threading (Note) Enabled Enable CPU ...


