User Manual
Page 27
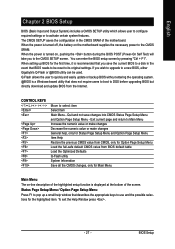
... to use and the possible selections for Option Page Setup Menu Load the fail-safe default CMOS value from the Internet. To exit the Help Window press . - 27 - CONTROL KEYS Enter> Move to activate certain system features. BIOS Setup English Chapter 2 BIOS Setup BIOS (Basic Input and Output System)... on , pushing the button during the BIOS POST (Power-On Self Test) will take you wish to upgrade to a new BIOS, either Gigabyte's Q-Flash or @BIOS utility can enter the BIOS setup screen by pressing "Ctrl + F1". Exit current page and return to the CMOS SRAM.
... to use and the possible selections for Option Page Setup Menu Load the fail-safe default CMOS value from the Internet. To exit the Help Window press . - 27 - CONTROL KEYS Enter> Move to activate certain system features. BIOS Setup English Chapter 2 BIOS Setup BIOS (Basic Input and Output System)... on , pushing the button during the BIOS POST (Power-On Self Test) will take you wish to upgrade to a new BIOS, either Gigabyte's Q-Flash or @BIOS utility can enter the BIOS setup screen by pressing "Ctrl + F1". Exit current page and return to the CMOS SRAM.

User Manual
Page 33
... Enable VT8237R Plus Serial ATA support. (Default value) Disabled Disable this function. - 33 - BIOS Setup Please note that this feature is only working Disabled for windows XP.(Default value) 2-3 Integrated Peripherals CMOS Setup Utility-Copyright (C) 1984-2005 Award Software Integrated Peripherals OnChip IDE Channel 0 OnChip IDE Channel 1 OnChip Serial ATA SATA...
... Enable VT8237R Plus Serial ATA support. (Default value) Disabled Disable this function. - 33 - BIOS Setup Please note that this feature is only working Disabled for windows XP.(Default value) 2-3 Integrated Peripherals CMOS Setup Utility-Copyright (C) 1984-2005 Award Software Integrated Peripherals OnChip IDE Channel 0 OnChip IDE Channel 1 OnChip Serial ATA SATA...

User Manual
Page 45
... and Go" technology to install other drivers. For USB2.0 driver support under Windows 2000/XP. Some Nvidia graphics cards might have display problems under Windows XP operating system, please use Windows Service Pack. Please install the driver from the following location: D:\Chipset\nVidia\WinXP_2K...install. Some device drivers will restart your system the "Xpress Install" will show the installation guide. Drivers Installation in Windows XP. After install Windows Service Pack, it will continue to install the drivers automatically. If not, please double click the CD-ROM device...
... and Go" technology to install other drivers. For USB2.0 driver support under Windows 2000/XP. Some Nvidia graphics cards might have display problems under Windows XP operating system, please use Windows Service Pack. Please install the driver from the following location: D:\Chipset\nVidia\WinXP_2K...install. Some device drivers will restart your system the "Xpress Install" will show the installation guide. Drivers Installation in Windows XP. After install Windows Service Pack, it will continue to install the drivers automatically. If not, please double click the CD-ROM device...

User Manual
Page 50
Featuring several powerful yet easy to GIGABYTE website Display EasyTuneTM 5 Help file Quit or Minimize EasyTuneTM 5 software (Note) EasyTune 5 functions may ... Minimize button Description Enters the Overclocking setting page Enters the C.I.A./2 and M.I .A. GA-8VM800M Motherboard - 50 - GIGABYTE Logo 10. C.I.A./C.I.A.2 and M.I.B./M.I .B. Function display LEDs 9. "Easy Mode" & "Advance Mode" 7. and M.I .B.2 3. PC Health 5. English 4-1-1 EasyTune 5 Introduction EasyTune 5 presents the most convenient Windows based system performance enhancement and manageability utility.
Featuring several powerful yet easy to GIGABYTE website Display EasyTuneTM 5 Help file Quit or Minimize EasyTuneTM 5 software (Note) EasyTune 5 functions may ... Minimize button Description Enters the Overclocking setting page Enters the C.I.A./2 and M.I .A. GA-8VM800M Motherboard - 50 - GIGABYTE Logo 10. C.I.A./C.I.A.2 and M.I.B./M.I .B. Function display LEDs 9. "Easy Mode" & "Advance Mode" 7. and M.I .B.2 3. PC Health 5. English 4-1-1 EasyTune 5 Introduction EasyTune 5 presents the most convenient Windows based system performance enhancement and manageability utility.
User Manual
Page 51
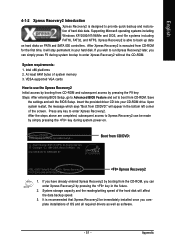
... Advanced BIOS Feature and set to boot from CD/DVD:" will appear in your CD-ROM drive. Intel x86 platforms 2. Supporting Microsoft operating systems including Windows XP/2000/NT/98/Me and DOS, and file systems including FAT16, FAT32, and NTFS, Xpress Recovery2 is designed to provide quick backup and restoration...
... Advanced BIOS Feature and set to boot from CD/DVD:" will appear in your CD-ROM drive. Intel x86 platforms 2. Supporting Microsoft operating systems including Windows XP/2000/NT/98/Me and DOS, and file systems including FAT16, FAT32, and NTFS, Xpress Recovery2 is designed to provide quick backup and restoration...
User Manual
Page 52
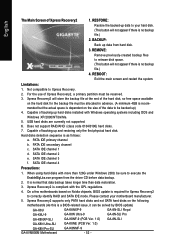
...backup file at the end of backing up ) 4. Hard disks detection sequence is normal that data backup takes longer time than 128G under Windows 2000, be reserved. 3. SATA IDE channel 1 d. REMOVE: Remove previously-created backup files to your motherboard manufacturer. 5. Limitations: 1....Xpress Recovery. 2. Not compatible to be solved by BIOS update) GA-K8U GA-K8U-9 GA-K8NXP-SLI GA-K8N Ultra-SLI GA-K8N Pro-SLI GA-8VM800M Motherboard GA-K8NXP-9 GA-K8N Ultra-9 GA-K8NF-9 (PCB Ver. 1.0) GA-K8NE (PCB Ver. 1.0) GA-K8NMF-9 - 52 - mended but the actual space is dependent...
...backup file at the end of backing up ) 4. Hard disks detection sequence is normal that data backup takes longer time than 128G under Windows 2000, be reserved. 3. SATA IDE channel 1 d. REMOVE: Remove previously-created backup files to your motherboard manufacturer. 5. Limitations: 1....Xpress Recovery. 2. Not compatible to be solved by BIOS update) GA-K8U GA-K8U-9 GA-K8NXP-SLI GA-K8N Ultra-SLI GA-K8N Pro-SLI GA-8VM800M Motherboard GA-K8NXP-9 GA-K8N Ultra-9 GA-K8NF-9 (PCB Ver. 1.0) GA-K8NE (PCB Ver. 1.0) GA-K8NMF-9 - 52 - mended but the actual space is dependent...

User Manual
Page 53
...use Q-Flash utility. Appendix With this utility, users only have to stay in DOS or Windows. Extract the BIOS file downloaded and save the BIOS file (the one with any utility in..., An Energy Star Ally Copyright (C) 1984-2003, Award Software, Inc. In the BIOS menu of Gigabyte motherboards are combined in Single Channel Primary Master : FUJITSU MPE3170AT ED-03-08 Primary Slave : None ... and Dual BIOS utility are equipped with dual BIOS. In the following sections, we take GA-8KNXP Ultra as the example to flash BIOS without any complicated instructions and operating system since ...
...use Q-Flash utility. Appendix With this utility, users only have to stay in DOS or Windows. Extract the BIOS file downloaded and save the BIOS file (the one with any utility in..., An Energy Star Ally Copyright (C) 1984-2003, Award Software, Inc. In the BIOS menu of Gigabyte motherboards are combined in Single Channel Primary Master : FUJITSU MPE3170AT ED-03-08 Primary Slave : None ... and Dual BIOS utility are equipped with dual BIOS. In the following sections, we take GA-8KNXP Ultra as the example to flash BIOS without any complicated instructions and operating system since ...
User Manual
Page 60
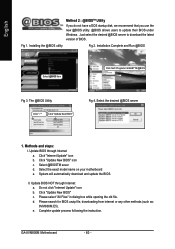
.../ GIGABYTE/@BIOS Fig 3. Select the exact model name on your motherboard e. Please search for BIOS unzip file, downloading from internet or any other methods (such as: 8VM800M.E5). Methods and steps: I. e. Please select "All Files" in dialog box while opening the old file. Click "Internet Update" icon b. Click "Update New BIOS" c. GA-8VM800M Motherboard...
.../ GIGABYTE/@BIOS Fig 3. Select the exact model name on your motherboard e. Please search for BIOS unzip file, downloading from internet or any other methods (such as: 8VM800M.E5). Methods and steps: I. e. Please select "All Files" in dialog box while opening the old file. Click "Internet Update" icon b. Click "Update New BIOS" c. GA-8VM800M Motherboard...
User Manual
Page 63
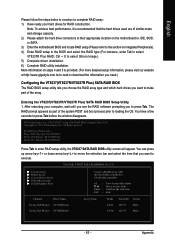
...VIA Tech. Note: To achieve best performance, it is provided. (For more detailed setup information, please visit our website at http:\\www.gigabyte.com.tw to read or download the information you need.) Configuring the VT8237(VT8237R/VT8237R Plus) SATA RAID BIOS The RAID BIOS setup ...array type and which hard drives you want to execute. Serial_Ch0 Master : ST3120026AS Serial_Ch1 Master : ST3120026AS Press Tab to press Tab before the window disappears. Appendix You have a few seconds to enter RAID setup utility, the VT8237 SATA RAID BIOS utility screen will appear. More information ...
...VIA Tech. Note: To achieve best performance, it is provided. (For more detailed setup information, please visit our website at http:\\www.gigabyte.com.tw to read or download the information you need.) Configuring the VT8237(VT8237R/VT8237R Plus) SATA RAID BIOS The RAID BIOS setup ...array type and which hard drives you want to execute. Serial_Ch0 Master : ST3120026AS Serial_Ch1 Master : ST3120026AS Press Tab to press Tab before the window disappears. Appendix You have a few seconds to enter RAID setup utility, the VT8237 SATA RAID BIOS utility screen will appear. More information ...
User Manual
Page 68
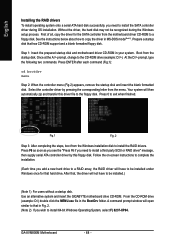
...drive. GA-8VM800M Motherboard - 68 - English Installing the RAID drivers To install operating system onto a serial ATA hard disk successfully, you need to install a third party SCSI or RAID driver" message, then supply serial ATA controller driver by pressing the corresponding letter from the Windows installation ...finished. (Note 2) Fig.1 Fig. 2 Step 3: After completing the steps, boot from the menu. Use an alternative system and insert the GIGABYTE motherboard drive CD-ROM. Without the driver, the hard disk may not be recognized during OS installation. Press 0 to that has CD-ROM...
...drive. GA-8VM800M Motherboard - 68 - English Installing the RAID drivers To install operating system onto a serial ATA hard disk successfully, you need to install a third party SCSI or RAID driver" message, then supply serial ATA controller driver by pressing the corresponding letter from the Windows installation ...finished. (Note 2) Fig.1 Fig. 2 Step 3: After completing the steps, boot from the menu. Use an alternative system and insert the GIGABYTE motherboard drive CD-ROM. Without the driver, the hard disk may not be recognized during OS installation. Press 0 to that has CD-ROM...


