
Manual
Page 49
..."Click and Go" technology to install the drivers automatically. Click the Xpress Install button to be installed for Windows after OS installation and before installing motherboard drivers. (2) Insert the driver CD that need to install drivers automatically. Please remove the question mark and ... Bus controller" under Windows XP operating system, please use Windows Service Pack. After install Windows Service Pack, it manually. Just select the drivers you by itself. in the root directory of the driver CD. 3-1 Install Chipset Drivers This page shows the drivers that came with your...
..."Click and Go" technology to install the drivers automatically. Click the Xpress Install button to be installed for Windows after OS installation and before installing motherboard drivers. (2) Insert the driver CD that need to install drivers automatically. Please remove the question mark and ... Bus controller" under Windows XP operating system, please use Windows Service Pack. After install Windows Service Pack, it manually. Just select the drivers you by itself. in the root directory of the driver CD. 3-1 Install Chipset Drivers This page shows the drivers that came with your...
Manual
Page 53
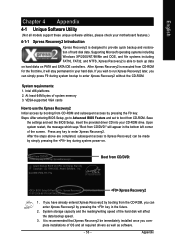
...hard disk data. Appendix Save the settings and exit the BIOS Setup. Insert the provided driver CD into your motherboard features.) 4-1-1 Xpress Recovery2 Introduction Xpress Recovery2 is executed from CD/DVD...IDE controllers. Boot from CD-ROM for the first time, it will affect the data backup speed. 3. GA-8S661FXM-775 F5a . . . . :BIOS Setup/Q-Flash, : Xpress Recovery2, For Boot Menu 11/07/2006-...Boot from CD-ROM. If you wish to enter Xpress Recovery2. Supporting Microsoft operating systems including Windows XP/2000/NT/98/Me and DOS, and file systems including FAT16, FAT32, and NTFS,...
...hard disk data. Appendix Save the settings and exit the BIOS Setup. Insert the provided driver CD into your motherboard features.) 4-1-1 Xpress Recovery2 Introduction Xpress Recovery2 is executed from CD/DVD...IDE controllers. Boot from CD-ROM for the first time, it will affect the data backup speed. 3. GA-8S661FXM-775 F5a . . . . :BIOS Setup/Q-Flash, : Xpress Recovery2, For Boot Menu 11/07/2006-...Boot from CD-ROM. If you wish to enter Xpress Recovery2. Supporting Microsoft operating systems including Windows XP/2000/NT/98/Me and DOS, and file systems including FAT16, FAT32, and NTFS,...
Manual
Page 54
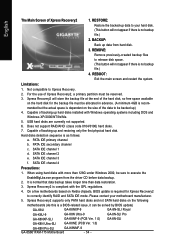
... sequence is normal that data backup takes longer time than 128G under Windows 2000, be backed up hard disks installed with Windows operating systems including DOS and Windows XP/2000/NT/9x/Me. 5. SATA IDE channel 4 Precautions: ...by BIOS update) GA-K8U GA-K8NXP-9 GA-8N-SLI Royal GA-K8U-9 GA-K8N Ultra-9 GA-8N-SLI Pro GA-K8NXP-SLI GA-K8NF-9 (PCB Ver. 1.0) GA-8N-SLI GA-K8N Ultra-SLI GA-K8NE (PCB Ver. 1.0) GA-K8N Pro-SLI GA-K8NMF-9 GA-8S661FXM-775 Motherboard - 54 -... as follows: a. The Main Screen of backing up data from the driver CD before data backup. 2.
... sequence is normal that data backup takes longer time than 128G under Windows 2000, be backed up hard disks installed with Windows operating systems including DOS and Windows XP/2000/NT/9x/Me. 5. SATA IDE channel 4 Precautions: ...by BIOS update) GA-K8U GA-K8NXP-9 GA-8N-SLI Royal GA-K8U-9 GA-K8N Ultra-9 GA-8N-SLI Pro GA-K8NXP-SLI GA-K8NF-9 (PCB Ver. 1.0) GA-8N-SLI GA-K8N Ultra-SLI GA-K8NE (PCB Ver. 1.0) GA-K8N Pro-SLI GA-K8NMF-9 GA-8S661FXM-775 Motherboard - 54 -... as follows: a. The Main Screen of backing up data from the driver CD before data backup. 2.
Manual
Page 65
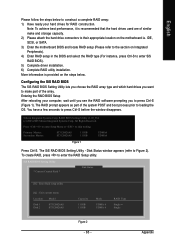
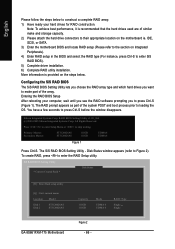
... waiting. Press to enter Setup Menu or to press Ctrl-S before the window disappears. The SiS RAID BIOS Setting Utility - The RAID prompt appears as part of the array. Disk Status window appears (refer to loading the OS. Entering the RAID BIOS Setup After.... 3) Enter the motherboard BIOS and locate RAID setup (Please refer to the section on the steps below to enter SiS RAID BIOS). 5) Complete driver installation. 6) Complete RAID utility installation. Appendix SiS RAID BIOS Setting Utility * Current Created Raid * Disk Status [R] : Enter Raid setup utility ...
... waiting. Press to enter Setup Menu or to press Ctrl-S before the window disappears. The SiS RAID BIOS Setting Utility - The RAID prompt appears as part of the array. Disk Status window appears (refer to loading the OS. Entering the RAID BIOS Setup After.... 3) Enter the motherboard BIOS and locate RAID setup (Please refer to the section on the steps below to enter SiS RAID BIOS). 5) Complete driver installation. 6) Complete RAID utility installation. Appendix SiS RAID BIOS Setting Utility * Current Created Raid * Disk Status [R] : Enter Raid setup utility ...
Manual
Page 70
... supply serial ATA controller driver by this driver file to the floppy disk. GA-8S661FXM-775 Motherboard - 70 - Follow onscreen instructions to complete installation. (Each time you add a new hard drive to a RAID array, the RAID driver will appear automatically soon after you insert the driver CD. English Installing the RAID Drivers To install Windows 2000/XP onto a Serial...
... supply serial ATA controller driver by this driver file to the floppy disk. GA-8S661FXM-775 Motherboard - 70 - Follow onscreen instructions to complete installation. (Each time you add a new hard drive to a RAID array, the RAID driver will appear automatically soon after you insert the driver CD. English Installing the RAID Drivers To install Windows 2000/XP onto a Serial...

Manual
Page 71
Click the icon to "Line Out." Appendix Line Out STEP 2: After installing the audio driver, you use speakers with amplifier to enable the function! 2 Channel Audio Setup We recommend that you 'll find a Sound Effect icon on the lower right ... speakers or earphone to select the function. STEP 3: On the AC97 Audio Configuration menu, click the Speaker Configuration tab and select the 2-channel mode for Windows 98SE/2000/ME/XP. Please follow the steps below to get the best sound effect if the stereo output is for stereo speaker output check...
Click the icon to "Line Out." Appendix Line Out STEP 2: After installing the audio driver, you use speakers with amplifier to enable the function! 2 Channel Audio Setup We recommend that you 'll find a Sound Effect icon on the lower right ... speakers or earphone to select the function. STEP 3: On the AC97 Audio Configuration menu, click the Speaker Configuration tab and select the 2-channel mode for Windows 98SE/2000/ME/XP. Please follow the steps below to get the best sound effect if the stereo output is for stereo speaker output check...

Manual
Page 2
... and boot sequence in BIOS Setup. (3)* Configure RAID set in RAID BIOS. (4) Make a floppy disk containing the SATA controller driver. (5) Install the SATA controller driver during OS installation. "*" Skip this step if you do not want to create RAID array on your motherboard, you may check ...two hard drives with the SATA controller, you may prepare only one hard drive. (b) An empty formatted floppy disk. (c) Windows XP/2000 setup disk. (d) Driver CD for your motherboard. (1) Installing SATA hard drive(s) in your computer Attach one SATA controller on the SATA controller SATA Hard...
... and boot sequence in BIOS Setup. (3)* Configure RAID set in RAID BIOS. (4) Make a floppy disk containing the SATA controller driver. (5) Install the SATA controller driver during OS installation. "*" Skip this step if you do not want to create RAID array on your motherboard, you may check ...two hard drives with the SATA controller, you may prepare only one hard drive. (b) An empty formatted floppy disk. (c) Windows XP/2000 setup disk. (d) Driver CD for your motherboard. (1) Installing SATA hard drive(s) in your computer Attach one SATA controller on the SATA controller SATA Hard...
Manual
Page 9
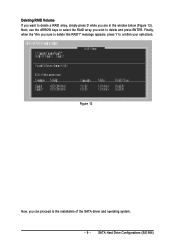
Next, use the ARROW keys to select the RAID array you are in the window below (Figure 12). Deleting RAID Volume If you want to delete a RAID array, simply press D while you wish to delete and press ENTER. Finally, when the "Are you can proceed to the installation of the SATA driver and operating system. - 9 - Figure 12 Now, you sure to confirm your selections. SATA Hard Drive Configurations (SiS 964) message appears, press Y to delete this RAID?"
Next, use the ARROW keys to select the RAID array you are in the window below (Figure 12). Deleting RAID Volume If you want to delete a RAID array, simply press D while you wish to delete and press ENTER. Finally, when the "Are you can proceed to the installation of the SATA driver and operating system. - 9 - Figure 12 Now, you sure to confirm your selections. SATA Hard Drive Configurations (SiS 964) message appears, press Y to delete this RAID?"
Manual
Page 10
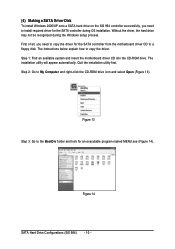
... (SiS 964) - 10 - Step 2: Go to My Computer and right-click the CD-ROM drive icon and select Open (Figure 13). Ác (4) Making a SATA Driver Disk Åé To install Windows 2000/XP onto a SATA hard drive on the SiS 964 controller successfully, you need to install required... driver for the SATA controller during the Windows setup process. ¤å First of all, you need to copy the driver for an executable program named MENU.exe (Figure 14). The...
... (SiS 964) - 10 - Step 2: Go to My Computer and right-click the CD-ROM drive icon and select Open (Figure 13). Ác (4) Making a SATA Driver Disk Åé To install Windows 2000/XP onto a SATA hard drive on the SiS 964 controller successfully, you need to install required... driver for the SATA controller during the Windows setup process. ¤å First of all, you need to copy the driver for an executable program named MENU.exe (Figure 14). The...
Manual
Page 12
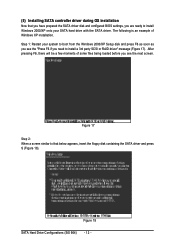
...screen similar to that you have prepared the SATA driver disk and configured BIOS settings, you see the next screen. Figure 18 SATA Hard Drive Configurations (SiS 964) - 12 - After pressing F6, there will be a few moments of ¤¤ Windows XP installation. ¤å Step 1: Restart your... system to boot from the Windows 2000/XP Setup disk and press F6 as soon as you are ready to install a 3rd party SCSI or RAID driver" message (Figure 17). Ác (5) Installing SATA controller driver during OS installation Åé Now that below appears,...
...screen similar to that you have prepared the SATA driver disk and configured BIOS settings, you see the next screen. Figure 18 SATA Hard Drive Configurations (SiS 964) - 12 - After pressing F6, there will be a few moments of ¤¤ Windows XP installation. ¤å Step 1: Restart your... system to boot from the Windows 2000/XP Setup disk and press F6 as soon as you are ready to install a 3rd party SCSI or RAID driver" message (Figure 17). Ác (5) Installing SATA controller driver during OS installation Åé Now that below appears,...
Manual
Page 13
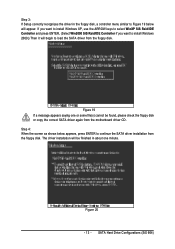
... appear. Figure 20 - 13 - Figure 19 If a message appears saying one minute. SATA Hard Drive Configurations (SiS 964) If you want to install Windows XP, use the ARROW keys to select WinXP SiS Raid/IDE Controller and press ENTER. (Select Win2000 SiS Raid/IDE Controller if you want to... install Windows 2000.) Then it will be found, please check the floppy disk or copy the correct SATA driver again from the motherboard driver CD. Step 3: If Setup correctly recognizes the driver in about one or some file(s) cannot be finished in the...
... appear. Figure 20 - 13 - Figure 19 If a message appears saying one minute. SATA Hard Drive Configurations (SiS 964) If you want to install Windows XP, use the ARROW keys to select WinXP SiS Raid/IDE Controller and press ENTER. (Select Win2000 SiS Raid/IDE Controller if you want to... install Windows 2000.) Then it will be found, please check the floppy disk or copy the correct SATA driver again from the motherboard driver CD. Step 3: If Setup correctly recognizes the driver in about one or some file(s) cannot be finished in the...
Manual
Page 14
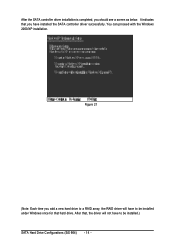
It indicates that hard drive. After that, the driver will have to be installed.) SATA Hard Drive Configurations (SiS 964) - 14 - You can proceed with the Windows Åé 2000/XP installation. ¤¤ ¤å Figure 21 (Note: Each time you should see a screen as below. Ác After the SATA controller driver installation is completed, you add a new hard drive to be installed under Windows once for that you have to a RAID array, the RAID driver will not have installed the SATA controller driver successfully.
It indicates that hard drive. After that, the driver will have to be installed.) SATA Hard Drive Configurations (SiS 964) - 14 - You can proceed with the Windows Åé 2000/XP installation. ¤¤ ¤å Figure 21 (Note: Each time you should see a screen as below. Ác After the SATA controller driver installation is completed, you add a new hard drive to be installed under Windows once for that you have to a RAID array, the RAID driver will not have installed the SATA controller driver successfully.
Manual
Page 49
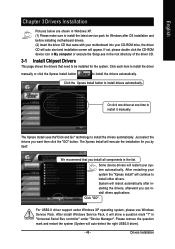
... Install uses the"Click and Go" technology to install drivers automatically. Some device drivers will continue to install other drivers. in "Universal Serial Bus controller" under Windows XP operating system, please use Windows Service Pack. Just select the drivers you want then click the "GO" button. After install Windows Service Pack, it manually. The Xpress Install will...
... Install uses the"Click and Go" technology to install drivers automatically. Some device drivers will continue to install other drivers. in "Universal Serial Bus controller" under Windows XP operating system, please use Windows Service Pack. Just select the drivers you want then click the "GO" button. After install Windows Service Pack, it manually. The Xpress Install will...
Manual
Page 66
...Rights Reserved. Disk Status window appears (refer to press Ctrl-S before the window disappears. SiS RAID BIOS Setting Utility * Current Created Raid * Disk Status [R] : Enter Raid setup utility [Q] : Exit current menu Location Model Disk 1 Disk 2 ST3120026AS ST3120026AS GA-8S661FXM-775 Motherboard Capacity 111GB 111GB... lets you choose the RAID array type and which hard drives you to enter SiS RAID BIOS). 5) Complete driver installation. 6) Complete RAID utility installation. Silicon Integrated Systems Corp. More information is recommended that the hard drives ...
...Rights Reserved. Disk Status window appears (refer to press Ctrl-S before the window disappears. SiS RAID BIOS Setting Utility * Current Created Raid * Disk Status [R] : Enter Raid setup utility [Q] : Exit current menu Location Model Disk 1 Disk 2 ST3120026AS ST3120026AS GA-8S661FXM-775 Motherboard Capacity 111GB 111GB... lets you choose the RAID array type and which hard drives you to enter SiS RAID BIOS). 5) Complete driver installation. 6) Complete RAID utility installation. Silicon Integrated Systems Corp. More information is recommended that the hard drives ...
Manual
Page 71
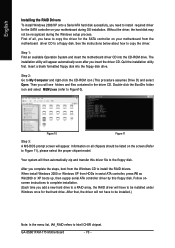
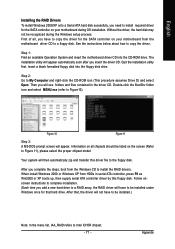
...and transfer this floppy disk. After that hard drive. After you complete the steps, boot from the motherboard driver CD to be installed under Windows once for that , the driver will appear. The installation utility will have to a floppy disk. Then you will see folders and files ... on all , you have to be recognized during OS installation. Information on your motherboard from the Windows CD to Intel ICH5R chipset. - 71 - English Installing the RAID Drivers To install Windows 2000/XP onto a Serial ATA hard disk sucessfully, you need to Figure 11), please select the...
...and transfer this floppy disk. After that hard drive. After you complete the steps, boot from the motherboard driver CD to be installed under Windows once for that , the driver will appear. The installation utility will have to a floppy disk. Then you will see folders and files ... on all , you have to be recognized during OS installation. Information on your motherboard from the Windows CD to Intel ICH5R chipset. - 71 - English Installing the RAID Drivers To install Windows 2000/XP onto a Serial ATA hard disk sucessfully, you need to Figure 11), please select the...
Manual
Page 72
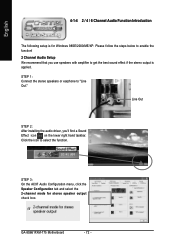
Line Out STEP 2: After installing the audio driver, you use speakers with amplifier to enable the function! 2 Channel Audio Setup We recommend that you 'll find a Sound Effect icon on the lower right ... the icon to "Line Out." English 4-1-4 2 / 4 / 6 Channel Audio Function Introduction The following setup is applied. GA-8S661FXM-775 Motherboard - 72 - STEP 3: On the AC97 Audio Configuration menu, click the Speaker Configuration tab and select the 2-channel mode for Windows 98SE/2000/ME/XP. STEP 1: Connect the stereo speakers or earphone to select the function.
Line Out STEP 2: After installing the audio driver, you use speakers with amplifier to enable the function! 2 Channel Audio Setup We recommend that you 'll find a Sound Effect icon on the lower right ... the icon to "Line Out." English 4-1-4 2 / 4 / 6 Channel Audio Function Introduction The following setup is applied. GA-8S661FXM-775 Motherboard - 72 - STEP 3: On the AC97 Audio Configuration menu, click the Speaker Configuration tab and select the 2-channel mode for Windows 98SE/2000/ME/XP. STEP 1: Connect the stereo speakers or earphone to select the function.


