
Manual
Page 11
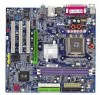
Hardware Installation English Onboard SATA RAID Š BIOS Š Š Additional Features Š Š Form Factor Š Onboard SiS964 chipset - supports data striping (RAID 0) or mirroring (RAID 1) function - supports hot plugging function - supports data transfer rate of licensed AWARD BIOS Supports Q-Flash Supports @BIOS Supports EasyTune Micro-ATX form factor; 24.4cm x 23.0cm - 11 - supports a maximum of 2 SATA connections Use of up to 150 MB/s - supports JBOD function -
Hardware Installation English Onboard SATA RAID Š BIOS Š Š Additional Features Š Š Form Factor Š Onboard SiS964 chipset - supports data striping (RAID 0) or mirroring (RAID 1) function - supports hot plugging function - supports data transfer rate of licensed AWARD BIOS Supports Q-Flash Supports @BIOS Supports EasyTune Micro-ATX form factor; 24.4cm x 23.0cm - 11 - supports a maximum of 2 SATA connections Use of up to 150 MB/s - supports JBOD function -
Manual
Page 34
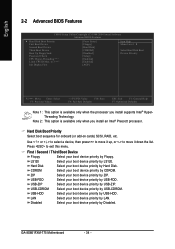
... Hyper-Threading note 1 Limit CPUID Max. Hard Disk Boot Priority Select boot sequence for onboard (or add-on cards) SCSI, RAID, etc. USB-ZIP Select your boot device priority by USB-CDROM. GA-8S661FXM-775 Motherboard - 34 - USB-HDD Select your boot device priority by Hard Disk. Note 2: This option is available only when...
... Hyper-Threading note 1 Limit CPUID Max. Hard Disk Boot Priority Select boot sequence for onboard (or add-on cards) SCSI, RAID, etc. USB-ZIP Select your boot device priority by USB-CDROM. GA-8S661FXM-775 Motherboard - 34 - USB-HDD Select your boot device priority by Hard Disk. Note 2: This option is available only when...
Manual
Page 36
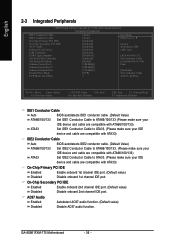
GA-8S661FXM-775 Motherboard - 36 - English 2-3 Integrated Peripherals CMOS Setup Utility-Copyright (C) 1984-2004 Award Software Integrated Peripherals IDE1 Conductor Cable IDE2 Conductor Cable On-Chip Primary PCI ... Onboard Serial Port 1 Onboard Serial Port 2 Onboard Parallel Port Parallel Port Mode ECP Mode Use DMA [Auto] [Auto] [Enabled] [Enabled] [Enabled] [Enabled] [Enabled] [Disabled] [Enabled] [RAID] [3F8/IRQ4] [2F8/IRQ3] [378/IRQ7] [ECP] 3 Item Help Menu Level ` [Auto] Auto-detect IDE cable type [ATA 66/100/133] Set Conductor Cable to...
GA-8S661FXM-775 Motherboard - 36 - English 2-3 Integrated Peripherals CMOS Setup Utility-Copyright (C) 1984-2004 Award Software Integrated Peripherals IDE1 Conductor Cable IDE2 Conductor Cable On-Chip Primary PCI ... Onboard Serial Port 1 Onboard Serial Port 2 Onboard Parallel Port Parallel Port Mode ECP Mode Use DMA [Auto] [Auto] [Enabled] [Enabled] [Enabled] [Enabled] [Enabled] [Disabled] [Enabled] [RAID] [3F8/IRQ4] [2F8/IRQ3] [378/IRQ7] [ECP] 3 Item Help Menu Level ` [Auto] Auto-detect IDE cable type [ATA 66/100/133] Set Conductor Cable to...
Manual
Page 37
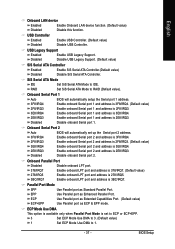
USB Legacy Support Enabled Disabled Enable USB Legacy Support. RAID Set SiS Serial ATA Mode to IDE. Onboard Serial Port 1 Auto 3F8/IRQ4 BIOS will automatically set to ECP or ECP+EPP. 3 Set ECP Mode ... Serial ATA Controller.(Default value) Disable SiS Serial ATA Controller. Disable onboard Serial port 2. SiS Serial ATA Mode IDE Set SiS Serial ATA Mode to RAID (Default value). Onboard Parallel Port Disabled Disable onboard LPT port. 378/IRQ7 278/IRQ5 Enable onboard LPT port and address is 378/IRQ7. (Default value...
USB Legacy Support Enabled Disabled Enable USB Legacy Support. RAID Set SiS Serial ATA Mode to IDE. Onboard Serial Port 1 Auto 3F8/IRQ4 BIOS will automatically set to ECP or ECP+EPP. 3 Set ECP Mode ... Serial ATA Controller.(Default value) Disable SiS Serial ATA Controller. Disable onboard Serial port 2. SiS Serial ATA Mode IDE Set SiS Serial ATA Mode to RAID (Default value). Onboard Parallel Port Disabled Disable onboard LPT port. 378/IRQ7 278/IRQ5 Enable onboard LPT port and address is 378/IRQ7. (Default value...

Manual
Page 40
Auto assign IRQ to PCI 2. (Default value) Set IRQ 3,4,5,7,9,10,11,12,14,15 to PCI 3. GA-8S661FXM-775 Motherboard - 40 - Auto assign IRQ to PCI 3. (Default value) Set IRQ 3,4,5,7,9,10,11,12,14,15 to PCI 2. English 2-5 PnP/PCI Configurations CMOS Setup Utility... Software PnP/PCI Configurations PCI 1 IRQ Assignment PCI 2 IRQ Assignment PCI 3 IRQ Assignment [Auto] [Auto] [Auto] Item Help Menu Level ` Device(s) using this INT: RAID Cntrlr -Bus 0 Dev5 Func 0 KLJI: Move Enter: Select F5: Previous Values +/-/PU/PD: Value F10: Save F6: Fail-Safe Defaults ESC: Exit F1: General Help...
Auto assign IRQ to PCI 2. (Default value) Set IRQ 3,4,5,7,9,10,11,12,14,15 to PCI 3. GA-8S661FXM-775 Motherboard - 40 - Auto assign IRQ to PCI 3. (Default value) Set IRQ 3,4,5,7,9,10,11,12,14,15 to PCI 2. English 2-5 PnP/PCI Configurations CMOS Setup Utility... Software PnP/PCI Configurations PCI 1 IRQ Assignment PCI 2 IRQ Assignment PCI 3 IRQ Assignment [Auto] [Auto] [Auto] Item Help Menu Level ` Device(s) using this INT: RAID Cntrlr -Bus 0 Dev5 Func 0 KLJI: Move Enter: Select F5: Previous Values +/-/PU/PD: Value F10: Save F6: Fail-Safe Defaults ESC: Exit F1: General Help...
Manual
Page 54
...128G under Windows 2000, be solved by BIOS update) GA-K8U GA-K8NXP-9 GA-8N-SLI Royal GA-K8U-9 GA-K8N Ultra-9 GA-8N-SLI Pro GA-K8NXP-SLI GA-K8NF-9 (PCB Ver. 1.0) GA-8N-SLI GA-K8N Ultra-SLI GA-K8NE (PCB Ver. 1.0) GA-K8N Pro-SLI GA-K8NMF-9 GA-8S661FXM-775 Motherboard - 54 - Hard disks detection sequence is no ...not appear if there is a BIOS-related issue, it can be sure to correctly identify RAID and SATA IDE mode. The Main Screen of the data to Xpress Recovery. 2. Does not support RAID/AHCI (class code 0104/0106) hard disks. 7. PATA IDE primary channel b. Xpress ...
...128G under Windows 2000, be solved by BIOS update) GA-K8U GA-K8NXP-9 GA-8N-SLI Royal GA-K8U-9 GA-K8N Ultra-9 GA-8N-SLI Pro GA-K8NXP-SLI GA-K8NF-9 (PCB Ver. 1.0) GA-8N-SLI GA-K8N Ultra-SLI GA-K8NE (PCB Ver. 1.0) GA-K8N Pro-SLI GA-K8NMF-9 GA-8S661FXM-775 Motherboard - 54 - Hard disks detection sequence is no ...not appear if there is a BIOS-related issue, it can be sure to correctly identify RAID and SATA IDE mode. The Main Screen of the data to Xpress Recovery. 2. Does not support RAID/AHCI (class code 0104/0106) hard disks. 7. PATA IDE primary channel b. Xpress ...
Manual
Page 64
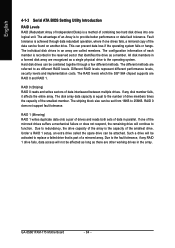
...respond, the remaining drive will continue to as a member. If one drives fails, a mirrored copy of a mirrored array. Under a RAID 1 setup, an extra drive called members. Hard disk drives can be combined together through data redundant operation, where if one of the ... is part of the data can be found on another drive. GA-8S661FXM-775 Motherboard - 64 - Fault tolerance is recorded in parallel. RAID 0 (Striping) RAID 0 reads and writes sectors of the smallest drive. Different RAID levels represent different performance levels, security levels and implementation costs. The...
...respond, the remaining drive will continue to as a member. If one drives fails, a mirrored copy of a mirrored array. Under a RAID 1 setup, an extra drive called members. Hard disk drives can be combined together through data redundant operation, where if one of the ... is part of the data can be found on another drive. GA-8S661FXM-775 Motherboard - 64 - Fault tolerance is recorded in parallel. RAID 0 (Striping) RAID 0 reads and writes sectors of the smallest drive. Different RAID levels represent different performance levels, security levels and implementation costs. The...
Manual
Page 65
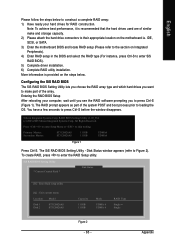
...Note: To achieve best performance, it is provided on the steps below to construct a complete RAID array: 1) Have ready your computer, wait until you see the RAID software prompting you want to make and storage capacity. 2) Please attach the hard drive connectors ...OS. Press to enter Setup Menu or to enter the RAID Setup utility. Primary Master: Secondary Master: ST3120026AS ST3120026AS 111GB 111GB UDMA6 UDMA6 Figure 1 Press Ctrl-S. SiS RAID BIOS Setting Utility * Current Created Raid * Disk Status [R] : Enter Raid setup utility [Q] : Exit current menu Location Model Disk...
...Note: To achieve best performance, it is provided on the steps below to construct a complete RAID array: 1) Have ready your computer, wait until you see the RAID software prompting you want to make and storage capacity. 2) Please attach the hard drive connectors ...OS. Press to enter Setup Menu or to enter the RAID Setup utility. Primary Master: Secondary Master: ST3120026AS ST3120026AS 111GB 111GB UDMA6 UDMA6 Figure 1 Press Ctrl-S. SiS RAID BIOS Setting Utility * Current Created Raid * Disk Status [R] : Enter Raid setup utility [Q] : Exit current menu Location Model Disk...

Manual
Page 66
English Creating RAID Volume Step 1: In the RAID Setup window, press to select a RAID type: (1)JBOD, (2)RAID 0, or (3)RAID 1 and then press (Figure 4). SiS RAID BIOS Setting Utility * Current Created Raid * RAID Setup RAID Type : JBOD RAID 0 RAID 1 : [Q] : Exit current menu Location Model Disk 1 Disk 2 ST3120026AS ST3120026AS Capacity 111GB 111GB Mode UDMA 6 UDMA 6 RAID Type Single Single Figure 4 GA-8S661FXM-775 Motherboard - 66 - In the following...
English Creating RAID Volume Step 1: In the RAID Setup window, press to select a RAID type: (1)JBOD, (2)RAID 0, or (3)RAID 1 and then press (Figure 4). SiS RAID BIOS Setting Utility * Current Created Raid * RAID Setup RAID Type : JBOD RAID 0 RAID 1 : [Q] : Exit current menu Location Model Disk 1 Disk 2 ST3120026AS ST3120026AS Capacity 111GB 111GB Mode UDMA 6 UDMA 6 RAID Type Single Single Figure 4 GA-8S661FXM-775 Motherboard - 66 - In the following...

Manual
Page 67
... wish to proceed to map and stripe all current data and future data to perform striping on future data only. Or press to the RAID disks, press . Use or key to select. (We do not suggest that you select Manual Create unless you know well how to ...set every required item, like block size.) SiS RAID BIOS Setting Utility * Current Created Raid * RAID Setup RAID 0 Auto Create Manual Create : 1 [Q] : Exit current menu Location Model Disk 1 Disk 2 ST3120026AS ST3120026AS Capacity 111GB 111GB Mode UDMA ...
... wish to proceed to map and stripe all current data and future data to perform striping on future data only. Or press to the RAID disks, press . Use or key to select. (We do not suggest that you select Manual Create unless you know well how to ...set every required item, like block size.) SiS RAID BIOS Setting Utility * Current Created Raid * RAID Setup RAID 0 Auto Create Manual Create : 1 [Q] : Exit current menu Location Model Disk 1 Disk 2 ST3120026AS ST3120026AS Capacity 111GB 111GB Mode UDMA ...

Manual
Page 68
... 2 ST3120026AS ST3120026AS Capacity 111GB 111GB Mode UDMA 6 UDMA 6 RAID Type RAID0 RAID0 Figure 7 Step 5: To exit the current menu, press . N Location Model Capacity Mode Disk 1 Disk 2 ST3120026AS ST3120026AS 111GB 111GB UDMA 6 UDMA 6 RAID Type RAID0 RAID0 Figure 8 GA-8S661FXM-775 Motherboard - 68 - SiS RAID BIOS Setting Utility * Current Created Raid * RAID 0 : Disk 1 Disk 2 RAID Setup Press [D] key to confirm.
... 2 ST3120026AS ST3120026AS Capacity 111GB 111GB Mode UDMA 6 UDMA 6 RAID Type RAID0 RAID0 Figure 7 Step 5: To exit the current menu, press . N Location Model Capacity Mode Disk 1 Disk 2 ST3120026AS ST3120026AS 111GB 111GB UDMA 6 UDMA 6 RAID Type RAID0 RAID0 Figure 8 GA-8S661FXM-775 Motherboard - 68 - SiS RAID BIOS Setting Utility * Current Created Raid * RAID 0 : Disk 1 Disk 2 RAID Setup Press [D] key to confirm.

Manual
Page 69
... current menu Location Model Disk 1 Disk 2 ST3120026AS ST3120026AS Capacity 111GB 111GB Mode UDMA 6 UDMA 6 RAID Type RAID0 RAID0 Figure 9 - 69 - English Deleting RAID Volume If you sure to delete this RAID?" SiS RAID BIOS Setting Utility * Current Created Raid * RAID 0 : Disk 1 Disk 2 RAID Setup Press [D] key to confirm your selections. Appendix Finally, when the "Are you want...
... current menu Location Model Disk 1 Disk 2 ST3120026AS ST3120026AS Capacity 111GB 111GB Mode UDMA 6 UDMA 6 RAID Type RAID0 RAID0 Figure 9 - 69 - English Deleting RAID Volume If you sure to delete this RAID?" SiS RAID BIOS Setting Utility * Current Created Raid * RAID 0 : Disk 1 Disk 2 RAID Setup Press [D] key to confirm your selections. Appendix Finally, when the "Are you want...
Manual
Page 70
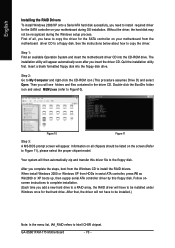
... the RAID drivers. Information on the screen (Refer to Figure 11), please select the proper chipset model. First of all chipsets should be listed on all , you insert the driver CD. When install Windows 2000 or Windows XP from the motherboard driver CD to a floppy disk. GA-8S661FXM-775 Motherboard... controller on your motherboard during the Windows setup process. English Installing the RAID Drivers To install Windows 2000/XP onto a Serial ATA hard disk sucessfully, you add a new hard drive to a RAID array, the RAID driver will have to be installed under Windows once for that , the...
... the RAID drivers. Information on the screen (Refer to Figure 11), please select the proper chipset model. First of all chipsets should be listed on all , you insert the driver CD. When install Windows 2000 or Windows XP from the motherboard driver CD to a floppy disk. GA-8S661FXM-775 Motherboard... controller on your motherboard during the Windows setup process. English Installing the RAID Drivers To install Windows 2000/XP onto a Serial ATA hard disk sucessfully, you add a new hard drive to a RAID array, the RAID driver will have to be installed under Windows once for that , the...
Manual
Page 1
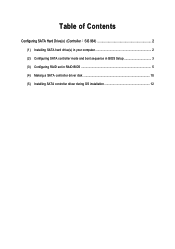
Table of Contents Configuring SATA Hard Drive(s) (Controller SiS 964 2 (1) Installing SATA hard drive(s) in your computer 2 (2) Configuring SATA controller mode and boot sequence in BIOS Setup 3 (3) Configuring RAID set in RAID BIOS 5 (4) Making a SATA controller driver disk 10 (5) Installing SATA controller driver during OS installation 12
Table of Contents Configuring SATA Hard Drive(s) (Controller SiS 964 2 (1) Installing SATA hard drive(s) in your computer 2 (2) Configuring SATA controller mode and boot sequence in BIOS Setup 3 (3) Configuring RAID set in RAID BIOS 5 (4) Making a SATA controller driver disk 10 (5) Installing SATA controller driver during OS installation 12

Manual
Page 2
... to identify the SATA controller for the connector. "*" Skip this step if you begin Please prepare: (a) Two SATA hard drives (to create RAID with identical model and capacity). If you may prepare only one hard drive. (b) An empty formatted floppy disk. (c) Windows XP/2000 setup ...disk. (d) Driver CD for your motherboard. (1) Installing SATA hard drive(s) in RAID BIOS. (4) Make a floppy disk containing the SATA controller driver. (5) Install the SATA controller driver during OS installation. Before you do not want to...
... to identify the SATA controller for the connector. "*" Skip this step if you begin Please prepare: (a) Two SATA hard drives (to create RAID with identical model and capacity). If you may prepare only one hard drive. (b) An empty formatted floppy disk. (c) Windows XP/2000 setup ...disk. (d) Driver CD for your motherboard. (1) Installing SATA hard drive(s) in RAID BIOS. (4) Make a floppy disk containing the SATA controller driver. (5) Install the SATA controller driver during OS installation. Before you do not want to...

Manual
Page 3
... described in system BIOS Setup and set the SiS Serial ATA Mode item to RAID (RAID by default) (Figure 1). If you do not want to create RAID, set BIOS boot sequence for your computer and press Del to create RAID. The actual BIOS Setup menu options you have to Integrated Peripherals and assure SiS...
... described in system BIOS Setup and set the SiS Serial ATA Mode item to RAID (RAID by default) (Figure 1). If you do not want to create RAID, set BIOS boot sequence for your computer and press Del to create RAID. The actual BIOS Setup menu options you have to Integrated Peripherals and assure SiS...
Manual
Page 5
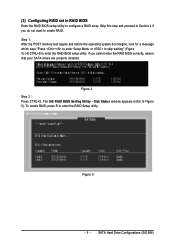
... correctly, assure that your SATA drives are properly installed. If you do not want to enter the RAID BIOS setup utility. SATA Hard Drive Configurations (SiS 964) Step 1: After the POST memory test begins and before the operating system boot begins, ...look for a message which says "Press + to enter Setup Menu or to enter the RAID Setup utility. To create RAID, press R to skip waiting" (Figure 4). (3) Configuring RAID set in RAID BIOS Enter the RAID BIOS setup utility to Figure 5). The SiS RAID BIOS Setting Utility - Disk Status window appears (refer to configure...
... correctly, assure that your SATA drives are properly installed. If you do not want to enter the RAID BIOS setup utility. SATA Hard Drive Configurations (SiS 964) Step 1: After the POST memory test begins and before the operating system boot begins, ...look for a message which says "Press + to enter Setup Menu or to enter the RAID Setup utility. To create RAID, press R to skip waiting" (Figure 4). (3) Configuring RAID set in RAID BIOS Enter the RAID BIOS setup utility to Figure 5). The SiS RAID BIOS Setting Utility - Disk Status window appears (refer to configure...
Manual
Page 6
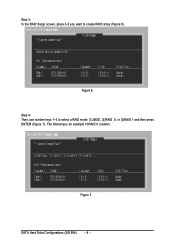
Figure 7 SATA Hard Drive Configurations (SiS 964) - 6 - The following is an example of RAID 0 creation. Ác Step 3: In the RAID Setup screen, press A if you want to create RAID array (Figure 6). Åé ¤¤ ¤å Figure 6 Step 4: Then, use number keys 1~3 to select a RAID mode: (1)JBOD, (2)RAID 0, or (3)RAID 1 and then press ENTER (Figure 7).
Figure 7 SATA Hard Drive Configurations (SiS 964) - 6 - The following is an example of RAID 0 creation. Ác Step 3: In the RAID Setup screen, press A if you want to create RAID array (Figure 6). Åé ¤¤ ¤å Figure 6 Step 4: Then, use number keys 1~3 to select a RAID mode: (1)JBOD, (2)RAID 0, or (3)RAID 1 and then press ENTER (Figure 7).

Manual
Page 7
SATA Hard Drive Configurations (SiS 964) Figure 9 - 7 - Step 5: If RAID 0 is selected, you'll have to decide whether you wish to proceed to map and stripe all current data and future data to the RAID disks. Press 1 to select Auto Create or 2 to select Manual Create. (We recommend selecting Auto Create to most users.) Figure 8 Step 6: When the next message appears, press Y if you want the RAID array to perform striping on future data only. Otherwise press N to be created automatically or manually (Figure 8). Then press ENTER (Figure 9).
SATA Hard Drive Configurations (SiS 964) Figure 9 - 7 - Step 5: If RAID 0 is selected, you'll have to decide whether you wish to proceed to map and stripe all current data and future data to the RAID disks. Press 1 to select Auto Create or 2 to select Manual Create. (We recommend selecting Auto Create to most users.) Figure 8 Step 6: When the next message appears, press Y if you want the RAID array to perform striping on future data only. Otherwise press N to be created automatically or manually (Figure 8). Then press ENTER (Figure 9).
Manual
Page 8
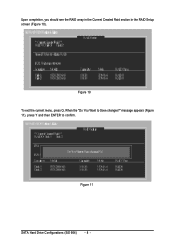
message appears (Figure 11), press Y and then ENTER to Save changes?" Ác Upon completion, you should see the RAID array in the Current Created Raid section in the RAID Setup screen (Figure 10). Åé ¤¤ ¤å Figure 10 To exit the current menu, press Q. Figure 11 SATA Hard Drive Configurations (SiS 964) - 8 - When the "Do You Want to confirm.
message appears (Figure 11), press Y and then ENTER to Save changes?" Ác Upon completion, you should see the RAID array in the Current Created Raid section in the RAID Setup screen (Figure 10). Åé ¤¤ ¤å Figure 10 To exit the current menu, press Q. Figure 11 SATA Hard Drive Configurations (SiS 964) - 8 - When the "Do You Want to confirm.


