
Manual
Page 3
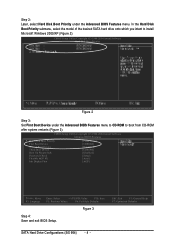
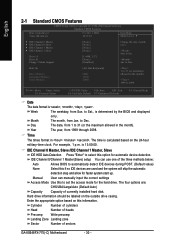
... drive(s). CMOS Setup Utility-Copyright (C) 1984-2004 Award Software Integrated Peripherals ` KLJI: Move F3: Language Enter: Select +/-/PU/PD: Value F10: Save F5: Previous Values F6: Fail-Safe Defaults Figure 1 ESC: Exit F1: General Help F7: Optimized Defaults The BIOS Setup menus described in system BIOS Setup and set the SiS...
... drive(s). CMOS Setup Utility-Copyright (C) 1984-2004 Award Software Integrated Peripherals ` KLJI: Move F3: Language Enter: Select +/-/PU/PD: Value F10: Save F5: Previous Values F6: Fail-Safe Defaults Figure 1 ESC: Exit F1: General Help F7: Optimized Defaults The BIOS Setup menus described in system BIOS Setup and set the SiS...
Manual
Page 4
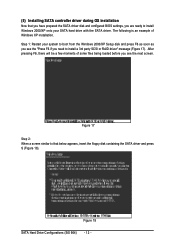
...] Password Check [Setup] Flexible AGP 8X [Auto] Init Display First [AGP] KLJI: Move F3: Language Enter: Select +/-/PU/PD: Value F10: Save F5: Previous Values F6: Fail-Safe Defaults Figure 3 Step 4: Save and exit BIOS Setup. ESC: Exit F1: General Help F7: Optimized Defaults SATA Hard Drive Configurations (SiS 964) - 4 -
...] Password Check [Setup] Flexible AGP 8X [Auto] Init Display First [AGP] KLJI: Move F3: Language Enter: Select +/-/PU/PD: Value F10: Save F5: Previous Values F6: Fail-Safe Defaults Figure 3 Step 4: Save and exit BIOS Setup. ESC: Exit F1: General Help F7: Optimized Defaults SATA Hard Drive Configurations (SiS 964) - 4 -
Manual
Page 12
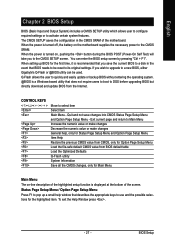
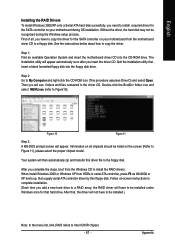
... Hard Drive Configurations (SiS 964) - 12 - Figure 17 Step 2: When a screen similar to install a 3rd party SCSI or RAID driver" message (Figure 17). After pressing F6, there will be a few moments of ¤¤ Windows XP installation. ¤å Step 1: Restart your SATA hard drive with the SATA driver. The following... you are ready to install Windows 2000/XP onto your system to boot from the Windows 2000/XP Setup disk and press F6 as soon as you see the "Press F6 if you need to that you have prepared the SATA driver disk and configured BIOS settings, you see the next screen...
... Hard Drive Configurations (SiS 964) - 12 - Figure 17 Step 2: When a screen similar to install a 3rd party SCSI or RAID driver" message (Figure 17). After pressing F6, there will be a few moments of ¤¤ Windows XP installation. ¤å Step 1: Restart your SATA hard drive with the SATA driver. The following... you are ready to install Windows 2000/XP onto your system to boot from the Windows 2000/XP Setup disk and press F6 as soon as you see the "Press F6 if you need to that you have prepared the SATA driver disk and configured BIOS settings, you see the next screen...
Manual
Page 27
... value or make changes Decrease the numeric value or make changes General help window that does not require users to boot to a new BIOS, either Gigabyte's Q-Flash or @BIOS utility can enter the BIOS setup screen by pressing "Ctrl + F1". To exit the Help Window press . - 27 - When the power is...
... value or make changes Decrease the numeric value or make changes General help window that does not require users to boot to a new BIOS, either Gigabyte's Q-Flash or @BIOS utility can enter the BIOS setup screen by pressing "Ctrl + F1". To exit the Help Window press . - 27 - When the power is...
Manual
Page 30
...(Default value) Select this information. to 2098 KLJI: Move Enter: Select F5: Previous Values +/-/PU/PD: Value F10: Save ESC: Exit F6: Fail-Safe Default F7: Optimized Defaults F1: General Help Date The date format is calculated based on the 24-hour military-time clock. For... from 1999 through 2098. to 31 (or maximum allowed in the month). The time is , , , . Manual User can use one of sectors GA-8S648FX-775(-C) Motherboard - 30 - IDE Channel 0/Channel 1 Master(Slave) setup You can manually input the correct settings Access Mode Use this option for the hard ...
...(Default value) Select this information. to 2098 KLJI: Move Enter: Select F5: Previous Values +/-/PU/PD: Value F10: Save ESC: Exit F6: Fail-Safe Default F7: Optimized Defaults F1: General Help Date The date format is calculated based on the 24-hour military-time clock. For... from 1999 through 2098. to 31 (or maximum allowed in the month). The time is , , , . Manual User can use one of sectors GA-8S648FX-775(-C) Motherboard - 30 - IDE Channel 0/Channel 1 Master(Slave) setup You can manually input the correct settings Access Mode Use this option for the hard ...
Manual
Page 32
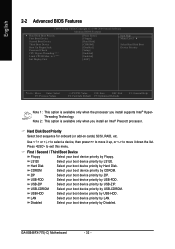
...SCSI, RAID, etc. Hard Disk Select your boot device priority by USB-ZIP. USB-ZIP Select your boot device priority by USB-CDROM. GA-8S648FX-775(-C) Motherboard - 32 - First / Second / Third Boot Device Floppy Select your boot device priority by Hard Disk. USB-CDROM Select your... Level ` Select Hard Disk Boot Device Priority KLJI: Move Enter: Select F5: Previous Values +/-/PU/PD: Value F10: Save ESC: Exit F6: Fail-Safe Default F7: Optimized Defaults F1: General Help Note 1: This option is available only when you install supports Intel® HyperThreading Technology...
...SCSI, RAID, etc. Hard Disk Select your boot device priority by USB-ZIP. USB-ZIP Select your boot device priority by USB-CDROM. GA-8S648FX-775(-C) Motherboard - 32 - First / Second / Third Boot Device Floppy Select your boot device priority by Hard Disk. USB-CDROM Select your... Level ` Select Hard Disk Boot Device Priority KLJI: Move Enter: Select F5: Previous Values +/-/PU/PD: Value F10: Save ESC: Exit F6: Fail-Safe Default F7: Optimized Defaults F1: General Help Note 1: This option is available only when you install supports Intel® HyperThreading Technology...
Manual
Page 34
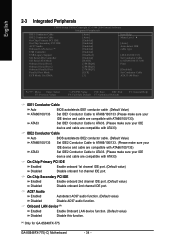
... Disable onboard 2nd channel IDE port. AC97 Audio Enabled Autodetect AC97 audio function. (Default value) Disabled Disable AC97 audio function. GA-8S648FX-775(-C) Motherboard - 34 - English 2-3 Integrated Peripherals CMOS Setup Utility-Copyright (C) 1984-2004 Award Software Integrated Peripherals IDE1 Conductor Cable IDE2...Conductor Cable ATA33 (40 Pins) KLJI: Move Enter: Select F5: Previous Values +/-/PU/PD: Value F10: Save ESC: Exit F6: Fail-Safe Default F7: Optimized Defaults F1: General Help IDE1 Conductor Cable Auto ATA66/100/133 ATA33 BIOS autodetects IDE1 conductor ...
... Disable onboard 2nd channel IDE port. AC97 Audio Enabled Autodetect AC97 audio function. (Default value) Disabled Disable AC97 audio function. GA-8S648FX-775(-C) Motherboard - 34 - English 2-3 Integrated Peripherals CMOS Setup Utility-Copyright (C) 1984-2004 Award Software Integrated Peripherals IDE1 Conductor Cable IDE2...Conductor Cable ATA33 (40 Pins) KLJI: Move Enter: Select F5: Previous Values +/-/PU/PD: Value F10: Save ESC: Exit F6: Fail-Safe Default F7: Optimized Defaults F1: General Help IDE1 Conductor Cable Auto ATA66/100/133 ATA33 BIOS autodetects IDE1 conductor ...

Manual
Page 36
... Off When AC-power is back to the system, the system will be always in "On" state. Enabled Enable PME Event Wake up. (Default value) GA-8S648FX-775(-C) Motherboard - 36 - Soft-Off by Alarm x Month Alarm x Day(of Month) x Time(hh:mm:ss) Power LED in "Off" state. (Default value) On When ...S3] Set suspend type to Suspend to RAM under ACPI OS KLJI: Move Enter: Select F5: Previous Values +/-/PU/PD: Value F10: Save ESC: Exit F6: Fail-Safe Default F7: Optimized Defaults F1: General Help ACPI Suspend Type S1(POS) Set ACPI suspend type to S1/POS (Power On Suspend). (Default...
... Off When AC-power is back to the system, the system will be always in "On" state. Enabled Enable PME Event Wake up. (Default value) GA-8S648FX-775(-C) Motherboard - 36 - Soft-Off by Alarm x Month Alarm x Day(of Month) x Time(hh:mm:ss) Power LED in "Off" state. (Default value) On When ...S3] Set suspend type to Suspend to RAM under ACPI OS KLJI: Move Enter: Select F5: Previous Values +/-/PU/PD: Value F10: Save ESC: Exit F6: Fail-Safe Default F7: Optimized Defaults F1: General Help ACPI Suspend Type S1(POS) Set ACPI suspend type to S1/POS (Power On Suspend). (Default...
Manual
Page 38
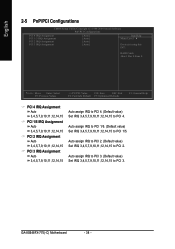
... Menu Level ` Device(s) using this INT: RAID Cntrlr -Bus 1 Dev 0 Func 0 KLJI: Move Enter: Select F5: Previous Values +/-/PU/PD: Value F10: Save ESC: Exit F6: Fail-Safe Default F7: Optimized Defaults F1: General Help PCI 4 IRQ Assignment Auto 3,4,5,7,9,10,11,12,14,15 PCI 1/5 IRQ Assignment Auto 3,4,5,7,9,10,11,12...) Set IRQ 3,4,5,7,9,10,11,12,14,15 to PCI 3. Auto assign IRQ to PCI 2. (Default value) Set IRQ 3,4,5,7,9,10,11,12,14,15 to PCI 1/5. GA-8S648FX-775(-C) Motherboard - 38 - Auto assign IRQ to PCI 1/5. (Default value) Set IRQ 3,4,5,7,9,10,11,12,14,15 to PCI 2.
... Menu Level ` Device(s) using this INT: RAID Cntrlr -Bus 1 Dev 0 Func 0 KLJI: Move Enter: Select F5: Previous Values +/-/PU/PD: Value F10: Save ESC: Exit F6: Fail-Safe Default F7: Optimized Defaults F1: General Help PCI 4 IRQ Assignment Auto 3,4,5,7,9,10,11,12,14,15 PCI 1/5 IRQ Assignment Auto 3,4,5,7,9,10,11,12...) Set IRQ 3,4,5,7,9,10,11,12,14,15 to PCI 3. Auto assign IRQ to PCI 2. (Default value) Set IRQ 3,4,5,7,9,10,11,12,14,15 to PCI 1/5. GA-8S648FX-775(-C) Motherboard - 38 - Auto assign IRQ to PCI 1/5. (Default value) Set IRQ 3,4,5,7,9,10,11,12,14,15 to PCI 2.
Manual
Page 39
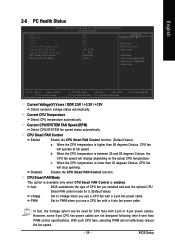
... degrees Celsius, the CPU fan speed will operate at next boot KLJI: Move Enter: Select F5: Previous Values +/-/PU/PD: Value F10: Save ESC: Exit F6: Fail-Safe Default F7: Optimized Defaults F1: General Help Current Voltage(V) Vcore / DDR 2.5V / +3.3V / +12V Detect system's voltage status automatically. In fact, the Voltage...
... degrees Celsius, the CPU fan speed will operate at next boot KLJI: Move Enter: Select F5: Previous Values +/-/PU/PD: Value F10: Save ESC: Exit F6: Fail-Safe Default F7: Optimized Defaults F1: General Help Current Voltage(V) Vcore / DDR 2.5V / +3.3V / +12V Detect system's voltage status automatically. In fact, the Voltage...
Manual
Page 40
... Timing issue KLJI: Move Enter: Select F5: Previous Values +/-/PU/PD: Value F10: Save ESC: Exit F6: Fail-Safe Default F7: Optimized Defaults F1: General Help Incorrect using these features may make system can't boot. GA-8S648FX-775(-C) Motherboard - 40 - For power users only. Auto BIOS will display "Locked" and read only if the...
... Timing issue KLJI: Move Enter: Select F5: Previous Values +/-/PU/PD: Value F10: Save ESC: Exit F6: Fail-Safe Default F7: Optimized Defaults F1: General Help Incorrect using these features may make system can't boot. GA-8S648FX-775(-C) Motherboard - 40 - For power users only. Auto BIOS will display "Locked" and read only if the...
Manual
Page 67
... be installed under Windows once for that , the driver will appear. The installation utility will see folders and files contained in serial ATA controller, press F6 as Win2000 or XP boots up, then supply serial ATA controller driver by this driver file to the floppy disk. Quit the installation utility first...
... be installed under Windows once for that , the driver will appear. The installation utility will see folders and files contained in serial ATA controller, press F6 as Win2000 or XP boots up, then supply serial ATA controller driver by this driver file to the floppy disk. Quit the installation utility first...