Manual
Page 1
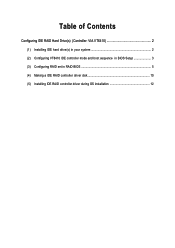
Table of Contents Configuring IDE RAID Hard Drive(s) (Controller: VIA VT6410 2 (1) Installing IDE hard drive(s) in your system 2 (2) Configuring VT6410 IDE controller mode and boot sequence in BIOS Setup 3 (3) Configuring RAID set in RAID BIOS 5 (4) Making a IDE RAID controller driver disk 10 (5) Installing IDE RAID controller driver during OS installation 12
Table of Contents Configuring IDE RAID Hard Drive(s) (Controller: VIA VT6410 2 (1) Installing IDE hard drive(s) in your system 2 (2) Configuring VT6410 IDE controller mode and boot sequence in BIOS Setup 3 (3) Configuring RAID set in RAID BIOS 5 (4) Making a IDE RAID controller driver disk 10 (5) Installing IDE RAID controller driver during OS installation 12
Manual
Page 2
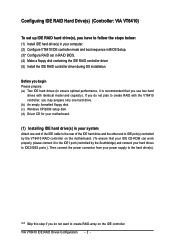
... driver during OS installation. Then connect the power connector from your hard drives to the hard drive(s). If you do not want to create RAID.array on the motherboard. (To ensure that you may prepare only one hard drive. (b) An empty formatted floppy disk. (c) Windows XP/2000 setup disk. (d) Driver ... drive(s) in your system Attach one end of the IDE cable to the rear of the IDE hard drive and the other end to create RAID with the VT6410 controller, you use two hard drives with identical model and capacity). Before you begin Please prepare: (a) Two IDE hard drives (to ensure...
... driver during OS installation. Then connect the power connector from your hard drives to the hard drive(s). If you do not want to create RAID.array on the motherboard. (To ensure that you may prepare only one hard drive. (b) An empty formatted floppy disk. (c) Windows XP/2000 setup disk. (d) Driver ... drive(s) in your system Attach one end of the IDE cable to the rear of the IDE hard drive and the other end to create RAID with the VT6410 controller, you use two hard drives with identical model and capacity). Before you begin Please prepare: (a) Two IDE hard drives (to ensure...

Manual
Page 3
... Port 0/2 Set to SATA Port 1/3 Set to enter BIOS Setup during POST (Power-On Self Test). To enable the VT6410 IDE controller, please select Onboard H/W RAID under the Integrated Peripherals menu and then press ENTER. If you set BIOS boot sequence for the IDE... H/W 1394 Onboard H/W LAN1 Onboard H/W LAN2 Onboard LAN1 Boot ROM Onboard LAN2 Boot ROM Onboard Serial Port 1 Onboard IrDA Port [Enabled] [RAID] Auto Ch.1 Master/Slave Ch.2 Master/Slave Ch.3 Master/Slave [Enabled] [Enabled] [Disabled] [Disabled] [Auto] [Enabled] [Enabled] [Enabled] [Enabled] [Disabled] [Disabled] [3F8/IRQ4] [2F8/IRQ] ...
... Port 0/2 Set to SATA Port 1/3 Set to enter BIOS Setup during POST (Power-On Self Test). To enable the VT6410 IDE controller, please select Onboard H/W RAID under the Integrated Peripherals menu and then press ENTER. If you set BIOS boot sequence for the IDE... H/W 1394 Onboard H/W LAN1 Onboard H/W LAN2 Onboard LAN1 Boot ROM Onboard LAN2 Boot ROM Onboard Serial Port 1 Onboard IrDA Port [Enabled] [RAID] Auto Ch.1 Master/Slave Ch.2 Master/Slave Ch.3 Master/Slave [Enabled] [Enabled] [Disabled] [Disabled] [Auto] [Enabled] [Enabled] [Enabled] [Enabled] [Disabled] [Disabled] [3F8/IRQ4] [2F8/IRQ] ...
Manual
Page 4
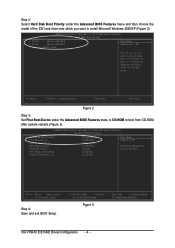
... and exit BIOS Setup. +/-/PU/PD: Value F10: Save F6: Fail-Safe Defaults Figure 3 ESC: Exit F1: General Help F7: Optimized Defaults VIA VT6410 IDE RAID Drives Configuration - 4 - CMOS Setup Utility-Copyright (C) 1984-2004 Award Software Advanced BIOS Features ` Hard Disk Boot Priority First Boot Device Second Boot Device Third Boot...
... and exit BIOS Setup. +/-/PU/PD: Value F10: Save F6: Fail-Safe Defaults Figure 3 ESC: Exit F1: General Help F7: Optimized Defaults VIA VT6410 IDE RAID Drives Configuration - 4 - CMOS Setup Utility-Copyright (C) 1984-2004 Award Software Advanced BIOS Features ` Hard Disk Boot Priority First Boot Device Second Boot Device Third Boot...
Manual
Page 5
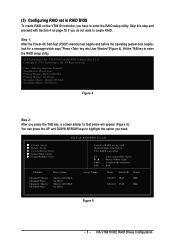
... : Maxtor 6E030L0 Primary Master : No Device Secondary Master : Maxtor 6E030L0 Secondary Master : No Device Figure 4 Step 2: After you have to enter the RAID setup utility. Scan Devices, Please wait... All Right reserved. You can press the UP and DOWN ARROW keys to highlight the option you do not... want to that below will appear (Figure 5). RAID BIOS Ver 2.11 X Create Array X Delete Array X Create/Delete Spare X Select Boot Array X Serial Number View Channel Channel0 Master Channel0 Slave ...
... : Maxtor 6E030L0 Primary Master : No Device Secondary Master : Maxtor 6E030L0 Secondary Master : No Device Figure 4 Step 2: After you have to enter the RAID setup utility. Scan Devices, Please wait... All Right reserved. You can press the UP and DOWN ARROW keys to highlight the option you do not... want to that below will appear (Figure 5). RAID BIOS Ver 2.11 X Create Array X Delete Array X Create/Delete Spare X Select Boot Array X Serial Number View Channel Channel0 Master Channel0 Slave ...
Manual
Page 6
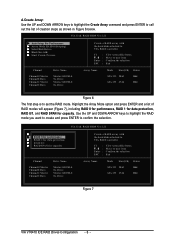
...NPrfocrecsaspacity Channel Channel0 Master Channel0 Slave Channel1 Master Channel1 Slave Drive Name Maxtor 6E030L0 No Drive Maxtor 6E030L0 No Drive Create a RAID array with the hard disks attached to VIA RAID controller F1 : K, L : Enter : ESC : View Array/disk Status Move to next item Confirm the selection ... Status ATA 133 28.63 Hdd ATA 133 27.24 Hdd Figure 6 The first step is to set the RAID mode. RAID BIOS Ver 2.11 X Auto Setup For Performance X Array Mode RAID 0 (Striping) X Select Disk Drives X Block Size 64K X Start Create Process Channel Channel0 Master Channel0 Slave ...
...NPrfocrecsaspacity Channel Channel0 Master Channel0 Slave Channel1 Master Channel1 Slave Drive Name Maxtor 6E030L0 No Drive Maxtor 6E030L0 No Drive Create a RAID array with the hard disks attached to VIA RAID controller F1 : K, L : Enter : ESC : View Array/disk Status Move to next item Confirm the selection ... Status ATA 133 28.63 Hdd ATA 133 27.24 Hdd Figure 6 The first step is to set the RAID mode. RAID BIOS Ver 2.11 X Auto Setup For Performance X Array Mode RAID 0 (Striping) X Select Disk Drives X Block Size 64K X Start Create Process Channel Channel0 Master Channel0 Slave ...
Manual
Page 7
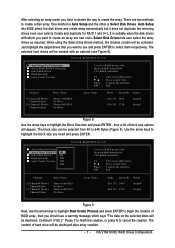
... drive will appear. Continue? (Y/N) ]." One method is Auto Setup and the other is suitable when the disk drives with the hard disks attached to VIA RAID controller F1 : K, L : Enter : ESC : View Array/disk Status Move to next item Confirm the selection Exit Channel [*] Channel0 Master Channel0 Slave [*] ... Mode Size(GB) Status ATA 133 28.63 Stripe0 ATA 133 27.24 Stripe1 Figure 8 Use the arrow keys to begin the creation of RAID array, then you should see Figure 8). VIA Tech. After selecting an array mode, you need and press ENTER. There are new ones. ...
... drive will appear. Continue? (Y/N) ]." One method is Auto Setup and the other is suitable when the disk drives with the hard disks attached to VIA RAID controller F1 : K, L : Enter : ESC : View Array/disk Status Move to next item Confirm the selection Exit Channel [*] Channel0 Master Channel0 Slave [*] ... Mode Size(GB) Status ATA 133 28.63 Stripe0 ATA 133 27.24 Stripe1 Figure 8 Use the arrow keys to begin the creation of RAID array, then you should see Figure 8). VIA Tech. After selecting an array mode, you need and press ENTER. There are new ones. ...
Manual
Page 8
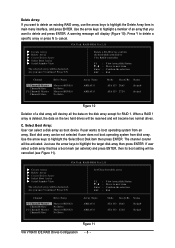
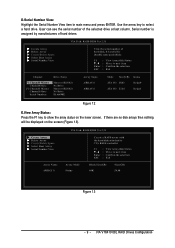
... Select Boot Array X Serial Number View The selected array will be reserved and will become two normal drives. Press Y/N Delete a RAID array contain the hard disks attached to VIA RAID controller F1 : K, L : Enter : ESC : View Array/disk Status Move to next item Confirm the selection Exit Channel [*] ... boot setting will be not selected if user does not boot operating system from an array. When a RAID 1 array is deleted, the data on the disk array except for RAID 1. Are you sure? C. RAID BIOS Ver 2.11 X Create Array X Delete Array X Create/Delete Spare X Select Boot Array X...
... Select Boot Array X Serial Number View The selected array will be reserved and will become two normal drives. Press Y/N Delete a RAID array contain the hard disks attached to VIA RAID controller F1 : K, L : Enter : ESC : View Array/disk Status Move to next item Confirm the selection Exit Channel [*] ... boot setting will be not selected if user does not boot operating system from an array. When a RAID 1 array is deleted, the data on the disk array except for RAID 1. Are you sure? C. RAID BIOS Ver 2.11 X Create Array X Delete Array X Create/Delete Spare X Select Boot Array X...
Manual
Page 9
... Array/disk Status Move to select a hard drive. VIA Tech. D.Serial Number View: Highlight the Serial Number View item in main menu and press ENTER. RAID BIOS Ver 2.11 X Create Array X Delete Array X Create/Delete Spare X Select Boot Array X Serial Number View View the serial number of hard disk, it is... of the selected drive at last column. If there are no disk arrays then nothing will be displayed on the lower screen. VIA VT6410 IDE RAID Drives Configuration Use the arrow key to next item Confirm the selection Exit Block Size(GB) 64K Size(GB) 54.48 Figure 13 - 9 -
... Array/disk Status Move to select a hard drive. VIA Tech. D.Serial Number View: Highlight the Serial Number View item in main menu and press ENTER. RAID BIOS Ver 2.11 X Create Array X Delete Array X Create/Delete Spare X Select Boot Array X Serial Number View View the serial number of hard disk, it is... of the selected drive at last column. If there are no disk arrays then nothing will be displayed on the lower screen. VIA VT6410 IDE RAID Drives Configuration Use the arrow key to next item Confirm the selection Exit Block Size(GB) 64K Size(GB) 54.48 Figure 13 - 9 -
Manual
Page 10
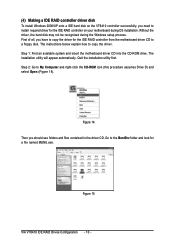
...installation utility first. Figure 14 Then you have to copy the driver for the IDE RAID controller from the motherboard driver CD to install required driver for a file named MENU.exe. Ác (4) Making a IDE RAID controller driver disk Åé To install Windows 2000/XP onto a IDE hard... disk on your motherboard during the Windows setup process. Figure 15 VIA VT6410 IDE RAID Drives Configuration - 10 - Go to the BootDrv folder and look for the IDE RAID controller on the VT6410 controller successfully, you need to ¤å a floppy disk. The installation...
...installation utility first. Figure 14 Then you have to copy the driver for the IDE RAID controller from the motherboard driver CD to install required driver for a file named MENU.exe. Ác (4) Making a IDE RAID controller driver disk Åé To install Windows 2000/XP onto a IDE hard... disk on your motherboard during the Windows setup process. Figure 15 VIA VT6410 IDE RAID Drives Configuration - 10 - Go to the BootDrv folder and look for the IDE RAID controller on the VT6410 controller successfully, you need to ¤å a floppy disk. The installation...
Manual
Page 11
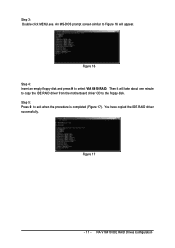
Step 5: Press 0 to select VIA 6410 RAID. Figure 17 - 11 - An MS-DOS prompt screen similar to Figure 16 will take about one minute to copy the IDE RAID driver from the motherboard driver CD to the floppy disk. You have copied the IDE RAID driver successfully. Then it will appear. Step 3: Double-click MENU.exe. VIA VT6410 IDE RAID Drives Configuration Figure 16 Step 4: Insert an empty floppy disk and press H to exit when the procedure is completed (Figure 17).
Step 5: Press 0 to select VIA 6410 RAID. Figure 17 - 11 - An MS-DOS prompt screen similar to Figure 16 will take about one minute to copy the IDE RAID driver from the motherboard driver CD to the floppy disk. You have copied the IDE RAID driver successfully. Then it will appear. Step 3: Double-click MENU.exe. VIA VT6410 IDE RAID Drives Configuration Figure 16 Step 4: Insert an empty floppy disk and press H to exit when the procedure is completed (Figure 17).

Manual
Page 12
... 2000/XP Setup disk and press F6 as soon as you see the next screen for use with the IDE RAID driver. Then you need to install a 3rd party SCSI or RAID driver. After pressing the F6 key, there will be a few moments of one or more mass storage devices installed in... determine the type of some files being loaded before you see a message which says "Press F6 if you will be asked to select the IDE RAID controller on your system to boot from a mass storage device manufacturer, or do not want to specify additional mass storage devices for use with Windows...
... 2000/XP Setup disk and press F6 as soon as you see the next screen for use with the IDE RAID driver. Then you need to install a 3rd party SCSI or RAID driver. After pressing the F6 key, there will be a few moments of one or more mass storage devices installed in... determine the type of some files being loaded before you see a message which says "Press F6 if you will be asked to select the IDE RAID controller on your system to boot from a mass storage device manufacturer, or do not want to specify additional mass storage devices for use with Windows...
Manual
Page 13
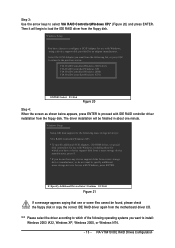
... a message appears saying that one or some files cannot be finished in about one minute. VIA RAID Controller(Windows 2003 IA32) VIA RAID Controller(Windows XP) VIA RAID Controller(Windows 2000) VIA RAID Controller(Windows NT4) ENTER=Select F3=Exit Figure 20 Step 4: When the screen as shown below ...IA32, Windows XP, Windows 2000, or Windows NT4. - 13 - Then it will be found, please check the floppy disk or copy the correct IDE RAID driver again from a mass storage device manufacturer, or do not have a device support disk from a mass storage device manufacturer, press S. * If you...
... a message appears saying that one or some files cannot be finished in about one minute. VIA RAID Controller(Windows 2003 IA32) VIA RAID Controller(Windows XP) VIA RAID Controller(Windows 2000) VIA RAID Controller(Windows NT4) ENTER=Select F3=Exit Figure 20 Step 4: When the screen as shown below ...IA32, Windows XP, Windows 2000, or Windows NT4. - 13 - Then it will be found, please check the floppy disk or copy the correct IDE RAID driver again from a mass storage device manufacturer, or do not have a device support disk from a mass storage device manufacturer, press S. * If you...
Manual
Page 14
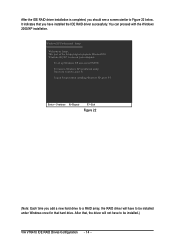
...a Windows XP installation using Recovery Console, press R. Enter= Continue R=Repair F3=Exit Figure 22 (Note: Each time you add a new hard drive to a RAID array, the RAID driver will not have to be installed under Windows once for that you should see a screen similar to be installed.) VIA VT6410 IDE... RAID Drives Configuration - 14 - To quit Setup without installing Windows XP, press F3. You can proceed with the Windows Åé 2000/XP installation. ...
...a Windows XP installation using Recovery Console, press R. Enter= Continue R=Repair F3=Exit Figure 22 (Note: Each time you add a new hard drive to a RAID array, the RAID driver will not have to be installed under Windows once for that you should see a screen similar to be installed.) VIA VT6410 IDE... RAID Drives Configuration - 14 - To quit Setup without installing Windows XP, press F3. You can proceed with the Windows Åé 2000/XP installation. ...
Manual
Page 7
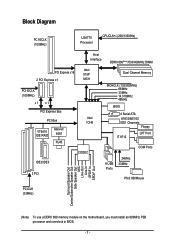
...(Note)/533/400MHz DIMM PCI Express x16 Intel 915P 2 PCI Express x1 MCH PCI-ECLK (100MHz) x1 x1 PCI Express Bus PCI Bus VT6410 IDE RAID Marvell 8001 RJ45 IDE2/IDE3 Intel ICH6 CODEC 3 PCI Dual Channel Memory MCHCLK (133/200MHz) 66MHz 33MHz 14.318MHz 48MHz BIOS 4 Serial ATA ATA33/66...
...(Note)/533/400MHz DIMM PCI Express x16 Intel 915P 2 PCI Express x1 MCH PCI-ECLK (100MHz) x1 x1 PCI Express Bus PCI Bus VT6410 IDE RAID Marvell 8001 RJ45 IDE2/IDE3 Intel ICH6 CODEC 3 PCI Dual Channel Memory MCHCLK (133/200MHz) 66MHz 33MHz 14.318MHz 48MHz BIOS 4 Serial ATA ATA33/66...

Manual
Page 10
...SATA Peripherals Onboard LAN Š Supports the latest Intel® Pentium® 4 LGA775 CPU Š Supports 800/533MHz FSB Š L2 cache varies with RAID, allows connection of 4 IDE devices(IDE2,IDE3)(Note 3) Š 1 FDD connection, allows connection of 2 FDD devices Š 4 Serial ATA connections &#...mode for system usage and therefore the actual memory size is less than the stated amount. For example, 4 GB of 2 IDE devices(IDE1) - GA-8I915P-D Motherboard - 10 - Supported on the Win 2000/XP operating systems Š 2 IDE connection (UDMA 33/ATA 66/ATA 100/ATA 133), compatible...
...SATA Peripherals Onboard LAN Š Supports the latest Intel® Pentium® 4 LGA775 CPU Š Supports 800/533MHz FSB Š L2 cache varies with RAID, allows connection of 4 IDE devices(IDE2,IDE3)(Note 3) Š 1 FDD connection, allows connection of 2 FDD devices Š 4 Serial ATA connections &#...mode for system usage and therefore the actual memory size is less than the stated amount. For example, 4 GB of 2 IDE devices(IDE1) - GA-8I915P-D Motherboard - 10 - Supported on the Win 2000/XP operating systems Š 2 IDE connection (UDMA 33/ATA 66/ATA 100/ATA 133), compatible...

Manual
Page 11
MIC ; Side Speaker Out connection Š Supports SPDIF In/Out connection Š CD In On-Board IDE RAID Š Built-in VT6410 chipset (IDE2, IDE3) Š Supports disk striping (RAID 0) or disk mirroring (RAID 1) or striping + mirroring (RAID 0 + RAID 1) Š supports JBOD function Š Supports concurrent dual ATA133 IDE controller operation Š Supports ATAPI mode for...
MIC ; Side Speaker Out connection Š Supports SPDIF In/Out connection Š CD In On-Board IDE RAID Š Built-in VT6410 chipset (IDE2, IDE3) Š Supports disk striping (RAID 0) or disk mirroring (RAID 1) or striping + mirroring (RAID 0 + RAID 1) Š supports JBOD function Š Supports concurrent dual ATA133 IDE controller operation Š Supports ATAPI mode for...

Manual
Page 34
...® Pentium® 4 processor with HT Technology. LS120 Select your boot device priority by LS120. Hard Disk Select your boot device priority by Hard Disk. GA-8I915P-D Motherboard - 34 - First / Second / Third Boot Device Floppy Select your boot device priority by Floppy. USB-HDD Select your boot device priority by USB-HDD... by USB-FDD. CDROM Select your boot device priority by CDROM. Hard Disk Boot Priority Select boot sequence for onboard(or add-on cards) SCSI, RAID, etc. Disabled Disable this menu.
...® Pentium® 4 processor with HT Technology. LS120 Select your boot device priority by LS120. Hard Disk Select your boot device priority by Hard Disk. GA-8I915P-D Motherboard - 34 - First / Second / Third Boot Device Floppy Select your boot device priority by Floppy. USB-HDD Select your boot device priority by USB-HDD... by USB-FDD. CDROM Select your boot device priority by CDROM. Hard Disk Boot Priority Select boot sequence for onboard(or add-on cards) SCSI, RAID, etc. Disabled Disable this menu.

Manual
Page 36
... Port 0/2 Set to SATA Port 1/3 Set to use up to 6 HDDs to USB Controller USB 2.0 Controller USB Keyboard Support USB Mouse Support AC97 Audio Onboard H/W RAID Onboard H/W LAN Onboard LAN Boot ROM Onboard Serial Port 1 Onboard Serial Port 2 Onboard Parallel Port Parallel Port Mode x ECP Mode Use DMA [Enabled] [Auto] Ch... On-Chip SATA mode to Non-Combined, SATA will auto set to PATA mode. If PATA IDE were set to Ch. 0 Master/Slave,this function. GA-8I915P-D Motherboard - 36 -
... Port 0/2 Set to SATA Port 1/3 Set to use up to 6 HDDs to USB Controller USB 2.0 Controller USB Keyboard Support USB Mouse Support AC97 Audio Onboard H/W RAID Onboard H/W LAN Onboard LAN Boot ROM Onboard Serial Port 1 Onboard Serial Port 2 Onboard Parallel Port Parallel Port Mode x ECP Mode Use DMA [Enabled] [Auto] Ch... On-Chip SATA mode to Non-Combined, SATA will auto set to PATA mode. If PATA IDE were set to Ch. 0 Master/Slave,this function. GA-8I915P-D Motherboard - 36 -

Manual
Page 37
... is 3F8/IRQ4. Enabled Disabled Enable USB 2.0 Controller. (Default value) Disable USB 2.0 Controller. USB Keyboard Support Enabled Disabled Enable USB Keyboard Support. Onboard H/W RAID Enabled Enable Onboard H/W RAID function. (Default value) Disabled Disable this function. Disabled Disable onboard Serial port 1. Disable USB Keyboard Support. (Default value) USB Mouse Support Enabled Enable USB...
... is 3F8/IRQ4. Enabled Disabled Enable USB 2.0 Controller. (Default value) Disable USB 2.0 Controller. USB Keyboard Support Enabled Disabled Enable USB Keyboard Support. Onboard H/W RAID Enabled Enable Onboard H/W RAID function. (Default value) Disabled Disable this function. Disabled Disable onboard Serial port 1. Disable USB Keyboard Support. (Default value) USB Mouse Support Enabled Enable USB...


