
Manual
Page 5
Channel Audio Function Introduction 69 4-1-5 Jack-Sensing Introduction 75 4-2 Troubleshooting 77 - 5 - Chapter 3 Install Drivers 51 3-1 Install Chipset Drivers 51 3-2 SoftwareApplications 52 3-3 Driver CD Information 52 3-4 Hardware Information 53 3-5 Contact Us ...53 Chapter 4 Appendix ...55 4-1 Unique Software Utilities 55 4-1-1 EasyTune 5 Introduction 56 4-1-2 Xpress Recovery2 Introduction 57 4-1-3 Flash BIOS Method Introduction 60 4-1-4 2- / 4- / 6-
Channel Audio Function Introduction 69 4-1-5 Jack-Sensing Introduction 75 4-2 Troubleshooting 77 - 5 - Chapter 3 Install Drivers 51 3-1 Install Chipset Drivers 51 3-2 SoftwareApplications 52 3-3 Driver CD Information 52 3-4 Hardware Information 53 3-5 Contact Us ...53 Chapter 4 Appendix ...55 4-1 Unique Software Utilities 55 4-1-1 EasyTune 5 Introduction 56 4-1-2 Xpress Recovery2 Introduction 57 4-1-3 Flash BIOS Method Introduction 60 4-1-4 2- / 4- / 6-
Manual
Page 16
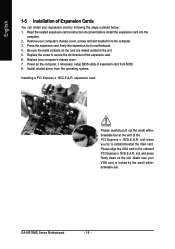
...slot .Make sure your VGA card is locked by following the steps outlined below: 1. Power on the card are indeed seated in motherboard. 4. GA-8I915ME Series Motherboard - 16 - Replace your computer's chassis cover, screws and slot bracket from the operating system. Please align the VGA card to ... on the computer, if necessary, setup BIOS utility of the PCI Express x 16/G.E.A.R. Remove your computer's chassis cover. 7. Install related driver from the computer. 3. Replace the screw to the onboard PCI Express x 16/G.E.A.R. slot when you try to install/Uninstall the VGA card.
...slot .Make sure your VGA card is locked by following the steps outlined below: 1. Power on the card are indeed seated in motherboard. 4. GA-8I915ME Series Motherboard - 16 - Replace your computer's chassis cover, screws and slot bracket from the operating system. Please align the VGA card to ... on the computer, if necessary, setup BIOS utility of the PCI Express x 16/G.E.A.R. Remove your computer's chassis cover. 7. Install related driver from the computer. 3. Replace the screw to the onboard PCI Express x 16/G.E.A.R. slot when you try to install/Uninstall the VGA card.
Manual
Page 17
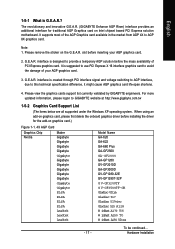
G.E.A.R. When using an add-on graphics card, please first delete the onboard graphics driver before installing the driver for traditional AGP Graphics card on Intel chipset based PCI Express solution motherboard. Note: 1. ...graphics card.) Figure 1-1. 4X AGP Card Graphics Chip Nvidia Maker Gigabyte Gigabyte Gigabyte Gigabyte Model Name GA-620 GA-622 GA-660 Plus GA-GF2560 Gigabyte Gigabyte Gigabyte Gigabyte Gigabyte Gigabyte GA-GF2000 GA-GF1280 GV-GF2010D GA-GF3000D GV-GF1280-32E GV-GF1280T-32P Gigabyte Gigabyte ELSA G V-GF3200TF G V-GF3500TF-GH Gladiac Ultra ELSA ELSA ELSA...
G.E.A.R. When using an add-on graphics card, please first delete the onboard graphics driver before installing the driver for traditional AGP Graphics card on Intel chipset based PCI Express solution motherboard. Note: 1. ...graphics card.) Figure 1-1. 4X AGP Card Graphics Chip Nvidia Maker Gigabyte Gigabyte Gigabyte Gigabyte Model Name GA-620 GA-622 GA-660 Plus GA-GF2560 Gigabyte Gigabyte Gigabyte Gigabyte Gigabyte Gigabyte GA-GF2000 GA-GF1280 GV-GF2010D GA-GF3000D GV-GF1280-32E GV-GF1280T-32P Gigabyte Gigabyte ELSA G V-GF3200TF G V-GF3500TF-GH Gladiac Ultra ELSA ELSA ELSA...
Manual
Page 20
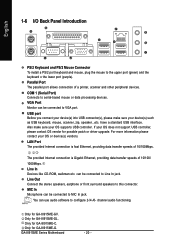
... please contact your OS does not support USB controller, please contact OS vendor for possible patch or driver upgrade. COM 1 (Serial Port) Connects to MIC In jack. have a standard USB interface. Only for GA-8I915ME-GL. Only for GA-8I915ME-G. Parallel Port The parallel port allows connection of a printer, scanner and other peripheral devices. USB port...
... please contact your OS does not support USB controller, please contact OS vendor for possible patch or driver upgrade. COM 1 (Serial Port) Connects to MIC In jack. have a standard USB interface. Only for GA-8I915ME-GL. Only for GA-8I915ME-G. Parallel Port The parallel port allows connection of a printer, scanner and other peripheral devices. USB port...
Manual
Page 24
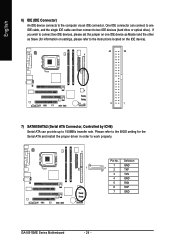
... as Master and the other as Slave (for the Serial ATA and install the proper driver in order to two IDE devices (hard drive or optical drive). Pin No. Definition 1 GND 1 7 2 TXP 3 TXN 4 GND 5 RXN 6 RXP 7 GND GA-8I915ME Series Motherboard - 24 - English 6) IDE (IDE Connector) An IDE device connects to 150MB/s transfer...
... as Master and the other as Slave (for the Serial ATA and install the proper driver in order to two IDE devices (hard drive or optical drive). Pin No. Definition 1 GND 1 7 2 TXP 3 TXN 4 GND 5 RXN 6 RXP 7 GND GA-8I915ME Series Motherboard - 24 - English 6) IDE (IDE Connector) An IDE device connects to 150MB/s transfer...
Manual
Page 51
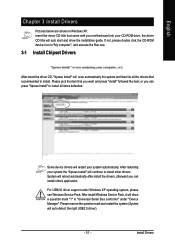
...install others application. After restarting your system the "Xpress Install" will continue to install all the drivers that you can press "Xpress Install" to install other drivers. For USB2.0 driver support under "Device Manager". After install Windows Service Pack, it will scan automatically the system and.... Please remove the question mark and restart the system (System will restart your CD-ROM drive, the driver CD-title will reboot automatically after install the drivers, afterward you want and press "install" followed the item; Please pick the item that recommended to install...
...install others application. After restarting your system the "Xpress Install" will continue to install all the drivers that you can press "Xpress Install" to install other drivers. For USB2.0 driver support under "Device Manager". After install Windows Service Pack, it will scan automatically the system and.... Please remove the question mark and restart the system (System will restart your CD-ROM drive, the driver CD-title will reboot automatically after install the drivers, afterward you want and press "install" followed the item; Please pick the item that recommended to install...
Manual
Page 52
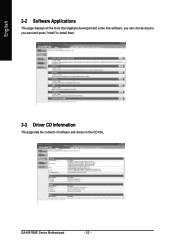
GA-8I915ME Series Motherboard - 52 - English 3-2 Software Applications This page displays all the tools that Gigabyte developed and some free software, you can choose anyone you want and press "install" to install them. 3-3 Driver CD Information This page lists the contents of software and drivers in this CD-title.
GA-8I915ME Series Motherboard - 52 - English 3-2 Software Applications This page displays all the tools that Gigabyte developed and some free software, you can choose anyone you want and press "install" to install them. 3-3 Driver CD Information This page lists the contents of software and drivers in this CD-title.
Manual
Page 53
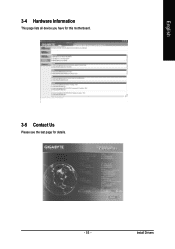
Install Drivers English 3-4 Hardware Information This page lists all device you have for this motherboard. 3-5 Contact Us Please see the last page for details. - 53 -
Install Drivers English 3-4 Hardware Information This page lists all device you have for this motherboard. 3-5 Contact Us Please see the last page for details. - 53 -

Manual
Page 55
...characteristics make it the ideal companion with the latest LGA775 Intel® Pentium® 4 Processor as well as the latest drivers for ultimate system protection. for intelligent indication of programs. When the function is disabled, the CPU is no longer need ... Intel® processors. English Chapter 4 Appendix 4-1 Unique Software Utilities (Not all new drivers with the option for download. Designed to factory default settings. C.I.A.2 (CPU Intelligent Accelerator 2) GIGABYTE CPU Intelligent Accelerator 2(C.I .B. 2) is designed to automatically adjust CPU computing power to its...
...characteristics make it the ideal companion with the latest LGA775 Intel® Pentium® 4 Processor as well as the latest drivers for ultimate system protection. for intelligent indication of programs. When the function is disabled, the CPU is no longer need ... Intel® processors. English Chapter 4 Appendix 4-1 Unique Software Utilities (Not all new drivers with the option for download. Designed to factory default settings. C.I.A.2 (CPU Intelligent Accelerator 2) GIGABYTE CPU Intelligent Accelerator 2(C.I .B. 2) is designed to automatically adjust CPU computing power to its...
Manual
Page 57
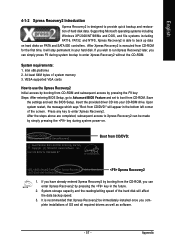
...wish to run Xpress Recovery2 later, you can enter Xpress Recovery2 by booting from the CD-ROM, you complete installations of OS and all required drivers as well as software. - 57 - System requirements: 1. After the steps above are completed, subsequent access to Xpress Recovery2 can be immediately ...you have already entered Xpress Recovery2 by pressing the key in the future. 2. At least 64M bytes of hard disk data. Insert the provided driver CD into your hard disk. Press any key to back up data on hard disks on . . . System storage capacity and the reading/writing...
...wish to run Xpress Recovery2 later, you can enter Xpress Recovery2 by booting from the CD-ROM, you complete installations of OS and all required drivers as well as software. - 57 - System requirements: 1. After the steps above are completed, subsequent access to Xpress Recovery2 can be immediately ...you have already entered Xpress Recovery2 by pressing the key in the future. 2. At least 64M bytes of hard disk data. Insert the provided driver CD into your hard disk. Press any key to back up data on hard disks on . . . System storage capacity and the reading/writing...
Manual
Page 58
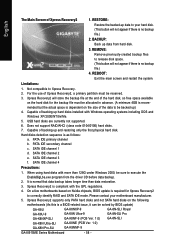
...: Remove previously-created backup files to correctly identify RAID and SATA IDE mode. Limitations: 1. Capable of backing up data from the driver CD before data backup. 2. SATA IDE channel 2 e. PATA IDE secondary channel c . Xpress Recovery2 supports only PATA hard disks and...Windows 2000, be solved by BIOS update) GA-K8U GA-K8U-9 GA-K8NXP-SLI GA-K8N Ultra-SLI GA-K8N Pro-SLI GA-K8NXP-9 GA-K8N Ultra-9 GA-K8NF-9 (PCB Ver. 1.0) GA-K8NE (PCB Ver. 1.0) GA-K8NMF-9 GA-8N-SLI Royal GA-8N-SLI Pro GA-8N-SLI GA-8I915ME Series Motherboard - 58 - Please contact ...
...: Remove previously-created backup files to correctly identify RAID and SATA IDE mode. Limitations: 1. Capable of backing up data from the driver CD before data backup. 2. SATA IDE channel 2 e. PATA IDE secondary channel c . Xpress Recovery2 supports only PATA hard disks and...Windows 2000, be solved by BIOS update) GA-K8U GA-K8U-9 GA-K8NXP-SLI GA-K8N Ultra-SLI GA-K8N Pro-SLI GA-K8NXP-9 GA-K8N Ultra-9 GA-K8NF-9 (PCB Ver. 1.0) GA-K8NE (PCB Ver. 1.0) GA-K8NMF-9 GA-8N-SLI Royal GA-8N-SLI Pro GA-8N-SLI GA-8I915ME Series Motherboard - 58 - Please contact ...
Manual
Page 68
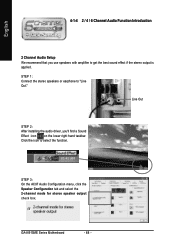
Line Out STEP 2: After installing the audio driver, you use speakers with amplifier to get the best sound effect if the stereo output is applied. STEP 1: Connect the stereo speakers or earphone to ... check box. English 4-1-4 2 / 4 / 6 Channel Audio Function Introduction 2 Channel Audio Setup We recommend that you 'll find a Sound Effect icon on the lower right hand taskbar. GA-8I915ME Series Motherboard - 68 - Click the icon to "Line Out."
Line Out STEP 2: After installing the audio driver, you use speakers with amplifier to get the best sound effect if the stereo output is applied. STEP 1: Connect the stereo speakers or earphone to ... check box. English 4-1-4 2 / 4 / 6 Channel Audio Function Introduction 2 Channel Audio Setup We recommend that you 'll find a Sound Effect icon on the lower right hand taskbar. GA-8I915ME Series Motherboard - 68 - Click the icon to "Line Out."
Manual
Page 69
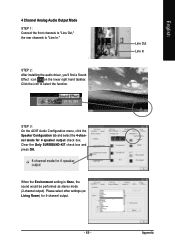
... 4 Channel Analog Audio Output Mode STEP 1: Connect the front channels to "Line Out," the rear channels to select the function. STEP 2: After installing the audio driver, you'll find a Sound Effect icon on the lower right hand taskbar. Please select other settings (ex: Living Room) for 4 speaker output check box. When...
... 4 Channel Analog Audio Output Mode STEP 1: Connect the front channels to "Line Out," the rear channels to select the function. STEP 2: After installing the audio driver, you'll find a Sound Effect icon on the lower right hand taskbar. Please select other settings (ex: Living Room) for 4 speaker output check box. When...

Manual
Page 70
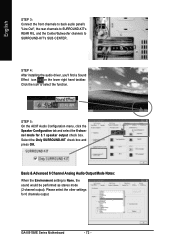
... Analog Audio Output Mode Use the back audio panel to select the function. Click the icon to connect the audio output without any additional module. GA-8I915ME Series Motherboard - 70 - Clear the Only SURROUND-KIT check box and press OK. Line In STEP 3: On the AC97 Audio Configuration menu, ...click the Speaker Configuration tab and select the 6-channel mode for 5.1 speaker output check box. MIC In Line Out STEP 2: After installing the audio driver, you'll find a Sound Effect icon on the lower right hand taskbar. STEP 1: Connect the front channels to "Line Out",the rear channels to ...
... Analog Audio Output Mode Use the back audio panel to select the function. Click the icon to connect the audio output without any additional module. GA-8I915ME Series Motherboard - 70 - Clear the Only SURROUND-KIT check box and press OK. Line In STEP 3: On the AC97 Audio Configuration menu, ...click the Speaker Configuration tab and select the 6-channel mode for 5.1 speaker output check box. MIC In Line Out STEP 2: After installing the audio driver, you'll find a Sound Effect icon on the lower right hand taskbar. STEP 1: Connect the front channels to "Line Out",the rear channels to ...
Manual
Page 72
.... STEP 4: After installing the audio driver, you'll find a Sound Effect icon on the lower right hand taskbar. English STEP 3: Connect the front channels to back audio panel's "Line Out", the rear channels to SURROUND-KIT's REAR R/L, and the Center/Subwoofer channels to select the function. GA-8I915ME Series Motherboard - 72 - Click the...
.... STEP 4: After installing the audio driver, you'll find a Sound Effect icon on the lower right hand taskbar. English STEP 3: Connect the front channels to back audio panel's "Line Out", the rear channels to SURROUND-KIT's REAR R/L, and the Center/Subwoofer channels to select the function. GA-8I915ME Series Motherboard - 72 - Click the...


