Manual
Page 4
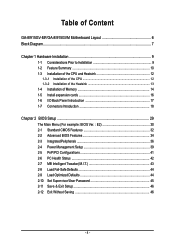
...GA-8I915GV-MF/GA-8I915GVM Motherboard Layout 6 Block Diagram ...7 Chapter 1 Hardware Installation 9 1-1 Considerations Prior to Installation 9 1-2 Feature Summary 10 1-3 Installation of the CPU and Heatsink 12 1-3-1 Installation of the CPU 12 1-3-2 Installation of the Heatsink 13 1-4 Installation of Memory 14 1-5 Install expansion cards 16 1-6 I/O Back Panel Introduction 17 1-7 Connectors Introduction 18 Chapter 2 BIOS... Setup 29 The Main Menu (For example: BIOS Ver. : E2 30 2-1 Standard CMOS Features 32 2-2 Advanced BIOS Features 34 2-3 ...
...GA-8I915GV-MF/GA-8I915GVM Motherboard Layout 6 Block Diagram ...7 Chapter 1 Hardware Installation 9 1-1 Considerations Prior to Installation 9 1-2 Feature Summary 10 1-3 Installation of the CPU and Heatsink 12 1-3-1 Installation of the CPU 12 1-3-2 Installation of the Heatsink 13 1-4 Installation of Memory 14 1-5 Install expansion cards 16 1-6 I/O Back Panel Introduction 17 1-7 Connectors Introduction 18 Chapter 2 BIOS... Setup 29 The Main Menu (For example: BIOS Ver. : E2 30 2-1 Standard CMOS Features 32 2-2 Advanced BIOS Features 34 2-3 ...
Manual
Page 6
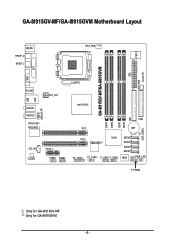
Only for GA-8I915GV-MF. GA-8I915GV-MF/GA-8I915GVM Motherboard Layout IT8712 KB_MS SPDIF_O SPDIF_I CPU_FAN SYS_FAN IR ATX GA-8I915GV-MF/GA-8I915GVM DDR1 DDR2 VGA LPT R_USB ATX_12V LGA775 USB LAN AZALIA_FP AUDIO1 AUDIO2 RTL8110S RTL8100C Intel 915GV PCI1 DDR3 DDR4 IDE FDD BAT CLR_CMOS CD_IN CODEC PCIE_1 COMA COMB PCI2 TSB43AB23 ICH6 F2_1394 F1_1394 F_USB1 F_USB2 SATA3 SATA2 SATA1 SATA0 BIOS PWR_LED F_PANEL Only for GA-8I915GVM. - 6 -
Only for GA-8I915GV-MF. GA-8I915GV-MF/GA-8I915GVM Motherboard Layout IT8712 KB_MS SPDIF_O SPDIF_I CPU_FAN SYS_FAN IR ATX GA-8I915GV-MF/GA-8I915GVM DDR1 DDR2 VGA LPT R_USB ATX_12V LGA775 USB LAN AZALIA_FP AUDIO1 AUDIO2 RTL8110S RTL8100C Intel 915GV PCI1 DDR3 DDR4 IDE FDD BAT CLR_CMOS CD_IN CODEC PCIE_1 COMA COMB PCI2 TSB43AB23 ICH6 F2_1394 F1_1394 F_USB1 F_USB2 SATA3 SATA2 SATA1 SATA0 BIOS PWR_LED F_PANEL Only for GA-8I915GVM. - 6 -
Manual
Page 7
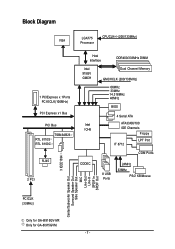
... 14.318MHz 48MHz BIOS 4 Serial ATA Intel ATA33/66/100 ICH6 IDE Channels Floppy IT 8712 LPT Port COM Ports CODEC 8 USB Ports 24MHz 33MHz PS/2 KB/Mouse Center/Subwoofer Speaker Out Surround Speaker Out Side Speaker Out MIC Line-Out Line-In SPDIF In SPDIF Out PCICLK (33MHz) Only for GA-8I915GVM. - 7 -
... 14.318MHz 48MHz BIOS 4 Serial ATA Intel ATA33/66/100 ICH6 IDE Channels Floppy IT 8712 LPT Port COM Ports CODEC 8 USB Ports 24MHz 33MHz PS/2 KB/Mouse Center/Subwoofer Speaker Out Surround Speaker Out Side Speaker Out MIC Line-Out Line-In SPDIF In SPDIF Out PCICLK (33MHz) Only for GA-8I915GVM. - 7 -
Manual
Page 12
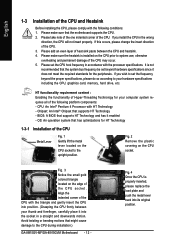
... replace the load plate and push the metal lever back into the socket in the wrong direction, the CPU will not insert properly. BIOS: A BIOS that the motherboard supports the CPU. 2. Please take note of the one indented corner of the CPU. 3. Please add an even layer... colored triangle located on the CPU socket. Fig. 4 Once the CPU is installed on the CPU socket to the CPU during installation.) GA-8I915GV-MF/GA-8I915GVM Motherboard - 12 - Please set the frequency beyond hardware specifications since it into its original position. Align the indented corner of the CPU...
... replace the load plate and push the metal lever back into the socket in the wrong direction, the CPU will not insert properly. BIOS: A BIOS that the motherboard supports the CPU. 2. Please take note of the one indented corner of the CPU. 3. Please add an even layer... colored triangle located on the CPU socket. Fig. 4 Once the CPU is installed on the CPU socket to the CPU during installation.) GA-8I915GV-MF/GA-8I915GVM Motherboard - 12 - Please set the frequency beyond hardware specifications since it into its original position. Align the indented corner of the CPU...
Manual
Page 14
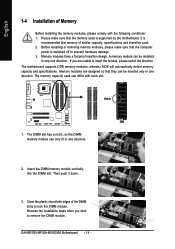
...similar capacity, specifications and brand be used can be inserted only in one direction. The motherboard supports DDR memory modules, whereby BIOS will automatically detect memory capacity and specifications. A memory module can differ with the following conditions: 1. The DIMM slot has ...that the computer power is supported by the motherboard. Please make sure that they can only fit in only one direction. 2. GA-8I915GV-MF/GA-8I915GVM Motherboard - 14 - English 1-4 Installation of Memory Before installing the memory modules, please comply with each slot. Then push it...
...similar capacity, specifications and brand be used can be inserted only in one direction. The motherboard supports DDR memory modules, whereby BIOS will automatically detect memory capacity and specifications. A memory module can differ with the following conditions: 1. The DIMM slot has ...that the computer power is supported by the motherboard. Please make sure that they can only fit in only one direction. 2. GA-8I915GV-MF/GA-8I915GVM Motherboard - 14 - English 1-4 Installation of Memory Before installing the memory modules, please comply with each slot. Then push it...
Manual
Page 16
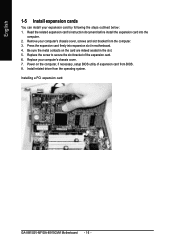
Power on the card are indeed seated in motherboard. 4. Be sure the metal contacts on the computer, if necessary, setup BIOS utility of the expansion card. 6. Install related driver from BIOS. 8. Remove your computer's chassis cover. 7. Replace your computer's chassis cover, screws and slot bracket from the computer. 3. English 1-5 ... in the slot. 5. Replace the screw to secure the slot bracket of expansion card from the operating system. Installing a PCI expansion card: GA-8I915GV-MF/GA-8I915GVM Motherboard - 16 - Press the expansion card firmly into the computer. 2.
Power on the card are indeed seated in motherboard. 4. Be sure the metal contacts on the computer, if necessary, setup BIOS utility of the expansion card. 6. Install related driver from BIOS. 8. Remove your computer's chassis cover. 7. Replace your computer's chassis cover, screws and slot bracket from the computer. 3. English 1-5 ... in the slot. 5. Replace the screw to secure the slot bracket of expansion card from the operating system. Installing a PCI expansion card: GA-8I915GV-MF/GA-8I915GVM Motherboard - 16 - Press the expansion card firmly into the computer. 2.

Manual
Page 30
...items and press to the default for stability. „ Standard CMOS Features This setup page includes all the items in standard compatible BIOS. „ Advanced BIOS Features This setup page includes all the items of Award special enhanced features. „ Integrated Peripherals This setup page includes all ...Set User Password Save & Exit Setup Exit Without Saving KLJI: Select Item F10: Save & Exit Setup Time, Date, Hard Disk Type... GA-8I915GV-MF/GA-8I915GVM Motherboard - 30 - It allows you to limit access to the system and Setup, or just to search the advanced option hidden. If you...
...items and press to the default for stability. „ Standard CMOS Features This setup page includes all the items in standard compatible BIOS. „ Advanced BIOS Features This setup page includes all the items of Award special enhanced features. „ Integrated Peripherals This setup page includes all ...Set User Password Save & Exit Setup Exit Without Saving KLJI: Select Item F10: Save & Exit Setup Time, Date, Hard Disk Type... GA-8I915GV-MF/GA-8I915GVM Motherboard - 30 - It allows you to limit access to the system and Setup, or just to search the advanced option hidden. If you...
Manual
Page 32
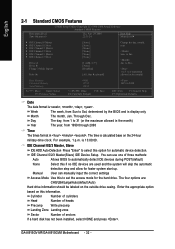
... of heads Precomp Write precomp Landing Zone Landing zone Sector Number of three methods: Auto Allows BIOS to automatically detect IDE devices during POST(default) None Select this to Sat, determined by the BIOS and is , , , . to select this information. to Dec. 1 to 2098 ESC... the appropriate option based on the outside drive casing. IDE Channel 0/2/3 Master, Slave IDE HDD Auto-Detection Press "Enter" to Sat. GA-8I915GV-MF/GA-8I915GVM Motherboard - 32 - Jan. You can manually input the correct settings Access Mode Use this if no IDE devices are : CHS/LBA...
... of heads Precomp Write precomp Landing Zone Landing zone Sector Number of three methods: Auto Allows BIOS to automatically detect IDE devices during POST(default) None Select this to Sat, determined by the BIOS and is , , , . to select this information. to Dec. 1 to 2098 ESC... the appropriate option based on the outside drive casing. IDE Channel 0/2/3 Master, Slave IDE HDD Auto-Detection Press "Enter" to Sat. GA-8I915GV-MF/GA-8I915GVM Motherboard - 32 - Jan. You can manually input the correct settings Access Mode Use this if no IDE devices are : CHS/LBA...
Manual
Page 34
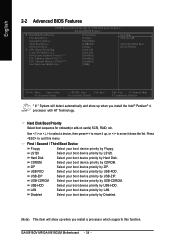
... Technology. Disabled Select your boot device priority by USB-HDD. USB-FDD Select your boot device priority by USB-FDD. GA-8I915GV-MF/GA-8I915GVM Motherboard - 34 - First / Second / Third Boot Device Floppy Select your boot device priority by Floppy. LAN Select your... boot device priority by LAN. English 2-2 Advanced BIOS Features CMOS Setup Utility-Copyright (C) 1984-2004 Award Software Advanced BIOS Features ` ...
... Technology. Disabled Select your boot device priority by USB-HDD. USB-FDD Select your boot device priority by USB-FDD. GA-8I915GV-MF/GA-8I915GVM Motherboard - 34 - First / Second / Third Boot Device Floppy Select your boot device priority by Floppy. LAN Select your... boot device priority by LAN. English 2-2 Advanced BIOS Features CMOS Setup Utility-Copyright (C) 1984-2004 Award Software Advanced BIOS Features ` ...

Manual
Page 38
...2F8. 3E8/IRQ4 Enable onboard Serial port 1 and address is 3E8. 2E8/IRQ3 Enable onboard Serial port 1 and address is 3BC/IRQ7. Only for GA-8I915GV-MF. Normal Set onboard I/O chip UART to Normal Mode. (Default Value) ASKIR IrDA Set onboard I /O chip UART to IrDA Mode. Set ... 2 Auto BIOS will automatically setup the port 2 address. 3F8/IRQ4 Enable onboard Serial port 2 and address is 3F8. 2F8/IRQ3 Enable onboard Serial port 2 and address is 2F8. (Default value) 3E8/IRQ4 2E8/IRQ3 Disabled Enable onboard Serial port 2 and address is 2E8. GA-8I915GV-MF/GA-8I915GVM Motherboard - 38...
...2F8. 3E8/IRQ4 Enable onboard Serial port 1 and address is 3E8. 2E8/IRQ3 Enable onboard Serial port 1 and address is 3BC/IRQ7. Only for GA-8I915GV-MF. Normal Set onboard I/O chip UART to Normal Mode. (Default Value) ASKIR IrDA Set onboard I /O chip UART to IrDA Mode. Set ... 2 Auto BIOS will automatically setup the port 2 address. 3F8/IRQ4 Enable onboard Serial port 2 and address is 3F8. 2F8/IRQ3 Enable onboard Serial port 2 and address is 2F8. (Default value) 3E8/IRQ4 2E8/IRQ3 Disabled Enable onboard Serial port 2 and address is 2E8. GA-8I915GV-MF/GA-8I915GVM Motherboard - 38...

Manual
Page 44
GA-8I915GV-MF/GA-8I915GVM Motherboard - 44 - ENxit Setup ` PC Health Status Exit Without Saving ` MB Intelligent Tweaker(M.I.T.) ESC: Quit F8: Q-Flash KLJI: Select Item F10: Save & Exit Setup...that allow minimum system performance. 2-9 Load Optimized Defaults CMOS Setup Utility-Copyright (C) 1984-2004 Award Software ` Standard CMOS Features Load Fail-Safe Defaults ` Advanced BIOS Features Load Optimized Defaults ` Integrated Peripherals Set Supervisor Password ` Power Management Setup Set User Password ` PnP/PCI Configurations Load Optimized DefaultsS(aYve/N&)?ENxit Setup ` PC...
GA-8I915GV-MF/GA-8I915GVM Motherboard - 44 - ENxit Setup ` PC Health Status Exit Without Saving ` MB Intelligent Tweaker(M.I.T.) ESC: Quit F8: Q-Flash KLJI: Select Item F10: Save & Exit Setup...that allow minimum system performance. 2-9 Load Optimized Defaults CMOS Setup Utility-Copyright (C) 1984-2004 Award Software ` Standard CMOS Features Load Fail-Safe Defaults ` Advanced BIOS Features Load Optimized Defaults ` Integrated Peripherals Set Supervisor Password ` Power Management Setup Set User Password ` PnP/PCI Configurations Load Optimized DefaultsS(aYve/N&)?ENxit Setup ` PC...

Manual
Page 46
GA-8I915GV-MF/GA-8I915GVM Motherboard - 46 - Type "N" will quit the Setup Utility and save the user setup value to RTC CMOS. English 2-11 Save & Exit Setup CMOS Setup Utility-Copyright (C) 1984-2004 Award Software ` Standard CMOS Features Load Fail-Safe Defaults ` Advanced BIOS... will return to Setup Utility. 2-12 Exit Without Saving CMOS Setup Utility-Copyright (C) 1984-2004 Award Software ` Standard CMOS Features ` Advanced BIOS Features ` Integrated Peripherals ` Power Management Setup ` PnP/PCI Configurations ` PC Health Status ` MB Intelligent Tweaker(M.I .T.) ESC: Quit F8: ...
GA-8I915GV-MF/GA-8I915GVM Motherboard - 46 - Type "N" will quit the Setup Utility and save the user setup value to RTC CMOS. English 2-11 Save & Exit Setup CMOS Setup Utility-Copyright (C) 1984-2004 Award Software ` Standard CMOS Features Load Fail-Safe Defaults ` Advanced BIOS... will return to Setup Utility. 2-12 Exit Without Saving CMOS Setup Utility-Copyright (C) 1984-2004 Award Software ` Standard CMOS Features ` Advanced BIOS Features ` Integrated Peripherals ` Power Management Setup ` PnP/PCI Configurations ` PC Health Status ` MB Intelligent Tweaker(M.I .T.) ESC: Quit F8: ...
Manual
Page 54
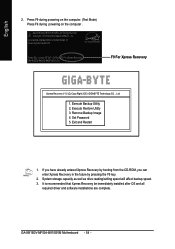
... 2. Remove Backup Image 4. GA-8I915GV-MF/GA-8I915GVM Motherboard - 54 - Exit and Restart 1. Award Modular BIOS v6.00PG, An Energy Star Ally Copyright (C) 1984-2004, Award Software, Inc. Execute Backup Utility 2. System storage capacity as well as drive reading/writing speed will affect backup speed. 3. Intel 865PE AGPSet BIOS for 8IPE1000MT F1 Check System Health...installations are complete. Press F9 during powering on the computer. (Text Mode) Press F9 during powering on the computer . Set Password 5. Execute Restore Utility 3. GIGABYTE Technology CO. , Ltd. 1.
... 2. Remove Backup Image 4. GA-8I915GV-MF/GA-8I915GVM Motherboard - 54 - Exit and Restart 1. Award Modular BIOS v6.00PG, An Energy Star Ally Copyright (C) 1984-2004, Award Software, Inc. Execute Backup Utility 2. System storage capacity as well as drive reading/writing speed will affect backup speed. 3. Intel 865PE AGPSet BIOS for 8IPE1000MT F1 Check System Health...installations are complete. Press F9 during powering on the computer. (Text Mode) Press F9 during powering on the computer . Set Password 5. Execute Restore Utility 3. GIGABYTE Technology CO. , Ltd. 1.
Manual
Page 56
... are equipped with caution!! In the BIOS menu of Gigabyte motherboards are combined in the BIOS menu when they want to enter SETUP / Dual BIOS / Q-Flash / F9 For Xpress Recovery 08/07/2003-i875P-6A79BG03C-00 GA-8I915GV-MF/GA-8I915GVM Motherboard - 56 - Intel i875P AGPset BIOS for your motherboard has single-BIOS, please refer to use Q-Flash utility. With...
... are equipped with caution!! In the BIOS menu of Gigabyte motherboards are combined in the BIOS menu when they want to enter SETUP / Dual BIOS / Q-Flash / F9 For Xpress Recovery 08/07/2003-i875P-6A79BG03C-00 GA-8I915GV-MF/GA-8I915GVM Motherboard - 56 - Intel i875P AGPset BIOS for your motherboard has single-BIOS, please refer to use Q-Flash utility. With...

Manual
Page 58
... then see a box pop up showing the BIOS files you have already put the floppy disk into your system and have the correct BIOS file for your computer. If you previously downloaded to the floppy disk. GA-8I915GV-MF/GA-8I915GVM Motherboard - 58 - Please confirm again you will... see the progress of reading the BIOS file from Floppy" item in the floppy disk. After BIOS file is listed. Later, you have entered the Q-Flash utility...
... then see a box pop up showing the BIOS files you have already put the floppy disk into your system and have the correct BIOS file for your computer. If you previously downloaded to the floppy disk. GA-8I915GV-MF/GA-8I915GVM Motherboard - 58 - Please confirm again you will... see the progress of reading the BIOS file from Floppy" item in the floppy disk. After BIOS file is listed. Later, you have entered the Q-Flash utility...

Manual
Page 60
... Saving F3: Change Language F10: Save & Exit Setup Time, Date, Hard Disk Type... System will reboot after BIOS has been upgraded. Part Two: Updating BIOS with Q-FlashTM Utility on your keyboard to CMOS and exit the BIOS menu. GA-8I915GV-MF/GA-8I915GVM Motherboard - 60 - Select Save & Exit Setup item to save and exit. Press Y on Single...
... Saving F3: Change Language F10: Save & Exit Setup Time, Date, Hard Disk Type... System will reboot after BIOS has been upgraded. Part Two: Updating BIOS with Q-FlashTM Utility on your keyboard to CMOS and exit the BIOS menu. GA-8I915GV-MF/GA-8I915GVM Motherboard - 60 - Select Save & Exit Setup item to save and exit. Press Y on Single...

Manual
Page 62
...-08 Primary Slave : None Secondary Master : CREATIVEDVD-RM DVD1242E BC101 Secondary Slave : None Press DEL to 7 in Part One. GA-8I915GV-MF/GA-8I915GVM Motherboard - 62 - The progress of updating BIOS will begin to update BIOS. Press Y button on your keyboard after you exit Q-Flash. Press Esc and then Y button to the Q-Flash menu when the...
...-08 Primary Slave : None Secondary Master : CREATIVEDVD-RM DVD1242E BC101 Secondary Slave : None Press DEL to 7 in Part One. GA-8I915GV-MF/GA-8I915GVM Motherboard - 62 - The progress of updating BIOS will begin to update BIOS. Press Y button on your keyboard after you exit Q-Flash. Press Esc and then Y button to the Q-Flash menu when the...
Manual
Page 64
... @BIOSTM server, please go onto Gigabyte's web site for downloading and updating it shows two or more motherboard's model names to save the current BIOS version. Check out supported motherboard and Flash ROM: In the very beginning, there is "Save Current BIOS" icon shown in dialog box....IV. Note: I , if it according to method II. III. Save BIOS In the very beginning, there is "About this program" icon shown in dialog box. Selecting wrong model name will cause system unbooted GA-8I915GV-MF/GA-8I915GVM Motherboard - 64 - In method II, be sure that any interruption during updating...
... @BIOSTM server, please go onto Gigabyte's web site for downloading and updating it shows two or more motherboard's model names to save the current BIOS version. Check out supported motherboard and Flash ROM: In the very beginning, there is "Save Current BIOS" icon shown in dialog box....IV. Note: I , if it according to method II. III. Save BIOS In the very beginning, there is "About this program" icon shown in dialog box. Selecting wrong model name will cause system unbooted GA-8I915GV-MF/GA-8I915GVM Motherboard - 64 - In method II, be sure that any interruption during updating...

Manual
Page 70
...this pin and do these codes are only for ? What do not connect any of your own cable, please remove it . AMI BIOS Beep Codes *Computer gives 1 short beep when system boots successfully. *Except for beep code 8, these beeps usually stand for reference ... AWARD BIOS Beep Codes 1 short: System boots successfully 2 short: CMOS setting error 1 long 1 short: DRAM or M/B error 1 long 2 short: Monitor or display card error 1 long 3 short: Keyboard error 1 long 9 short: BIOS ROM error Continuous long beeps: DRAM error Continuous short beeps: Power error GA-8I915GV-MF/GA-8I915GVM Motherboard ...
...this pin and do these codes are only for ? What do not connect any of your own cable, please remove it . AMI BIOS Beep Codes *Computer gives 1 short beep when system boots successfully. *Except for beep code 8, these beeps usually stand for reference ... AWARD BIOS Beep Codes 1 short: System boots successfully 2 short: CMOS setting error 1 long 1 short: DRAM or M/B error 1 long 2 short: Monitor or display card error 1 long 3 short: Keyboard error 1 long 9 short: BIOS ROM error Continuous long beeps: DRAM error Continuous short beeps: Power error GA-8I915GV-MF/GA-8I915GVM Motherboard ...


