Manual
Page 5
Chapter 3 Drivers Installation 49 3-1 Install Chipset Drivers 49 3-2 SoftwareApplication 50 3-3 Software Information 50 3-4 Hardware Information 51 3-5 Contact Us ...51 Chapter 4 Appendix 53 4-1 Unique Software Utilities 53 4-1-1 Xpress Recovery2 Introduction 53 4-1-2 Flash BIOS Method Introduction 55 4-1-3 2 / 4 / 6 / 8 Channel Audio Function Introduction 64 4-1-4 Jack-Sensing and UAJ Introduction 70 4-2 Troubleshooting 72 - 5 -
Chapter 3 Drivers Installation 49 3-1 Install Chipset Drivers 49 3-2 SoftwareApplication 50 3-3 Software Information 50 3-4 Hardware Information 51 3-5 Contact Us ...51 Chapter 4 Appendix 53 4-1 Unique Software Utilities 53 4-1-1 Xpress Recovery2 Introduction 53 4-1-2 Flash BIOS Method Introduction 55 4-1-3 2 / 4 / 6 / 8 Channel Audio Function Introduction 64 4-1-4 Jack-Sensing and UAJ Introduction 70 4-2 Troubleshooting 72 - 5 -
Manual
Page 16
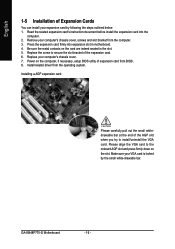
.... Please align the VGA card to secure the slot bracket of the expansion card. 6. GA-8I848P775-G Motherboard - 16 - Read the related expansion card's instruction document before install the expansion card into expansion slot in the slot. 5. Install related driver from BIOS. 8. Be sure the metal contacts on the computer, if necessary, setup BIOS...
.... Please align the VGA card to secure the slot bracket of the expansion card. 6. GA-8I848P775-G Motherboard - 16 - Read the related expansion card's instruction document before install the expansion card into expansion slot in the slot. 5. Install related driver from BIOS. 8. Be sure the metal contacts on the computer, if necessary, setup BIOS...
Manual
Page 17
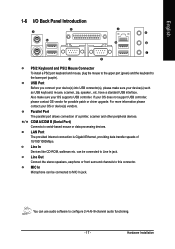
... you connect your device(s) into USB connector(s), please make sure your OS does not support USB controller, please contact OS vendor for possible patch or driver upgrade. can be connected to the lower port (purple). English 1-6 I/O Back Panel Introduction PS/2 Keyboard and PS/2 Mouse Connector To install a PS/2 port keyboard and...
... you connect your device(s) into USB connector(s), please make sure your OS does not support USB controller, please contact OS vendor for possible patch or driver upgrade. can be connected to the lower port (purple). English 1-6 I/O Back Panel Introduction PS/2 Keyboard and PS/2 Mouse Connector To install a PS/2 port keyboard and...

Manual
Page 21
... No. One IDE connector can connect to one IDE device as Master and the other as Slave (for the Serial ATA and install the proper driver in order to two IDE devices (hard drive or optical drive). If you wish to connect two IDE devices, please set the jumper on the...
... No. One IDE connector can connect to one IDE device as Master and the other as Slave (for the Serial ATA and install the proper driver in order to two IDE devices (hard drive or optical drive). If you wish to connect two IDE devices, please set the jumper on the...

Manual
Page 49
... (System will continue to install other drivers. Drivers Installation System will auto start and show a question mark "?" For USB2.0 driver support under "Device Manager". Insert the driver CD-title that recommended to install the drivers automatically. If not, please double click...to install. English Chapter 3 Drivers Installation Pictures below are shown in "My computer", and execute the Setup.exe. 3-1 Install Chipset Drivers After insert the driver CD, "Xpress Install" will show the installation guide. Some device drivers will execute the installation for you...
... (System will continue to install other drivers. Drivers Installation System will auto start and show a question mark "?" For USB2.0 driver support under "Device Manager". Insert the driver CD-title that recommended to install the drivers automatically. If not, please double click...to install. English Chapter 3 Drivers Installation Pictures below are shown in "My computer", and execute the Setup.exe. 3-1 Install Chipset Drivers After insert the driver CD, "Xpress Install" will show the installation guide. Some device drivers will execute the installation for you...
Manual
Page 50
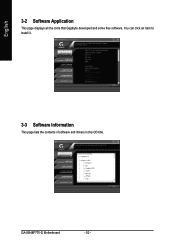
You can click an item to install it. 3-3 Software Information This page lists the contents of software and drivers in this CD-title. English 3-2 Software Application This page displays all the tools that Gigabyte developed and some free software. GA-8I848P775-G Motherboard - 50 -
You can click an item to install it. 3-3 Software Information This page lists the contents of software and drivers in this CD-title. English 3-2 Software Application This page displays all the tools that Gigabyte developed and some free software. GA-8I848P775-G Motherboard - 50 -

Manual
Page 51
Drivers Installation English 3-4 Hardware Information This page lists all device you have for this motherboard. 3-5 Contact Us Please see the last page for details. - 51 -
Drivers Installation English 3-4 Hardware Information This page lists all device you have for this motherboard. 3-5 Contact Us Please see the last page for details. - 51 -

Manual
Page 53
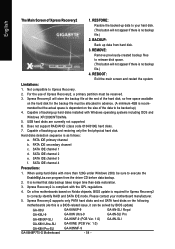
... Unique Software Utilities 4-1-1 Xpress Recovery2 Introduction Xpress Recovery2 is designed to provide quick backup and restoration of system memory 3. Insert the provided driver CD into your hard disk. Press any key to startup XpressRecovery2..... If you wish to enter Xpress Recovery2. System requirements: 1. Boot ... enter Xpress Recovery2 by booting from CD-ROM. System storage capacity and the reading/writing speed of OS and all required drivers as well as software. - 53 - VESA-supported VGA cards How to use the Xpress Recovery2 Initial access by pressing the...
... Unique Software Utilities 4-1-1 Xpress Recovery2 Introduction Xpress Recovery2 is designed to provide quick backup and restoration of system memory 3. Insert the provided driver CD into your hard disk. Press any key to startup XpressRecovery2..... If you wish to enter Xpress Recovery2. System requirements: 1. Boot ... enter Xpress Recovery2 by booting from CD-ROM. System storage capacity and the reading/writing speed of OS and all required drivers as well as software. - 53 - VESA-supported VGA cards How to use the Xpress Recovery2 Initial access by pressing the...
Manual
Page 54
... there is a BIOS-related issue, it can be solved by BIOS update) GA-K8U GA-K8U-9 GA-K8NXP-SLI GA-K8N Ultra-SLI GA-K8N Pro-SLI GA-8I848P775-G Motherboard GA-K8NXP-9 GA-K8N Ultra-9 GA-K8NF-9 (PCB Ver. 1.0) GA-K8NE (PCB Ver. 1.0) GA-K8NMF-9 - 54 - Not compatible to correctly identify RAID and SATA IDE mode...not support RAID/AHCI (class code 0104/0106) hard disks. 7. SATA IDE channel 2 e. GA-8N-SLI Royal GA-8N-SLI Pro GA-8N-SLI RESTORE: English Restore the backed-up data from the driver CD before data backup. 2. BACKUP: Back up data to release disk space. (This button will...
... there is a BIOS-related issue, it can be solved by BIOS update) GA-K8U GA-K8U-9 GA-K8NXP-SLI GA-K8N Ultra-SLI GA-K8N Pro-SLI GA-8I848P775-G Motherboard GA-K8NXP-9 GA-K8N Ultra-9 GA-K8NF-9 (PCB Ver. 1.0) GA-K8NE (PCB Ver. 1.0) GA-K8NMF-9 - 54 - Not compatible to correctly identify RAID and SATA IDE mode...not support RAID/AHCI (class code 0104/0106) hard disks. 7. SATA IDE channel 2 e. GA-8N-SLI Royal GA-8N-SLI Pro GA-8N-SLI RESTORE: English Restore the backed-up data from the driver CD before data backup. 2. BACKUP: Back up data to release disk space. (This button will...
Manual
Page 64
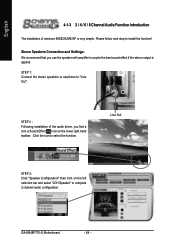
... Effect icon on the left selection bar and select "2CH Speaker" to select the function. English 4-1-3 2 / 4 / 6 / 8 Channel Audio Function Introduction The installation of the audio driver, you use the speaker with amplifier to acqiire the best sound effect if the stereo output is very simple. Please follow next step to "Line... on the lower right hand taskbar. STEP 1: Connect the stereo speakers or earphone to install the function! Click the icon to complete 2 channel audio configuration. GA-8I848P775-G Motherboard - 64 -
... Effect icon on the left selection bar and select "2CH Speaker" to select the function. English 4-1-3 2 / 4 / 6 / 8 Channel Audio Function Introduction The installation of the audio driver, you use the speaker with amplifier to acqiire the best sound effect if the stereo output is very simple. Please follow next step to "Line... on the lower right hand taskbar. STEP 1: Connect the stereo speakers or earphone to install the function! Click the icon to complete 2 channel audio configuration. GA-8I848P775-G Motherboard - 64 -
Manual
Page 65
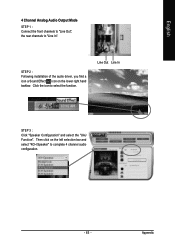
English 4 Channel Analog Audio Output Mode STEP 1 : Connect the front channels to "Line Out", the rear channels to select the function. Appendix Click the icon to "Line In". Then click on the lower right hand taskbar. Line Out Line In STEP 3 : Click "Speaker Configuration" and select the "UAJ Function". STEP 2 : Following installation of the audio driver, you find a icon a Sound Effect icon on the left selection bar and select "4CH Speaker" to complete 4 channel audio configuration. - 65 -
English 4 Channel Analog Audio Output Mode STEP 1 : Connect the front channels to "Line Out", the rear channels to select the function. Appendix Click the icon to "Line In". Then click on the lower right hand taskbar. Line Out Line In STEP 3 : Click "Speaker Configuration" and select the "UAJ Function". STEP 2 : Following installation of the audio driver, you find a icon a Sound Effect icon on the left selection bar and select "4CH Speaker" to complete 4 channel audio configuration. - 65 -

Manual
Page 66
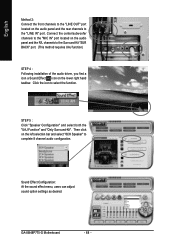
... Line Out STEP 2 : Following installation of the audio driver, you find a icon a Sound Effect icon on the left selection bar and select "6CH Speaker" to select the function. Then click on the lower right hand taskbar. Click the icon to complete 6 channel audio configuration. GA-8I848P775-G Motherboard - 66 - Line In STEP 3 : Click "Speaker...
... Line Out STEP 2 : Following installation of the audio driver, you find a icon a Sound Effect icon on the left selection bar and select "6CH Speaker" to select the function. Then click on the lower right hand taskbar. Click the icon to complete 6 channel audio configuration. GA-8I848P775-G Motherboard - 66 - Line In STEP 3 : Click "Speaker...
Manual
Page 68
... to select the function. Click the icon to the Surround-Kit "SUR BACK" port. (This method requires UAJ function) STEP 4 : Following installation of the audio driver, you find a icon a Sound Effect icon on the lower right hand taskbar. GA-8I848P775-G Motherboard - 68 -
... to select the function. Click the icon to the Surround-Kit "SUR BACK" port. (This method requires UAJ function) STEP 4 : Following installation of the audio driver, you find a icon a Sound Effect icon on the lower right hand taskbar. GA-8I848P775-G Motherboard - 68 -


