
Manual
Page 35
... allow users to quickly turn off or reset the computer in an open-case environment when they want to change hardware components or conduct hardware testing. date information and BIOS configurations) and reset the CMOS values to factory defaults when needed. • Always turn on/off your computer and unplug the...
... allow users to quickly turn off or reset the computer in an open-case environment when they want to change hardware components or conduct hardware testing. date information and BIOS configurations) and reset the CMOS values to factory defaults when needed. • Always turn on/off your computer and unplug the...
Manual
Page 37
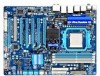
...Setup program. For instructions on the motherboard supplies the necessary power to the CMOS to boot. To upgrade the BIOS, use either the GIGABYTE Q-Flash or @BIOS utility. • Q-Flash allows the user to quickly and easily upgrade or back up BIOS without entering the ... to modify basic system configuration settings or to prevent system instability or other unexpected results. Its major functions include conducting the Power-On Self-Test (POST) during the POST. Refer to Chapter 5, "Troubleshooting," for how to the "Load Optimized Defaults" section in the CMOS on...
...Setup program. For instructions on the motherboard supplies the necessary power to the CMOS to boot. To upgrade the BIOS, use either the GIGABYTE Q-Flash or @BIOS utility. • Q-Flash allows the user to quickly and easily upgrade or back up BIOS without entering the ... to modify basic system configuration settings or to prevent system instability or other unexpected results. Its major functions include conducting the Power-On Self-Test (POST) during the POST. Refer to Chapter 5, "Troubleshooting," for how to the "Load Optimized Defaults" section in the CMOS on...

Manual
Page 75
...GIGABYTE Easy Energy Saver shows how much power they have saved in taskbar) 14 INFO/Help 15 Live Utility Update (Check for the latest utility version) • The above data is for reference only. The Easy Energy Saver Interface A. Actual performance may vary based on testing...power savings and enhanced power efficiency without sacrificing computing performance. Meter Mode - Unique Features Featuring an advanced proprietary software design, GIGABYTE Easy Energy Saver is able to run in a set period of the button. Button Information Table Button Description 1 Easy ...
...GIGABYTE Easy Energy Saver shows how much power they have saved in taskbar) 14 INFO/Help 15 Live Utility Update (Check for the latest utility version) • The above data is for reference only. The Easy Energy Saver Interface A. Actual performance may vary based on testing...power savings and enhanced power efficiency without sacrificing computing performance. Meter Mode - Unique Features Featuring an advanced proprietary software design, GIGABYTE Easy Energy Saver is able to run in a set period of the button. Button Information Table Button Description 1 Easy ...

Manual
Page 82
... on your motherboard. To enable support for the SATA3_0/1/2/3 connectors, set OnChip SATA RAID5 Support to enter BIOS Setup during the POST (Power-On Self-Test). B. CMOS Setup Utility-Copyright (C) 1984-2010 Award Software Integrated Peripherals OnChip SATA Controller OnChip SATA Type OnChip SATA Port4/5 Type OnChip SATA RAID5 Support OnChip...
... on your motherboard. To enable support for the SATA3_0/1/2/3 connectors, set OnChip SATA RAID5 Support to enter BIOS Setup during the POST (Power-On Self-Test). B. CMOS Setup Utility-Copyright (C) 1984-2010 Award Software Integrated Peripherals OnChip SATA Controller OnChip SATA Type OnChip SATA Port4/5 Type OnChip SATA RAID5 Support OnChip...

Manual
Page 83
... to enter the LD View/LD Define Menu window. To create an array, press to enter the Controller Configuration window. Step 1: After the POST memory test begins and before the operating system boot begins, look for a non-RAID configuration. Figure 2 Step 2: Main Menu This is defined.. RAID Option ROM Version 3.2.1540...
... to enter the LD View/LD Define Menu window. To create an array, press to enter the Controller Configuration window. Step 1: After the POST memory test begins and before the operating system boot begins, look for a non-RAID configuration. Figure 2 Step 2: Main Menu This is defined.. RAID Option ROM Version 3.2.1540...

Manual
Page 87
... described in your computer and press to the hard drive. Appendix See the table below for configuring different SATA controllers for RAID (Figure 1). Controller Connectors GIGABYTE GSATA2_6/7 SATA2 JMicron eSATA ports JMB362 BIOS Settings Set Onboard GSATA controller to Enabled Set Onboard GSATA Mode to RAID/IDE Set Onboard ESATA controller... SATA controllers and their corresponding SATA ports. See the table below for your power supply to enter BIOS Setup during the POST (Power-On Self-Test).
... described in your computer and press to the hard drive. Appendix See the table below for configuring different SATA controllers for RAID (Figure 1). Controller Connectors GIGABYTE GSATA2_6/7 SATA2 JMicron eSATA ports JMB362 BIOS Settings Set Onboard GSATA controller to Enabled Set Onboard GSATA Mode to RAID/IDE Set Onboard ESATA controller... SATA controllers and their corresponding SATA ports. See the table below for your power supply to enter BIOS Setup during the POST (Power-On Self-Test).

Manual
Page 88
... Highlight the item that you can select a hard drive in the Hard Disk Drive List block and press to configure a RAID array. Gigabyte Technology Corp. Skip this step and proceed to the installation of the RAID setup utility (Figure 3), use the up or down arrow key... to enter RAID Setup Utility ... Appendix - 88 - After the POST memory test begins and before the operating system boot begins, look for a non-RAID configuration. Gigabyte Technology Corp. Figure 2 In the main screen of Windows operating system for a message which says "Press to ...
... Highlight the item that you can select a hard drive in the Hard Disk Drive List block and press to configure a RAID array. Gigabyte Technology Corp. Skip this step and proceed to the installation of the RAID setup utility (Figure 3), use the up or down arrow key... to enter RAID Setup Utility ... Appendix - 88 - After the POST memory test begins and before the operating system boot begins, look for a non-RAID configuration. Gigabyte Technology Corp. Figure 2 In the main screen of Windows operating system for a message which says "Press to ...
Manual
Page 115
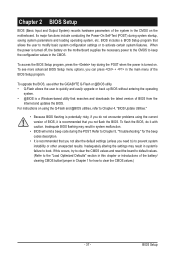
... & S/W interrupts to E000 & F000 shadow RAM Expand the Xgroup codes locating in F000 for Winbond 977 series Super I /O chips Test F000h segment shadow to check out interface in CMOS circuitry. Enable keyboard interface 1. Auto-detection of DRAM size, type and ECC Expand ... default values into BIOS stack. Reset keyboard Super I /O chips 2. If CMOS checksum fails, use default value instead - 115 - Initialize 8042 self-test 1. If no special specified, all H/W interrupts are MODBINable by a port & interface swap (optional) 3. Load CMOS settings into chipset. Also set ...
... & S/W interrupts to E000 & F000 shadow RAM Expand the Xgroup codes locating in F000 for Winbond 977 series Super I /O chips Test F000h segment shadow to check out interface in CMOS circuitry. Enable keyboard interface 1. Auto-detection of DRAM size, type and ECC Expand ... default values into BIOS stack. Reset keyboard Super I /O chips 2. If CMOS checksum fails, use default value instead - 115 - Initialize 8042 self-test 1. If no special specified, all H/W interrupts are MODBINable by a port & interface swap (optional) 3. Load CMOS settings into chipset. Also set ...
Manual
Page 116
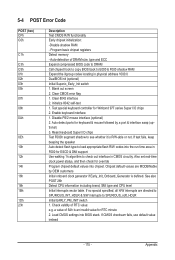
...PnP device Appendix - 116 - Initialize the APIC for 0-640K memory address 2. Measure CPU speed Invoke video BIOS 1. Calculate total memory by testing the last double word of the ESCD's legacy information Early PCI initialization: - Program MTRR of processors (multi-processor platform) 1. Early ISA... for a valid VGA device & VGA BIOS, and put it into consideration of each CPU are not identical Initialize USB Keyboard & Mouse Test all memory (clear all extended memory to 0) Clear password according to CMOS setup Example: onboard IDE controller 4. Initialize double-byte language font...
...PnP device Appendix - 116 - Initialize the APIC for 0-640K memory address 2. Measure CPU speed Invoke video BIOS 1. Calculate total memory by testing the last double word of the ESCD's legacy information Early PCI initialization: - Program MTRR of processors (multi-processor platform) 1. Early ISA... for a valid VGA device & VGA BIOS, and put it into consideration of each CPU are not identical Initialize USB Keyboard & Mouse Test all memory (clear all extended memory to 0) Clear password according to CMOS setup Example: onboard IDE controller 4. Initialize double-byte language font...