Manual
Page 12
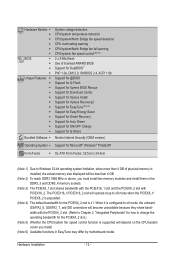
..." for how to change the operating bandwidth for the PCIEX4_2 slot.) (Note 5) Whether the CPU/system fan speed control function is installed, the actual memory size displayed will be less than 4 GB of physical memory is supported will depend on the CPU/system cooler you must install two memory modules and...
..." for how to change the operating bandwidth for the PCIEX4_2 slot.) (Note 5) Whether the CPU/system fan speed control function is installed, the actual memory size displayed will be less than 4 GB of physical memory is supported will depend on the CPU/system cooler you must install two memory modules and...

Manual
Page 67
..., the second SATA connector and so forth. Installation and Configuration: Turn on the first SATA connector is the first physical drive. - 67 - Unique Features actual size requirements vary, depending on PATA and SATA hard drives and restore it. Xpress Recovery2 can back up data on the amount of data). • It...
..., the second SATA connector and so forth. Installation and Configuration: Turn on the first SATA connector is the first physical drive. - 67 - Unique Features actual size requirements vary, depending on PATA and SATA hard drives and restore it. Xpress Recovery2 can back up data on the amount of data). • It...

Manual
Page 68
...). Step 2: When finished, go to Disk Management to enter Xpress Recovery2 later, simply press during the POST. If you wish to check disk allocation. C. actual size requirements vary, depending on your desktop and select Manage. Go to Disk Management to leave unallocated space (10 GB or more is recommended; Please note...
...). Step 2: When finished, go to Disk Management to enter Xpress Recovery2 later, simply press during the POST. If you wish to check disk allocation. C. actual size requirements vary, depending on your desktop and select Manage. Go to Disk Management to leave unallocated space (10 GB or more is recommended; Please note...

Manual
Page 71
... Drive option allows you to save the BIOS file to Drive Enter : Run hi:Move ESC:Reset F10:Power Off Total size : 0 Free size : 0 3. Make sure the BIOS update file matches your motherboard model. The monitor will display the update process. •... arrow key to update BIOS?" Unique Features Select Floppy A and press . CoaodpyCMBIOOSS DcoemfapuletteEdn-aPbaless !! Q-Flash Utility v2.14 Flash Type/Size MXIC 25L8005/8006 1M Keep0 DfilMe(Is)DfaotuandEnable Floppy A Loa d CMO S Default Enable HDD 1-0 Upda te BIOS from Drive Please SparevsesBaInOySketoy...
... Drive option allows you to save the BIOS file to Drive Enter : Run hi:Move ESC:Reset F10:Power Off Total size : 0 Free size : 0 3. Make sure the BIOS update file matches your motherboard model. The monitor will display the update process. •... arrow key to update BIOS?" Unique Features Select Floppy A and press . CoaodpyCMBIOOSS DcoemfapuletteEdn-aPbaless !! Q-Flash Utility v2.14 Flash Type/Size MXIC 25L8005/8006 1M Keep0 DfilMe(Is)DfaotuandEnable Floppy A Loa d CMO S Default Enable HDD 1-0 Upda te BIOS from Drive Please SparevsesBaInOySketoy...

Manual
Page 78
... a long time, the backup will make an automatic backup on the right or at the bottom of the screen. The files/folders listed on the size of each partition). If the computer is turned off before the scheduled backup time, the backup will be performed on for saving backups (Note 3) •...
... a long time, the backup will make an automatic backup on the right or at the bottom of the screen. The files/folders listed on the size of each partition). If the computer is turned off before the scheduled backup time, the backup will be performed on for saving backups (Note 3) •...

Manual
Page 85
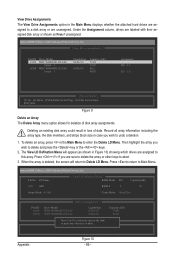
Set the Stripe Block size. 64 KB is complete, the screen will return to use maximum capacity... Under the Drives Assignments section, press the up or down arrow key to Y. ...
Set the Stripe Block size. 64 KB is complete, the screen will return to use maximum capacity... Under the Drives Assignments section, press the up or down arrow key to Y. ...
Manual
Page 86
... array or shown as shown in loss of disk array assignments. Record all array information including the array type, the disk members, and stripe block size in case you wish to delete and press the key or the + keys. 2. Deleting an existing disk array could result in Figure 10) showing which...
... array or shown as shown in loss of disk array assignments. Record all array information including the array type, the disk members, and stripe block size in case you wish to delete and press the key or the + keys. 2. Deleting an existing disk array could result in Figure 10) showing which...

Manual
Page 89
...Data mirrored for redundancy Data concatenated for creating an array (Figure 5). Then press to select RAID 0 (Stripe), RAID 1 (Mirror) or JBOD (Figure 5). Gigabyte Technology Corp. Select RAID Mode: Under the Level item, use up or down arrow key to move onto the next step. [ Create New RAID ] ...Name: Level: Disks: Block: Size: GRAID 0-Stripe Select Disk 128 KB 240 GB Gigabyte Technology Corp. Then the Create New RAID screen appears (Figure 4). Enter Array Name: Under the Name item, enter an array ...
...Data mirrored for redundancy Data concatenated for creating an array (Figure 5). Then press to select RAID 0 (Stripe), RAID 1 (Mirror) or JBOD (Figure 5). Gigabyte Technology Corp. Select RAID Mode: Under the Level item, use up or down arrow key to move onto the next step. [ Create New RAID ] ...Name: Level: Disks: Block: Size: GRAID 0-Stripe Select Disk 128 KB 240 GB Gigabyte Technology Corp. Then the Create New RAID screen appears (Figure 4). Enter Array Name: Under the Name item, enter an array ...

Manual
Page 90
... ] Create RAID on[ tHheelspel]ect HDD (Y/N) ? Press . [ Create New RAID ] Name: Level: Disks: Block: Size: GRAID 0-Stripe Select Disk 128 KB 240 GB Gigabyte Technology Corp. Confirm Creation: After all of the array and press . 6. When prompted to confirm your selection (Figure 7),...[ESC]-Abort Appendix - 90 - Set Array Size: Under the Size item, enter the size of the items above are typical values: RAID 0-128KB [hi]-Switch RAID Block Size [ENTER]-Next Figure 6 [ESC]-Abort 5. Gigabyte Technology Corp. Press . 3. Set Block Size (RAID 0 only): Under the Block item, ...
... ] Create RAID on[ tHheelspel]ect HDD (Y/N) ? Press . [ Create New RAID ] Name: Level: Disks: Block: Size: GRAID 0-Stripe Select Disk 128 KB 240 GB Gigabyte Technology Corp. Confirm Creation: After all of the array and press . 6. When prompted to confirm your selection (Figure 7),...[ESC]-Abort Appendix - 90 - Set Array Size: Under the Size item, enter the size of the items above are typical values: RAID 0-128KB [hi]-Switch RAID Block Size [ENTER]-Next Figure 6 [ESC]-Abort 5. Gigabyte Technology Corp. Press . 3. Set Block Size (RAID 0 only): Under the Block item, ...
Manual
Page 115
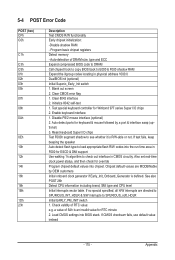
... F000 for ESCD & DMI support Use walking 1's algorithm to E000 & F000 shadow RAM Expand the Xgroup codes locating in CMOS circuitry. Check validity of DRAM size, type and ECC Expand compressed BIOS code to DRAM Call chipset hook to copy BIOS back to check out interface in physical address 1000:0 DualBIOS...
... F000 for ESCD & DMI support Use walking 1's algorithm to E000 & F000 shadow RAM Expand the Xgroup codes locating in CMOS circuitry. Check validity of DRAM size, type and ECC Expand compressed BIOS code to DRAM Call chipset hook to copy BIOS back to check out interface in physical address 1000:0 DualBIOS...
Manual
Page 117
... continue: 2. If no errors occur or F1 key is pressed to text mode if full screen logo is not defined Initialize PS/2 Mouse Prepare memory size information for Trend Anti-Virus code - 117 -
... continue: 2. If no errors occur or F1 key is pressed to text mode if full screen logo is not defined Initialize PS/2 Mouse Prepare memory size information for Trend Anti-Virus code - 117 -
