
Manual
Page 49
...features such as Native Command Queuing and hot plug. - 49 - 2-6 Integrated Peripherals CMOS Setup Utility-Copyright (C) 1984-2010 Award Software Integrated Peripherals OnChip SATA Controller OnChip SATA Type x ...F10: Save F6: Fail-Safe Defaults ESC: Exit F1: General Help F7: Optimized Defaults CMOS Setup Utility-Copyright (C) 1984-2010 Award Software Integrated Peripherals USB Controllers USB Legacy Function USB Storage Function ...to AHCI mode. BIOS Setup Advanced Host Controller Interface (AHCI) is an interface specification that support Native mode...
...features such as Native Command Queuing and hot plug. - 49 - 2-6 Integrated Peripherals CMOS Setup Utility-Copyright (C) 1984-2010 Award Software Integrated Peripherals OnChip SATA Controller OnChip SATA Type x ...F10: Save F6: Fail-Safe Defaults ESC: Exit F1: General Help F7: Optimized Defaults CMOS Setup Utility-Copyright (C) 1984-2010 Award Software Integrated Peripherals USB Controllers USB Legacy Function USB Storage Function ...to AHCI mode. BIOS Setup Advanced Host Controller Interface (AHCI) is an interface specification that support Native mode...
Manual
Page 50
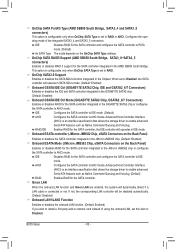
... RAID for the SATA controller and configures the SATA controller to IDE mode. BIOS Setup - 50 - Configures the operating mode of using the onboard LAN, set to Disabled, the SATA controller will operate in SATA 3Gb/s mode. (Default: Enabled) Onboard GSATA/IDE Ctrl (GIGABYTE ...GSATA2_6/7 Connectors) Enables or disables the IDE and SATA controller integrated in the GIGABYTE SATA2 chip. (Default: Enabled) Onboard GSATA/IDE Ctrl Mode (GIGABYTE SATA2 Chip, GSATA2_6/7 Connectors) Enables or disables RAID for the SATA controller integrated in the Chipset. OnChip SATA3.0 Support Enables ...
... RAID for the SATA controller and configures the SATA controller to IDE mode. BIOS Setup - 50 - Configures the operating mode of using the onboard LAN, set to Disabled, the SATA controller will operate in SATA 3Gb/s mode. (Default: Enabled) Onboard GSATA/IDE Ctrl (GIGABYTE ...GSATA2_6/7 Connectors) Enables or disables the IDE and SATA controller integrated in the GIGABYTE SATA2 chip. (Default: Enabled) Onboard GSATA/IDE Ctrl Mode (GIGABYTE SATA2 Chip, GSATA2_6/7 Connectors) Enables or disables RAID for the SATA controller integrated in the Chipset. OnChip SATA3.0 Support Enables ...

Manual
Page 65
... graphics card • Windows XP with Xpress Recovery cannot be restored using Xpress Recovery2. • USB hard drives are not supported. • Hard drives in RAID/AHCI mode are attached to boot from the Windows Vista...
... graphics card • Windows XP with Xpress Recovery cannot be restored using Xpress Recovery2. • USB hard drives are not supported. • Hard drives in RAID/AHCI mode are attached to boot from the Windows Vista...
Manual
Page 68
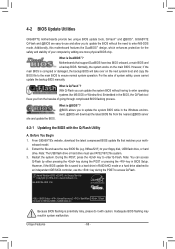
...to enter Q-Flash. However, if the main BIOS is saved to a hard drive in RAID/AHCI mode or a hard drive attached to an independent IDE/SATA controller, use the key...frees you to update the BIOS without having to enter MS-DOS mode. Embedded in BIOS Setup. From GIGABYTE's website, download the latest compressed BIOS update file that support DualBIOS have two BIOS onboard, ... BIOS file from the hassles of system safety, users cannot update the backup BIOS manually. GA-890FXA-UD5 F3c . . . . : BIOS Setup : XpressRecovery2 : Boot Menu : Qflash 05/24/2010-RD890-SB850-7A66DG04C-00 Because BIOS ...
...to enter Q-Flash. However, if the main BIOS is saved to a hard drive in RAID/AHCI mode or a hard drive attached to an independent IDE/SATA controller, use the key...frees you to update the BIOS without having to enter MS-DOS mode. Embedded in BIOS Setup. From GIGABYTE's website, download the latest compressed BIOS update file that support DualBIOS have two BIOS onboard, ... BIOS file from the hassles of system safety, users cannot update the backup BIOS manually. GA-890FXA-UD5 F3c . . . . : BIOS Setup : XpressRecovery2 : Boot Menu : Qflash 05/24/2010-RD890-SB850-7A66DG04C-00 Because BIOS ...

Manual
Page 79
... and capacity). Chapter 5 Appendix 5-1 Configuring SATA Hard Drive(s) To configure SATA hard drive(s), follow the steps below: A. Configure a RAID array in BIOS Setup. C. If you do not want to ensure optimal performance, it is more than one hard drive. • An empty formatted floppy... disk. • Windows Vista/XP setup disk. • Motherboard driver disk. 5-1-1 Configuring AMD SB850 SATA Controller A. Appendix Install SATA hard drive(s) in your motherboard, refer to ...
... and capacity). Chapter 5 Appendix 5-1 Configuring SATA Hard Drive(s) To configure SATA hard drive(s), follow the steps below: A. Configure a RAID array in BIOS Setup. C. If you do not want to ensure optimal performance, it is more than one hard drive. • An empty formatted floppy... disk. • Windows Vista/XP setup disk. • Motherboard driver disk. 5-1-1 Configuring AMD SB850 SATA Controller A. Appendix Install SATA hard drive(s) in your motherboard, refer to ...

Manual
Page 80
...: Optimized Defaults Figure 1 Step 2: Save changes and exit BIOS Setup. The actual BIOS Setup menu options you will see shall depend on your motherboard. Configuring SATA controller mode in system BIOS Setup. To enable RAID for the SATA3_0/1/2/3 connectors, set OnChip SATA Port4/5 Type to RAID. To enable support for your computer and press to...
...: Optimized Defaults Figure 1 Step 2: Save changes and exit BIOS Setup. The actual BIOS Setup menu options you will see shall depend on your motherboard. Configuring SATA controller mode in system BIOS Setup. To enable RAID for the SATA3_0/1/2/3 connectors, set OnChip SATA Port4/5 Type to RAID. To enable support for your computer and press to...

Manual
Page 81
..., press to Select Option Figure 3 [ESC] Exit - 81 - No Array is the first option screen when you enter the BIOS RAID Setup utility. (Figure 3). Press to enter the LD View/LD Define Menu window. To create an array, press to enter... RAID Option ROM Utility... RAID Option ROM Version 3.2.1540.15 (c) 2009 Advanced Micro Devices, Inc. Appendix Step 1: After the POST memory test begins and before the operating system boot begins, look for a non-RAID configuration. To view controller settings, press to enter the RAID BIOS setup utility. Press ...
..., press to Select Option Figure 3 [ESC] Exit - 81 - No Array is the first option screen when you enter the BIOS RAID Setup utility. (Figure 3). Press to enter the LD View/LD Define Menu window. To create an array, press to enter... RAID Option ROM Utility... RAID Option ROM Version 3.2.1540.15 (c) 2009 Advanced Micro Devices, Inc. Appendix Step 1: After the POST memory test begins and before the operating system boot begins, look for a non-RAID configuration. To view controller settings, press to enter the RAID BIOS setup utility. Press ...

Manual
Page 85
5-1-2 Configuring GIGABYTE SATA2/JMicron JMB362 SATA Controller A. See the table below for configuring different SATA Controllers for RAID. To enable RAID, see shall depend on your motherboard. The BIOS Setup menus described in system BIOS Setup. In BIOS Setup, go to the hard drive. The actual BIOS Setup menu options you have and the BIOS version. - 85 - Then...
5-1-2 Configuring GIGABYTE SATA2/JMicron JMB362 SATA Controller A. See the table below for configuring different SATA Controllers for RAID. To enable RAID, see shall depend on your motherboard. The BIOS Setup menus described in system BIOS Setup. In BIOS Setup, go to the hard drive. The actual BIOS Setup menu options you have and the BIOS version. - 85 - Then...

Manual
Page 86
... system boot begins, look for a non-RAID configuration. GIGABYTE Technology Corp. PCI Express to enter RAID Setup Utility ... HDD0 : HDD1 : ST3120026AS ST3120026AS 120 GB 120 GB Non-RAID Non-RAID Press to SATAII Host Controller ROM v1.07.16G Copyright (C) 2005-2009 GIGABYTE Technology. Appendix - 86 - Gigabyte Technology Corp. Press + to enter RAID Setup Utility" (Figure 2). Skip this step and...
... system boot begins, look for a non-RAID configuration. GIGABYTE Technology Corp. PCI Express to enter RAID Setup Utility ... HDD0 : HDD1 : ST3120026AS ST3120026AS 120 GB 120 GB Non-RAID Non-RAID Press to SATAII Host Controller ROM v1.07.16G Copyright (C) 2005-2009 GIGABYTE Technology. Appendix - 86 - Gigabyte Technology Corp. Press + to enter RAID Setup Utility" (Figure 2). Skip this step and...

Manual
Page 87
...Cursor [DEL,BS]-Delete Character Figure 4 [ENTER]-Next [ESC]-Abort The Create New RAID block displays all the items that need to be special characters) and press . 2. RAID Setup Utility v1.07.16G [ Create New RAID ] Name: Level: Disks: Block: Size: GRAID 0-Stripe Select Disk 128 KB 240...Data mirrored for redundancy Data concatenated for creating an array (Figure 5). Steps: 1. Then press to select RAID 0 (Stripe), RAID 1 (Mirror) or JBOD (Figure 5). Gigabyte Technology Corp. Select RAID Mode: Under the Level item, use up or down arrow key to move onto the next step. Enter...
...Cursor [DEL,BS]-Delete Character Figure 4 [ENTER]-Next [ESC]-Abort The Create New RAID block displays all the items that need to be special characters) and press . 2. RAID Setup Utility v1.07.16G [ Create New RAID ] Name: Level: Disks: Block: Size: GRAID 0-Stripe Select Disk 128 KB 240...Data mirrored for redundancy Data concatenated for creating an array (Figure 5). Steps: 1. Then press to select RAID 0 (Stripe), RAID 1 (Mirror) or JBOD (Figure 5). Gigabyte Technology Corp. Select RAID Mode: Under the Level item, use up or down arrow key to move onto the next step. Enter...

Manual
Page 88
... Figure 7 [ENTER]-Next [ESC]-Abort Appendix - 88 - 3. Press . RAID Setup Utility v1.07.16G [ Hard Disk Drive List ] Model Name } HDD0: ST3120026AS } HDD1: ST3120026AS Available 120 GB 120 GB Type/Status Non-RAID Non-RAID Confirm Creation [ RAID Disk Drive List ] Create RAID on[ tHheelspel]ect HDD (Y/N) ? Gigabyte Technology Corp. The following are configured, the selection bar...
... Figure 7 [ENTER]-Next [ESC]-Abort Appendix - 88 - 3. Press . RAID Setup Utility v1.07.16G [ Hard Disk Drive List ] Model Name } HDD0: ST3120026AS } HDD1: ST3120026AS Available 120 GB 120 GB Type/Status Non-RAID Non-RAID Confirm Creation [ RAID Disk Drive List ] Create RAID on[ tHheelspel]ect HDD (Y/N) ? Gigabyte Technology Corp. The following are configured, the selection bar...

Manual
Page 89
... Members: HDD 01 Status: Normal [fgTAB]-Switch Window [hi]-Select RAID Figure 9 [ENTER]-Detail [ESC]-Exit - 89 - Appendix Select the array and press . Gigabyte Technology Corp. RAID Setup Utility v1.07.16G [ Main Menu ] Create RAID Disk Drive Delete RAID Disk Drive Revert HDD to the RAID Disk Drive List block. A small window displaying the array information...
... Members: HDD 01 Status: Normal [fgTAB]-Switch Window [hi]-Select RAID Figure 9 [ENTER]-Detail [ESC]-Exit - 89 - Appendix Select the array and press . Gigabyte Technology Corp. RAID Setup Utility v1.07.16G [ Main Menu ] Create RAID Disk Drive Delete RAID Disk Drive Revert HDD to the RAID Disk Drive List block. A small window displaying the array information...

Manual
Page 90
...GB 120 GB Type/Status RAID Inside RAID Inside [ RAID Disk Drive List ] Model Name } RDD0: GRAID ALL DATA ON THE RAID WILL LOST!! a small triangle will move to Non-RAID Solve Mirror Conflict Rebuild Mirror Drive Save And Exit Setup Exit Without Saving Gigabyte Technology Corp. ARE YOU SURE... Main Menu ] Create RAID Disk Drive Delete RAID Disk Drive Revert HDD to Non-RAID Solve Mirror Conflict Rebuild Mirror Drive Save And Exit Setup Exit Without Saving Gigabyte Technology Corp. Save and Exit Setup: After configuring the RAID array, select the Save And Exit Setup item in the main ...
...GB 120 GB Type/Status RAID Inside RAID Inside [ RAID Disk Drive List ] Model Name } RDD0: GRAID ALL DATA ON THE RAID WILL LOST!! a small triangle will move to Non-RAID Solve Mirror Conflict Rebuild Mirror Drive Save And Exit Setup Exit Without Saving Gigabyte Technology Corp. ARE YOU SURE... Main Menu ] Create RAID Disk Drive Delete RAID Disk Drive Revert HDD to Non-RAID Solve Mirror Conflict Rebuild Mirror Drive Save And Exit Setup Exit Without Saving Gigabyte Technology Corp. Save and Exit Setup: After configuring the RAID array, select the Save And Exit Setup item in the main ...

Manual
Page 91
... Vista, you need to install the SATA controller driver during the Windows setup process. In MS-DOS mode: Prepare a startup disk that the drive letter for your optical drive is /are configured to RAID/AHCI mode, you also can copy the SATA controller driver from the ... (here we as- Press after the command: • For the AMD SB850, type (Figure 1): (Note 1) A:\>copy d:\bootdrv\SB8xx\x86\*.* • For the GIGABYTE SATA2/JMicron JMB362, type (Figure 2): (Note 2) A:\>copy d:\bootdrv\gsata\32bit\*.* Figure 1 Figure 2 (Note 1) Type the driver directory based on the operating system...
... Vista, you need to install the SATA controller driver during the Windows setup process. In MS-DOS mode: Prepare a startup disk that the drive letter for your optical drive is /are configured to RAID/AHCI mode, you also can copy the SATA controller driver from the ... (here we as- Press after the command: • For the AMD SB850, type (Figure 1): (Note 1) A:\>copy d:\bootdrv\SB8xx\x86\*.* • For the GIGABYTE SATA2/JMicron JMB362, type (Figure 2): (Note 2) A:\>copy d:\bootdrv\gsata\32bit\*.* Figure 1 Figure 2 (Note 1) Type the driver directory based on the operating system...

Manual
Page 93
...XP and Vista installation. The followings are ready to install a third party SCSI or RAID driver. Select AMD AHCI Compatible RAID Controller-x86 platform and press . Appendix Windows Setup Press F6 if you need to configure a SCSI Adapter for use with Windows, using ...support disk provided by an adapter manufacturer. AMD AHCI Compatible RAID Controller-x86 platform AMD AHCI Compatible RAID Controller-x64 platform ENTER=Select F3=Exit Figure 2 - 93 - Windows Setup You have chosen to install a 3rd party SCSI or RAID driver" (Figure 1). A. Installing Windows XP Step 1: ...
...XP and Vista installation. The followings are ready to install a third party SCSI or RAID driver. Select AMD AHCI Compatible RAID Controller-x86 platform and press . Appendix Windows Setup Press F6 if you need to configure a SCSI Adapter for use with Windows, using ...support disk provided by an adapter manufacturer. AMD AHCI Compatible RAID Controller-x86 platform AMD AHCI Compatible RAID Controller-x64 platform ENTER=Select F3=Exit Figure 2 - 93 - Windows Setup You have chosen to install a 3rd party SCSI or RAID driver" (Figure 1). A. Installing Windows XP Step 1: ...

Manual
Page 94
...Select F3=Exit Figure 3 Step 3: On the next screen, press to the previous screen. For the GIGABYTE SATA2/JMicron JMB362: Insert the floppy disk containing the SATA RAID/AHCI driver and press . Select the SCSI Adapter you can proceed with Windows, using a device support ...disk provided by an adapter manufacturer. Windows Setup You have chosen to Figure 3 below will appear. Then a controller menu similar to configure a SCSI Adapter for GIGABYTE GBB36X...
...Select F3=Exit Figure 3 Step 3: On the next screen, press to the previous screen. For the GIGABYTE SATA2/JMicron JMB362: Insert the floppy disk containing the SATA RAID/AHCI driver and press . Select the SCSI Adapter you can proceed with Windows, using a device support ...disk provided by an adapter manufacturer. Windows Setup You have chosen to Figure 3 below will appear. Then a controller menu similar to configure a SCSI Adapter for GIGABYTE GBB36X...

Manual
Page 95
... similar to the USB flash drive). Appendix Installing Windows Vista The procedure below assumes that below appears (RAID hard drive will not be sure to copy the driver files from the Windows Vista setup disk and perform standard OS installation steps. Note: For users using a SATA optical drive, be detected...a USB flash drive before installing Windows Vista (go to the BootDrv folder and save the whole SB8xxV folder to that only one RAID array exists in your system. For the AMD SB850: Step 1: Restart your system and browse to the following directory: \BootDrv\SB8xxV...
... similar to the USB flash drive). Appendix Installing Windows Vista The procedure below assumes that below appears (RAID hard drive will not be sure to copy the driver files from the Windows Vista setup disk and perform standard OS installation steps. Note: For users using a SATA optical drive, be detected...a USB flash drive before installing Windows Vista (go to the BootDrv folder and save the whole SB8xxV folder to that only one RAID array exists in your system. For the AMD SB850: Step 1: Restart your system and browse to the following directory: \BootDrv\SB8xxV...

Manual
Page 97
... Insert the motherboard driver disk (Method A) or the floppy disk/USB flash drive that below appears (RAID/AHCI hard drive(s) will not be sure to copy the driver files from the Windows Vista setup disk and perform standard OS installation steps. Figure 9 - 97 - Note: For users using a SATA... optical drive, be detected at this stage), select Load Driver (Figure 8). Method B: Insert the USB flash drive containing the driver files and browse to load the driver. For the GIGABYTE ...
... Insert the motherboard driver disk (Method A) or the floppy disk/USB flash drive that below appears (RAID/AHCI hard drive(s) will not be sure to copy the driver files from the Windows Vista setup disk and perform standard OS installation steps. Figure 9 - 97 - Note: For users using a SATA... optical drive, be detected at this stage), select Load Driver (Figure 8). Method B: Insert the USB flash drive containing the driver files and browse to load the driver. For the GIGABYTE ...

Manual
Page 100
... ] Model Name HDD0: ST3120026AS HDD1: ST3120026AS Capacity 120 GB 120 GB Type/Status RAID Inside Non-RAID [ RAID Disk Drive List ] Model Name RDD0: GRAID RAID Level 1-Mirror Capacity 120 GB Status Degraded Members(HDDx) 0? Use either the RAID setup utility or the GIGABYTE RAID CONFIGURER utility in the operating system to perform the rebuild. • Rebuilding with...
... ] Model Name HDD0: ST3120026AS HDD1: ST3120026AS Capacity 120 GB 120 GB Type/Status RAID Inside Non-RAID [ RAID Disk Drive List ] Model Name RDD0: GRAID RAID Level 1-Mirror Capacity 120 GB Status Degraded Members(HDDx) 0? Use either the RAID setup utility or the GIGABYTE RAID CONFIGURER utility in the operating system to perform the rebuild. • Rebuilding with...


