
Manual
Page 15
... the CPU. 1-3-2 Installing the CPU Cooler Follow the steps below to correctly install the CPU cooler on the CPU. (The following procedure uses the GIGABYTE cooler as the picture above shows) to lock into place. (Refer to your CPU cooler installation manual for instructions on installing the cooler.) Step 5: Finally, attach the...
... the CPU. 1-3-2 Installing the CPU Cooler Follow the steps below to correctly install the CPU cooler on the CPU. (The following procedure uses the GIGABYTE cooler as the picture above shows) to lock into place. (Refer to your CPU cooler installation manual for instructions on installing the cooler.) Step 5: Finally, attach the...
Manual
Page 17
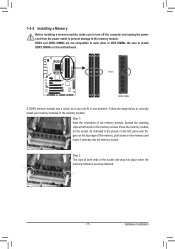
As indicated in the picture on the left, place your memory modules in the memory sockets. Follow the steps below to the memory module. Step 1: Note the orientation of the ...
As indicated in the picture on the left, place your memory modules in the memory sockets. Follow the steps below to the memory module. Step 1: Note the orientation of the ...

Manual
Page 102
... Audio Input and Output 5-2-1 Configuring 2/4/5.1/7.1-Channel Audio The motherboard provides six audio jacks on both of the front and back panel audio connections simultaneously. The picture to -analog converters (DACs) that support 44.1KHz/48KHz/ 96KHz/192KHz sampling rate. all at the same time. High Definition Audio (HD Audio) HD Audio...
... Audio Input and Output 5-2-1 Configuring 2/4/5.1/7.1-Channel Audio The motherboard provides six audio jacks on both of the front and back panel audio connections simultaneously. The picture to -analog converters (DACs) that support 44.1KHz/48KHz/ 96KHz/192KHz sampling rate. all at the same time. High Definition Audio (HD Audio) HD Audio...
