Manual
Page 25
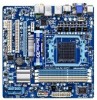
... motherboard supports CPU fan speed control, which requires the use a metal object like a screwdriver to remove the jumper cap from overheating. date information and BIOS configurations) and reset the CMOS values to clear the CMOS values (e.g. Each fan header supplies a +12V power voltage and possesses a foolproof insertion design. Hardware Installation When connecting...
... motherboard supports CPU fan speed control, which requires the use a metal object like a screwdriver to remove the jumper cap from overheating. date information and BIOS configurations) and reset the CMOS values to clear the CMOS values (e.g. Each fan header supplies a +12V power voltage and possesses a foolproof insertion design. Hardware Installation When connecting...

Manual
Page 27
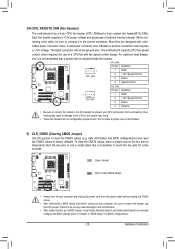
..., Green): Connects to the reset switch on the chassis to the pin assignments below. This function requires a chassis with a chassis intrusion switch/sensor. When connecting your system using the power switch (refer to Chapter 2, "BIOS Setup," "Power Management Setup," for information about beep codes. • HD (Hard Drive Activity LED, Blue) Connects...
..., Green): Connects to the reset switch on the chassis to the pin assignments below. This function requires a chassis with a chassis intrusion switch/sensor. When connecting your system using the power switch (refer to Chapter 2, "BIOS Setup," "Power Management Setup," for information about beep codes. • HD (Hard Drive Activity LED, Blue) Connects...

Manual
Page 31
...BIOS, use either the GIGABYTE Q-Flash or @BIOS utility. • Q-Flash allows the user to boot. To flash the BIOS, do not encounter problems using the Q-Flash and @BIOS utilities, refer to keep the configuration values in system's failure to quickly and easily upgrade or back up BIOS without entering the operating system. • @BIOS... the POST when the power is turned on using the current version of BIOS, it with caution. For instructions on . If this occurs, try to clear the CMOS values and reset the board to default values. (Refer to the "Load Optimized Defaults" section...
...BIOS, use either the GIGABYTE Q-Flash or @BIOS utility. • Q-Flash allows the user to boot. To flash the BIOS, do not encounter problems using the Q-Flash and @BIOS utilities, refer to keep the configuration values in system's failure to quickly and easily upgrade or back up BIOS without entering the operating system. • @BIOS... the POST when the power is turned on using the current version of BIOS, it with caution. For instructions on . If this occurs, try to clear the CMOS values and reset the board to default values. (Refer to the "Load Optimized Defaults" section...
Manual
Page 36
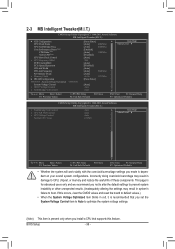
If this occurs, clear the CMOS values and reset the board to default values.) • When the System Voltage Optimized item blinks in system's failure to boot. This page is for advanced users only... results. (Inadequately altering the settings may result in damage to optimize the system voltage settings. (Note) This item is dependent on your overall system configurations. BIOS Setup - 36 - 2-3 MB Intelligent Tweaker(M.I.T.) CMOS Setup Utility-Copyright (C) 1984-2011 Award Software MB Intelligent Tweaker(M.I .T.) x SouthBridge Volt Control x CPU NB VID Control x CPU Voltage...
If this occurs, clear the CMOS values and reset the board to default values.) • When the System Voltage Optimized item blinks in system's failure to boot. This page is for advanced users only... results. (Inadequately altering the settings may result in damage to optimize the system voltage settings. (Note) This item is dependent on your overall system configurations. BIOS Setup - 36 - 2-3 MB Intelligent Tweaker(M.I.T.) CMOS Setup Utility-Copyright (C) 1984-2011 Award Software MB Intelligent Tweaker(M.I .T.) x SouthBridge Volt Control x CPU NB VID Control x CPU Voltage...
Manual
Page 38
...performance. (Default: Disabled) CPU Host Clock Control Enables or disables the control of CPU host clock. Important It is from 200 MHz to X6.66. BIOS Setup - 38 - The adjustable range is from 100 MHz to x1~x10 (200 MHz~2.0 GHz). Note: If your system fails to boot after overclocking..., please wait for 20 seconds to allow for automated system reboot, or clear the CMOS values to reset the board to manually set the frequency for the HT Link between the CPU and chipset. PCIE Clock(MHz) Allows you to default values....
...performance. (Default: Disabled) CPU Host Clock Control Enables or disables the control of CPU host clock. Important It is from 200 MHz to X6.66. BIOS Setup - 38 - The adjustable range is from 100 MHz to x1~x10 (200 MHz~2.0 GHz). Note: If your system fails to boot after overclocking..., please wait for 20 seconds to allow for automated system reboot, or clear the CMOS values to reset the board to manually set the frequency for the HT Link between the CPU and chipset. PCIE Clock(MHz) Allows you to default values....

Manual
Page 52
... If the system chassis cover is removed, this occurs. (Default: Disabled) BIOS Setup - 52 - 2-9 PC Health Status CMOS Setup Utility-Copyright (C) 1984-2011 Award Software PC Health Status Hardware Thermal Control Reset Case Open Status Case Opened Vcore DDR3 1.5V +3.3V +12V Current System Temperature... Thermal Control Enables or disables the CPU overheating protection function. To clear the chassis intrusion status record, set Reset Case Open Status to Enabled, save the settings to emit warning sound if the CPU/system fan is overheated. (Default: Enabled...
... If the system chassis cover is removed, this occurs. (Default: Disabled) BIOS Setup - 52 - 2-9 PC Health Status CMOS Setup Utility-Copyright (C) 1984-2011 Award Software PC Health Status Hardware Thermal Control Reset Case Open Status Case Opened Vcore DDR3 1.5V +3.3V +12V Current System Temperature... Thermal Control Enables or disables the CPU overheating protection function. To clear the chassis intrusion status record, set Reset Case Open Status to Enabled, save the settings to emit warning sound if the CPU/system fan is overheated. (Default: Enabled...
Manual
Page 65
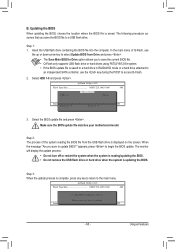
...Flash Type/Size MXIC 25L1605/1606 4M Keep0 DfilMe(Is)Dfaotuan d Enable HDD 1-0 Loa d CMO S Default Enable Update BIOS from Drive Please SparevsesBaInOySketoy Dtoricvoentinue Enter : Run hi:Move ESC:Reset F10:Power Off - 65 - CoaodpyCMBIOOSS Dcoemfapulet t e Edn-aPbaless !! B. appears, press to access Q-Flash. 2. ...allows you sure to Drive Enter : Run hi:Move Total size : 0 ESC:Reset Free size : 0 F10:Power Off 3. When the message "Are you to save the BIOS file to select Update BIOS from the USB flash drive is displayed on the screen. Step 3: When the...
...Flash Type/Size MXIC 25L1605/1606 4M Keep0 DfilMe(Is)Dfaotuan d Enable HDD 1-0 Loa d CMO S Default Enable Update BIOS from Drive Please SparevsesBaInOySketoy Dtoricvoentinue Enter : Run hi:Move ESC:Reset F10:Power Off - 65 - CoaodpyCMBIOOSS Dcoemfapulet t e Edn-aPbaless !! B. appears, press to access Q-Flash. 2. ...allows you sure to Drive Enter : Run hi:Move Total size : 0 ESC:Reset Free size : 0 F10:Power Off 3. When the message "Are you to save the BIOS file to select Update BIOS from the USB flash drive is displayed on the screen. Step 3: When the...


