
Manual
Page 33
Submenu Help While in a submenu, press to display a help screen. Help for each item is in the Item Help block on the screen. Press to BIOS Load CMOS from BIOS Change CPU's Clock & Voltage BIOS Setup Program Function Keys Move the selection bar to select an item Execute command or enter the submenu Main Menu: Exit the BIOS Setup program Submenus: Exit current submenu Increase the numeric value or make changes Decrease the numeric value or make changes Show descriptions of the function keys Move cursor to the Item Help block on the right (submenus only)...
Submenu Help While in a submenu, press to display a help screen. Help for each item is in the Item Help block on the screen. Press to BIOS Load CMOS from BIOS Change CPU's Clock & Voltage BIOS Setup Program Function Keys Move the selection bar to select an item Execute command or enter the submenu Main Menu: Exit the BIOS Setup program Submenus: Exit current submenu Increase the numeric value or make changes Decrease the numeric value or make changes Show descriptions of the function keys Move cursor to the Item Help block on the right (submenus only)...
Manual
Page 35
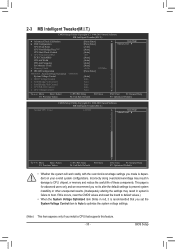
...Auto] Auto Auto Auto Auto Auto Item Help Menu Level Move Enter: Select F5: Previous Values +/-/PU/PD: Value F10: Save F6: Fail-Safe Defaults ESC: Exit F1: General Help F7: Optimized Defaults CMOS Setup Utility-Copyright (C) 1984-2010 Award Software MB Intelligent Tweaker(M.I.T.)... Normal CPU Vcore 1.3500V Item Help Menu Level Move Enter: Select F5: Previous Values +/-/PU/PD: Value F10: Save F6: Fail-Safe Defaults ESC: Exit F1: General Help F7: Optimized Defaults • Whether the system will work stably with the overclock/overvoltage...
...Auto] Auto Auto Auto Auto Auto Item Help Menu Level Move Enter: Select F5: Previous Values +/-/PU/PD: Value F10: Save F6: Fail-Safe Defaults ESC: Exit F1: General Help F7: Optimized Defaults CMOS Setup Utility-Copyright (C) 1984-2010 Award Software MB Intelligent Tweaker(M.I.T.)... Normal CPU Vcore 1.3500V Item Help Menu Level Move Enter: Select F5: Previous Values +/-/PU/PD: Value F10: Save F6: Fail-Safe Defaults ESC: Exit F1: General Help F7: Optimized Defaults • Whether the system will work stably with the overclock/overvoltage...

Manual
Page 36
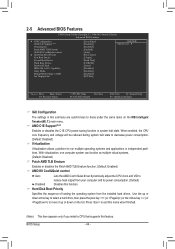
...) x CPU core 3 (Note) [Normal] [Disabled] -2% -2% -2% -2% -2% [Auto] Enabled Enabled Item Help Menu Level Move Enter: Select F5: Previous Values +/-/PU/PD: Value F10: Save F6: Fail-Safe Defaults ESC: Exit F1: General Help F7: Optimized Defaults EC Firmware Selection Allows you to enable all CPU cores. A message which says "BIOS...
...) x CPU core 3 (Note) [Normal] [Disabled] -2% -2% -2% -2% -2% [Auto] Enabled Enabled Item Help Menu Level Move Enter: Select F5: Previous Values +/-/PU/PD: Value F10: Save F6: Fail-Safe Defaults ESC: Exit F1: General Help F7: Optimized Defaults EC Firmware Selection Allows you to enable all CPU cores. A message which says "BIOS...
Manual
Page 37
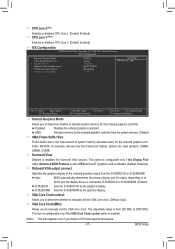
...(MHz) [UMA] [Auto] Disabled [D-SUB/DVI] [Disabled] 350 Item Help Menu Level Move Enter: Select F5: Previous Values +/-/PU/PD: Value F10: Save F6: Fail-Safe Defaults ESC: Exit F1: General Help F7: Optimized Defaults Internal Graphics Mode Allows you to determine whether to allocate system memory for the...
...(MHz) [UMA] [Auto] Disabled [D-SUB/DVI] [Disabled] 350 Item Help Menu Level Move Enter: Select F5: Previous Values +/-/PU/PD: Value F10: Save F6: Fail-Safe Defaults ESC: Exit F1: General Help F7: Optimized Defaults Internal Graphics Mode Allows you to determine whether to allocate system memory for the...

Manual
Page 39
... 9T 24T -5T 105ns -10T 5T 33T 4T Item Help Menu Level Move Enter: Select F5: Previous Values +/-/PU/PD: Value F10: Save F6: Fail-Safe Defaults ESC: Exit F1: General Help F7: Optimized Defaults DCTs Mode (Note) Allows you install a CPU that supports this feature. - 39 - CAS# latency...
... 9T 24T -5T 105ns -10T 5T 33T 4T Item Help Menu Level Move Enter: Select F5: Previous Values +/-/PU/PD: Value F10: Save F6: Fail-Safe Defaults ESC: Exit F1: General Help F7: Optimized Defaults DCTs Mode (Note) Allows you install a CPU that supports this feature. - 39 - CAS# latency...

Manual
Page 42
... Support [1.44M, 3.5"] [Disabled] Halt On [All, But Keyboard] Base Memory Extended Memory 640K 1790M Move Enter: Select F5: Previous Values +/-/PU/PD: Value F10: Save F6: Fail-Safe Defaults ESC: Exit F1: General Help F7: Optimized Defaults Date (mm:dd:yy) Sets the system date. Select the desired field and use...
... Support [1.44M, 3.5"] [Disabled] Halt On [All, But Keyboard] Base Memory Extended Memory 640K 1790M Move Enter: Select F5: Previous Values +/-/PU/PD: Value F10: Save F6: Fail-Safe Defaults ESC: Exit F1: General Help F7: Optimized Defaults Date (mm:dd:yy) Sets the system date. Select the desired field and use...
Manual
Page 44
...] [Hard Disk] [CDROM] [Setup] [Disabled] [Disabled] [Disabled] [PCI Slot] Item Help Menu Level Move Enter: Select F5: Previous Values +/-/PU/PD: Value F10: Save F6: Fail-Safe Defaults ESC: Exit F1: General Help F7: Optimized Defaults IGX Configuration The settings in this submenu are synchronous to reduce heat output from...
...] [Hard Disk] [CDROM] [Setup] [Disabled] [Disabled] [Disabled] [PCI Slot] Item Help Menu Level Move Enter: Select F5: Previous Values +/-/PU/PD: Value F10: Save F6: Fail-Safe Defaults ESC: Exit F1: General Help F7: Optimized Defaults IGX Configuration The settings in this submenu are synchronous to reduce heat output from...
Manual
Page 46
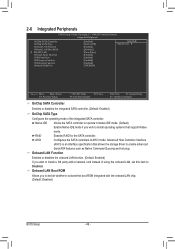
...] [Disabled] [Press Enter] [Enabled] [Enabled] [Enabled] [Enabled] [3F8/IRQ4] Item Help Menu Level Move Enter: Select F5: Previous Values +/-/PU/PD: Value F10: Save F6: Fail-Safe Defaults ESC: Exit F1: General Help F7: Optimized Defaults OnChip SATA Controller Enables or disables the integrated SATA controller. (Default: Enabled) OnChip SATA...
...] [Disabled] [Press Enter] [Enabled] [Enabled] [Enabled] [Enabled] [3F8/IRQ4] Item Help Menu Level Move Enter: Select F5: Previous Values +/-/PU/PD: Value F10: Save F6: Fail-Safe Defaults ESC: Exit F1: General Help F7: Optimized Defaults OnChip SATA Controller Enables or disables the integrated SATA controller. (Default: Enabled) OnChip SATA...

Manual
Page 47
... = Open / Length = 0m Part7-8 Status = Open / Length = 0m Item Help Menu Level Move Enter: Select F5: Previous Values +/-/PU/PD: Value F10: Save F6: Fail-Safe Defaults ESC: Exit F1: General Help F7: Optimized Defaults This motherboard incorporates cable diagnostic feature designed to the fault or short.
... = Open / Length = 0m Part7-8 Status = Open / Length = 0m Item Help Menu Level Move Enter: Select F5: Previous Values +/-/PU/PD: Value F10: Save F6: Fail-Safe Defaults ESC: Exit F1: General Help F7: Optimized Defaults This motherboard incorporates cable diagnostic feature designed to the fault or short.

Manual
Page 49
...] [Enabled] [Disabled] [Disabled] Enter [Soft-Off] [Disabled] Everyday 0 : 0 : 0 [Disabled] Item Help Menu Level Move Enter: Select F5: Previous Values +/-/PU/PD: Value F10: Save F6: Fail-Safe Defaults ESC: Exit F1: General Help F7: Optimized Defaults ACPI Suspend Type Specifies the ACPI sleep state when the system enters suspend. In...
...] [Enabled] [Disabled] [Disabled] Enter [Soft-Off] [Disabled] Everyday 0 : 0 : 0 [Disabled] Item Help Menu Level Move Enter: Select F5: Previous Values +/-/PU/PD: Value F10: Save F6: Fail-Safe Defaults ESC: Exit F1: General Help F7: Optimized Defaults ACPI Suspend Type Specifies the ACPI sleep state when the system enters suspend. In...

Manual
Page 51
... Configurations PCI1 IRQ Assignment PCI2 IRQ Assignment [Auto] [Auto] Item Help Menu Level Move Enter: Select F5: Previous Values +/-/PU/PD: Value F10: Save F6: Fail-Safe Defaults ESC: Exit F1: General Help F7: Optimized Defaults PCI1 IRQ Assignment Auto 3,4,5,7,9,10,11,12,14,15 PCI2 IRQ Assignment Auto 3,4,5,7,9,10...
... Configurations PCI1 IRQ Assignment PCI2 IRQ Assignment [Auto] [Auto] Item Help Menu Level Move Enter: Select F5: Previous Values +/-/PU/PD: Value F10: Save F6: Fail-Safe Defaults ESC: Exit F1: General Help F7: Optimized Defaults PCI1 IRQ Assignment Auto 3,4,5,7,9,10,11,12,14,15 PCI2 IRQ Assignment Auto 3,4,5,7,9,10...

Manual
Page 52
... 47oC 3375 RPM 0 RPM [Disabled] [Disabled] [Disabled] [Enabled] [Auto] Item Help Menu Level Move Enter: Select F5: Previous Values +/-/PU/PD: Value F10: Save F6: Fail-Safe Defaults ESC: Exit F1: General Help F7: Optimized Defaults Hardware Thermal Control Enables or disables the CPU overheating protection function. Options are: Disabled...
... 47oC 3375 RPM 0 RPM [Disabled] [Disabled] [Disabled] [Enabled] [Auto] Item Help Menu Level Move Enter: Select F5: Previous Values +/-/PU/PD: Value F10: Save F6: Fail-Safe Defaults ESC: Exit F1: General Help F7: Optimized Defaults Hardware Thermal Control Enables or disables the CPU overheating protection function. Options are: Disabled...

Manual
Page 74
...] [Disabled] [Press Enter] [Enabled] [Enabled] [Enabled] [Enabled] [3F8/IRQ4] Item Help Menu Level Move Enter: Select F5: Previous Values +/-/PU/PD: Value F10: Save F6: Fail-Safe Defaults Figure 1 ESC: Exit F1: General Help F7: Optimized Defaults Step 2: Save changes and exit BIOS Setup. The BIOS Setup menus described in...
...] [Disabled] [Press Enter] [Enabled] [Enabled] [Enabled] [Enabled] [3F8/IRQ4] Item Help Menu Level Move Enter: Select F5: Previous Values +/-/PU/PD: Value F10: Save F6: Fail-Safe Defaults Figure 1 ESC: Exit F1: General Help F7: Optimized Defaults Step 2: Save changes and exit BIOS Setup. The BIOS Setup menus described in...
Manual
Page 81
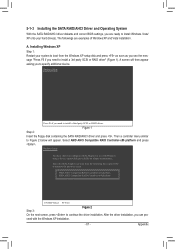
... BIOS settings, you are examples of Windows XP and Vista installation. Installing Windows XP Step 1: Restart your hard drive(s). Windows Setup Press F6 if you to continue the driver installation. Select AMD AHCI Compatible RAID Controller-x86 platform and press . After the driver installation, you need... previous screen. Select the SCSI Adapter you want from the Windows XP setup disk and press as soon as you see the message "Press F6 if you can pro- Figure 1 Step 2: Insert the floppy disk containing the SATA RAID/AHCI driver and press . The followings are ready...
... BIOS settings, you are examples of Windows XP and Vista installation. Installing Windows XP Step 1: Restart your hard drive(s). Windows Setup Press F6 if you to continue the driver installation. Select AMD AHCI Compatible RAID Controller-x86 platform and press . After the driver installation, you need... previous screen. Select the SCSI Adapter you want from the Windows XP setup disk and press as soon as you see the message "Press F6 if you can pro- Figure 1 Step 2: Insert the floppy disk containing the SATA RAID/AHCI driver and press . The followings are ready...