Manual
Page 1
GA-73UM-S2H LGA775 socket motherboard for Intel® CoreTM processor family/ Intel® Pentium® processor family/Intel® Celeron® processor family User's Manual Rev. 1001 12ME-73UMS2H-1001R
GA-73UM-S2H LGA775 socket motherboard for Intel® CoreTM processor family/ Intel® Pentium® processor family/Intel® Celeron® processor family User's Manual Rev. 1001 12ME-73UMS2H-1001R
Manual
Page 3
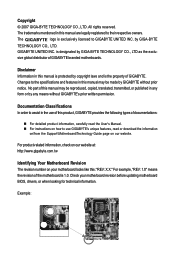
sive global distributor of the motherboard is the property of this manual are legally registered to GIGABYTE UNITED INC. Check your motherboard looks like this manual may be made by GIGA-BYTE TECHNOLOGY CO., LTD. Changes to the specifications and features...to assist in this product, GIGABYTE provides the following types of this manual is protected by any form or by copyright laws and is 1.0. For example, "REV: 1.0" means the revision of GIGABYTE branded motherboards. Example: Disclaimer Information in this manual may be reproduced, copied, ...
sive global distributor of the motherboard is the property of this manual are legally registered to GIGABYTE UNITED INC. Check your motherboard looks like this manual may be made by GIGA-BYTE TECHNOLOGY CO., LTD. Changes to the specifications and features...to assist in this product, GIGABYTE provides the following types of this manual is protected by any form or by copyright laws and is 1.0. For example, "REV: 1.0" means the revision of GIGABYTE branded motherboards. Example: Disclaimer Information in this manual may be reproduced, copied, ...

Manual
Page 6
...-1CM001-32R) LPT port cable (Part No. 12CF1-1LP001-01R) - 6 - The box contents are for reference only. Box Contents GA-73UM-S2H motherboard Motherboard driver disk Motherboard driver disk (for Windows Vista) User's Manual Intel® LGA775 CPU Installation Guide One IDE cable and one floppy disk drive cable Two SATA 3Gb/s cables I/O Shield...
...-1CM001-32R) LPT port cable (Part No. 12CF1-1LP001-01R) - 6 - The box contents are for reference only. Box Contents GA-73UM-S2H motherboard Motherboard driver disk Motherboard driver disk (for Windows Vista) User's Manual Intel® LGA775 CPU Installation Guide One IDE cable and one floppy disk drive cable Two SATA 3Gb/s cables I/O Shield...

Manual
Page 9
... the installation process can become damaged as a result of the product, please consult a certified computer technician. - 9 - Hardware Installation Prior to installation, carefully read the user's manual and follow these procedures: • Prior to the use of electrostatic discharge (ESD).
... the installation process can become damaged as a result of the product, please consult a certified computer technician. - 9 - Hardware Installation Prior to installation, carefully read the user's manual and follow these procedures: • Prior to the use of electrostatic discharge (ESD).

Manual
Page 15
... remove the cooler, on the contrary, is complete. Check that the Male and Female push pins are joined closely. (Refer to your CPU cooler installation manual for instructions on the motherboard. Push down each push pin. Direction of the Arrow Sign on the Male Push Pin Male Push Pin The Top...
... remove the cooler, on the contrary, is complete. Check that the Male and Female push pins are joined closely. (Refer to your CPU cooler installation manual for instructions on the motherboard. Push down each push pin. Direction of the Arrow Sign on the Male Push Pin Male Push Pin The Top...
Manual
Page 17
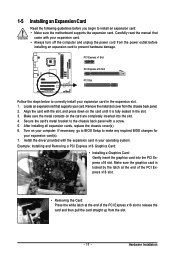
... necessary, go to BIOS Setup to correctly install your expansion card(s). 7. Make sure the graphics card is fully seated in your computer. Carefully read the manual that supports your expansion card. • Always turn off the computer and unplug the power cord from the power outlet before you begin to the...
... necessary, go to BIOS Setup to correctly install your expansion card(s). 7. Make sure the graphics card is fully seated in your computer. Carefully read the manual that supports your expansion card. • Always turn off the computer and unplug the power cord from the power outlet before you begin to the...

Manual
Page 31
... do so may cause damage to the motherboard. • After system restart, go to BIOS Setup to load factory defaults (select Load Optimized Defaults) or manually configure the BIOS settings (refer to factory defaults. Open: Normal Short: Clear CMOS Values • Always turn off your computer, be sure to remove the...
... do so may cause damage to the motherboard. • After system restart, go to BIOS Setup to load factory defaults (select Load Optimized Defaults) or manually configure the BIOS settings (refer to factory defaults. Open: Normal Short: Clear CMOS Values • Always turn off your computer, be sure to remove the...

Manual
Page 37
.../SATA device on this item to None so the system will skip the detection of the device during the POST for faster system startup. • Manual Allows you to set the date. Select the desired field and use the up arrow or down arrow key to... manually enter the specifications of the two methods below : • Auto Lets BIOS automatically detect IDE/SATA devices during the POST. (Default) • None If no ...
.../SATA device on this item to None so the system will skip the detection of the device during the POST for faster system startup. • Manual Allows you to set the date. Select the desired field and use the up arrow or down arrow key to... manually enter the specifications of the two methods below : • Auto Lets BIOS automatically detect IDE/SATA devices during the POST. (Default) • None If no ...

Manual
Page 38
... item to the information on Allows you wish to enter the parameters manually, refer to None. Halt on the hard drive. Extended Memory The amount of cylinders. Capacity Approximate capacity of heads. Head Number of the currently installed hard drive. GA-73UM-S2H Motherboard - 38 - Floppy 3 Mode Support Allows you to specify whether the...
... item to the information on Allows you wish to enter the parameters manually, refer to None. Halt on the hard drive. Extended Memory The amount of cylinders. Capacity Approximate capacity of heads. Head Number of the currently installed hard drive. GA-73UM-S2H Motherboard - 38 - Floppy 3 Mode Support Allows you to specify whether the...

Manual
Page 51
Setting shows the value you to Unlinked. FSB-Memory Clock Mode Auto Linked BIOS will automatically set FSB speed manually; Auto BIOS will automatically set the FSB-Memory clock mode. (Default) Allows you to manually set this item to 5:4. CPU Host Frequency (Mhz) Allows you to set the FSB-Memory ratio. (Default) 1:1 Sets... FSB-Memory Clock Mode option is highly recommended that supports this item to Linked. mode based on system configurations. CPU Clock Ratio (Note) Allows you manually adjust;
Setting shows the value you to Unlinked. FSB-Memory Clock Mode Auto Linked BIOS will automatically set FSB speed manually; Auto BIOS will automatically set the FSB-Memory clock mode. (Default) Allows you to manually set this item to 5:4. CPU Host Frequency (Mhz) Allows you to set the FSB-Memory ratio. (Default) 1:1 Sets... FSB-Memory Clock Mode option is highly recommended that supports this item to Linked. mode based on system configurations. CPU Clock Ratio (Note) Allows you manually adjust;

Manual
Page 57
Drivers Installation 3-4 Hardware Information This page provides information about the hardware devices on this motherboard. 3-5 Contact Us Check the contacts information of the GIGABYTE headquarter in Taiwan and the overseas branch offices on the last page of this manual. - 57 -
Drivers Installation 3-4 Hardware Information This page provides information about the hardware devices on this motherboard. 3-5 Contact Us Check the contacts information of the GIGABYTE headquarter in Taiwan and the overseas branch offices on the last page of this manual. - 57 -

Manual
Page 68
...sure the model name on the @BIOS server site, please manually download the BIOS update file from the Internet or through other source. Update the BIOS without Using the Internet Update Function" below. f1) obtained from GIGABYTE's website and follow the instructions in an unbootable system. ...Defaults and press to load BIOS defaults. Upon completion, restart your motherboard model. Make sure the extracted BIOS file matches your system. GA-73UM-S2H Motherboard - 68 - Step 3: Press OK to enter the BIOS Setup program. Updating the BIOS with an incorrect BIOS file could ...
...sure the model name on the @BIOS server site, please manually download the BIOS update file from the Internet or through other source. Update the BIOS without Using the Internet Update Function" below. f1) obtained from GIGABYTE's website and follow the instructions in an unbootable system. ...Defaults and press to load BIOS defaults. Upon completion, restart your motherboard model. Make sure the extracted BIOS file matches your system. GA-73UM-S2H Motherboard - 68 - Step 3: Press OK to enter the BIOS Setup program. Updating the BIOS with an incorrect BIOS file could ...
Manual
Page 73
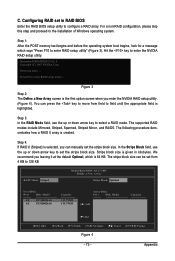
... size is created. C. Step 3: In the RAID Mode field, use the up or down arrow key to set in kilobytes. The stripe block size can manually set from field to 128 KB RAID Mode: Striped MediaShield BIOS Jul 27 2007 - You can press the key to move from 4 KB to field...
... size is created. C. Step 3: In the RAID Mode field, use the up or down arrow key to set in kilobytes. The stripe block size can manually set from field to 128 KB RAID Mode: Striped MediaShield BIOS Jul 27 2007 - You can press the key to move from 4 KB to field...

Manual
Page 77
..., including those for use with Windows, press ENTER. Windows Setup Setup could not determine the type of some files being loaded before you need to manually specify an adapter.
..., including those for use with Windows, press ENTER. Windows Setup Setup could not determine the type of some files being loaded before you need to manually specify an adapter.

Manual
Page 82
... audio: Front speaker out, Rear speaker out, Center/Subwoofer speaker out, and Side speaker out. Side Speaker Out Mic In For example, in jack and manually configure the jack for High Definition Audio" has been installed from the motherboard driver disk and your system tray. Before installing the audio driver, make... at the same time. Double-click the icon to the right shows the default audio jack assignments. The picture to access the Audio Control Panel. GA-73UM-S2H Motherboard - 82 -
... audio: Front speaker out, Rear speaker out, Center/Subwoofer speaker out, and Side speaker out. Side Speaker Out Mic In For example, in jack and manually configure the jack for High Definition Audio" has been installed from the motherboard driver disk and your system tray. Before installing the audio driver, make... at the same time. Double-click the icon to the right shows the default audio jack assignments. The picture to access the Audio Control Panel. GA-73UM-S2H Motherboard - 82 -

Manual
Page 92
...in a manner that the information contained herein was accurate in all GIGABYTE motherboards fulfill European Union regulations for recycling. Š If you need further assistance in recycling, reusing in your product's user's manual and we will be disposed of with your effort. The separate ...for RoHS (Restriction of electric and electronic devices and their components. GA-73UM-S2H Motherboard - 92 - The parts and components have not intended to develop products that do not use of our natural resources, GIGABYTE provides the following information on how you can drop off your waste...
...in a manner that the information contained herein was accurate in all GIGABYTE motherboards fulfill European Union regulations for recycling. Š If you need further assistance in recycling, reusing in your product's user's manual and we will be disposed of with your effort. The separate ...for RoHS (Restriction of electric and electronic devices and their components. GA-73UM-S2H Motherboard - 92 - The parts and components have not intended to develop products that do not use of our natural resources, GIGABYTE provides the following information on how you can drop off your waste...


