
Manual
Page 3
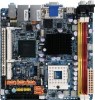
... to Installation 6 1.2 Features Summary 7 1.3 Motherboard Components (GA-6KIEH-RH 9 1.4 Motherboard Components (GA-6KIEL-RH 10 Chapter 2 Hardware Installation Process 11 2-1: Installing Processor 11 2-2: Installing Processor Colling Fan 12 2-3: Install Memory Modules 13 2-4: Connect ribbon cables, cabinet wires, and power supply 15 2-4-1 : I/O Back Panel Introduction (GA-6KIEH-RH 15 2-4-2 : I/O Back Panel Introduction (GA-6KIEL-RH 16 2-5: Connectors Introduction & Jumper Setting 20 2-6: Block...
... to Installation 6 1.2 Features Summary 7 1.3 Motherboard Components (GA-6KIEH-RH 9 1.4 Motherboard Components (GA-6KIEL-RH 10 Chapter 2 Hardware Installation Process 11 2-1: Installing Processor 11 2-2: Installing Processor Colling Fan 12 2-3: Install Memory Modules 13 2-4: Connect ribbon cables, cabinet wires, and power supply 15 2-4-1 : I/O Back Panel Introduction (GA-6KIEH-RH 15 2-4-2 : I/O Back Panel Introduction (GA-6KIEL-RH 16 2-5: Connectors Introduction & Jumper Setting 20 2-6: Block...
Manual
Page 7
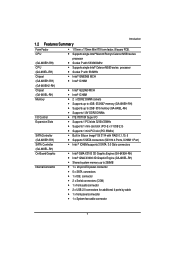
... single Intel® Merom/Penryn/Celeron M550 series (GA-6KIEH-RH) CPU (GA-6KIEL-RH) Chipset (GA-6KIEH-RH) processor y Socket P with 533/800MHz y Supports single Intel® Celeron M550 series processor y Socket P with 533MHz y Intel® GME965 MCH y Intel® ICH8M (GA-6KIEH2-RH) Chipset (GA-6KIEL-RH) Memory I/O Control Expansion Slots SATA Controller (GA-6KIEH-RH) SATA Controller y Intel® GLE960 MCH y Intel®...
... single Intel® Merom/Penryn/Celeron M550 series (GA-6KIEH-RH) CPU (GA-6KIEL-RH) Chipset (GA-6KIEH-RH) processor y Socket P with 533/800MHz y Supports single Intel® Celeron M550 series processor y Socket P with 533MHz y Intel® GME965 MCH y Intel® ICH8M (GA-6KIEH2-RH) Chipset (GA-6KIEL-RH) Memory I/O Control Expansion Slots SATA Controller (GA-6KIEH-RH) SATA Controller y Intel® GLE960 MCH y Intel®...

Manual
Page 13
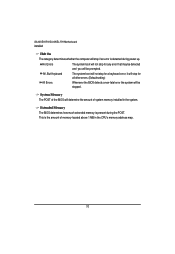
... want to remove the DIMM module. 13 Please make sure the computer power is switched off before installing or removing memory modules. Step 2. 2-3: Install Memory Modules Hardware Installation Process Before installing the memory modules, please comply with the following conditions: 1. Installation Steps: Step 1. Firmly insert the DIMMinto the socket until the retaining clips...
... want to remove the DIMM module. 13 Please make sure the computer power is switched off before installing or removing memory modules. Step 2. 2-3: Install Memory Modules Hardware Installation Process Before installing the memory modules, please comply with the following conditions: 1. Installation Steps: Step 1. Firmly insert the DIMMinto the socket until the retaining clips...
Manual
Page 32
...any error that may be detected and you will be stopped. Extended Memory The BIOS determines how much extended memory is the amount of system memory installed in the CPU's memory address map. 32 This is present during power up. GA-6KIEH-RH/GA-6KIEL-RH Motherboard installed Halt On The category determines whether the computer will not ... will stop for all other errors. (Default setting) All Errors Whenever the BIOS detects a non-fatal error the system will determine the amount of memory located above 1 MB in the system. System Memory The POST of the BIOS will be prompted.
...any error that may be detected and you will be stopped. Extended Memory The BIOS determines how much extended memory is the amount of system memory installed in the CPU's memory address map. 32 This is present during power up. GA-6KIEH-RH/GA-6KIEL-RH Motherboard installed Halt On The category determines whether the computer will not ... will stop for all other errors. (Default setting) All Errors Whenever the BIOS detects a non-fatal error the system will determine the amount of memory located above 1 MB in the system. System Memory The POST of the BIOS will be prompted.
Manual
Page 34
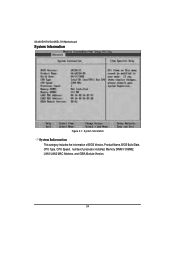
GA-6KIEH-RH/GA-6KIEL-RH Motherboard System Information Figure 2-1: System Information System Information This category includes the information of BIOS Version, Product Name, BIOS Build Date, CPU Type, CPU Speed, numberof processor installed, Memory DIMM1/ DIMM2, LAN1/LAN2 MAC Address, and GBIA Module Version. 34
GA-6KIEH-RH/GA-6KIEL-RH Motherboard System Information Figure 2-1: System Information System Information This category includes the information of BIOS Version, Product Name, BIOS Build Date, CPU Type, CPU Speed, numberof processor installed, Memory DIMM1/ DIMM2, LAN1/LAN2 MAC Address, and GBIA Module Version. 34
Manual
Page 37
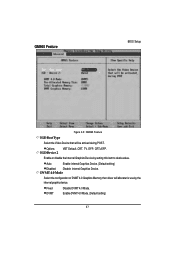
... Disable internal Graphics Device. IGDDevice 2 Enable or disable the Internal Graphics Device by the internal graphic device. DVMT 4.0 Mode Select the configuration of DVMT 4.0 Graphics Memory that will allocate for use by setting this item to desire value. Fixed DVMT Disable DVMT 4.0 Mode. GM965 Feature BIOS Setup Figure 2-3: GM965 Feature IGD...
... Disable internal Graphics Device. IGDDevice 2 Enable or disable the Internal Graphics Device by the internal graphic device. DVMT 4.0 Mode Select the configuration of DVMT 4.0 Graphics Memory that will allocate for use by setting this item to desire value. Fixed DVMT Disable DVMT 4.0 Mode. GM965 Feature BIOS Setup Figure 2-3: GM965 Feature IGD...

Manual
Page 38
... BIOS will determine the amount of total graphics memory detected in the system. 38 DVMTGraphics Memory The POST of the BIOS will determine the amount of DVMT graphics memory detected in the system. GA-6KIEH-RH/GA-6KIEL-RH Motherboard Pre-Allocated Memory Size Select the amount of Pre-Allocated Graphics Memory for use by the internal grapphics device. 8M...
... BIOS will determine the amount of total graphics memory detected in the system. 38 DVMTGraphics Memory The POST of the BIOS will determine the amount of DVMT graphics memory detected in the system. GA-6KIEH-RH/GA-6KIEL-RH Motherboard Pre-Allocated Memory Size Select the amount of Pre-Allocated Graphics Memory for use by the internal grapphics device. 8M...
Manual
Page 49
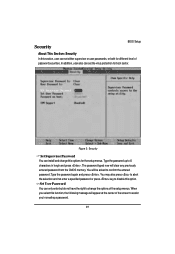
... options for boot sector. Type the password up to disable this option. The password typed now will clear any previously entered password from the CMOS memory. Type the password again and press . Figure 3: Security Set Supervisor Password You can install and change the options of password securities. Set User Password You...
... options for boot sector. Type the password up to disable this option. The password typed now will clear any previously entered password from the CMOS memory. Type the password again and press . Figure 3: Security Set Supervisor Password You can install and change the options of password securities. Set User Password You...
Manual
Page 50
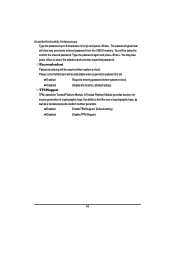
... note that this function. (Default setting) TPM Support TPM, stands for secure generation of cryptographic keys, the ability to 6 characters in lengh and press . GA-6KIEH-RH/GA-6KIEL-RH Motherboard Type the password up to limit the use of cryptographic keys, as well as a hardware pseudo-random number generator. A Trusted Platform Module provides function... Support. 50 You may also press to confirm the entered password. Password on boot Password entering will clear any previously entered password from the CMOS memory.
... note that this function. (Default setting) TPM Support TPM, stands for secure generation of cryptographic keys, the ability to 6 characters in lengh and press . GA-6KIEH-RH/GA-6KIEL-RH Motherboard Type the password up to limit the use of cryptographic keys, as well as a hardware pseudo-random number generator. A Trusted Platform Module provides function... Support. 50 You may also press to confirm the entered password. Password on boot Password entering will clear any previously entered password from the CMOS memory.


