Gigabyte 3D Mercury Support and Manuals
Get Help and Manuals for this Gigabyte item
View All Support Options Below
Free Gigabyte 3D Mercury manuals!
Problems with Gigabyte 3D Mercury?
Ask a Question
Free Gigabyte 3D Mercury manuals!
Problems with Gigabyte 3D Mercury?
Ask a Question
Gigabyte 3D Mercury Videos

3d Mercury
Duration: :20
Total Views: 1,841
Duration: :20
Total Views: 1,841
Videorecensione Gigabyte 3d Mercury
Duration: 10:35
Total Views: 2,228
Duration: 10:35
Total Views: 2,228
Idle temps and stress test 3D Mercury Water Cooling
Duration: 2:39
Total Views: 1,169
Duration: 2:39
Total Views: 1,169
#878 - Gigabyte 3D Mercury Water Cooling Case Video Review
Duration: 6:29
Total Views: 52,910
Duration: 6:29
Total Views: 52,910
Popular Gigabyte 3D Mercury Manual Pages
User Manual - Page 2
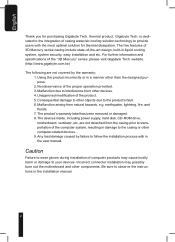
... five features of 3D Mercury series casing include state-of the proper operation provided. 3. Be sure to observe the instructions in damage to interference from natural hazards, e.g. Using the product incorrectly or in liquid cooling system, system security, easy installation and etc. English
Thank you for thermal dissipation. For further information and specifications of the computer...
User Manual - Page 3

Specification Features
8
4. English
Table of Liquid Cooling System
17
4-13 4-way Splitter Valve Instruction and User Manual
20
4-14 Liquid Cooling System Maintenance
24
3 Installation Instruction
9
4-1 Installation of Power Supply
9
4-2 Installation of Motherboard
11
4-3 Installation of Add on Card
12
4-4 Installation of Front Multi-Media I/O Ports
13
4-5 Connection of ...
User Manual - Page 4
... panel
1
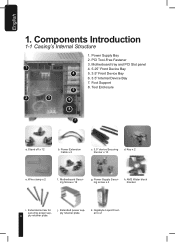
4. 5.25" Front Device Bay
4
5. 3.5" Front Device Bay
6. 3.5" Internal Device Bay
7. Foot Support
8. Motherboard Securing Screw x 12
g. Power Supply Securing screw x 4
h. j. Gigabyte Liquid Coolant x 2 Stand off x 12
b. Components Introduction
1-1 Casing's Internal Structure
1. Power Extension Cable x 2
c. 3.5" device Securing Runner x 10
d. Extended power supply...
User Manual - Page 6

All new Upgrade, Extremely Big Volume
Extended Body, for easy installation and service, support SLI, Cross Fire Dual/ Quad multi-graphic cards, and support 12" x 13" motherboard.
- High Quality Design
Gigabyte Tech. top-class full tower thermal solution casing Lightweight aluminum alloy with hair-line brush anodized finishing Full-open aluminum side panel door design, with hair-line...
User Manual - Page 7
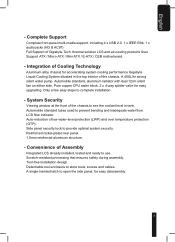
... tools, screws and cables. Integration of Assembly
Integrated LCS already installed, tested and ready to prevent bending and inadequate water flow. Auto-induction of Gigabyte Tech. Complete Support
Complete front panel multi-media support, including 4 x USB 2.0, 1 x IEEE1394, 1 x audio jacks (HD & AC97) Full Support of low water-level protection (LWP) and over temperature protection...
User Manual - Page 9
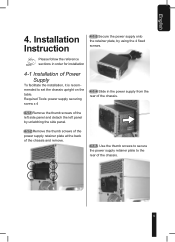
Installation Instruction
4-1-3 Secure the power supply onto the retainer plate, by unlatching the side panel.
4-1-2 Remove the thumb screws of the power supply ....
4-1-1 Remove the thumb screws of the chassis and remove.
4-1-5 Use the thumb screws to secure the power supply retainer plate to set the chassis upright on the
table. mended to the rear of Power Supply
To facilitate the...
User Manual - Page 11

... supply area and back panel, total of 5 screws.)
4-1-7i Reverse the steps to reassemble the parts
4-2 Installation of Motherboard
3D Mercury can support ATX / Micro ATX / Mini ATX / E-ATX / CEB Please confirm the motherboard screw holes locations and size specification before installation Required Tools: Screwdriver, stand offs, and the motherboard screws
4-1-7g Gently lift the liquid cooling...
User Manual - Page 12
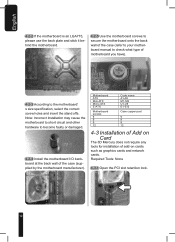
... motherboard manual to check what type of motherboard you have).
4-2-3 According to become faulty or damaged.
4-2-4 Install the motherboard I/O backboard at the back wall of add-on Card
The 3D Mercury does not require any tools for installation of the case (supplied by the motherboard manufacturer). Motherboard ATX Mini ATX Micro ATX E-ATX
Motherboard screws 9 9 9 12
Code...
User Manual - Page 13
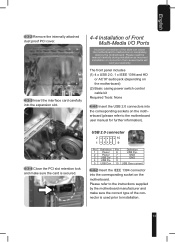
...manual carefully during installation as incorrect installation or connection that causes faults will
void your warranty
The front panel includes (1) 4 x USB 2.0, 1 x IEEE 1394 and HD
or AC'97 audio jack (depending on the motherboard) (2) Basic casing....
4-4 Installation of Front Multi-Media I/O Ports
Incorrect connection of the connector is secured. Please refer to the instructions supplied by...
User Manual - Page 14

... user manual supplied by the motherboard manufacturer
4-5 Connection of Fan Power Cables
The 3D Mercury has one...case includes internal connectors that connect the front and rear fans, making it a 3-pin power connector. Plug the 3-pin connector into
the corresponding socket on the mother-
board. HD AUDIO
Reminder, Different Motherboards have different installation areas and specifications...
User Manual - Page 15
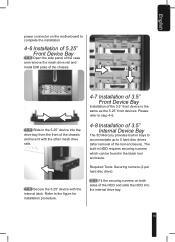
... device into the internal drive bay.
15 Please refer to step 4-6.
4-8 Installation of 3.5" Internal Device Bay
The 3D Mercury provides built-in bays to accommodate up to 5 hard disc drives (after ..." device with the internal latch. Refer to complete the installation
4-6 Installation of 5.25" Front Device Bay
4-6-1 Open the side panel of the case and remove the mesh drive rail and metal EMI plate ...
User Manual - Page 16
... following step 4-8-1.
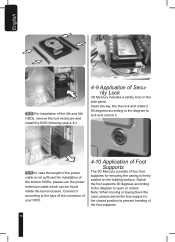
4-9 Application of four foot supports for installation of the foot supports.
16 Connect it according to lock and unlock it 90 degrees according to the diagram to the type of the connector of your HDD.
4-10 Application of Foot Supports
The 3D Mercury consists of Security Lock
3D Mercury includes a safety lock on the holding surface...
User Manual - Page 20
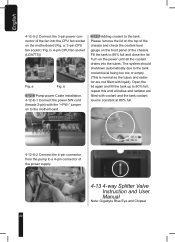
...to a 4-pin connector of the power supply.
4-13 4-way Splitter Valve Instruction and User Manual
Note: Gigabyte Blue Eye and Chipset
20 repeat this until all tubes and radiator are filled...-" jumper on to the motherboard.
4-12-7 Adding coolant to 80% full; b
4-12-6 Pump power Cable Installation. 4-12-6-1 Connect the power SW cord (female 2-pin) with liquid). Turn on the power until all the...
User Manual - Page 23
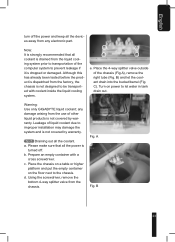
...due to improper installation may damage the system and is not designed to the chassis. B) and let the coolant drain into the bucket/barrel (Fig. Warning: Use only GIGABYTE liquid coolant; ...d.
Note: It is strongly recommended that all the power is
turned off the power and keep all the coolant. any electronic part. a. Using the ...
User Manual - Page 26

... After cleaning the fan filter, reverse steps to purchase - d.
b. GIGABYTE Chipset Water block - l. Recommended parts to reassemble. GIGABYTE Radiator
c. a.
Replace the parts that hold
the front panel onto the chassis, and remove the front panel.
GIGABYTE Blue Eye (VGA Liquid
Cooling) - English
k. GIGABYTE VGA Air Cooler - Release the plastic clamps that need to...
Gigabyte 3D Mercury Reviews
We have not received any reviews for Gigabyte yet.