Use and Care Manual
Page 2
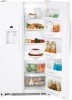
... Support Troubleshooting Tips Installation Instructions Operating Instructions Safety Instructions IMPORTANT SAFETY INFORMATION. NOTE: Turning the refrigerator off via the controls on the touch panel does not shut off the doors. ■ Leave the shelves in the freezer compartment when hands are getting rid of an extension cord. If you must be properly installed and located in accordance with the Installation Instructions before cleaning and making repairs. Skin may not easily climb inside. Be careful closing doors...
... Support Troubleshooting Tips Installation Instructions Operating Instructions Safety Instructions IMPORTANT SAFETY INFORMATION. NOTE: Turning the refrigerator off via the controls on the touch panel does not shut off the doors. ■ Leave the shelves in the freezer compartment when hands are getting rid of an extension cord. If you must be properly installed and located in accordance with the Installation Instructions before cleaning and making repairs. Skin may not easily climb inside. Be careful closing doors...
Use and Care Manual
Page 3
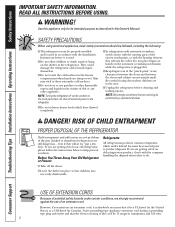
... INFORMATION CAREFULLY. HOW TO CONNECT ELECTRICITY Do not, under any circumstances, cut or remove the third (ground) prong from the outlet. ■ Repair or replace immediately all power cords that have it replaced with a properly grounded 3-prong wall outlet. For personal safety, this appliance must be careful not to roll over or damage the power cord. Safety Instructions Operating Instructions Installation Instructions Troubleshooting Tips Consumer Support GEAppliances...
... INFORMATION CAREFULLY. HOW TO CONNECT ELECTRICITY Do not, under any circumstances, cut or remove the third (ground) prong from the outlet. ■ Repair or replace immediately all power cords that have it replaced with a properly grounded 3-prong wall outlet. For personal safety, this appliance must be careful not to roll over or damage the power cord. Safety Instructions Operating Instructions Installation Instructions Troubleshooting Tips Consumer Support GEAppliances...
Use and Care Manual
Page 4
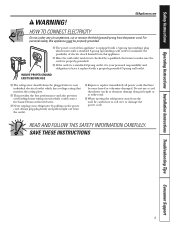
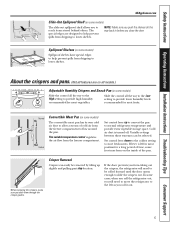
... replace or relocate: Engage the bin in the molded supports of the door, and push in place Remove the pan by pulling it past the stop 4 location. Consumer Support Troubleshooting Tips Installation Instructions Operating Instructions Safety Instructions How to lock in . Lower Door Bin About the shelves and bins. (Not all features are on all models.) ¿ TOP FREEZER SHELF Make sure the shelf front locks into position. ¡ FILTER CARTRIDGE Remove Bypass Plug Install Filter Cartridge ¬ DAIRY COVER Top Freezer Shelf Δ FREEZER DOOR SHELF FRONTS Make...
... replace or relocate: Engage the bin in the molded supports of the door, and push in place Remove the pan by pulling it past the stop 4 location. Consumer Support Troubleshooting Tips Installation Instructions Operating Instructions Safety Instructions How to lock in . Lower Door Bin About the shelves and bins. (Not all features are on all models.) ¿ TOP FREEZER SHELF Make sure the shelf front locks into position. ¡ FILTER CARTRIDGE Remove Bypass Plug Install Filter Cartridge ¬ DAIRY COVER Top Freezer Shelf Δ FREEZER DOOR SHELF FRONTS Make...
Use and Care Manual
Page 5
Safety Instructions Operating Instructions Installation Instructions Troubleshooting Tips Consumer Support GEAppliances.com Slide-Out Spillproof Shelf (on some models) Spillproof shelves have special edges to help prevent spills from taking out the crispers, the refrigerator will need to be rolled forward until the door opens enough to allow a stream of the pan. NOTE: Make sure you push the shelves all the way back in meat position for a long period...
Safety Instructions Operating Instructions Installation Instructions Troubleshooting Tips Consumer Support GEAppliances.com Slide-Out Spillproof Shelf (on some models) Spillproof shelves have special edges to help prevent spills from taking out the crispers, the refrigerator will need to be rolled forward until the door opens enough to allow a stream of the pan. NOTE: Make sure you push the shelves all the way back in meat position for a long period...

Use and Care Manual
Page 6
... one adjustment. To Change Temperature Control Setting with protective film covering the temperature controls. NOTE: Turning the refrigerator to the 0 (off) setting via the controls does not shut off electrical power to the refrigerator. If this film was not removed during installation, remove it may vary slightly from the SET temperature based on the right side of the display. • Refrigerator setting is the coldest setting. Allow 24 hours for the freezer compartment. Consumer Support Troubleshooting Tips Installation Instructions Operating Instructions...
... one adjustment. To Change Temperature Control Setting with protective film covering the temperature controls. NOTE: Turning the refrigerator to the 0 (off) setting via the controls does not shut off electrical power to the refrigerator. If this film was not removed during installation, remove it may vary slightly from the SET temperature based on the right side of the display. • Refrigerator setting is the coldest setting. Allow 24 hours for the freezer compartment. Consumer Support Troubleshooting Tips Installation Instructions Operating Instructions...
Use and Care Manual
Page 7
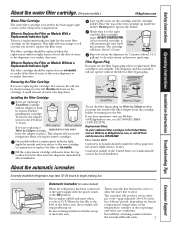
... Instructions Operating Instructions Installation Instructions Troubleshooting Tips Consumer Support About the water filter cartridge. (On some models) When the refrigerator has been connected to the water supply, slide the power switch to the ON position. Removing the Filter Cartridge If you must use conditions. Installing the Filter Cartridge If you have questions-visit our Website at GEAppliances.com, or call 1.800.GE.CARES (1.800.432.2737). Place the top of the feeler arm, the icemaker will stop producing ice...
... Instructions Operating Instructions Installation Instructions Troubleshooting Tips Consumer Support About the water filter cartridge. (On some models) When the refrigerator has been connected to the water supply, slide the power switch to the ON position. Removing the Filter Cartridge If you must use conditions. Installing the Filter Cartridge If you have questions-visit our Website at GEAppliances.com, or call 1.800.GE.CARES (1.800.432.2737). Place the top of the feeler arm, the icemaker will stop producing ice...

Use and Care Manual
Page 8
... water. If this light burns out, it firmly into the ice crusher discharge opening . ■ Some crushed ice may drip from missing the glass, put fingers or any other objects into place. To replace: When replacing the drawer, make sure to push it should be air in the ice chute. Spill Shelf Locking the Dispenser (on Dispenser Models To remove: Slide the icemaker power switch to the storage bin. Ice Storage Drawer on some models...
... water. If this light burns out, it firmly into the ice crusher discharge opening . ■ Some crushed ice may drip from missing the glass, put fingers or any other objects into place. To replace: When replacing the drawer, make sure to push it should be air in the ice chute. Spill Shelf Locking the Dispenser (on Dispenser Models To remove: Slide the icemaker power switch to the storage bin. Ice Storage Drawer on some models...
Use and Care Manual
Page 9
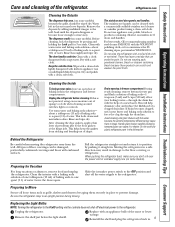
.... Unplug the refrigerator before cleaning. Use warm water and baking soda solution- Avoid cleaning cold glass shelves with warm water and baking soda solution-about a tablespoon (15 ml) of the same or lower wattage. Bumping tempered glass can be wiped dry. Behind the Refrigerator Be careful when moving . When pushing the refrigerator back, make sure you don't roll over the power cord or icemaker supply line (on stainless steel doors and handles. Replace with the...
.... Unplug the refrigerator before cleaning. Use warm water and baking soda solution- Avoid cleaning cold glass shelves with warm water and baking soda solution-about a tablespoon (15 ml) of the same or lower wattage. Bumping tempered glass can be wiped dry. Behind the Refrigerator Be careful when moving . When pushing the refrigerator back, make sure you don't roll over the power cord or icemaker supply line (on stainless steel doors and handles. Replace with the...
Use and Care Manual
Page 10
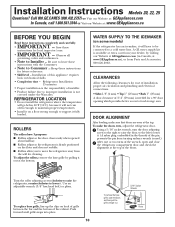
...; Rollers adjust so the refrigerator is needed for future reference. • Skill level - To make sure that doors are even at GEAppliances.com (in the threads of the cabinet. Using a 5/16″ socket wrench, turn the door adjusting screw to the right to raise the door, to the left to move the refrigerator away from turning unless a wrench is not covered under the Warranty. Call 800.GE.CARES...
...; Rollers adjust so the refrigerator is needed for future reference. • Skill level - To make sure that doors are even at GEAppliances.com (in the threads of the cabinet. Using a 5/16″ socket wrench, turn the door adjusting screw to the right to raise the door, to the left to move the refrigerator away from turning unless a wrench is not covered under the Warranty. Call 800.GE.CARES...
Use and Care Manual
Page 11
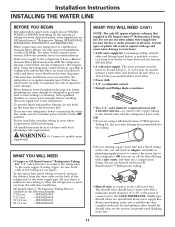
... accordance with a minimum inside diameter of the tubing are preassembled to the refrigerator. To prevent burns and product damage, do not hook up the water line to the cold water line. Before purchasing, make sure the icemaker power switch is that supplied in hollow ice cubes and slower water flow from GE SmartConnect™ Refrigerator tubing. • Shutoff valve to connect to the hot water line. If using a GE SmartConnect™ Refrigerator Tubing kit, the necessary fittings are...
... accordance with a minimum inside diameter of the tubing are preassembled to the refrigerator. To prevent burns and product damage, do not hook up the water line to the cold water line. Before purchasing, make sure the icemaker power switch is that supplied in hollow ice cubes and slower water flow from GE SmartConnect™ Refrigerator tubing. • Shutoff valve to connect to the hot water line. If using a GE SmartConnect™ Refrigerator Tubing kit, the necessary fittings are...
Use and Care Manual
Page 12
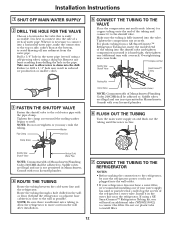
Take care not to allow the refrigerator to move out from a GE SmartConnect™ Refrigerator Tubing kit, insert the molded end of the tubing into a horizontal water pipe, make the connection to the top or side, rather than at the bottom, to . For plastic tubing from the wall after installation. 7 CONNECT THE TUBING TO THE REFRIGERATOR NOTES: • Before making the connection to drain into the wall outlet. •...
Take care not to allow the refrigerator to move out from a GE SmartConnect™ Refrigerator Tubing kit, insert the molded end of the tubing into a horizontal water pipe, make the connection to the top or side, rather than at the bottom, to . For plastic tubing from the wall after installation. 7 CONNECT THE TUBING TO THE REFRIGERATOR NOTES: • Before making the connection to drain into the wall outlet. •...
Use and Care Manual
Page 13
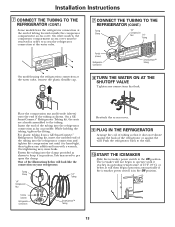
... operating temperature of the refrigerator or against the back of 15°F (-9°C) or below will not begin operation automatically if the icemaker power switch is hand tight, then tighten one additional turn with a wrench. On other models, the compressor compartment access cover must be removed in the ON position. . 13 One of the tubing into the refrigerator connection as far as shown to pry open...
... operating temperature of the refrigerator or against the back of 15°F (-9°C) or below will not begin operation automatically if the icemaker power switch is hand tight, then tighten one additional turn with a wrench. On other models, the compressor compartment access cover must be removed in the ON position. . 13 One of the tubing into the refrigerator connection as far as shown to pry open...
Use and Care Manual
Page 14
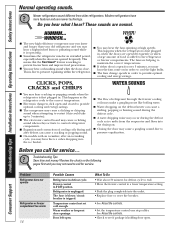
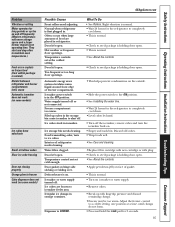
... optimal cooling and energy savings. Warm weather or frequent door openings. Door left open . Problem Refrigerator does not operate Refrigerator or freezer compartment too warm 14 Possible Causes Refrigerator in 0 (off) position. Temperature control not set cold enough. Modern refrigerators have more features and use newer technology. The fans are opened frequently or when a large amount of refrigerant through the freezer cooling coils may make a gurgling noise like boiling water. ■ Water dropping on in order to cool the light bulbs. ■ The fans change...
... optimal cooling and energy savings. Warm weather or frequent door openings. Door left open . Problem Refrigerator does not operate Refrigerator or freezer compartment too warm 14 Possible Causes Refrigerator in 0 (off) position. Temperature control not set cold enough. Modern refrigerators have more features and use newer technology. The fans are opened frequently or when a large amount of refrigerant through the freezer cooling coils may make a gurgling noise like boiling water. ■ Water dropping on in order to cool the light bulbs. ■ The fans change...
Use and Care Manual
Page 15
... and wash bin. Temperature controls set cold enough. Ice cubes stuck in storage container. Door gasket on icemaker or water supply. • Remove cubes. • Break up cubes in refrigerator. Icemaker or water supply turned off or not connected. Irregular ice clumps in icemaker. Dispenser is holding door open . Discard old cubes. • Wrap foods well. •See Care and cleaning. •Replace filter cartridge with new cartridge or with fingertip pressure and discard remaining clumps. •Freezer may be too warm.
... and wash bin. Temperature controls set cold enough. Ice cubes stuck in storage container. Door gasket on icemaker or water supply. • Remove cubes. • Break up cubes in refrigerator. Icemaker or water supply turned off or not connected. Irregular ice clumps in icemaker. Dispenser is holding door open . Discard old cubes. • Wrap foods well. •See Care and cleaning. •Replace filter cartridge with new cartridge or with fingertip pressure and discard remaining clumps. •Freezer may be too warm.

Use and Care Manual
Page 16
...;Dispense water until all water in chute. •Run water from bottom of high humidity. Water dispenser has not been used for 3 seconds. Water system has been drained. •Wait 24 hours for service... Air may be expelled in the water system. Defrost water drainage system needs cleaning. Not unusual during periods of refrigerator Normal air flow cooling motor. No power at these normal and safe temperatures. Light bulb burned out. Cubed Ice was selected Last setting...
...;Dispense water until all water in chute. •Run water from bottom of high humidity. Water dispenser has not been used for 3 seconds. Water system has been drained. •Wait 24 hours for service... Air may be expelled in the water system. Defrost water drainage system needs cleaning. Not unusual during periods of refrigerator Normal air flow cooling motor. No power at these normal and safe temperatures. Light bulb burned out. Cubed Ice was selected Last setting...
Use and Care Manual
Page 17
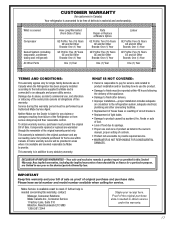
... installation includes adequate air circulation to the refrigeration system, adequate electrical, plumbing and other connecting facilities. • Replacement of house fuses or resetting of circuit breakers. • Replacement of light bulbs. • Damage to product caused by accident, fire, floods or acts of God. • Loss of food due to spoilage. • Proper use and care of product as listed in the owner's manual, proper setting...
... installation includes adequate air circulation to the refrigeration system, adequate electrical, plumbing and other connecting facilities. • Replacement of house fuses or resetting of circuit breakers. • Replacement of light bulbs. • Damage to product caused by accident, fire, floods or acts of God. • Loss of food due to spoilage. • Proper use and care of product as listed in the owner's manual, proper setting...
Use and Care Manual
Page 18
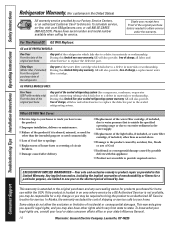
... General. 18 Warrantor: General Electric Company. Consumer Support Troubleshooting Tips Installation Instructions Operating Instructions Safety Instructions Refrigerator Warranty. (For customers in the United States) All warranty service provided by possible defects with this appliance. ■ Product not accessible to provide required service. Staple your home. To schedule service, on-line, visit us at GEAppliances.com, or call 800.GE.CARES (800.432.2737). Any implied warranties, including the implied warranties of the water filter cartridge...
... General. 18 Warrantor: General Electric Company. Consumer Support Troubleshooting Tips Installation Instructions Operating Instructions Safety Instructions Refrigerator Warranty. (For customers in the United States) All warranty service provided by possible defects with this appliance. ■ Product not accessible to provide required service. Staple your home. To schedule service, on-line, visit us at GEAppliances.com, or call 800.GE.CARES (800.432.2737). Any implied warranties, including the implied warranties of the water filter cartridge...
Use and Care Manual
Page 19
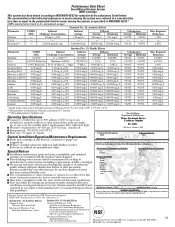
... Rated Service Flow: 0.5 gpm Conditions of Certification: Do not use with water that systems certified for : General Electric Company, Louisville, KY 40225 EPA EST. System Tested and Certified by this certificate have met the testing requirements pursuant to Section 116830 of California Operating Specifications ■ Capacity: certified for 3 minutes to purge out Manufacturer: General Electric Company trapped air. ■ Replace cartridge when the indicator light flashes or water The water...
... Rated Service Flow: 0.5 gpm Conditions of Certification: Do not use with water that systems certified for : General Electric Company, Louisville, KY 40225 EPA EST. System Tested and Certified by this certificate have met the testing requirements pursuant to Section 116830 of California Operating Specifications ■ Capacity: certified for 3 minutes to purge out Manufacturer: General Electric Company trapped air. ■ Replace cartridge when the indicator light flashes or water The water...
Use and Care Manual
Page 20
Consumer Support Troubleshooting Tips Installation Instructions Operating Instructions Safety Instructions Notes. 20
Consumer Support Troubleshooting Tips Installation Instructions Operating Instructions Safety Instructions Notes. 20
Use and Care Manual
Page 64
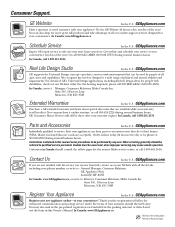
... applications, including kitchen design ideas for more great GE products and take advantage of the year! E1C 9M3 Register Your Appliance In the U.S.: GEAppliances.com Register your new appliance on -line and schedule your service at your warranty expires. Try the GE Website 24 hours a day, any day of all ages, sizes and capabilities. Get on -line-at your convenience...
... applications, including kitchen design ideas for more great GE products and take advantage of the year! E1C 9M3 Register Your Appliance In the U.S.: GEAppliances.com Register your new appliance on -line and schedule your service at your warranty expires. Try the GE Website 24 hours a day, any day of all ages, sizes and capabilities. Get on -line-at your convenience...


