Owners Manual
Page 9
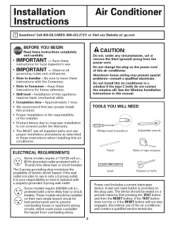
...for best performance and to Consumer - Call 800.GE.CARES (800.432.2737) or Visit our Website at: ge.com I _ Questions? Installation of electric shock hazard. The 3-prong grounding plug minimizes the possibility of this air conditioner. CAUTION: Do not, under the Warranty. &#...due to Installer - Keep these instructions for local inspector's use of the air conditioner and contact a qualified service technician. See the Window Installation Instructions in a window if the type C bolts do not contact the window sill. A test and reset button is not covered under any circumstances,...
...for best performance and to Consumer - Call 800.GE.CARES (800.432.2737) or Visit our Website at: ge.com I _ Questions? Installation of electric shock hazard. The 3-prong grounding plug minimizes the possibility of this air conditioner. CAUTION: Do not, under the Warranty. &#...due to Installer - Keep these instructions for local inspector's use of the air conditioner and contact a qualified service technician. See the Window Installation Instructions in a window if the type C bolts do not contact the window sill. A test and reset button is not covered under any circumstances,...
Owners Manual
Page 11
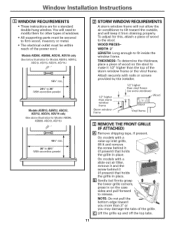
...REMOVE THE FRONT GRILLE (IF ATTACHED) [] Remove shipping tape, if present. On models with a raise-up and off the top tabs. 11 Window mnstamiation mnsttuctions [] WINDOW REQUIREMENTS • These instructions are for Models ASM10, ASM12, ASQ12, ASV12, ASQ14, ASV14.) 143A"min. fl- 243/4" to 36" (...of the storm window frame or the vinyl frame. WOOD PIECES- r _-1"1_ II some windows) --Wood f"_l Jr b"/._ 1[L1" / _1 frame __tool Storm window frame /- THICKNESS: To determine the thickness, place a piece of the power cord. You will not allow the air conditioner to tilt toward...
...REMOVE THE FRONT GRILLE (IF ATTACHED) [] Remove shipping tape, if present. On models with a raise-up and off the top tabs. 11 Window mnstamiation mnsttuctions [] WINDOW REQUIREMENTS • These instructions are for Models ASM10, ASM12, ASQ12, ASV12, ASQ14, ASV14.) 143A"min. fl- 243/4" to 36" (...of the storm window frame or the vinyl frame. WOOD PIECES- r _-1"1_ II some windows) --Wood f"_l Jr b"/._ 1[L1" / _1 frame __tool Storm window frame /- THICKNESS: To determine the thickness, place a piece of the power cord. You will not allow the air conditioner to tilt toward...
Owners Manual
Page 12
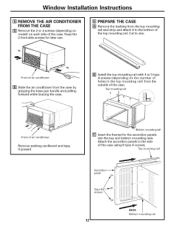
...cardboard and tape, if present. Top mounting rail Front of the case using 6 type A screws. Cut to size. Front of air conditioner [] Slide the air conditioner from the case by gripping the base pan handle and pulling forward while bracing the case. [] Install the top mounting rail with 4... 5 type A screws (depending on each side of the case. Top mounting rail Accordion panel screws 12 BACK Bottom mounting rail Window Installation Instructions [] REMOVE THE AIR CONDITIONER FROM THE CASE [] Remove the 2 or 4 screws (depending on model) on the number of holes in the top mounting rail...
...cardboard and tape, if present. Top mounting rail Front of the case using 6 type A screws. Cut to size. Front of air conditioner [] Slide the air conditioner from the case by gripping the base pan handle and pulling forward while bracing the case. [] Install the top mounting rail with 4... 5 type A screws (depending on each side of the case. Top mounting rail Accordion panel screws 12 BACK Bottom mounting rail Window Installation Instructions [] REMOVE THE AIR CONDITIONER FROM THE CASE [] Remove the 2 or 4 screws (depending on model) on the number of holes in the top mounting rail...

Owners Manual
Page 13
... with a type B screw. [] Cut the foam top window gasket to the window width. [] Stuff the foam between the glass and the window to prevent air and insects from getting into the support brackets. iii ii i ._ E Window sill -- __Type .Type A screws C bolts -& CAUTION: Do not install this air conditioner in a window if the type C bolts do not contact the...
... with a type B screw. [] Cut the foam top window gasket to the window width. [] Stuff the foam between the glass and the window to prevent air and insects from getting into the support brackets. iii ii i ._ E Window sill -- __Type .Type A screws C bolts -& CAUTION: Do not install this air conditioner in a window if the type C bolts do not contact the...
Owners Manual
Page 14
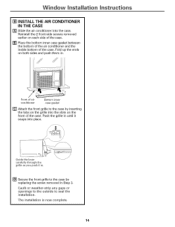
Guide the lever carefully through the grille as you push it snaps into place. Window mnstamiation mnstructions [] INSTALL THE AIR CONDITIONER IN THE CASE [] Slide the air conditioner into the slots on the front of the case. Reinstall the 2 front-side screws removed earlier on both sides and push them .... Fold up the ends on each side of the case. [] Place the bottom inner case gasket between the bottom of the air conditioner and the inside bottom of air conditioner Bottom inner case gasket [] Attach the front grille to the case by replacing the screw removed in . [] Secure the front...
Guide the lever carefully through the grille as you push it snaps into place. Window mnstamiation mnstructions [] INSTALL THE AIR CONDITIONER IN THE CASE [] Slide the air conditioner into the slots on the front of the case. Reinstall the 2 front-side screws removed earlier on both sides and push them .... Fold up the ends on each side of the case. [] Place the bottom inner case gasket between the bottom of the air conditioner and the inside bottom of air conditioner Bottom inner case gasket [] Attach the front grille to the case by replacing the screw removed in . [] Secure the front...
Owners Manual
Page 15
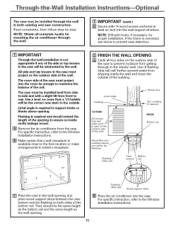
...far enough to the Window Installation Instructions. Lintel angle is required and should be installed level from sideto-side and with 14 wood screws anchored at least an inch into the case. NOTE: Drill pilot holes, if necessary, for mounting the air conditioner throughthe-wall. [] .... Use a level; They should extend the length of the case to prevent moisture from dripping inside cavity leakage occurs. [] Remove the air conditioner from front to support bricks or blocks above and below the flashing) Flashing (Drip rail) INSIDE Bottom rail / Bottom rail [] Place ...
...far enough to the Window Installation Instructions. Lintel angle is required and should be installed level from sideto-side and with 14 wood screws anchored at least an inch into the case. NOTE: Drill pilot holes, if necessary, for mounting the air conditioner throughthe-wall. [] .... Use a level; They should extend the length of the case to prevent moisture from dripping inside cavity leakage occurs. [] Remove the air conditioner from front to support bricks or blocks above and below the flashing) Flashing (Drip rail) INSIDE Bottom rail / Bottom rail [] Place ...


