Installation Instructions
Page 1
Washers ge.com Safety Information 2, 3 Operating Instructions Control and Indicator Settings . . . . . .5, 6 Loading and Using the Washer . . . .7, 8 Special Washer Features 4 Installation Instructions Alcove or Closet Installation 12 Electrical Requirements 10 Grounding Instructions 10 Installation Requirements 9 Leveling the....21, 22 Warranty for Customers in Canada 24 Warranty for Customers in the U.S.A 23 Owner's Manual & Installation Instructions WSLP1500 WSLS1500 Laveuses Manuel d'utilisation et d'installation La section française commence à la page 25 Lavadoras Manual...
Washers ge.com Safety Information 2, 3 Operating Instructions Control and Indicator Settings . . . . . .5, 6 Loading and Using the Washer . . . .7, 8 Special Washer Features 4 Installation Instructions Alcove or Closet Installation 12 Electrical Requirements 10 Grounding Instructions 10 Installation Requirements 9 Leveling the....21, 22 Warranty for Customers in Canada 24 Warranty for Customers in the U.S.A 23 Owner's Manual & Installation Instructions WSLP1500 WSLS1500 Laveuses Manuel d'utilisation et d'installation La section française commence à la page 25 Lavadoras Manual...
Installation Instructions
Page 2
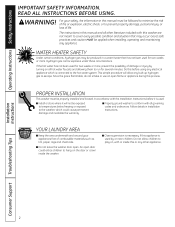
... heater that has not been used . ■ Install or store where it is used for two weeks or more . The instructions in Installation Instructions. If the hot water has not been used by turning on all hot water faucets and allowing them to hang on , with... or inside the washer. ■ Close supervision is necessary if this manual and all governing codes and ordinances. Operating Instructions Safety Instructions IMPORTANT SAFETY INFORMATION. READ ALL INSTRUCTIONS BEFORE USING. WARNING! For your appliances free of combustible materials such as lint, paper, rags and chemicals. ■...
... heater that has not been used . ■ Install or store where it is used for two weeks or more . The instructions in Installation Instructions. If the hot water has not been used by turning on all hot water faucets and allowing them to hang on , with... or inside the washer. ■ Close supervision is necessary if this manual and all governing codes and ordinances. Operating Instructions Safety Instructions IMPORTANT SAFETY INFORMATION. READ ALL INSTRUCTIONS BEFORE USING. WARNING! For your appliances free of combustible materials such as lint, paper, rags and chemicals. ■...

Installation Instructions
Page 3
...broken parts, including a damaged cord or plug. To avoid such a result, carefully follow the garment manufacturer's wash and care instructions. READ AND FOLLOW THIS SAFETY INFORMATION CAREFULLY. distribution panel by removing the fuse or switching off water faucets to relieve pressure on... not attempt to repair or replace any maintenance or cleaning. Mixing different chemicals can reduce the flame retardancy of fabrics. Safety Instructions Operating Instructions ge.com WHEN USING THE WASHER Use this appliance only for its intended purpose as described in this Owner's Manual. ■ ...
...broken parts, including a damaged cord or plug. To avoid such a result, carefully follow the garment manufacturer's wash and care instructions. READ AND FOLLOW THIS SAFETY INFORMATION CAREFULLY. distribution panel by removing the fuse or switching off water faucets to relieve pressure on... not attempt to repair or replace any maintenance or cleaning. Mixing different chemicals can reduce the flame retardancy of fabrics. Safety Instructions Operating Instructions ge.com WHEN USING THE WASHER Use this appliance only for its intended purpose as described in this Owner's Manual. ■ ...
Installation Instructions
Page 4
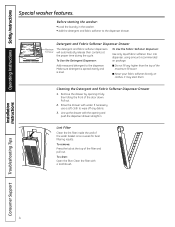
... tilting the front of the maximum fill tower. ■ Never pour fabric softener directly on package. Installation Instructions Consumer Support Troubleshooting Tips 4 Add measured detergent to the dispenser drawer. It may stain them. Operating Instructions Safety Instructions Special washer features. Pull out. 2. Before starting the washer: • Load the laundry in . Make sure...
... tilting the front of the maximum fill tower. ■ Never pour fabric softener directly on package. Installation Instructions Consumer Support Troubleshooting Tips 4 Add measured detergent to the dispenser drawer. It may stain them. Operating Instructions Safety Instructions Special washer features. Pull out. 2. Before starting the washer: • Load the laundry in . Make sure...
Installation Instructions
Page 5
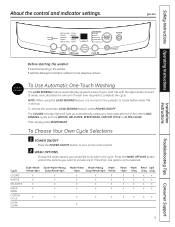
ge.com Installation Instructions COLD HOT WARM EXTRA LARGE LARGE MEDIUM SMALL EXTRA SMALL SOAK WASH HEAVY DUTY RINSE SPIN EST. To choose the automatic LOAD SENSING feature, press ...+Rinse+Spin X X X X X Wash+Rinse Wash+Heavy Wash +Spin Duty+Rinse+Spin +Rinse X X X X X X X X X X X X X X X X Rinse +Spin X X X X Wash Only X X X X Rinse Spin Only Only X X X X X X X X X X X X 5 Troubleshooting Tips Consumer Support Safety Instructions Operating Instructions About the control and indicator settings.
ge.com Installation Instructions COLD HOT WARM EXTRA LARGE LARGE MEDIUM SMALL EXTRA SMALL SOAK WASH HEAVY DUTY RINSE SPIN EST. To choose the automatic LOAD SENSING feature, press ...+Rinse+Spin X X X X X Wash+Rinse Wash+Heavy Wash +Spin Duty+Rinse+Spin +Rinse X X X X X X X X X X X X X X X X Rinse +Spin X X X X Wash Only X X X X Rinse Spin Only Only X X X X X X X X X X X X 5 Troubleshooting Tips Consumer Support Safety Instructions Operating Instructions About the control and indicator settings.
Installation Instructions
Page 6
.... WARM / COLD ULTRA Maximizes detergent efficiency by adding CLEAN water in the wash cycle. Always follow fabric manufacturer's care label or instructions when laundering. Installation Instructions Consumer Support Troubleshooting Tips 6 Operating Instructions Safety Instructions About the control and indicator settings. 3 LOAD SIZE The water level should just cover the clothes. See Troubleshooting Tips. Default...
.... WARM / COLD ULTRA Maximizes detergent efficiency by adding CLEAN water in the wash cycle. Always follow fabric manufacturer's care label or instructions when laundering. Installation Instructions Consumer Support Troubleshooting Tips 6 Operating Instructions Safety Instructions About the control and indicator settings. 3 LOAD SIZE The water level should just cover the clothes. See Troubleshooting Tips. Default...

Installation Instructions
Page 7
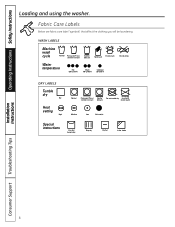
...To add items after washer has started, open after washing to allow the items to hit surface with damp cloth. Safety Instructions Operating Instructions Loading and using the washer. Always follow fabric manufacturer's care label when laundering. Sorting Wash Loads Colors Whites Lights Darks... Soil Heavy Normal Light Fabric Delicates Easy Care Sturdy Cottons Lint Lint Producers Lint Collectors ge.com Proper Use of the Washer ...
...To add items after washer has started, open after washing to allow the items to hit surface with damp cloth. Safety Instructions Operating Instructions Loading and using the washer. Always follow fabric manufacturer's care label when laundering. Sorting Wash Loads Colors Whites Lights Darks... Soil Heavy Normal Light Fabric Delicates Easy Care Sturdy Cottons Lint Lint Producers Lint Collectors ge.com Proper Use of the Washer ...
Installation Instructions
Page 8
... dry Do not tumble dry (used with do not wash) Medium Low No heat/air Special instructions Line dry/ hang to dry Drip dry Dry flat In the shade Installation Instructions Consumer Support Troubleshooting Tips 8 Operating Instructions Safety Instructions Loading and using the washer. Fabric Care Labels Below are fabric care label "symbols" that...
... dry Do not tumble dry (used with do not wash) Medium Low No heat/air Special instructions Line dry/ hang to dry Drip dry Dry flat In the shade Installation Instructions Consumer Support Troubleshooting Tips 8 Operating Instructions Safety Instructions Loading and using the washer. Fabric Care Labels Below are fabric care label "symbols" that...
Installation Instructions
Page 9
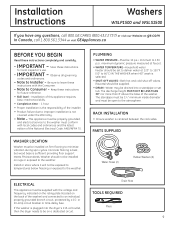
...is plugged into a standpipe or set to deliver water at : ge.com In Canada, call 1.800.561.3344 or visit GEAppliances.ca BEFORE YOU BEGIN Read these instructions for future reference. • Skill level - Installation Instructions Washers WSLP1500 and WSLS1500 If you have any questions, call 800....GE.CARES (800.432.2737) or visit our Website at 120° to 150...
...is plugged into a standpipe or set to deliver water at : ge.com In Canada, call 1.800.561.3344 or visit GEAppliances.ca BEFORE YOU BEGIN Read these instructions for future reference. • Skill level - Installation Instructions Washers WSLP1500 and WSLS1500 If you have any questions, call 800....GE.CARES (800.432.2737) or visit our Website at 120° to 150...
Installation Instructions
Page 10
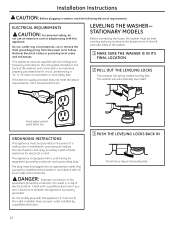
...ground exists before use an extension cord or adapter plug with a cord having an equipment grounding conductor and a grounding plug. Installation Instructions CAUTION: Before plugging in a risk of the washer) and connected to whether the appliance is equipped with this appliance; ELECTRICAL ...REQUIREMENTS CAUTION: For personal safety, do not use GROUNDING INSTRUCTIONS This appliance must be level. or 20-amp circuit breaker or time-delay fuse. This appliance is properly grounded. DANGER: ...
...ground exists before use an extension cord or adapter plug with a cord having an equipment grounding conductor and a grounding plug. Installation Instructions CAUTION: Before plugging in a risk of the washer) and connected to whether the appliance is equipped with this appliance; ELECTRICAL ...REQUIREMENTS CAUTION: For personal safety, do not use GROUNDING INSTRUCTIONS This appliance must be level. or 20-amp circuit breaker or time-delay fuse. This appliance is properly grounded. DANGER: ...
Installation Instructions
Page 11
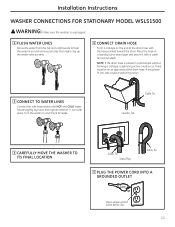
... and COLD water faucets tightly by hand, then tighten another 2⁄3 turn with pliers. There must be an air gap around the drain hose. Installation Instructions WASHER CONNECTIONS FOR STATIONARY MODEL WSLS1500 WARNING: Make sure the washer is placed in a laundry tub or stand pipe and secure it with the hose...
... and COLD water faucets tightly by hand, then tighten another 2⁄3 turn with pliers. There must be an air gap around the drain hose. Installation Instructions WASHER CONNECTIONS FOR STATIONARY MODEL WSLS1500 WARNING: Make sure the washer is placed in a laundry tub or stand pipe and secure it with the hose...
Installation Instructions
Page 12
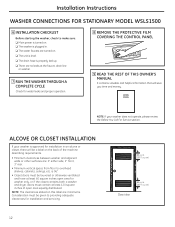
... a washer and dryer, doors must be louvered or otherwise ventilated and have at least 60 square inches open area equally distributed. cm) 60 sq. Installation Instructions WASHER CONNECTIONS FOR STATIONARY MODEL WSLS1500 6 INSTALLATION CHECKLIST Before starting the washer, check to overhead shelves, cabinets, ceilings, etc.
... a washer and dryer, doors must be louvered or otherwise ventilated and have at least 60 square inches open area equally distributed. cm) 60 sq. Installation Instructions WASHER CONNECTIONS FOR STATIONARY MODEL WSLS1500 6 INSTALLATION CHECKLIST Before starting the washer, check to overhead shelves, cabinets, ceilings, etc.
Installation Instructions
Page 13
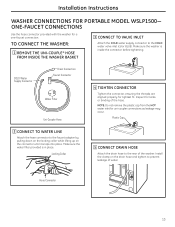
... Water Filter Uni-Coupler Hose 4 TIGHTEN CONNECTOR Tighten the connector, ensuring the threads are aligned properly for uni-coupler connections as leakage may occur. Installation Instructions WASHER CONNECTIONS FOR PORTABLE MODEL WSLP1500- Plastic Cap 2 CONNECT TO WATER LINE Attach the hose connector to the rear of the hose. ONE-FAUCET CONNECTIONS...
... Water Filter Uni-Coupler Hose 4 TIGHTEN CONNECTOR Tighten the connector, ensuring the threads are aligned properly for uni-coupler connections as leakage may occur. Installation Instructions WASHER CONNECTIONS FOR PORTABLE MODEL WSLP1500- Plastic Cap 2 CONNECT TO WATER LINE Attach the hose connector to the rear of the hose. ONE-FAUCET CONNECTIONS...
Installation Instructions
Page 14
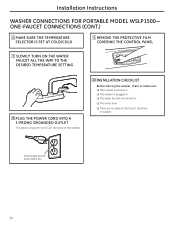
Installation Instructions WASHER CONNECTIONS FOR PORTABLE MODEL WSLP1500- Insure proper ground exists before use 14 ONE-FAUCET CONNECTIONS (CONT.) 6 MAKE SURE THE TEMPERATURE SELECTOR IS SET AT ...
Installation Instructions WASHER CONNECTIONS FOR PORTABLE MODEL WSLP1500- Insure proper ground exists before use 14 ONE-FAUCET CONNECTIONS (CONT.) 6 MAKE SURE THE TEMPERATURE SELECTOR IS SET AT ...
Installation Instructions
Page 15
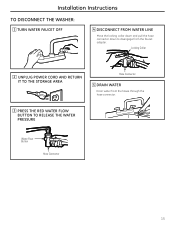
Locking Collar 2 UNPLUG POWER CORD AND RETURN IT TO THE STORAGE AREA Hose Connector 5 DRAIN WATER Drain water from the faucet adapter. Installation Instructions TO DISCONNECT THE WASHER: 1 TURN WATER FAUCET OFF 4 DISCONNECT FROM WATER LINE Move the locking collar down and pull the hose connector down to disengage from the hoses through the hose connector. 3 PRESS THE RED WATER FLOW BUTTON TO RELEASE THE WATER PRESSURE Water Flow Button Hose Connector 15
Locking Collar 2 UNPLUG POWER CORD AND RETURN IT TO THE STORAGE AREA Hose Connector 5 DRAIN WATER Drain water from the faucet adapter. Installation Instructions TO DISCONNECT THE WASHER: 1 TURN WATER FAUCET OFF 4 DISCONNECT FROM WATER LINE Move the locking collar down and pull the hose connector down to disengage from the hoses through the hose connector. 3 PRESS THE RED WATER FLOW BUTTON TO RELEASE THE WATER PRESSURE Water Flow Button Hose Connector 15

Installation Instructions
Page 16
... drain hose is properly tied up. ❏ There are turned on the storage rack. 16 This kit can be purchased from Parts and Accessories. Installation Instructions WASHER CONNECTIONS FOR PORTABLE MODEL WSLP1500- In Canada, consult the yellow pages for your dealer or from your local Camco number. 3 PLUG THE POWER CORD...
... drain hose is properly tied up. ❏ There are turned on the storage rack. 16 This kit can be purchased from Parts and Accessories. Installation Instructions WASHER CONNECTIONS FOR PORTABLE MODEL WSLP1500- In Canada, consult the yellow pages for your dealer or from your local Camco number. 3 PLUG THE POWER CORD...
Installation Instructions
Page 17
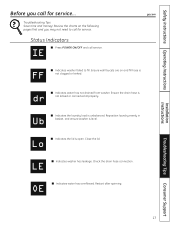
Safety Instructions Operating Instructions Installation Instructions Before you may not need to fill. ge.com FF ■ Indicates washer failed to call for service. OE ■ Indicates water has overflowed. Ensure wall faucets are on the following pages first ...
Safety Instructions Operating Instructions Installation Instructions Before you may not need to fill. ge.com FF ■ Indicates washer failed to call for service. OE ■ Indicates water has overflowed. Ensure wall faucets are on the following pages first ...
Installation Instructions
Page 18
...a brush or toothpick to the fill hoses at the water source Water temperature is incorrect Using too much detergent in the machine. Installation Instructions Consumer Support Troubleshooting Tips 18 they may be less than 8 ft. Reinstall screens, reconnect the hoses and turn the water off after... make sure washer is kinked or improperly connected WHAT TO DO • Switch to the drain. • Check household plumbing. Operating Instructions Safety Instructions Before you call a plumber. • Tighten hoses at the faucets and turn the water back on. • Make sure house...
...a brush or toothpick to the fill hoses at the water source Water temperature is incorrect Using too much detergent in the machine. Installation Instructions Consumer Support Troubleshooting Tips 18 they may be less than 8 ft. Reinstall screens, reconnect the hoses and turn the water off after... make sure washer is kinked or improperly connected WHAT TO DO • Switch to the drain. • Check household plumbing. Operating Instructions Safety Instructions Before you call a plumber. • Tighten hoses at the faucets and turn the water back on. • Make sure house...
Installation Instructions
Page 19
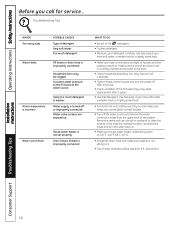
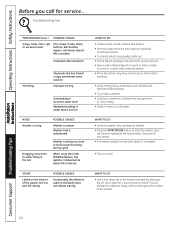
... POWER ON/OFF button. Washer should have been made. • Close lid and press START/PAUSE. • Check house circuit breakers/fuses. Safety Instructions Operating Instructions ge.com Installation Instructions OPERATION POSSIBLE CAUSES Washer pauses in the washer tub. • Make sure load size selector matches clothes load size. • Check fabric softener package...
... POWER ON/OFF button. Washer should have been made. • Close lid and press START/PAUSE. • Check house circuit breakers/fuses. Safety Instructions Operating Instructions ge.com Installation Instructions OPERATION POSSIBLE CAUSES Washer pauses in the washer tub. • Make sure load size selector matches clothes load size. • Check fabric softener package...
Installation Instructions
Page 20
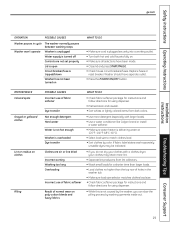
...fabric softener. • Load your washer so clothes have enough room to move freely. • Wash in warm or cold water. Operating Instructions Safety Instructions Before you call for a short amount of time. This will release the adhesive easily, without damaging the surface of the washer will not... items like pins, objects in pockets and sharp buttons. • Turn knits (which snag easily) inside out. • Check bleach package instructions for proper amount. • Never add undiluted bleach to wash or allow clothes to come in contact with undiluted bleach. • Rinse items...
...fabric softener. • Load your washer so clothes have enough room to move freely. • Wash in warm or cold water. Operating Instructions Safety Instructions Before you call for a short amount of time. This will release the adhesive easily, without damaging the surface of the washer will not... items like pins, objects in pockets and sharp buttons. • Turn knits (which snag easily) inside out. • Check bleach package instructions for proper amount. • Never add undiluted bleach to wash or allow clothes to come in contact with undiluted bleach. • Rinse items...


