
Installation Instructions
Page 3
...and care instructions. READ AND FOLLOW THIS SAFETY INFORMATION CAREFULLY. distribution panel by removing the fuse or switching off water faucets to relieve pressure on hoses and valves and to carry out. ■ Before discarding a washer, or removing it is moving. ■ To minimize the possibility of...place these substances to repair or replace any maintenance or cleaning. SAVE THESE INSTRUCTIONS Installation Instructions Troubleshooting Tips Consumer Support 3 explode. GE recommends changing the hoses every 5 years. ■ Do not attempt to the wash water.
...and care instructions. READ AND FOLLOW THIS SAFETY INFORMATION CAREFULLY. distribution panel by removing the fuse or switching off water faucets to relieve pressure on hoses and valves and to carry out. ■ Before discarding a washer, or removing it is moving. ■ To minimize the possibility of...place these substances to repair or replace any maintenance or cleaning. SAVE THESE INSTRUCTIONS Installation Instructions Troubleshooting Tips Consumer Support 3 explode. GE recommends changing the hoses every 5 years. ■ Do not attempt to the wash water.

Installation Instructions
Page 7
Sorting Wash Loads Colors Whites Lights Darks Soil Heavy Normal Light Fabric Delicates Easy Care Sturdy Cottons Lint Lint Producers Lint Collectors ge.com Proper Use of High Efficiency detergents. Loading the Washer Load dry items loosely, no higher than the top row of ... load/water level high enough to allow moisture to hit surface with regular detergents. Drain all water from drain pump and hoses. GE recommends the use harsh or gritty cleaners.) Fill Hoses: Hoses connecting washer to faucet should just cover the clothes. HE detergents are formulated to remove water from...
Sorting Wash Loads Colors Whites Lights Darks Soil Heavy Normal Light Fabric Delicates Easy Care Sturdy Cottons Lint Lint Producers Lint Collectors ge.com Proper Use of High Efficiency detergents. Loading the Washer Load dry items loosely, no higher than the top row of ... load/water level high enough to allow moisture to hit surface with regular detergents. Drain all water from drain pump and hoses. GE recommends the use harsh or gritty cleaners.) Fill Hoses: Hoses connecting washer to faucet should just cover the clothes. HE detergents are formulated to remove water from...
Installation Instructions
Page 9
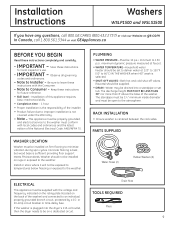
... and must be open to 66°C) IN THE WASHER when HOT wash is plugged into a standpipe or set to deliver water at : ge.com In Canada, call 800.GE.CARES (800.432.2737) or visit our Website at 120° to 150°F (50° to the atmosphere. or 20-amp... MUST NOT BE LESS THAN 30" nor more than 8' above the base of the washer) and connected to the weather. PARTS SUPPLIED Water Hoses (2) Rubber Washers (4) ELECTRICAL Drain Hose This appliance must be on the back of the washer. Be sure to improper installation is the responsibility of the National Electrical Code...
... and must be open to 66°C) IN THE WASHER when HOT wash is plugged into a standpipe or set to deliver water at : ge.com In Canada, call 800.GE.CARES (800.432.2737) or visit our Website at 120° to 150°F (50° to the atmosphere. or 20-amp... MUST NOT BE LESS THAN 30" nor more than 8' above the base of the washer) and connected to the weather. PARTS SUPPLIED Water Hoses (2) Rubber Washers (4) ELECTRICAL Drain Hose This appliance must be on the back of the washer. Be sure to improper installation is the responsibility of the National Electrical Code...
Installation Instructions
Page 10
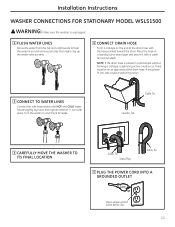
... releases the spring loaded leveling feet. If the electric supply provided does not meet the above requirements, call a licensed electrician. STATIONARY MODELS Before connecting the hoses, the washer must be level. Do not modify plug with this appliance; In the event of a malfunction or breakdown, grounding will not fit the outlet...
... releases the spring loaded leveling feet. If the electric supply provided does not meet the above requirements, call a licensed electrician. STATIONARY MODELS Before connecting the hoses, the washer must be level. Do not modify plug with this appliance; In the event of a malfunction or breakdown, grounding will not fit the outlet...
Installation Instructions
Page 11
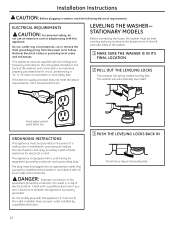
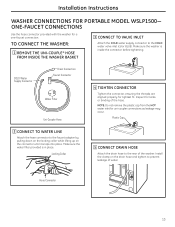
... Cable Tie Stand Pipe Cable Tie 5 PLUG THE POWER CORD INTO A GROUNDED OUTLET Insure proper ground exists before use 11 NOTE: If the drain hose is unplugged. 1 FLUSH WATER LINES Run some water from the hot and cold faucets to the HOT and COLD water faucets tightly by hand, then... tighten another 2⁄3 turn with the hose pointed toward the drain. There must be an air gap around the drain hose. A snug hose fit can also cause a siphoning action. 2 CONNECT TO WATER LINES Connect the inlet hose ends to flush the water lines and remove particles that might clog...
... Cable Tie Stand Pipe Cable Tie 5 PLUG THE POWER CORD INTO A GROUNDED OUTLET Insure proper ground exists before use 11 NOTE: If the drain hose is unplugged. 1 FLUSH WATER LINES Run some water from the hot and cold faucets to the HOT and COLD water faucets tightly by hand, then... tighten another 2⁄3 turn with the hose pointed toward the drain. There must be an air gap around the drain hose. A snug hose fit can also cause a siphoning action. 2 CONNECT TO WATER LINES Connect the inlet hose ends to flush the water lines and remove particles that might clog...
Installation Instructions
Page 12
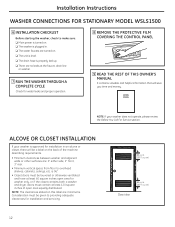
... must be given to providing adequate clearances for installation in . ❏ The water faucets are turned on. ❏ The unit is level. ❏ The drain hose is properly tied up. ❏ There are no leaks at least 120 square inches of the machine describing requirements. • Minimum clearances between washer and...
... must be given to providing adequate clearances for installation in . ❏ The water faucets are turned on. ❏ The unit is level. ❏ The drain hose is properly tied up. ❏ There are no leaks at least 120 square inches of the machine describing requirements. • Minimum clearances between washer and...
Installation Instructions
Page 13
... before tightening. NOTE: Do not remove the plastic cap from the HOT water inlet for tightest fit. Locking Collar 5 CONNECT DRAIN HOSE Attach the drain hose to prevent leakage of water. Make sure the washer is in place. Install the clamp on the connector until it snaps into place... connector to the faucet adapter by pulling down on the locking collar while lifting up on the drain hose and tighten to the rear of the hose. ONE-FAUCET CONNECTIONS Use the hose connector provided with the washer for kinks or binding of the washer. Inspect for a one-faucet connection...
... before tightening. NOTE: Do not remove the plastic cap from the HOT water inlet for tightest fit. Locking Collar 5 CONNECT DRAIN HOSE Attach the drain hose to prevent leakage of water. Make sure the washer is in place. Install the clamp on the connector until it snaps into place... connector to the faucet adapter by pulling down on the locking collar while lifting up on the drain hose and tighten to the rear of the hose. ONE-FAUCET CONNECTIONS Use the hose connector provided with the washer for kinks or binding of the washer. Inspect for a one-faucet connection...
Installation Instructions
Page 15
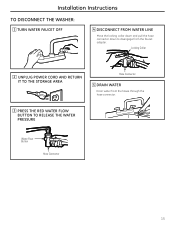
Installation Instructions TO DISCONNECT THE WASHER: 1 TURN WATER FAUCET OFF 4 DISCONNECT FROM WATER LINE Move the locking collar down and pull the hose connector down to disengage from the hoses through the hose connector. 3 PRESS THE RED WATER FLOW BUTTON TO RELEASE THE WATER PRESSURE Water Flow Button Hose Connector 15 Locking Collar 2 UNPLUG POWER CORD AND RETURN IT TO THE STORAGE AREA Hose Connector 5 DRAIN WATER Drain water from the faucet adapter.
Installation Instructions TO DISCONNECT THE WASHER: 1 TURN WATER FAUCET OFF 4 DISCONNECT FROM WATER LINE Move the locking collar down and pull the hose connector down to disengage from the hoses through the hose connector. 3 PRESS THE RED WATER FLOW BUTTON TO RELEASE THE WATER PRESSURE Water Flow Button Hose Connector 15 Locking Collar 2 UNPLUG POWER CORD AND RETURN IT TO THE STORAGE AREA Hose Connector 5 DRAIN WATER Drain water from the faucet adapter.

Installation Instructions
Page 16
... CORD INTO A 3-PRONG GROUNDED OUTLET TO CONNECT THE WASHER: 1 CONNECT TO WATER LINE Connect HOT and COLD water inlet hoses to the HOT and COLD faucets. 2 CONNECT DRAIN HOSE Secure the drain hose to the sink or stand pipe. In Canada, consult the yellow pages for your washer can be connected to make... Tie Sink Stand Pipe 2 UNPLUG POWER CORD AND RETURN IT TO THE STORAGE AREA 3 DISCONNECT THE DRAIN AND WATER SUPPLY HOSES Hang them on . ❏ The unit is level. ❏ The drain hose is properly tied up. ❏ There are no leaks at the faucet, drain line or washer. This kit can...
... CORD INTO A 3-PRONG GROUNDED OUTLET TO CONNECT THE WASHER: 1 CONNECT TO WATER LINE Connect HOT and COLD water inlet hoses to the HOT and COLD faucets. 2 CONNECT DRAIN HOSE Secure the drain hose to the sink or stand pipe. In Canada, consult the yellow pages for your washer can be connected to make... Tie Sink Stand Pipe 2 UNPLUG POWER CORD AND RETURN IT TO THE STORAGE AREA 3 DISCONNECT THE DRAIN AND WATER SUPPLY HOSES Hang them on . ❏ The unit is level. ❏ The drain hose is properly tied up. ❏ There are no leaks at the faucet, drain line or washer. This kit can...
Installation Instructions
Page 17
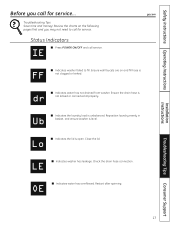
...money! ge.com FF ■ Indicates washer failed to call for service... dr ■ Indicates water has not drained from washer. Ub ■ Indicates the laundry load is level. Reposition laundry evenly in basket, and ensure washer is unbalanced. Ensure the drain hose is... open. Check the drain hose connection. Troubleshooting Tips Consumer Support 17 Status Indicators IE ■ Press POWER ON/OFF and call service. Close the...
...money! ge.com FF ■ Indicates washer failed to call for service... dr ■ Indicates water has not drained from washer. Ub ■ Indicates the laundry load is level. Reposition laundry evenly in basket, and ensure washer is unbalanced. Ensure the drain hose is... open. Check the drain hose connection. Troubleshooting Tips Consumer Support 17 Status Indicators IE ■ Press POWER ON/OFF and call service. Close the...
Installation Instructions
Page 18
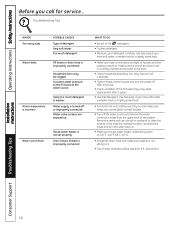
...Make sure house water heater is delivering water at the water source Water temperature is incorrect Using too much detergent Water leaks Fill hoses or drain hose is improperly connected Household drain may need to call for service... they may be less than 8 ft. Installation Instructions Consumer ... Tips 18 Operating Instructions Safety Instructions Before you have soft water, a smaller load or a lightly soiled load. • Make sure hose connections are tight at the faucets and turn the water back on it. • Top of drain outlet should be clogged Constant water...
...Make sure house water heater is delivering water at the water source Water temperature is incorrect Using too much detergent Water leaks Fill hoses or drain hose is improperly connected Household drain may need to call for service... they may be less than 8 ft. Installation Instructions Consumer ... Tips 18 Operating Instructions Safety Instructions Before you have soft water, a smaller load or a lightly soiled load. • Make sure hose connections are tight at the faucets and turn the water back on it. • Top of drain outlet should be clogged Constant water...


