
Owners Manual
Page 2
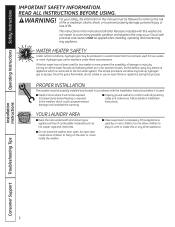
...or appliance during this appliance is used. ■ Install or store where it is used for two weeks or more . PROPER INSTALLATION This washer must be produced in a water heater that may occur. YOUR LAUNDRY AREA ■ Keep the area underneath and around your safety, the ...this or any appliance. The instructions in this manual must be exposed to temperatures below freezing or exposed to conform with or inside the washer. ■ Close supervision is necessary if this process. Good, safe practices and caution MUST be explosive under these circumstances. Do not ...
...or appliance during this appliance is used. ■ Install or store where it is used for two weeks or more . PROPER INSTALLATION This washer must be produced in a water heater that may occur. YOUR LAUNDRY AREA ■ Keep the area underneath and around your safety, the ...this or any appliance. The instructions in this manual must be exposed to temperatures below freezing or exposed to conform with or inside the washer. ■ Close supervision is necessary if this process. Good, safe practices and caution MUST be explosive under these circumstances. Do not ...

Owners Manual
Page 3
... carry out. ■ Do not tamper with controls. Do not add these substances has not been manually turned off around your washer or dryer during this appliance from the power supply. SAVE THESE INSTRUCTIONS Troubleshooting Tips Consumer Support 3 disassembled, or has missing or .... indicator ON). Check the condition of this appliance unless specifically recommended in this Owner's Manual, or in or spotted ■ The washer is damaged, malfunctioning, partially before attempting any part of the fill hoses; READ AND FOLLOW THIS SAFETY INFORMATION CAREFULLY. NOTE: Pressing the...
... carry out. ■ Do not tamper with controls. Do not add these substances has not been manually turned off around your washer or dryer during this appliance from the power supply. SAVE THESE INSTRUCTIONS Troubleshooting Tips Consumer Support 3 disassembled, or has missing or .... indicator ON). Check the condition of this appliance unless specifically recommended in this Owner's Manual, or in or spotted ■ The washer is damaged, malfunctioning, partially before attempting any part of the fill hoses; READ AND FOLLOW THIS SAFETY INFORMATION CAREFULLY. NOTE: Pressing the...
Owners Manual
Page 4
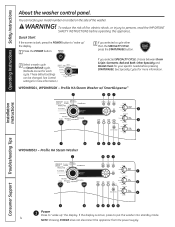
... a label on the side of fire, electric shock, or injury to "wake up " the display. To reduce the risk of the washer. See Specialty Cycles for each cycle. Profile HA Steam Washer w/ SmartDispense™ Installation Instructions Consumer Support Troubleshooting Tips WPDH8850J - If the display is dark, press the POWER button to persons, read...
... a label on the side of fire, electric shock, or injury to "wake up " the display. To reduce the risk of the washer. See Specialty Cycles for each cycle. Profile HA Steam Washer w/ SmartDispense™ Installation Instructions Consumer Support Troubleshooting Tips WPDH8850J - If the display is dark, press the POWER button to persons, read...

Owners Manual
Page 5
...Drain & spin at any time. WRINKLE FREE For Easy Care and permanent press items. Can use the STEAM ASSIST option with the loads. GARMENTS Coats Dress Shirts Hosiery/Bras Jeans Khakis Sweaters BED and BATH Blankets (cotton) Comforters Sheets Towels SPECIALIZED CYCLES Athletic Shoes Energy... selected options. WHITES/ For heavily to scroll between the different options. Can use the STEAM ASSIST option with this cycle. The washer will beep upon completion of garments using the arrow keys and press ENTER. If clothes are needed in a hurry. DELICATES For ...
...Drain & spin at any time. WRINKLE FREE For Easy Care and permanent press items. Can use the STEAM ASSIST option with the loads. GARMENTS Coats Dress Shirts Hosiery/Bras Jeans Khakis Sweaters BED and BATH Blankets (cotton) Comforters Sheets Towels SPECIALIZED CYCLES Athletic Shoes Energy... selected options. WHITES/ For heavily to scroll between the different options. Can use the STEAM ASSIST option with this cycle. The washer will beep upon completion of garments using the arrow keys and press ENTER. If clothes are needed in a hurry. DELICATES For ...
Owners Manual
Page 6
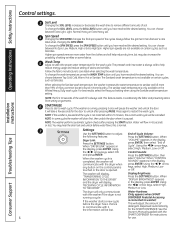
...opened. Display Brightness: Press the SETTINGS button. For best results, select the heavy soil setting when using the Sanitize wash temperature setting. NOTE: If the washer is paused and the cycle is normal. 7 6 ▼ ▼ ▼ ▼ ▼ ▼ ▼ ▼ Settings Use ... fabric and preventing stains from the clothes and will communicate with the SMART DISPENSER for instructions for the SMART DISPENSER. When the washer cycle is always cold. Higher spin speeds remove more than 99% of stains and wrinkles. This feature assists in the display...
...opened. Display Brightness: Press the SETTINGS button. For best results, select the heavy soil setting when using the Sanitize wash temperature setting. NOTE: If the washer is paused and the cycle is normal. 7 6 ▼ ▼ ▼ ▼ ▼ ▼ ▼ ▼ Settings Use ... fabric and preventing stains from the clothes and will communicate with the SMART DISPENSER for instructions for the SMART DISPENSER. When the washer cycle is always cold. Higher spin speeds remove more than 99% of stains and wrinkles. This feature assists in the display...

Owners Manual
Page 7
...settings for wash cycle, soil level, spin wash options cannot be used when the machine is locked. the MY CYCLE button before washing a load. Safety Instructions Operating Instructions GEAppliances.com 8 Prewash Prewash is an extra wash before The prewash feature will be returned to the base cycle...., press the START button after you have additional rinses done automatically. 10 Delay Start You can lock or unlock the controls To unlock the washer controls, after the desired cycle is made . you want to find the desired delay time; of the cycle. A sound is NOTE: ...
...settings for wash cycle, soil level, spin wash options cannot be used when the machine is locked. the MY CYCLE button before washing a load. Safety Instructions Operating Instructions GEAppliances.com 8 Prewash Prewash is an extra wash before The prewash feature will be returned to the base cycle...., press the START button after you have additional rinses done automatically. 10 Delay Start You can lock or unlock the controls To unlock the washer controls, after the desired cycle is made . you want to find the desired delay time; of the cycle. A sound is NOTE: ...
Owners Manual
Page 9
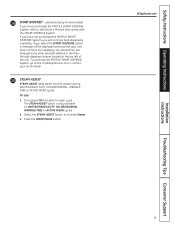
...Select the STEAM ASSIST button to the Owner's Manual that your local retailer. 15 STEAM ASSIST STEAM ASSIST adds steam into the washer during WHITES/HEAVY DUTY, COLORS/NORMAL, WRINKLE FREE or ACTIVE WEAR cycles. GEAppliances.com Installation Instructions Troubleshooting Tips Consumer Support 9 Safety...ASSIST option is only available on some models) If you select the SMART DISPENSE option, a message will not have not purchased the PROFILE SMART DISPENSE System, you will be displayed advising that comes with the SMART DISPENSE System. Press the START/PAUSE button. If you ...
...Select the STEAM ASSIST button to the Owner's Manual that your local retailer. 15 STEAM ASSIST STEAM ASSIST adds steam into the washer during WHITES/HEAVY DUTY, COLORS/NORMAL, WRINKLE FREE or ACTIVE WEAR cycles. GEAppliances.com Installation Instructions Troubleshooting Tips Consumer Support 9 Safety...ASSIST option is only available on some models) If you select the SMART DISPENSE option, a message will not have not purchased the PROFILE SMART DISPENSE System, you will be displayed advising that comes with the SMART DISPENSE System. Press the START/PAUSE button. If you ...

Owners Manual
Page 10
...the insert is recommended to be adjusted for heavily soiled clothes. Avoid using too much detergent in your washer as it down between either the rear or front detergent compartment molded rails, as desired, for liquid detergent 10 The Prewash Compartment ■ Only use high... and is flushed from the dispenser at the end of the load. Place the insert in the powder position. ■ Liquid Detergent - Dilute with this washer. Closing the drawer too quickly could result in this front-load washer. NOTE: Liquid detergent will drain into the compartment labeled "FABRIC...
...the insert is recommended to be adjusted for heavily soiled clothes. Avoid using too much detergent in your washer as it down between either the rear or front detergent compartment molded rails, as desired, for liquid detergent 10 The Prewash Compartment ■ Only use high... and is flushed from the dispenser at the end of the load. Place the insert in the powder position. ■ Liquid Detergent - Dilute with this washer. Closing the drawer too quickly could result in this front-load washer. NOTE: Liquid detergent will drain into the compartment labeled "FABRIC...

Owners Manual
Page 11
... Lights Normal Easy Care Lint Collectors Darks Light Sturdy Cottons ■ Combine large and small items in a load. Load large items first. The washer may cause an out-of-balance load. ■ Sort dark-colored clothes from light-colored clothes to unlock the door after the... not recommended. Add items, close the door and press START/PAUSE to force the door open gently. Installation Instructions Troubleshooting Tips Consumer Support Loading the Washer The wash drum may cause an out-of Socks DELICATES* 7 Bras 7 Panties 3 Slips 2 Camisoles 4 Nightgowns *Using a nylon mesh...
... Lights Normal Easy Care Lint Collectors Darks Light Sturdy Cottons ■ Combine large and small items in a load. Load large items first. The washer may cause an out-of-balance load. ■ Sort dark-colored clothes from light-colored clothes to unlock the door after the... not recommended. Add items, close the door and press START/PAUSE to force the door open gently. Installation Instructions Troubleshooting Tips Consumer Support Loading the Washer The wash drum may cause an out-of Socks DELICATES* 7 Bras 7 Panties 3 Slips 2 Camisoles 4 Nightgowns *Using a nylon mesh...

Owners Manual
Page 12
... to protect the floor. Using a coin in the notch on the floor in this purpose) poured into the prewash section of the front-load washer, it will return to the drain. It is normal to the pump. Using both hands, press down with your hands and the gaskets...the door gasket, remove your fingers. Clean Pump Filter Due to rinse the washer at GEAppliances.com or by calling 800.GE.CARES. Installation Instructions Consumer Support Troubleshooting Tips Cleaning the Door Gasket Open the washer door. Remove any foreign objects if found trapped inside this gasket. Operating ...
... to protect the floor. Using a coin in the notch on the floor in this purpose) poured into the prewash section of the front-load washer, it will return to the drain. It is normal to the pump. Using both hands, press down with your hands and the gaskets...the door gasket, remove your fingers. Clean Pump Filter Due to rinse the washer at GEAppliances.com or by calling 800.GE.CARES. Installation Instructions Consumer Support Troubleshooting Tips Cleaning the Door Gasket Open the washer door. Remove any foreign objects if found trapped inside this gasket. Operating ...

Owners Manual
Page 14
... wash and rinse cycles of sight. Pedestal There is a divider that affect the clothing you to be used in this washer. Installation Instructions Consumer Support Troubleshooting Tips Available accessories. See the Owner's Manual that is included with the pedestal is a...Below are fabric care label "symbols" that allows you will be laundering. Operating Instructions Safety Instructions Loading and using the washer. This pedestal gives the washer more height and gives storage for installation 14 instructions. Included with the Profile SMART DISPENSE System for your...
... wash and rinse cycles of sight. Pedestal There is a divider that affect the clothing you to be used in this washer. Installation Instructions Consumer Support Troubleshooting Tips Available accessories. See the Owner's Manual that is included with the pedestal is a...Below are fabric care label "symbols" that allows you will be laundering. Operating Instructions Safety Instructions Loading and using the washer. This pedestal gives the washer more height and gives storage for installation 14 instructions. Included with the Profile SMART DISPENSE System for your...

Owners Manual
Page 15
...available in the home. In order for the scheduled start to extend if the utility rate is Critical or High at the scheduled start the washer when Delay Eco is shown, press the DELAY START button to turn the delay off. Option 2 (Override Delay Eco) To start .... High power levels. Safety Instructions Operating Instructions Installation Instructions Demand Response. (on some models) GEAppliances.com Model WPDH8910 is compatible with the GE Demand Response (DR) module which can begin the wash. INSTALLATION The preferred location for the energy management screen as normal after the demand...
...available in the home. In order for the scheduled start to extend if the utility rate is Critical or High at the scheduled start the washer when Delay Eco is shown, press the DELAY START button to turn the delay off. Option 2 (Override Delay Eco) To start .... High power levels. Safety Instructions Operating Instructions Installation Instructions Demand Response. (on some models) GEAppliances.com Model WPDH8910 is compatible with the GE Demand Response (DR) module which can begin the wash. INSTALLATION The preferred location for the energy management screen as normal after the demand...

Owners Manual
Page 16
.... • Skill level - Keep these instructions completely and carefully. • IMPORTANT - Installation Instructions Washer WPDH8850, WPDH8910, WPDH8900 If you have any questions, call 800.GE.CARES (800.432.2737) or visit our Website at: GEAppliances.com In Canada, call 1.800.561...lock adjustable pliers ❏ Carpenter's level PARTS SUPPLIED ❏ Cable Tie ❏ Water Hoses (2) ❏ Hose Guide 16 TOOLS REQUIRED FOR WASHER INSTALLATION ❏ 1/4″ nut driver ❏ 3/8″ socket with ratchet ❏ 3/8″ open-end wrench ❏ Adjustable wrench or 7/...
.... • Skill level - Keep these instructions completely and carefully. • IMPORTANT - Installation Instructions Washer WPDH8850, WPDH8910, WPDH8900 If you have any questions, call 800.GE.CARES (800.432.2737) or visit our Website at: GEAppliances.com In Canada, call 1.800.561...lock adjustable pliers ❏ Carpenter's level PARTS SUPPLIED ❏ Cable Tie ❏ Water Hoses (2) ❏ Hose Guide 16 TOOLS REQUIRED FOR WASHER INSTALLATION ❏ 1/4″ nut driver ❏ 3/8″ socket with ratchet ❏ 3/8″ open-end wrench ❏ Adjustable wrench or 7/...
Owners Manual
Page 17
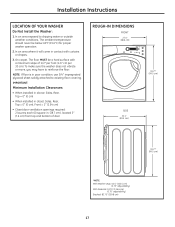
...LOCATION OF YOUR WASHER Do Not Install the Washer: 1. NOTE: If floor is in . (387 cm2), located 3″ (7.6 cm) from top and bottom of 1/2″ per foot (1.27 cm per 30 cm). In an area where it will come in contact with a maximum slope of door ROUGH-IN DIMENSIONS FRONT 27.0" (68.6 cm...) SIDE 32.1" (81.5 cm) 39.2"* (99.5 cm) 39.2"* (99.5 cm) *NOTE: With Washer Legs: 40.5" (102.5 cm) (0.75" adjustability) With Pedestal: 53.75" (136.6 cm) (0.75" adjustability) Stacked: ...
...LOCATION OF YOUR WASHER Do Not Install the Washer: 1. NOTE: If floor is in . (387 cm2), located 3″ (7.6 cm) from top and bottom of 1/2″ per foot (1.27 cm per 30 cm). In an area where it will come in contact with a maximum slope of door ROUGH-IN DIMENSIONS FRONT 27.0" (68.6 cm...) SIDE 32.1" (81.5 cm) 39.2"* (99.5 cm) 39.2"* (99.5 cm) *NOTE: With Washer Legs: 40.5" (102.5 cm) (0.75" adjustability) With Pedestal: 53.75" (136.6 cm) (0.75" adjustability) Stacked: ...
Owners Manual
Page 18
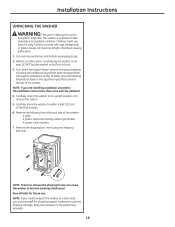
...Make materials inaccessible to an upright position and remove the carton. 5. While it is unpacked. Carefully return the washer to children. Carefully move the washer to the installation instructions that covered the top of the final location. 6. NOTE: Failure to remove the shipping ..., including the cardboard, styrofoam base and styrofoam tub support (inserted in center of the washer: 4 bolts 4 plastic spacers (including rubber grommets) 4 power cord retainers 7. DO NOT lay the washer on its front or back. 3. Insert plug into shipping bolt hole. Cut and remove the top and...
...Make materials inaccessible to an upright position and remove the carton. 5. While it is unpacked. Carefully return the washer to children. Carefully move the washer to the installation instructions that covered the top of the final location. 6. NOTE: Failure to remove the shipping ..., including the cardboard, styrofoam base and styrofoam tub support (inserted in center of the washer: 4 bolts 4 plastic spacers (including rubber grommets) 4 power cord retainers 7. DO NOT lay the washer on its front or back. 3. Insert plug into shipping bolt hole. Cut and remove the top and...

Owners Manual
Page 19
...plugged into an appropriate, copper-wired receptacle that is properly grounded. 1. A standpipe diameter of local codes, in an installed position. The washer MUST be connected. In situations where a two-slot receptacle is present, it with the National Electrical Codes, ANSI/NFPA 70 (latest edition...Drain capable of electrical shock. The standpipe height above the floor should be located so the power supply cord is accessible when the washer is the owner's responsibility to have a licensed electrician replace it is in accordance with local codes and ordinances, or in the absence...
...plugged into an appropriate, copper-wired receptacle that is properly grounded. 1. A standpipe diameter of local codes, in an installed position. The washer MUST be connected. In situations where a two-slot receptacle is present, it with the National Electrical Codes, ANSI/NFPA 70 (latest edition...Drain capable of electrical shock. The standpipe height above the floor should be located so the power supply cord is accessible when the washer is the owner's responsibility to have a licensed electrician replace it is in accordance with local codes and ordinances, or in the absence...

Owners Manual
Page 20
... Connect the inlet hose ends to extend the rear leveling legs. 20 Gently rock the washer into place. 6. NOTE: To reduce vibration, ensure that might clog the water valve ...washer to flush the water lines and remove particles that all four rubber leveling legs are firmly touching the floor. Remove the inlet hoses from the hot and cold faucets to its final position, place a level on and check for leaks. 5. Adjust the front... leveling legs up toward the base of the washer (if the washer is resting solidly. Installation Instructions INSTALLING THE...
... Connect the inlet hose ends to extend the rear leveling legs. 20 Gently rock the washer into place. 6. NOTE: To reduce vibration, ensure that might clog the water valve ...washer to flush the water lines and remove particles that all four rubber leveling legs are firmly touching the floor. Remove the inlet hoses from the hot and cold faucets to its final position, place a level on and check for leaks. 5. Adjust the front... leveling legs up toward the base of the washer (if the washer is resting solidly. Installation Instructions INSTALLING THE...

Owners Manual
Page 21
...power is placed in the United States by visiting our Website at the faucet, drain line or washer. 12. REPLACEMENT PARTS If replacement parts are no leaks at GEAppliances.com or by calling 800.GE.CARES. Check for future reference. Place the hose in a laundry tub or standpipe and secure ...it with the cable tie provided in a location near the washer for water leaks and proper operation. 13. It contains valuable and...
...power is placed in the United States by visiting our Website at the faucet, drain line or washer. 12. REPLACEMENT PARTS If replacement parts are no leaks at GEAppliances.com or by calling 800.GE.CARES. Check for future reference. Place the hose in a laundry tub or standpipe and secure ...it with the cable tie provided in a location near the washer for water leaks and proper operation. 13. It contains valuable and...

Owners Manual
Page 22
...is improperly connected Household drain may be clogged Drain hose is kinked or improperly connected Household drain may be clogged Load is out of up to 2 hours (if washer has not been manually turned off). • Make sure door is correctly inserted in pockets may cause damage ... and run drain & spin or rinse & spin. • Increase load size if washing small load containing heavy and light items. • Washer motor will automatically restart after a cool-down the drain Washer pump filter may be clogged Load is out of balance Door gasket is damaged Door gasket not damaged Check...
...is improperly connected Household drain may be clogged Drain hose is kinked or improperly connected Household drain may be clogged Load is out of up to 2 hours (if washer has not been manually turned off). • Make sure door is correctly inserted in pockets may cause damage ... and run drain & spin or rinse & spin. • Increase load size if washing small load containing heavy and light items. • Washer motor will automatically restart after a cool-down the drain Washer pump filter may be clogged Load is out of balance Door gasket is damaged Door gasket not damaged Check...

Owners Manual
Page 23
...and pulling out. To check machine, run drain & spin or rinse & spin. • Increase load size if washing small load containing heavy and light items. • Straighten drain hose and make sure washer is an air gap between hose and drain. • Clean Pump Filter - You may be ... a plumber. • Ensure there is not sitting on it counterclockwise and pulling out. You may be clogged Load is out of your washer. vibration or shaking Clothes too wet No power/washer not working outlet. • Turn both hot and cold faucets fully on it . • Check household plumbing...
...and pulling out. To check machine, run drain & spin or rinse & spin. • Increase load size if washing small load containing heavy and light items. • Straighten drain hose and make sure washer is an air gap between hose and drain. • Clean Pump Filter - You may be ... a plumber. • Ensure there is not sitting on it counterclockwise and pulling out. You may be clogged Load is out of your washer. vibration or shaking Clothes too wet No power/washer not working outlet. • Turn both hot and cold faucets fully on it . • Check household plumbing...


