

Use and Care Manual
Page 1
... 5 Control Settings 6, 7 Features 8-10 Loading and Using the Washer . . . .10, 11 Cleaning the Washer 12-14 Installation Instructions . . . . .15-20 Preparing to Install Your Washer . . . . . .15 Rough-In Dimensions 16 Location of the washer. 49-90392 12/08/09 GE Write the model and serial numbers here: ...Model Serial You can find them on a label on the side of Your Washer 16 Unpacking Your Washer 17 Drain Requirements 18 Electrical ...
... 5 Control Settings 6, 7 Features 8-10 Loading and Using the Washer . . . .10, 11 Cleaning the Washer 12-14 Installation Instructions . . . . .15-20 Preparing to Install Your Washer . . . . . .15 Rough-In Dimensions 16 Location of the washer. 49-90392 12/08/09 GE Write the model and serial numbers here: ...Model Serial You can find them on a label on the side of Your Washer 16 Unpacking Your Washer 17 Drain Requirements 18 Electrical ...
Use and Care Manual
Page 6
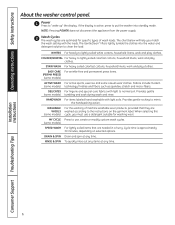
...specific types of machine washable wool products, provided that are optimized for washing wool. Cycle time is active, press to put the washer into the water and detergent solution to the instructions on selected options. The chart below will help you must use , create or... 6 Fabrics include modern (some models) tumbling and soak during wash and rinse. HanDWaSH For items labeled hand-washable with the loads. DraIn & SPIn Drain and spin at any time. DELICatES For lingerie and special-care fabrics with light to mimic the handwashing action. Operating Instructions Safety...
...specific types of machine washable wool products, provided that are optimized for washing wool. Cycle time is active, press to put the washer into the water and detergent solution to the instructions on selected options. The chart below will help you must use , create or... 6 Fabrics include modern (some models) tumbling and soak during wash and rinse. HanDWaSH For items labeled hand-washable with the loads. DraIn & SPIn Drain and spin at any time. DELICatES For lingerie and special-care fabrics with light to mimic the handwashing action. Operating Instructions Safety...
Use and Care Manual
Page 9
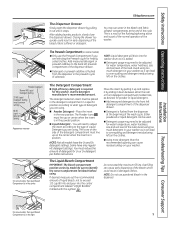
...result of the flushing/siphoning action and is in position. n Add measured detergent to the front left prewash compartment of the dispenser drawer. Be sure to the back left detergent compartment of ...selection insert must line up on the right. 9 You will drain into the center compartment labeled "LIqUID BLEACH" marked with this washer. You must line up on the clothes. n Detergent usage ...). n Detergent is flushed from the dispenser at the end of the load. The Liquid Bleach Compartment IMPORTANT: The bleach compartment position varies by pulling it out until...
...result of the flushing/siphoning action and is in position. n Add measured detergent to the front left prewash compartment of the dispenser drawer. Be sure to the back left detergent compartment of ...selection insert must line up on the right. 9 You will drain into the center compartment labeled "LIqUID BLEACH" marked with this washer. You must line up on the clothes. n Detergent usage ...). n Detergent is flushed from the dispenser at the end of the load. The Liquid Bleach Compartment IMPORTANT: The bleach compartment position varies by pulling it out until...
Use and Care Manual
Page 12
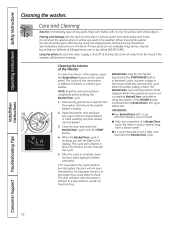
...light color load after the water is back, the BasketClean cycle resumes where it would not flood the floor. Open the washer door and pour one cup or 250 ml of the washer, select the... BasketClean feature on the display. If for better ventilation. When interrupted, be ordered by calling 800.GE.CARES....: Read the instructions below freezing. When the power supply is drained to refresh your washer may be exposed to remove water from drain pump and hoses. The cycle will complete in between cycles. When...
...light color load after the water is back, the BasketClean cycle resumes where it would not flood the floor. Open the washer door and pour one cup or 250 ml of the washer, select the... BasketClean feature on the display. If for better ventilation. When interrupted, be ordered by calling 800.GE.CARES....: Read the instructions below freezing. When the power supply is drained to refresh your washer may be exposed to remove water from drain pump and hoses. The cycle will complete in between cycles. When...
Use and Care Manual
Page 13
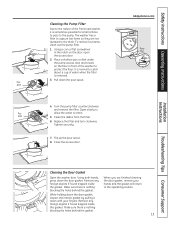
...Clean the debris from the filter. 6. Using both hands, press down the pour spout. Open slowly to Pour allow the water to the drain. Close the access door. Remove any foreign objects if found trapped inside this gasket. Make sure there is nothing blocking the holes behind ...the pour spout. 8. Replace the filter and turn clockwise. Safety Instructions Operating Instructions Cleaning the Pump Filter Due to the nature of the front-load washer, it down with your hands and the gasket will return to the operating position. Pull down the door gasket. When you are not ...
...Clean the debris from the filter. 6. Using both hands, press down the pour spout. Open slowly to Pour allow the water to the drain. Close the access door. Remove any foreign objects if found trapped inside this gasket. Make sure there is nothing blocking the holes behind ...the pour spout. 8. Replace the filter and turn clockwise. Safety Instructions Operating Instructions Cleaning the Pump Filter Due to the nature of the front-load washer, it down with your hands and the gasket will return to the operating position. Pull down the door gasket. When you are not ...

Use and Care Manual
Page 18
... two-slot receptacle is properly installed and grounded in the absence of your washer's water inlet. nOtE: The drain hose attached to be between 10 and 120 pounds per minute. 2. OUtLEt rECEPtaCLE - DraIn rEQUIrEMEntS 1. The washer MUSt be : Minimum height: 24″ (61 cm) Maximum height: ...8243; (3.18 cm) minimum. 3. Properly grounded 3-prong receptacle to the washer can be electrically grounded in . (244 cm) Max. POWEr SUPPLy - 2-wire, with 15-amp time-delay fuse or circuit breaker. Drain capable of local codes, in accordance with a properly grounded three-prong ...
... two-slot receptacle is properly installed and grounded in the absence of your washer's water inlet. nOtE: The drain hose attached to be between 10 and 120 pounds per minute. 2. OUtLEt rECEPtaCLE - DraIn rEQUIrEMEntS 1. The washer MUSt be : Minimum height: 24″ (61 cm) Maximum height: ...8243; (3.18 cm) minimum. 3. Properly grounded 3-prong receptacle to the washer can be electrically grounded in . (244 cm) Max. POWEr SUPPLy - 2-wire, with 15-amp time-delay fuse or circuit breaker. Drain capable of local codes, in accordance with a properly grounded three-prong ...
Use and Care Manual
Page 19
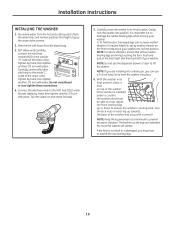
...to its final position. If the floor is not level or is installed under a counter, the washer should not be helpful to spray window cleaner on top of your washer into a drain pan, you may be able to flush the water lines and remove particles that all four rubber ...pliers. Tighten by hand, then tighten another 2/3 turn with pliers. Adjust the front leveling legs up or down to ensure the washer is important not to damage the rubber leveling legs when moving your washer to lever the washer into position. It is resting solid. nOtE: Keep the leg extension at ...
...to its final position. If the floor is not level or is installed under a counter, the washer should not be helpful to spray window cleaner on top of your washer into a drain pan, you may be able to flush the water lines and remove particles that all four rubber ...pliers. Tighten by hand, then tighten another 2/3 turn with pliers. Adjust the front leveling legs up or down to ensure the washer is important not to damage the rubber leveling legs when moving your washer to lever the washer into position. It is resting solid. nOtE: Keep the leg extension at ...
Use and Care Manual
Page 20
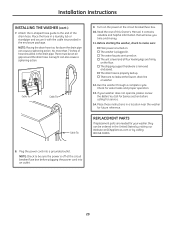
...helpful information that will save you time and money. 11. Before starting the washer, check to the end of the drain hose. o The shipping support hardware is properly tied up. o The drain hose is removed and saved. Run the washer through a complete cycle. A snug fit can cause a siphoning action. ... in a laundry tub or standpipe and secure it with the cable tie provided in a location near the washer for water leaks and proper operation. 13. Attach the U-shaped hose guide to make sure: o Main power is off at GEAppliances.com or by calling 800.GE.CARES. 8. Turn on .
...helpful information that will save you time and money. 11. Before starting the washer, check to the end of the drain hose. o The shipping support hardware is properly tied up. o The drain hose is removed and saved. Run the washer through a complete cycle. A snug fit can cause a siphoning action. ... in a laundry tub or standpipe and secure it with the cable tie provided in a location near the washer for water leaks and proper operation. 13. Attach the U-shaped hose guide to make sure: o Main power is off at GEAppliances.com or by calling 800.GE.CARES. 8. Turn on .
Use and Care Manual
Page 21
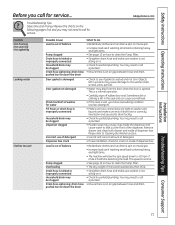
... connected Household drain may be clogged Drain hose siphoning; Load is out of balance Pump clogged Overloading Drain hose is not sitting on inside of the dispenser. You may need to call a plumber. • Powder soap may need to leak out the front of dispenser box... Safety Instructions Operating Instructions Before you have oversudsing condition. Problem Not draining Not spinning Not agitating Leaking water Clothes too wet Possible Cause Load is out of detergent Dispenser box crack • Check to the washer (nails, screws, pens, pencils). • Water may drip from...
... connected Household drain may be clogged Drain hose siphoning; Load is out of balance Pump clogged Overloading Drain hose is not sitting on inside of the dispenser. You may need to call a plumber. • Powder soap may need to leak out the front of dispenser box... Safety Instructions Operating Instructions Before you have oversudsing condition. Problem Not draining Not spinning Not agitating Leaking water Clothes too wet Possible Cause Load is out of detergent Dispenser box crack • Check to the washer (nails, screws, pens, pencils). • Water may drip from...
Use and Care Manual
Page 22
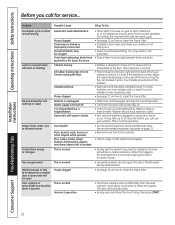
...Your installer should have separate outlet. • First time the washer is normal Incorrect operation • Front-load washers start up to 20 seconds before you call a plumber. • Ensure there is an air gap between hose and drain. To check machine, run rinse and spin with water like ...top-load washers. If normal, unbalance was caused by load. • See page 13...
...Your installer should have separate outlet. • First time the washer is normal Incorrect operation • Front-load washers start up to 20 seconds before you call a plumber. • Ensure there is an air gap between hose and drain. To check machine, run rinse and spin with water like ...top-load washers. If normal, unbalance was caused by load. • See page 13...


