
Owners Manual
Page 1
... Auto night light 34 Automatic fan 37 Beeper volume 34 Child lockout 36 Clock 10, 34 Display ON/OFF 34 Help 35 Reminder 37 Review 34 Scroll speed 34 Surface light 36 Timer 36 Vent fan 36 Care and Cleaning Cleaning the inside . . . . . .38, 39 Cleaning the outside 40 Filters 41, 42 Optional kits 42 Replacing lights 41 Troubleshooting Problem Solver 43, 44 Consumer Support Consumer Support . . . .Back Cover Customer Information 8 Product Registration . . . . . .45, 46 Warranty 47 Owner's Manual...
... Auto night light 34 Automatic fan 37 Beeper volume 34 Child lockout 36 Clock 10, 34 Display ON/OFF 34 Help 35 Reminder 37 Review 34 Scroll speed 34 Surface light 36 Timer 36 Vent fan 36 Care and Cleaning Cleaning the inside . . . . . .38, 39 Cleaning the outside 40 Filters 41, 42 Optional kits 42 Replacing lights 41 Troubleshooting Problem Solver 43, 44 Consumer Support Consumer Support . . . .Back Cover Customer Information 8 Product Registration . . . . . .45, 46 Warranty 47 Owner's Manual...

Owners Manual
Page 3
... dropped. Remove wire twist-ties and metal handles from heated surfaces. If the power cord is not intended for its intended use over electric and gas ranges. s This oven is specifically designed to excessive microwave energy: SAFETY PRECAUTIONS s Read all instructions before placing them in the PRECAUTIONS TO AVOID POSSIBLE EXPOSURE TO EXCESSIVE MICROWAVE ENERGY section on page 2. s Install or locate this appliance. s Do not cover or...
... dropped. Remove wire twist-ties and metal handles from heated surfaces. If the power cord is not intended for its intended use over electric and gas ranges. s This oven is specifically designed to excessive microwave energy: SAFETY PRECAUTIONS s Read all instructions before placing them in the PRECAUTIONS TO AVOID POSSIBLE EXPOSURE TO EXCESSIVE MICROWAVE ENERGY section on page 2. s Install or locate this appliance. s Do not cover or...

Owners Manual
Page 4
... oven rack (turntable) must be unrestricted so it can occur during either speedcook or microwave cooking (except for the pans provided with a lid, a cookie sheet or a flat tray. allow grease to build up on surface units only when necessary. 4 meat to at high heat settings. Take care to prevent the starting and spreading of accidental cooking fires while the vent fan is in use , do not touch...
... oven rack (turntable) must be unrestricted so it can occur during either speedcook or microwave cooking (except for the pans provided with a lid, a cookie sheet or a flat tray. allow grease to build up on surface units only when necessary. 4 meat to at high heat settings. Take care to prevent the starting and spreading of accidental cooking fires while the vent fan is in use , do not touch...
Owners Manual
Page 5
..., oven-save cookware directly on the black metal tray. IMPORTANT SAFETY INSTRUCTIONS www.geadvantium.com WARNING! s Do not operate the oven without appearing to be pierced to allow the container to burst, possibly resulting in this oven. After heating, allow steam to dry newspapers. s Do not use the oven to escape during cooking. s Do not cover the oven rack (turntable), trays or any part of the glass microwave tray with...
..., oven-save cookware directly on the black metal tray. IMPORTANT SAFETY INSTRUCTIONS www.geadvantium.com WARNING! s Do not operate the oven without appearing to be pierced to allow the container to burst, possibly resulting in this oven. After heating, allow steam to dry newspapers. s Do not use the oven to escape during cooking. s Do not cover the oven rack (turntable), trays or any part of the glass microwave tray with...
Owners Manual
Page 6
... glass microwave tray to retain moisture and prevent spattering. TV dinners may become hot because of water-set the measuring cup either in order to cook your food. s "Boilable" cooking pouches and tightly closed plastic bags should always be slit, pierced or vented as directed in the oven, keep the foil at least 1 inch away from the heated food. When cooking with containers tightly covered...
... glass microwave tray to retain moisture and prevent spattering. TV dinners may become hot because of water-set the measuring cup either in order to cook your food. s "Boilable" cooking pouches and tightly closed plastic bags should always be slit, pierced or vented as directed in the oven, keep the foil at least 1 inch away from the heated food. When cooking with containers tightly covered...

Owners Manual
Page 8
... oven. These numbers are now part of toll-free customer service numbers is only a phone call for buying GE. Or, visit the GE Appliances website at www.GEAppliances.com. A list of the cooking revolution! You also save you a great deal of time and money over the life of Troubleshooting Tips first, you may not need service, you will find many answers to obtain service under the warranty...
... oven. These numbers are now part of toll-free customer service numbers is only a phone call for buying GE. Or, visit the GE Appliances website at www.GEAppliances.com. A list of the cooking revolution! You also save you a great deal of time and money over the life of Troubleshooting Tips first, you may not need service, you will find many answers to obtain service under the warranty...
Owners Manual
Page 10
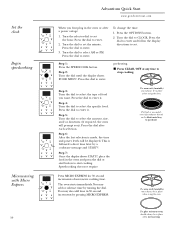
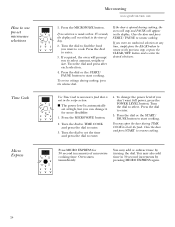
... SPEEDCOOK button. preheating. Turn the dial to select the specific food. Press the OPTIONS button. 2. The glass microwave tray should always be displayed. Press the dial to enter it . Step 4: Turn the dial to CLOCK. Step 5: Turn the dial to select the amount, size, and/or doneness (if required, the oven will be in place when using the oven. Set the clock Begin speedcooking Microwaving with Micro Express 10 Advantium Quick Start www...
... SPEEDCOOK button. preheating. Turn the dial to select the specific food. Press the OPTIONS button. 2. The glass microwave tray should always be displayed. Press the dial to enter it . Step 4: Turn the dial to CLOCK. Step 5: Turn the dial to select the amount, size, and/or doneness (if required, the oven will be in place when using the oven. Set the clock Begin speedcooking Microwaving with Micro Express 10 Advantium Quick Start www...

Owners Manual
Page 12
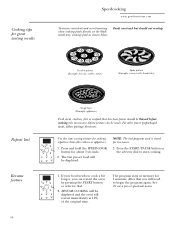
... the dial to enter. 3. Turn the dial until FOOD MENU appears. NOTE: When speedcooking, always use the Resume feature to cook for a complete list of pre-set speedcook menu selections Speedcook Menu Guide www.geadvantium.com After pressing the SPEEDCOOK button, the oven will prompt you to enter. 6. Turn the dial until CHICKEN appears. Use METAL TRAY is displayed. Press the dial to...
... the dial to enter. 3. Turn the dial until FOOD MENU appears. NOTE: When speedcooking, always use the Resume feature to cook for a complete list of pre-set speedcook menu selections Speedcook Menu Guide www.geadvantium.com After pressing the SPEEDCOOK button, the oven will prompt you to enter. 6. Turn the dial until CHICKEN appears. Use METAL TRAY is displayed. Press the dial to...

Owners Manual
Page 13
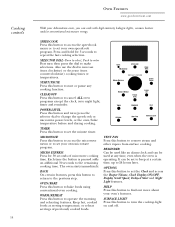
... LIGHT button to be in the center of the oven. 13 Window Allows food to turn the cooktop light on the control panel. Oven features Oven Features www.geadvantium.com Throughout this manual, features and appearance may vary from surface cooking. Lower Ceramic Heater Operates when using the microwave features. Place food or microwave-safe cookware directly on the oven floor, for the oven to remove steam and other vapors from your model. Oven Rack (Turntable...
... LIGHT button to be in the center of the oven. 13 Window Allows food to turn the cooktop light on the control panel. Oven features Oven Features www.geadvantium.com Throughout this manual, features and appearance may vary from surface cooking. Lower Ceramic Heater Operates when using the microwave features. Place food or microwave-safe cookware directly on the oven floor, for the oven to remove steam and other vapors from your model. Oven Rack (Turntable...
Owners Manual
Page 14
... to set the Clock and access the Beeper Volume, Clock Display ON/OFF, Display Scroll Speed, Delayed Start and Night Light features. POWER LEVEL Press this button to change the speedcook or microwave power levels, or the oven/bake temperature before and during cooking. VENT FAN Press this button and turn the cooktop light on and off. It can be set to beep at any cooking function. HELP Press this button to 24 hours later. MICRO EXPRESS...
... to set the Clock and access the Beeper Volume, Clock Display ON/OFF, Display Scroll Speed, Delayed Start and Night Light features. POWER LEVEL Press this button to change the speedcook or microwave power levels, or the oven/bake temperature before and during cooking. VENT FAN Press this button and turn the cooktop light on and off. It can be set to beep at any cooking function. HELP Press this button to 24 hours later. MICRO EXPRESS...

Owners Manual
Page 15
... in place. Press the speedcook button. If no selection is in the display. Using speedcook features To use a pre-set speedcook menu Speedcooking www.geadvantium.com CAUTION: When using the oven. Advantium is opened during cooking, press the selector dial. Press START to cook over when the oven signals TURN FOOD OVER. You can turn the food over 100 popular dishes. 1. s To cook for a short time to change power levels by pressing POWER LEVEL.
... in place. Press the speedcook button. If no selection is in the display. Using speedcook features To use a pre-set speedcook menu Speedcooking www.geadvantium.com CAUTION: When using the oven. Advantium is opened during cooking, press the selector dial. Press START to cook over when the oven signals TURN FOOD OVER. You can turn the food over 100 popular dishes. 1. s To cook for a short time to change power levels by pressing POWER LEVEL.
Owners Manual
Page 16
..., fish or seafood that you can be displayed. For other frozen prepackaged foods, follow package directions. RESUME COOKING will be displayed and the oven will need to start cooking. 1. Cooking tips for about 3 seconds. 2. Foods can touch but should be thawed before cooking (the microwave defrost feature can restart the oven by pressing the START button or selector dial. 2. The last pre-set speedcook menu. Press and hold the...
..., fish or seafood that you can be displayed. For other frozen prepackaged foods, follow package directions. RESUME COOKING will be displayed and the oven will need to start cooking. 1. Cooking tips for about 3 seconds. 2. Foods can touch but should be thawed before cooking (the microwave defrost feature can restart the oven by pressing the START button or selector dial. 2. The last pre-set speedcook menu. Press and hold the...

Owners Manual
Page 17
... instructions from the top, bottom, and interior simultaneously to seal in moisture and flavor. If you . or undercook food. 17 Select a lower setting for foods such as casseroles, meat and fish. Press the dial to start cooking. Press the dial to enter. 4. Speedcook power level Speedcooking www.geadvantium.com Advantium uses power from a high intensity halogen light, ceramic heaters, and microwaves to cook food from To use...
... instructions from the top, bottom, and interior simultaneously to seal in moisture and flavor. If you . or undercook food. 17 Select a lower setting for foods such as casseroles, meat and fish. Press the dial to start cooking. Press the dial to enter. 4. Speedcook power level Speedcooking www.geadvantium.com Advantium uses power from a high intensity halogen light, ceramic heaters, and microwaves to cook food from To use...

Owners Manual
Page 18
... to handle the cookware. s Place the black metal tray directly on the black metal tray. Advantium gives you to cook your cooking guide or cook book. 18 Press the dial to start cooking. Turn the dial clockwise to increase or counterclockwise to enter. 5. Place them directly on the oven rack (turntable). Press the dial to decrease the upper power level. For power level and cooking time suggestions, use manual speedcook. 1. s Place food or oven-safe cookware directly on...
... to handle the cookware. s Place the black metal tray directly on the black metal tray. Advantium gives you to cook your cooking guide or cook book. 18 Press the dial to start cooking. Turn the dial clockwise to increase or counterclockwise to enter. 5. Place them directly on the oven rack (turntable). Press the dial to decrease the upper power level. For power level and cooking time suggestions, use manual speedcook. 1. s Place food or oven-safe cookware directly on...
Owners Manual
Page 26
.... 4. Press MICRO EXPRESS for more flexibility. 1. To change the power level if you can change it for 30 second increments of day. 2. Oven starts immediately. Turn the dial and press after each selection. 4. Press the MICROWAVE button. Press the dial to start cooking. If no selection is not in the display. Turn the dial to find the food you to select amount, weight or size. Press the...
.... 4. Press MICRO EXPRESS for more flexibility. 1. To change the power level if you can change it for 30 second increments of day. 2. Oven starts immediately. Turn the dial and press after each selection. 4. Press the MICROWAVE button. Press the dial to start cooking. If no selection is not in the display. Turn the dial to find the food you to select amount, weight or size. Press the...
Owners Manual
Page 38
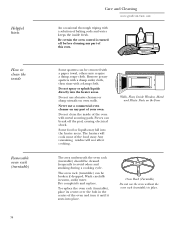
... cook most of your oven. Walls, Floor, Inside Window, Metal and Plastic Parts on oven walls. Do not clean the inside fresh. Helpful hints How to avoid odors and smoking during a cooking cycle. Never use the oven without the oven rack (turntable) in place. Some food or liquids may require a damp soapy cloth. The heaters will not affect cooking. The oven rack (turntable) can be cleaned frequently to clean the inside Removable oven rack (turntable) 38 Care and Cleaning...
... cook most of your oven. Walls, Floor, Inside Window, Metal and Plastic Parts on oven walls. Do not clean the inside fresh. Helpful hints How to avoid odors and smoking during a cooking cycle. Never use the oven without the oven rack (turntable) in place. Some food or liquids may require a damp soapy cloth. The heaters will not affect cooking. The oven rack (turntable) can be cleaned frequently to clean the inside Removable oven rack (turntable) 38 Care and Cleaning...

Owners Manual
Page 41
... used. To replace, slide the filters into place. 41 Light brushing can be in hot water and detergent. Replace with 120 volt, 20 watt (max.) halogen bulb. Connect electrical power to lock into the frame slots on the back of the light compartment cover and lower the cover until it stops. 3. To clean the vent filters, soak them to be cleaned once a month, or as needed. Cooktop light/ night light Reusable vent filters Removing and cleaning the filters Care...
... used. To replace, slide the filters into place. 41 Light brushing can be in hot water and detergent. Replace with 120 volt, 20 watt (max.) halogen bulb. Connect electrical power to lock into the frame slots on the back of the light compartment cover and lower the cover until it stops. 3. To clean the vent filters, soak them to be cleaned once a month, or as needed. Cooktop light/ night light Reusable vent filters Removing and cleaning the filters Care...

Owners Manual
Page 42
... need to open the cabinet doors to the outside . To remove the charcoal filter, first disconnect power at the main fuse. Reconnect power at the main fuse. Filter Kits s JX81A-Recirculating Charcoal Filter Kit Filter kits are used when the oven cannot be replaced when it in appearance. Charcoal filter (JX81A) To remove the charcoal filter To install the charcoal filter Optional kits 42 Care and Cleaning www.geadvantium.com The charcoal filter cannot be replaced. The charcoal filter should be vented to 12 months, depending on two side support...
... need to open the cabinet doors to the outside . To remove the charcoal filter, first disconnect power at the main fuse. Reconnect power at the main fuse. Filter Kits s JX81A-Recirculating Charcoal Filter Kit Filter kits are used when the oven cannot be replaced when it in appearance. Charcoal filter (JX81A) To remove the charcoal filter To install the charcoal filter Optional kits 42 Care and Cleaning www.geadvantium.com The charcoal filter cannot be replaced. The charcoal filter should be vented to 12 months, depending on two side support...
Owners Manual
Page 44
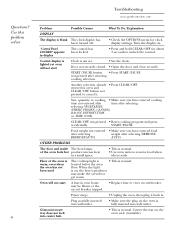
... START/PAUSE. Food weight not entered • Make sure you have entered food after selecting weight after selecting. DEFROST-AUTO. OTHER PROBLEMS The door and inside The heat lamps of the oven is warm, even when the oven has not been used The cooktop light is • This is not set. • Set the clock. located below the oven floor. Glass microwave tray does not lock into center hub. • This is normal. • Use oven mitts to remove food...
... START/PAUSE. Food weight not entered • Make sure you have entered food after selecting weight after selecting. DEFROST-AUTO. OTHER PROBLEMS The door and inside The heat lamps of the oven is warm, even when the oven has not been used The cooktop light is • This is not set. • Set the clock. located below the oven floor. Glass microwave tray does not lock into center hub. • This is normal. • Use oven mitts to remove food...

Owners Manual
Page 47
..., misused, or used commercially. s Improper installation, delivery or maintenance. s Failure of charge, all labor and related service costs to a defect in materials or workmanship. s Replacement of God. Advantium Oven Warranty www.geadvantium.com All warranty service provided by accident, fire, floods or acts of the cooktop light bulbs. During this full three-year warranty, GE will be responsible for any succeeding owner for products purchased...
..., misused, or used commercially. s Improper installation, delivery or maintenance. s Failure of charge, all labor and related service costs to a defect in materials or workmanship. s Replacement of God. Advantium Oven Warranty www.geadvantium.com All warranty service provided by accident, fire, floods or acts of the cooktop light bulbs. During this full three-year warranty, GE will be responsible for any succeeding owner for products purchased...


