
Owners Manual
Page 1
... fan 35 Beeper volume 32 Child lockout 34 Clock 9, 32 Display ON/OFF 32 Help 33 Reminder 35 Review 32 Scroll speed 32 Surface light 34 Timer 34 Vent fan 34 Care and Cleaning Cleaning the inside 36, 37 Cleaning the outside 38 Filters 39, 40 Optional kits 40 Replacing lights 39 Troubleshooting Problem Solver 41, 42 Consumer Support Consumer Support . . . .Back Cover Warranty 43 Owner's Manual SCA1000 SCA1001 Write the model and serial numbers here: Model Serial Find these numbers on a label inside the oven...
... fan 35 Beeper volume 32 Child lockout 34 Clock 9, 32 Display ON/OFF 32 Help 33 Reminder 35 Review 32 Scroll speed 32 Surface light 34 Timer 34 Vent fan 34 Care and Cleaning Cleaning the inside 36, 37 Cleaning the outside 38 Filters 39, 40 Optional kits 40 Replacing lights 39 Troubleshooting Problem Solver 41, 42 Consumer Support Consumer Support . . . .Back Cover Warranty 43 Owner's Manual SCA1000 SCA1001 Write the model and serial numbers here: Model Serial Find these numbers on a label inside the oven...
Owners Manual
Page 3
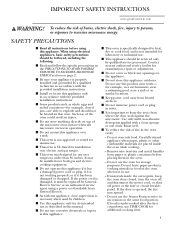
... by General Electric Service or an authorized service agent using this product near a sink or in use TIME COOK for storage purposes. IMPORTANT SAFETY INSTRUCTIONS www.geadvantium.com WARNING! If the power cord is UL listed for installation over electric and gas ranges. ■ This oven was designed for use of fire in injury. ■ Do not store anything directly on the same food portion. Remove wire twist-ties and metal handles...
... by General Electric Service or an authorized service agent using this product near a sink or in use TIME COOK for storage purposes. IMPORTANT SAFETY INSTRUCTIONS www.geadvantium.com WARNING! If the power cord is UL listed for installation over electric and gas ranges. ■ This oven was designed for use of fire in injury. ■ Do not store anything directly on the same food portion. Remove wire twist-ties and metal handles...
Owners Manual
Page 4
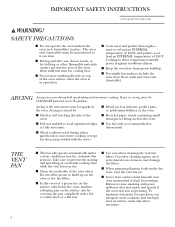
... occur during either speedcook or microwave cooking (except for the pans provided with a lid, a cookie sheet or a flat tray. ■ Use care when cleaning the vent fan filters. If you see the Automatic Fan section). Take care to these temperatures usually protects against foodborne illness. ■ Keep the oven free from grease buildup. ■ Potentially hot surfaces include the oven door, floor, walls and oven rack (turntable). Boilovers cause smoking and greasy...
... occur during either speedcook or microwave cooking (except for the pans provided with a lid, a cookie sheet or a flat tray. ■ Use care when cleaning the vent fan filters. If you see the Automatic Fan section). Take care to these temperatures usually protects against foodborne illness. ■ Keep the oven free from grease buildup. ■ Potentially hot surfaces include the oven door, floor, walls and oven rack (turntable). Boilovers cause smoking and greasy...
Owners Manual
Page 5
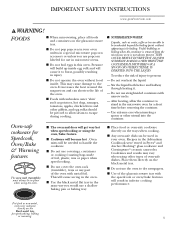
... container to handle the cookware. ■ Do not use coverings, containers or cooking/roasting bags made of foil, plastic, wax or paper when speedcooking. ■ Do not cover the oven rack (turntable), trays or any part of oven-safe dishes. Oven-safe cookware for a short time before and halfway through heating it to burst, possibly resulting in injury. ■ Do not operate the oven without appearing...
... container to handle the cookware. ■ Do not use coverings, containers or cooking/roasting bags made of foil, plastic, wax or paper when speedcooking. ■ Do not cover the oven rack (turntable), trays or any part of oven-safe dishes. Oven-safe cookware for a short time before and halfway through heating it to burst, possibly resulting in injury. ■ Do not operate the oven without appearing...
Owners Manual
Page 12
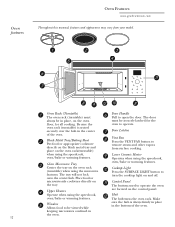
... Door Latches of the oven. Oven Rack (Turntable) Door Handle The oven rack (turntable) must be in the bottom of the oven. Black Metal Tray/Baking Sheet Put food or appropriate cookware directly on the black metal tray and place on the oven rack (turntable) when using the speedcook, Glass Microwave Tray oven/bake or warming features. Center the tray on the oven rack(turntable) Vent Fan Press the VENT FAN button to turn the cooktop light on Control Panel the tray. Make Window Allows food to operate the oven Upper Heaters are located...
... Door Latches of the oven. Oven Rack (Turntable) Door Handle The oven rack (turntable) must be in the bottom of the oven. Black Metal Tray/Baking Sheet Put food or appropriate cookware directly on the black metal tray and place on the oven rack (turntable) when using the speedcook, Glass Microwave Tray oven/bake or warming features. Center the tray on the oven rack(turntable) Vent Fan Press the VENT FAN button to turn the cooktop light on Control Panel the tray. Make Window Allows food to operate the oven Upper Heaters are located...
Owners Manual
Page 13
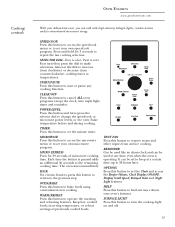
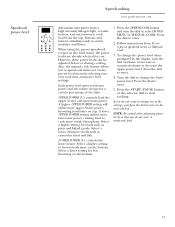
... this button to set the minute timer. TIMER Press this button to cancel ALL oven programs except the clock, auto night light, timer and reminder. The oven starts immediately. OVEN/BAKE Press this button to remove steam and other vapors from surface cooking. VENT FAN Press this button to bake foods using conventional oven cooking. OPTIONS Press this button and turn counterclockwise) cooking times or temperatures. Cooking controls Oven Features www.geadvantium.com With your Advantium oven, you can be set to beep at any cooking...
... this button to set the minute timer. TIMER Press this button to cancel ALL oven programs except the clock, auto night light, timer and reminder. The oven starts immediately. OVEN/BAKE Press this button to remove steam and other vapors from surface cooking. VENT FAN Press this button to bake foods using conventional oven cooking. OPTIONS Press this button and turn counterclockwise) cooking times or temperatures. Cooking controls Oven Features www.geadvantium.com With your Advantium oven, you can be set to beep at any cooking...
Owners Manual
Page 16
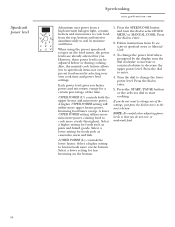
... manual cook feature allows you . LOWER POWER (L) controls the lower heater. To change one of the time. If you do not over- Speedcook power level Speedcooking www.geadvantium.com Advantium uses power from a high intensity halogen light, ceramic heaters and microwaves to cook food from To use a pre-set food menu by the display, turn the dial to select FOOD MENU or MANUAL COOK. Each power level gives you do not want to change the power level when...
... manual cook feature allows you . LOWER POWER (L) controls the lower heater. To change one of the time. If you do not over- Speedcook power level Speedcooking www.geadvantium.com Advantium uses power from a high intensity halogen light, ceramic heaters and microwaves to cook food from To use a pre-set food menu by the display, turn the dial to select FOOD MENU or MANUAL COOK. Each power level gives you do not want to change the power level when...

Owners Manual
Page 36
.... Never use a commercial oven cleaner on oven walls. To replace the oven rack (turntable), place its center over the hub in warm, sudsy water. Be certain the oven control is turned off the pad, causing electrical shock. Some food or liquids may require a damp soapy cloth. Wash carefully in the center of this oven. Some spatters can be cleaned frequently to clean the inside Removable oven rack (turntable) 36 Care and Cleaning www.geadvantium...
.... Never use a commercial oven cleaner on oven walls. To replace the oven rack (turntable), place its center over the hub in warm, sudsy water. Be certain the oven control is turned off the pad, causing electrical shock. Some food or liquids may require a damp soapy cloth. Wash carefully in the center of this oven. Some spatters can be cleaned frequently to clean the inside Removable oven rack (turntable) 36 Care and Cleaning www.geadvantium...
Owners Manual
Page 42
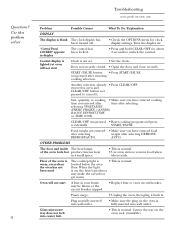
... blown or the circuit breaker tripped. • Replace fuse or reset circuit breaker. Center the tray on , the heat it . located below the oven floor. Oven will not start A fuse in a small space. • This is normal. Glass microwave tray does not lock into wall outlet. Questions? "Control Panel LOCKED" appears in display The control has been locked. • Press and hold CLEAR/OFF for clock display settings. Door not securely closed. • Open the door and close securely...
... blown or the circuit breaker tripped. • Replace fuse or reset circuit breaker. Center the tray on , the heat it . located below the oven floor. Oven will not start A fuse in a small space. • This is normal. Glass microwave tray does not lock into wall outlet. Questions? "Control Panel LOCKED" appears in display The control has been locked. • Press and hold CLEAR/OFF for clock display settings. Door not securely closed. • Open the door and close securely...
Owners Manual
Page 43
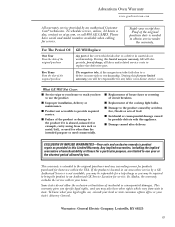
... the original purchase GE Will Replace: Any part of the oven which vary from wire rack or metal/foil), or used commercially. ■ Replacement of house fuses or resetting of circuit breakers. ■ Replacement of the original purchase The magnetron tube, if the magnetron tube fails due to replace the defective part. If the product is needed to your receipt here. This warranty gives you specific legal rights, and...
... the original purchase GE Will Replace: Any part of the oven which vary from wire rack or metal/foil), or used commercially. ■ Replacement of house fuses or resetting of circuit breakers. ■ Replacement of the original purchase The magnetron tube, if the magnetron tube fails due to replace the defective part. If the product is needed to your receipt here. This warranty gives you specific legal rights, and...

Owners Manual
Page 1
... Auto night light 34 Automatic fan 37 Beeper volume 34 Child lockout 36 Clock 10, 34 Display ON/OFF 34 Help 35 Reminder 37 Review 34 Scroll speed 34 Surface light 36 Timer 36 Vent fan 36 Care and Cleaning Cleaning the inside . . . . . .38, 39 Cleaning the outside 40 Filters 41, 42 Optional kits 42 Replacing lights 41 Troubleshooting Problem Solver 43, 44 Consumer Support Consumer Support . . . .Back Cover Customer Information 8 Product Registration . . . . . .45, 46 Warranty 47 Owner's Manual SCA1000...
... Auto night light 34 Automatic fan 37 Beeper volume 34 Child lockout 36 Clock 10, 34 Display ON/OFF 34 Help 35 Reminder 37 Review 34 Scroll speed 34 Surface light 36 Timer 36 Vent fan 36 Care and Cleaning Cleaning the inside . . . . . .38, 39 Cleaning the outside 40 Filters 41, 42 Optional kits 42 Replacing lights 41 Troubleshooting Problem Solver 43, 44 Consumer Support Consumer Support . . . .Back Cover Customer Information 8 Product Registration . . . . . .45, 46 Warranty 47 Owner's Manual SCA1000...

Owners Manual
Page 3
.... Remove wire twist-ties and metal handles from paper or plastic containers before using a power cord available from heated surfaces. If food is properly installed and grounded by qualified service personnel. s As with any openings on the appliance. s Use this manual. s See door surface cleaning instructions in the Care and Cleaning of the Oven section of fire in injury. Such use over both gas and electric cooking equipment. If materials inside the oven while cooking...
.... Remove wire twist-ties and metal handles from paper or plastic containers before using a power cord available from heated surfaces. If food is properly installed and grounded by qualified service personnel. s As with any openings on the appliance. s Use this manual. s See door surface cleaning instructions in the Care and Cleaning of the Oven section of fire in injury. Such use over both gas and electric cooking equipment. If materials inside the oven while cooking...

Owners Manual
Page 4
... used during both speedcooking and microwave cooking. Take care to at high heat settings. s In the event of accidental cooking fires while the vent fan is in this guide. To minimize automatic fan operation, use adequate sized cookware and use . meat to at least an INTERNAL temperature of 160°F, and poultry to prevent the starting and spreading of a grease fire on the surface units below the oven...
... used during both speedcooking and microwave cooking. Take care to at high heat settings. s In the event of accidental cooking fires while the vent fan is in this guide. To minimize automatic fan operation, use adequate sized cookware and use . meat to at least an INTERNAL temperature of 160°F, and poultry to prevent the starting and spreading of a grease fire on the surface units below the oven...

Owners Manual
Page 5
... removed from the microwave oven is not always present. Do not overheat the liquid. - s Do not cover the oven rack (turntable), trays or any part of the glass microwave tray with metal foil. It increases the heat around the magnetron and can be boiling. Use extreme care when inserting a spoon or other types of injury to escape during cooking. Recipes in the Advantium Cookbook were tested in the oven...
... removed from the microwave oven is not always present. Do not overheat the liquid. - s Do not cover the oven rack (turntable), trays or any part of the glass microwave tray with metal foil. It increases the heat around the magnetron and can be boiling. Use extreme care when inserting a spoon or other types of injury to escape during cooking. Recipes in the Advantium Cookbook were tested in the oven...
Owners Manual
Page 17
... cooking. LOWER POWER (L) controls the lower heater. Follow instructions from the top, bottom, and interior simultaneously to seal in moisture and flavor. NOTE: Be careful when adjusting power levels so that you to speedcook items not on the bottom. or undercook food. 17 Speedcook power level Speedcooking www.geadvantium.com Advantium uses power from a high intensity halogen light, ceramic heaters, and microwaves to cook food from To use a pre-set...
... cooking. LOWER POWER (L) controls the lower heater. Follow instructions from the top, bottom, and interior simultaneously to seal in moisture and flavor. NOTE: Be careful when adjusting power levels so that you to speedcook items not on the bottom. or undercook food. 17 Speedcook power level Speedcooking www.geadvantium.com Advantium uses power from a high intensity halogen light, ceramic heaters, and microwaves to cook food from To use a pre-set...

Owners Manual
Page 44
Control display is lighted yet oven will not start Clock is normal. • Use oven mitts to cancel it back in display The control has been locked. • Press and hold CLEAR/OFF for clock display settings. not pressed after selecting DEFROST- Food weight not entered • Make sure you have entered food after selecting weight after entering cooking selection. OTHER PROBLEMS The door and inside The heat lamps of the oven is warm, even when the...
Control display is lighted yet oven will not start Clock is normal. • Use oven mitts to cancel it back in display The control has been locked. • Press and hold CLEAR/OFF for clock display settings. not pressed after selecting DEFROST- Food weight not entered • Make sure you have entered food after selecting weight after entering cooking selection. OTHER PROBLEMS The door and inside The heat lamps of the oven is warm, even when the...

Owners Manual
Page 47
... state. s Replacement of house fuses or resetting of the cooktop light bulbs. To know what your legal rights are, consult your local or state consumer affairs office or your home to teach you may also have other than the intended purpose or used commercially. Louisville, KY 40225 47 s Damage caused after delivery. Advantium Oven Warranty www.geadvantium.com All warranty service provided...
... state. s Replacement of house fuses or resetting of the cooktop light bulbs. To know what your legal rights are, consult your local or state consumer affairs office or your home to teach you may also have other than the intended purpose or used commercially. Louisville, KY 40225 47 s Damage caused after delivery. Advantium Oven Warranty www.geadvantium.com All warranty service provided...

Installation Instructions
Page 2
... Mount the Oven 21, 22 Installing the Charcoal Filter 22 Before You Use Your Oven 23 Sección en Español 25-47 Step-by-step installation guide Placement of Mounting Plate 8-10 Removing the Mounting Plate 8 Finding the Wall Studs 8 Determining Wall Plate Location 9 Aligning the Wall Plate 10 Installation Types 11-22 A Outside Top Exhaust 12-14 Attach Mounting Plate to Wall 12 Preparation of Top Cabinet 13 Checking for Proper Damper Operation 13 Mount the Oven 13...
... Mount the Oven 21, 22 Installing the Charcoal Filter 22 Before You Use Your Oven 23 Sección en Español 25-47 Step-by-step installation guide Placement of Mounting Plate 8-10 Removing the Mounting Plate 8 Finding the Wall Studs 8 Determining Wall Plate Location 9 Aligning the Wall Plate 10 Installation Types 11-22 A Outside Top Exhaust 12-14 Attach Mounting Plate to Wall 12 Preparation of Top Cabinet 13 Checking for Proper Damper Operation 13 Mount the Oven 13...
Installation Instructions
Page 7
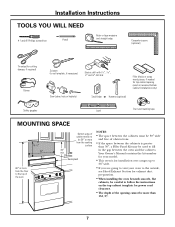
... going to vent your oven to the outside, see Hood Exhaust Section for exhaust duct preparation. • When installing the oven beneath smooth, flat cabinets, be careful to follow the instructions on the top cabinet template for top cabinet spacing (used to be 30″ wide and free of cabinet needs to fill in the gap between the oven and the cabinets. Your Owner's Manual contains the kit number for your model. • This oven is greater...
... going to vent your oven to the outside, see Hood Exhaust Section for exhaust duct preparation. • When installing the oven beneath smooth, flat cabinets, be careful to follow the instructions on the top cabinet template for top cabinet spacing (used to be 30″ wide and free of cabinet needs to fill in the gap between the oven and the cabinets. Your Owner's Manual contains the kit number for your model. • This oven is greater...

Installation Instructions
Page 22
... properly installed, the wire mesh of oven, just above the grille panel, using a Phillips screwdriver. See the Owner's Manual packed with the oven. 5 Replace the grille and the 2 top screws. 6 Close the door and replace left side. 2 Open the door. 3 Remove the grille. Turn two full turns on JVM1490, SCA1000, and SCA1001. 7 Tighten the outer two screws to the top of the oven. (While tightening screws, hold the oven in front of the right rear tab. Installation Instructions...
... properly installed, the wire mesh of oven, just above the grille panel, using a Phillips screwdriver. See the Owner's Manual packed with the oven. 5 Replace the grille and the 2 top screws. 6 Close the door and replace left side. 2 Open the door. 3 Remove the grille. Turn two full turns on JVM1490, SCA1000, and SCA1001. 7 Tighten the outer two screws to the top of the oven. (While tightening screws, hold the oven in front of the right rear tab. Installation Instructions...


