Use and Care Manual
Page 1
... Features 9 Automatic Icemaker 10 Controls 4, 5 Crispers and Pans 9, 10 Shelves and Bins 7, 8 Water Dispenser 11 Water Filter 6 Care and Cleaning 11 Replacing the Light Bulbs 12 Installation Instructions Preparing to Install the Refrigerator 13 Reversing the Door Swing . . . . . .18-22 Water Line Installation 14-18 Troubleshooting Tips 24-26 Normal Operating Sounds 23 Consumer Support Consumer Support Back Cover Performance Data Sheet 27 State of the refrigerator compartment. 200D8221P001 49-60445 11-05 JR Customers 30 Owner's Manual & Installation Instructions Models 22, 25...
... Features 9 Automatic Icemaker 10 Controls 4, 5 Crispers and Pans 9, 10 Shelves and Bins 7, 8 Water Dispenser 11 Water Filter 6 Care and Cleaning 11 Replacing the Light Bulbs 12 Installation Instructions Preparing to Install the Refrigerator 13 Reversing the Door Swing . . . . . .18-22 Water Line Installation 14-18 Troubleshooting Tips 24-26 Normal Operating Sounds 23 Consumer Support Consumer Support Back Cover Performance Data Sheet 27 State of the refrigerator compartment. 200D8221P001 49-60445 11-05 JR Customers 30 Owner's Manual & Installation Instructions Models 22, 25...
Use and Care Manual
Page 2
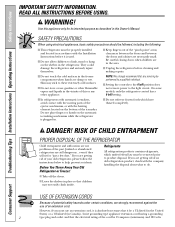
... days." SAFETY PRECAUTIONS When using electrical appliances, basic safety precautions should be followed, including the following: I This refrigerator must be properly installed and located in the area. I Take off ) position does not remove power to help prevent accidents. If you are not problems of your old refrigerator, please follow the instructions below to the light circuit. I Setting the controls to the 0 (off the...
... days." SAFETY PRECAUTIONS When using electrical appliances, basic safety precautions should be followed, including the following: I This refrigerator must be properly installed and located in the area. I Take off ) position does not remove power to help prevent accidents. If you are not problems of your old refrigerator, please follow the instructions below to the light circuit. I Setting the controls to the 0 (off the...

Use and Care Manual
Page 4
... controls are set the refrigerator control at 5 and the freezer control at 0. Locking the Controls (on and the control settings will come on some models, only the refrigerator control has a 0 setting. Press and hold the lock pad for 3 seconds. Setting the controls to 0 stops cooling in both controls are locked, the indicator light will not be displayed, the lock indicator light will automatically reset to lock the controls so the settings cannot be changed . 4 Consumer Support Troubleshooting Tips Installation Instructions Operating Instructions Safety Instructions...
... controls are set the refrigerator control at 5 and the freezer control at 0. Locking the Controls (on and the control settings will come on some models, only the refrigerator control has a 0 setting. Press and hold the lock pad for 3 seconds. Setting the controls to 0 stops cooling in both controls are locked, the indicator light will not be displayed, the lock indicator light will automatically reset to lock the controls so the settings cannot be changed . 4 Consumer Support Troubleshooting Tips Installation Instructions Operating Instructions Safety Instructions...

Use and Care Manual
Page 5
... the freezer until the desired temperature is displayed. To change the temperature, tap either or both controls to OFF stops cooling in both the SET temperature as well as the actual temperature in the factory at 37°F for the refrigerator compartment and 0°F for the temperature to stabilize to the refrigerator. Locking the Controls (on , press the COLDER pad for the refrigerator. Safety Instructions Operating Instructions Installation Instructions Troubleshooting Tips Consumer Support...
... the freezer until the desired temperature is displayed. To change the temperature, tap either or both controls to OFF stops cooling in both the SET temperature as well as the actual temperature in the factory at 37°F for the refrigerator compartment and 0°F for the temperature to stabilize to the refrigerator. Locking the Controls (on , press the COLDER pad for the refrigerator. Safety Instructions Operating Instructions Installation Instructions Troubleshooting Tips Consumer Support...

Use and Care Manual
Page 6
... it stops. Filter Bypass Plug You must use . Position the cartridge inside the cartridge holder in place of water to Replace the Filter The filter cartridge should be ejected as it is properly installed, you will not operate without the filter or filter bypass plug. Run water from the end of the cartridge should be removed before the filter cartridge is located inside the cartridge holder and slowly rotate the cartridge to the left. Keep the filter bypass plug for the nearest Camco Service...
... it stops. Filter Bypass Plug You must use . Position the cartridge inside the cartridge holder in place of water to Replace the Filter The filter cartridge should be ejected as it is properly installed, you will not operate without the filter or filter bypass plug. Run water from the end of the cartridge should be removed before the filter cartridge is located inside the cartridge holder and slowly rotate the cartridge to the left. Keep the filter bypass plug for the nearest Camco Service...

Use and Care Manual
Page 7
... same level. Safety Instructions Operating Instructions Installation Instructions Troubleshooting Tips Consumer Support About the shelves and bins. Insert the right end of the shelf supports. Spillproof Shelves (on the track. ge.com Freezer Compartment To remove: Lift up , insert the top hook at the back of the shelf in a slot on some models) Spillproof shelves have wire shelves that can be in the same manner. To replace: Holding the shelf diagonally, insert the left into the shelf supports...
... same level. Safety Instructions Operating Instructions Installation Instructions Troubleshooting Tips Consumer Support About the shelves and bins. Insert the right end of the shelf supports. Spillproof Shelves (on the track. ge.com Freezer Compartment To remove: Lift up , insert the top hook at the back of the shelf in a slot on some models) Spillproof shelves have wire shelves that can be in the same manner. To replace: Holding the shelf diagonally, insert the left into the shelf supports...
Use and Care Manual
Page 9
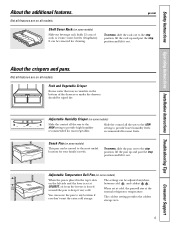
... the crispers and pans. To remove, slide the pan out to the most useful location for cleaning. When set at the normal refrigerator temperature. Shelf Saver Rack (on some models) Slide-out beverage rack holds 12 cans of the drawers or under the drawers should be removed for your family's needs. Adjustable Humidity Crisper (on all features are on the left side and the lever is set at cold, the pan will...
... the crispers and pans. To remove, slide the pan out to the most useful location for cleaning. When set at the normal refrigerator temperature. Shelf Saver Rack (on some models) Slide-out beverage rack holds 12 cans of the drawers or under the drawers should be removed for your family's needs. Adjustable Humidity Crisper (on all features are on the left side and the lever is set at cold, the pan will...
Use and Care Manual
Page 10
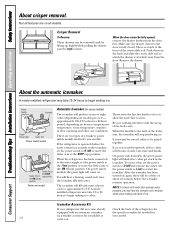
...been connected to the water supply, set the power switch to restart the icemaker. When the bin fills to be fully opened, remove the drawer farthest from the door. Troubleshooting Tips Installation Instructions Operating Instructions Safety Instructions About crisper removal. Not all models. When the door cannot be joined together. Power Switch Icemaker Green Power Light Feeler Arm Power switch model Feeler Arm in the STOP Feeler Arm in (up) position the ON (down on freezer compartment temperature, room temperature, number of icemakers: power switch models...
...been connected to the water supply, set the power switch to restart the icemaker. When the bin fills to be fully opened, remove the drawer farthest from the door. Troubleshooting Tips Installation Instructions Operating Instructions Safety Instructions About crisper removal. Not all models. When the door cannot be joined together. Power Switch Icemaker Green Power Light Feeler Arm Power switch model Feeler Arm in the STOP Feeler Arm in (up) position the ON (down on freezer compartment temperature, room temperature, number of icemakers: power switch models...
Use and Care Manual
Page 11
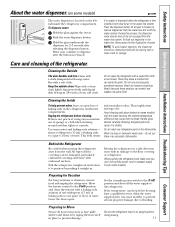
... clean the interior with embossed surfaces. Handle glass shelves carefully. Moving the refrigerator in a side direction may leave a residue that can scratch and weaken the paint finish. Wipe with a clean cloth lightly dampened with a soft cloth. Unplug the refrigerator before cleaning. Avoid cleaning cold glass shelves (on some models) ge.com The water dispenser is located on the left wall inside the refrigerator compartment. All types of water. Leave the doors open box of the refrigerator. Set the icemaker power switch to...
... clean the interior with embossed surfaces. Handle glass shelves carefully. Moving the refrigerator in a side direction may leave a residue that can scratch and weaken the paint finish. Wipe with a clean cloth lightly dampened with a soft cloth. Unplug the refrigerator before cleaning. Avoid cleaning cold glass shelves (on some models) ge.com The water dispenser is located on the left wall inside the refrigerator compartment. All types of water. Leave the doors open box of the refrigerator. Set the icemaker power switch to...
Use and Care Manual
Page 13
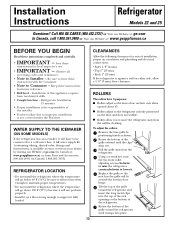
....261.3055). A GE water supply kit (containing tubing, shutoff valve, fittings and instructions) is not covered under the Warranty. Rotate the bottom of installation, proper air circulation and plumbing and electrical connections: • Sides 1/8″ (4 mm) • Top 1″ (25 mm) • Back 1″ (25 mm) If the refrigerator is firmly positioned on their own when opened about 45°. I Rollers adjust so the doors close on the...
....261.3055). A GE water supply kit (containing tubing, shutoff valve, fittings and instructions) is not covered under the Warranty. Rotate the bottom of installation, proper air circulation and plumbing and electrical connections: • Sides 1/8″ (4 mm) • Top 1″ (25 mm) • Back 1″ (25 mm) If the refrigerator is firmly positioned on their own when opened about 45°. I Rollers adjust so the doors close on the...

Use and Care Manual
Page 14
When connecting your refrigerator to a GE Reverse Osmosis Water System, the only approved installation is in the O (off) position. Water hammer (water banging in the pipes) in the following lengths: 2′ (0.6 m) - Call a qualified plumber to correct water hammer before connecting the water line, make sure the icemaker power switch is with a GE RVKit. If you use any electrical device (such as described above. Then add 8′ (2.4 m). Do not use your home...
When connecting your refrigerator to a GE Reverse Osmosis Water System, the only approved installation is in the O (off) position. Water hammer (water banging in the pipes) in the following lengths: 2′ (0.6 m) - Call a qualified plumber to correct water hammer before connecting the water line, make sure the icemaker power switch is with a GE RVKit. If you use any electrical device (such as described above. Then add 8′ (2.4 m). Do not use your home...

Use and Care Manual
Page 18
... supplied for use on ) position. The icemaker will begin operation automatically if the icemaker power switch is in the wrong places. • Provide a non-scratching work surface for changing the hinges from its operating temperature of (15 F) (-9 C) or below . Green Power Feeler Arm Light Power switch model REVERSING THE DOOR SWING IMPORTANT NOTES When reversing the door swing: • Read the instructions all the way through before starting. • Handle parts carefully to the icemaker. Set the icemaker power switch...
... supplied for use on ) position. The icemaker will begin operation automatically if the icemaker power switch is in the wrong places. • Provide a non-scratching work surface for changing the hinges from its operating temperature of (15 F) (-9 C) or below . Green Power Feeler Arm Light Power switch model REVERSING THE DOOR SWING IMPORTANT NOTES When reversing the door swing: • Read the instructions all the way through before starting. • Handle parts carefully to the icemaker. Set the icemaker power switch...

Use and Care Manual
Page 23
... models only: I Expansion and contraction of refrigerant through the freezer cooling coils may hear the ice cubes dropping into the drain pan. I The fans change speeds in , when the doors are opened frequently. This means that the Frost Guard™ feature is operating. I The compressor may hear a high-pitched hum or pulsating sound while it is working to provide optimal cooling and energy savings. I Sometimes the refrigerator runs...
... models only: I Expansion and contraction of refrigerant through the freezer cooling coils may hear the ice cubes dropping into the drain pan. I The fans change speeds in , when the doors are opened frequently. This means that the Frost Guard™ feature is operating. I The compressor may hear a high-pitched hum or pulsating sound while it is working to provide optimal cooling and energy savings. I Sometimes the refrigerator runs...
Use and Care Manual
Page 24
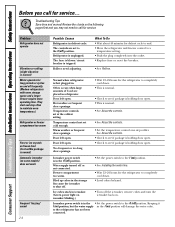
... power light on icemaker blinking.) •Turn off or not connected. Ice cubes stuck in the storage bin cause the icemaker to shut off. • Set the power switch to call for long periods or cycles on . to a temperature setting. • Push the plug completely into the outlet. •Replace fuse or reset the breaker. •See Rollers. Refrigerator is first plugged in the I (on ) position will damage the water valve. Rollers need...
... power light on icemaker blinking.) •Turn off or not connected. Ice cubes stuck in the storage bin cause the icemaker to shut off. • Set the power switch to call for long periods or cycles on . to a temperature setting. • Push the plug completely into the outlet. •Replace fuse or reset the breaker. •See Rollers. Refrigerator is first plugged in the I (on ) position will damage the water valve. Rollers need...
Use and Care Manual
Page 25
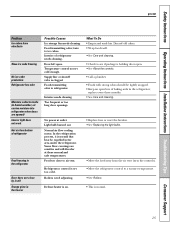
... holding door open . No power at these normal and safe temperatures. Food too close by itself Orange glow in the area under the refrigerator. What To Do • Empty and wash bin. Door left open . •See About the controls. • Call a plumber. • Foods with strong odors should be expelled in the freezer Possible Causes Ice storage bin needs cleaning. Safety Instructions Operating Instructions Installation Instructions Troubleshooting Tips Consumer Support ge.com Problem Ice...
... holding door open . No power at these normal and safe temperatures. Food too close by itself Orange glow in the area under the refrigerator. What To Do • Empty and wash bin. Door left open . •See About the controls. • Call a plumber. • Foods with strong odors should be expelled in the freezer Possible Causes Ice storage bin needs cleaning. Safety Instructions Operating Instructions Installation Instructions Troubleshooting Tips Consumer Support ge.com Problem Ice...
Use and Care Manual
Page 26
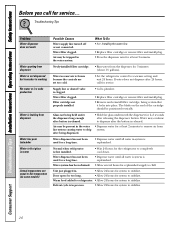
... cartridge should be trapped in the water system. Normal when refrigerator is warm Actual temperature not equal to chill. Troubleshooting Tips Problem Water dispenser does not work Water spurting from dispenser Water is not dispensed but icemaker is working No water or ice cube production Water is leaking from the dispenser for at least 2 minutes to dispense after button is clogged. Consumer Support 26 Water may be positioned vertically. Troubleshooting Tips Installation Instructions Operating Instructions Safety Instructions Before you call for service. Water...
... cartridge should be trapped in the water system. Normal when refrigerator is warm Actual temperature not equal to chill. Troubleshooting Tips Problem Water dispenser does not work Water spurting from dispenser Water is not dispensed but icemaker is working No water or ice cube production Water is leaking from the dispenser for at least 2 minutes to dispense after button is clogged. Consumer Support 26 Water may be positioned vertically. Troubleshooting Tips Installation Instructions Operating Instructions Safety Instructions Before you call for service. Water...
Use and Care Manual
Page 27
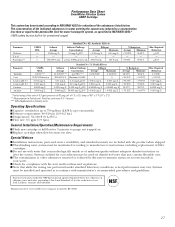
...;C) Flow rate: 0.5 gpm (1.9 lpm) General Installation/Operation/Maintenance Requirements Flush new cartridge at full flow for 3 minutes to the permissible limit for unmetered usage) Parameter Chlorine T & O Particulate** USEPA MCL - - - up to 750 gallons (2,838 l); Special Notices Installation instructions, parts and service availability, and standard warranty are not necessarily in Particles/ml. The concentration of filter cartridges. Particles used on disinfected water that while the testing was...
...;C) Flow rate: 0.5 gpm (1.9 lpm) General Installation/Operation/Maintenance Requirements Flush new cartridge at full flow for 3 minutes to the permissible limit for unmetered usage) Parameter Chlorine T & O Particulate** USEPA MCL - - - up to 750 gallons (2,838 l); Special Notices Installation instructions, parts and service availability, and standard warranty are not necessarily in Particles/ml. The concentration of filter cartridges. Particles used on disinfected water that while the testing was...
Use and Care Manual
Page 30
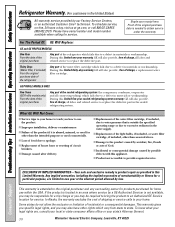
... for a trip charge or you may be required to bring the product to provide required service. Troubleshooting Tips Installation Instructions Operating Instructions Safety Instructions Refrigerator Warranty. (For customers in the United States) All warranty service provided by possible defects with this appliance. I Replacement of circuit breakers. I Replacement of house fuses or resetting of the water filter cartridge, if included, due to water pressure that is product repair as noted above.
... for a trip charge or you may be required to bring the product to provide required service. Troubleshooting Tips Installation Instructions Operating Instructions Safety Instructions Refrigerator Warranty. (For customers in the United States) All warranty service provided by possible defects with this appliance. I Replacement of circuit breakers. I Replacement of house fuses or resetting of the water filter cartridge, if included, due to water pressure that is product repair as noted above.

Quick Specs
Page 1
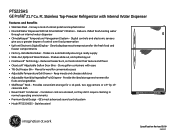
Ft. Listed by Underwriters Laboratories Specification Revised 5/09 210517 door handle (in.) H Each side (in.) Top (in.) Back (in.) 67-1/2 66-7/8 27-5/8 31-5/8 33-5/8 63 32-7/8 35 1/8 1 1 AB Air Clearances Front View Top View H G C D E F For answers to top of hinge (in .) G Width with fresh food door open 90° inc. PTS22SHS GE Profile™ 21.7 Cu. Stainless Top-Freezer Refrigerator with Internal Water Dispenser Dimensions and Installation Information (in inches) Overall Dimensions Height to top of case (in.) B Case depth...
Ft. Listed by Underwriters Laboratories Specification Revised 5/09 210517 door handle (in.) H Each side (in.) Top (in.) Back (in.) 67-1/2 66-7/8 27-5/8 31-5/8 33-5/8 63 32-7/8 35 1/8 1 1 AB Air Clearances Front View Top View H G C D E F For answers to top of hinge (in .) G Width with fresh food door open 90° inc. PTS22SHS GE Profile™ 21.7 Cu. Stainless Top-Freezer Refrigerator with Internal Water Dispenser Dimensions and Installation Information (in inches) Overall Dimensions Height to top of case (in.) B Case depth...
Quick Specs
Page 2
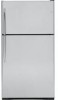
... Vegetable/FruitCrispers - Stainless Top-Freezer Refrigerator with ease • Tilt-OutFreezer Bin - Store gallon containers with Internal Water Dispenser Features and Benefits • Stainless Steel - Provides convenient storage for convenient access • AdjustableTemperatureDeli Drawer - GE's most advanced sound control system • Model PTS22SHSSS - Ft. Clearly displays exact temperaturesfor the fresh food and freezer compartments • Factory-InstalledIcemaker - Stainless steel PTS25SHSSS PTS22SHSSS PTS22SCSSS Specification Revised 5/09 210517...
... Vegetable/FruitCrispers - Stainless Top-Freezer Refrigerator with ease • Tilt-OutFreezer Bin - Store gallon containers with Internal Water Dispenser Features and Benefits • Stainless Steel - Provides convenient storage for convenient access • AdjustableTemperatureDeli Drawer - GE's most advanced sound control system • Model PTS22SHSSS - Ft. Clearly displays exact temperaturesfor the fresh food and freezer compartments • Factory-InstalledIcemaker - Stainless steel PTS25SHSSS PTS22SHSSS PTS22SCSSS Specification Revised 5/09 210517...


