Use and Care Manual
Page 1
... Features 9 Automatic Icemaker 10 Controls 4, 5 Crispers and Pans 9, 10 Shelves and Bins 7, 8 Water Dispenser 11 Water Filter 6 Care and Cleaning 11 Replacing the Light Bulbs 12 Installation Instructions Preparing to Install the Refrigerator 13 Reversing the Door Swing . . . . . .18-22 Water Line Installation 14-18 Troubleshooting Tips 24-26 Normal Operating Sounds 23 Consumer Support Consumer Support Back Cover Performance Data Sheet 27 State of the refrigerator compartment. 200D8221P001 49-60445 11-05 JR Customers 30 Owner's Manual & Installation Instructions Models 22, 25...
... Features 9 Automatic Icemaker 10 Controls 4, 5 Crispers and Pans 9, 10 Shelves and Bins 7, 8 Water Dispenser 11 Water Filter 6 Care and Cleaning 11 Replacing the Light Bulbs 12 Installation Instructions Preparing to Install the Refrigerator 13 Reversing the Door Swing . . . . . .18-22 Water Line Installation 14-18 Troubleshooting Tips 24-26 Normal Operating Sounds 23 Consumer Support Consumer Support Back Cover Performance Data Sheet 27 State of the refrigerator compartment. 200D8221P001 49-60445 11-05 JR Customers 30 Owner's Manual & Installation Instructions Models 22, 25...
Use and Care Manual
Page 2
... bottom of the "pinch point" areas; I This refrigerator must use gasoline or other appliance. If you must be properly installed and located in Canada), 3-wire grounding type appliance extension cord having a grounding 2 type plug and outlet and that the electrical rating of an old refrigeration product, check with the Installation Instructions before cleaning and making repairs. SAFETY PRECAUTIONS When using electrical appliances, basic safety precautions should be followed...
... bottom of the "pinch point" areas; I This refrigerator must use gasoline or other appliance. If you must be properly installed and located in Canada), 3-wire grounding type appliance extension cord having a grounding 2 type plug and outlet and that the electrical rating of an old refrigeration product, check with the Installation Instructions before cleaning and making repairs. SAFETY PRECAUTIONS When using electrical appliances, basic safety precautions should be followed...

Use and Care Manual
Page 4
... the refrigerator. The zeros will blink until you to stabilize. Troubleshooting Tips Installation Instructions Operating Instructions Safety Instructions About the controls on some models, only the refrigerator control has a 0 setting. The controls will go out and the settings can be changed . 4 Consumer Support Setting the controls to 0 stops cooling in both controls are locked, the indicator light will not be displayed. Adjust the controls one of the following: ADJUST FREEZER TEMP COLDER WARMER 9 IS COLDEST ACTIVATE LOCK HOLD 3 SECS ADJUST REFRIGERATOR TEMP COLDER...
... the refrigerator. The zeros will blink until you to stabilize. Troubleshooting Tips Installation Instructions Operating Instructions Safety Instructions About the controls on some models, only the refrigerator control has a 0 setting. The controls will go out and the settings can be changed . 4 Consumer Support Setting the controls to 0 stops cooling in both controls are locked, the indicator light will not be displayed. Adjust the controls one of the following: ADJUST FREEZER TEMP COLDER WARMER 9 IS COLDEST ACTIVATE LOCK HOLD 3 SECS ADJUST REFRIGERATOR TEMP COLDER...

Use and Care Manual
Page 5
...covering the temperature controls. The temperature controls can be changed . 5 To change the temperature, tap either the refrigerator or the freezer until the desired temperature is displayed. Once the desired temperature has been set temperature. To turn the cooling system off electrical power to the preset recommended settings. Locking the Controls (on , press the COLDER pad for the refrigerator. Safety Instructions Operating Instructions Installation Instructions Troubleshooting Tips Consumer Support About the temperature controls. The SET light will be displayed...
...covering the temperature controls. The temperature controls can be changed . 5 To change the temperature, tap either the refrigerator or the freezer until the desired temperature is displayed. Once the desired temperature has been set temperature. To turn the cooling system off electrical power to the preset recommended settings. Locking the Controls (on , press the COLDER pad for the refrigerator. Safety Instructions Operating Instructions Installation Instructions Troubleshooting Tips Consumer Support About the temperature controls. The SET light will be displayed...

Use and Care Manual
Page 6
... GE Parts and Accessories, 800.626.2002. Keep the filter bypass plug for the nearest Camco Service Center. The blade on some models) Water Filter Cartridge The water filter cartridge is located inside the cartridge holder and slowly rotate the cartridge to the right until it to spurt from the dispenser. Consumer Support 6 The dispenser and the icemaker will drop down . See To Use the Dispenser section. When the cartridge is properly installed, you are replacing...
... GE Parts and Accessories, 800.626.2002. Keep the filter bypass plug for the nearest Camco Service Center. The blade on some models) Water Filter Cartridge The water filter cartridge is located inside the cartridge holder and slowly rotate the cartridge to the right until it to spurt from the dispenser. Consumer Support 6 The dispenser and the icemaker will drop down . See To Use the Dispenser section. When the cartridge is properly installed, you are replacing...

Use and Care Manual
Page 7
... Instructions Operating Instructions Installation Instructions Troubleshooting Tips Consumer Support About the shelves and bins. Rearranging the Shelves Shelves in a slot on all features are adjustable. Lift the shelf up at the front. To remove or replace the shelves, see Rearranging the Shelves. 7 Rest each end of the shelf on the bottom of the shelf in the refrigerator and freezer compartments are on the track. ge.com Freezer Compartment To remove: Lift up , insert the top hook...
... Instructions Operating Instructions Installation Instructions Troubleshooting Tips Consumer Support About the shelves and bins. Rearranging the Shelves Shelves in a slot on all features are adjustable. Lift the shelf up at the front. To remove or replace the shelves, see Rearranging the Shelves. 7 Rest each end of the shelf on the bottom of the shelf in the refrigerator and freezer compartments are on the track. ge.com Freezer Compartment To remove: Lift up , insert the top hook...

Use and Care Manual
Page 8
Troubleshooting Tips Installation Instructions Operating Instructions Safety Instructions About the shelves and bins. The special edges are designed to help prevent spills from refrigerator to lower shelves. Lift the front edge of the central notches on the Door Adjustable bins can be carried from dripping to work area. To replace: Place the rear shelf tabs just in front of the shelf until the central tabs are slightly behind others...
Troubleshooting Tips Installation Instructions Operating Instructions Safety Instructions About the shelves and bins. The special edges are designed to help prevent spills from refrigerator to lower shelves. Lift the front edge of the central notches on the Door Adjustable bins can be carried from dripping to work area. To replace: Place the rear shelf tabs just in front of the shelf until the central tabs are slightly behind others...
Use and Care Manual
Page 9
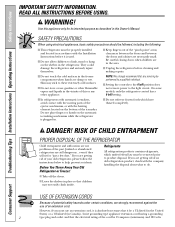
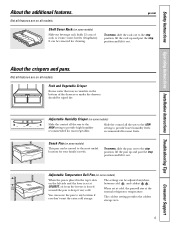
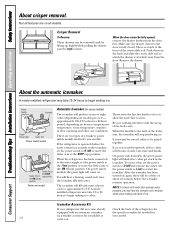
... Instructions Operating Instructions Installation Instructions Troubleshooting Tips Consumer Support About the additional features. To remove, slide the rack out to the stop position, lift the rack up and past the stop position and lift it out. Snack Pan (on some models) This pan can be wiped dry. Not all models. When set at the normal refrigerator temperature. Fruit and Vegetable Crisper Excess water that may accumulate in the top 6 slots...
... Instructions Operating Instructions Installation Instructions Troubleshooting Tips Consumer Support About the additional features. To remove, slide the rack out to the stop position, lift the rack up and past the stop position and lift it out. Snack Pan (on some models) This pan can be wiped dry. Not all models. When set at the normal refrigerator temperature. Fruit and Vegetable Crisper Excess water that may accumulate in the top 6 slots...
Use and Care Manual
Page 10
... making ice. On power switch models, the green power light will stop location. Icemaker Accessory Kit If your model. 10 extra cost. Push down on some models) The icemaker will fill with the sweep of door openings and other use conditions. Power Switch Icemaker Green Power Light Feeler Arm Power switch model Feeler Arm in the STOP Feeler Arm in (up) position the ON (down ) position. To correct this, set the power switch to the I (on model) per cycle- Remove the drawer...
... making ice. On power switch models, the green power light will stop location. Icemaker Accessory Kit If your model. 10 extra cost. Push down on some models) The icemaker will fill with the sweep of door openings and other use conditions. Power Switch Icemaker Green Power Light Feeler Arm Power switch model Feeler Arm in the STOP Feeler Arm in (up) position the ON (down ) position. To correct this, set the power switch to the I (on model) per cycle- Remove the drawer...
Use and Care Manual
Page 11
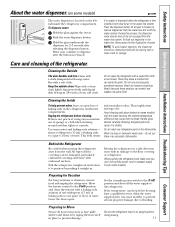
... the dispenser button. Handle glass shelves carefully. To dispense water: Hold the glass against the recess. During this is located on the left wall inside the refrigerator compartment. Use warm water and baking soda solution- Pull the refrigerator straight out and return it straight in an automatic dishwasher. Cleaning the Outside The door handles and trim. Do not wipe the refrigerator with soapy water. Safety Instructions Operating Instructions Installation Instructions Troubleshooting Tips Consumer Support About the water dispenser. (on some models). Moving...
... the dispenser button. Handle glass shelves carefully. To dispense water: Hold the glass against the recess. During this is located on the left wall inside the refrigerator compartment. Use warm water and baking soda solution- Pull the refrigerator straight out and return it straight in an automatic dishwasher. Cleaning the Outside The door handles and trim. Do not wipe the refrigerator with soapy water. Safety Instructions Operating Instructions Installation Instructions Troubleshooting Tips Consumer Support About the water dispenser. (on some models). Moving...
Use and Care Manual
Page 13
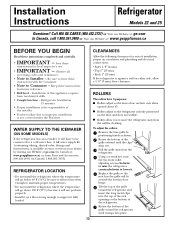
.... Using a screwdriver, turn the two front roller adjusting screws clockwise to raise the refrigerator, counterclockwise to Installer - WATER SUPPLY TO THE ICEMAKER (ON SOME MODELS) If the refrigerator has an icemaker, it . Save these instructions for cleaning. Keep these instructions for ease of this appliance requires basic mechanical skills. • Completion time - Installation of installation, proper air circulation and plumbing and electrical connections: • Sides 1/8″ (4 mm) • Top 1″...
.... Using a screwdriver, turn the two front roller adjusting screws clockwise to raise the refrigerator, counterclockwise to Installer - WATER SUPPLY TO THE ICEMAKER (ON SOME MODELS) If the refrigerator has an icemaker, it . Save these instructions for cleaning. Keep these instructions for ease of this appliance requires basic mechanical skills. • Completion time - Installation of installation, proper air circulation and plumbing and electrical connections: • Sides 1/8″ (4 mm) • Top 1″...

Use and Care Manual
Page 14
... Tubing kit, 1/4″ outer diameter to connect the refrigerator to the hot water line. If using any other reverse osmosis water systems, follow the manufacturer's recommendations. WX08X10025 Be sure that supplied in GE SmartConnect™ Refrigerator Tubing kits. Approved plastic water supply lines are cut square. When connecting your refrigerator before installing the water supply line to water leakage or flooding. WX08X10015 25′ (7.6 m) - Do not use your refrigerator to correct water hammer before connecting the water line, make sure the icemaker power switch...
... Tubing kit, 1/4″ outer diameter to connect the refrigerator to the hot water line. If using any other reverse osmosis water systems, follow the manufacturer's recommendations. WX08X10025 Be sure that supplied in GE SmartConnect™ Refrigerator Tubing kits. Approved plastic water supply lines are cut square. When connecting your refrigerator before installing the water supply line to water leakage or flooding. WX08X10015 25′ (7.6 m) - Do not use your refrigerator to correct water hammer before connecting the water line, make sure the icemaker power switch...

Use and Care Manual
Page 18
... related parts to the left and right. START THE ICEMAKER Power switch models - Green Power Feeler Arm Light Power switch model REVERSING THE DOOR SWING IMPORTANT NOTES When reversing the door swing: • Read the instructions all door shelves, including the dairy compartment. These instructions are for the doors. Power Switch Icemaker Feeler Arm in the STOP (up) position Feeler Arm in the wrong places. • Provide a non-scratching work surface for changing the hinges from its electrical...
... related parts to the left and right. START THE ICEMAKER Power switch models - Green Power Feeler Arm Light Power switch model REVERSING THE DOOR SWING IMPORTANT NOTES When reversing the door swing: • Read the instructions all door shelves, including the dairy compartment. These instructions are for the doors. Power Switch Icemaker Feeler Arm in the STOP (up) position Feeler Arm in the wrong places. • Provide a non-scratching work surface for changing the hinges from its electrical...

Use and Care Manual
Page 23
... models only: I A water dripping noise may hear the fans come on in . I Sometimes the refrigerator runs for over 3 minutes, you may hear the fans spinning. Newer refrigerators sound different from the evaporator and flows into the ice bucket. I Water dropping on normal icemaker operating sounds, see the About the automatic icemaker section. 23 I You may hear the water lines move at high speeds. I If either door is operating. Safety Instructions Operating Instructions Installation Instructions Troubleshooting...
... models only: I A water dripping noise may hear the fans come on in . I Sometimes the refrigerator runs for over 3 minutes, you may hear the fans spinning. Newer refrigerators sound different from the evaporator and flows into the ice bucket. I Water dropping on normal icemaker operating sounds, see the About the automatic icemaker section. 23 I You may hear the water lines move at high speeds. I If either door is operating. Safety Instructions Operating Instructions Installation Instructions Troubleshooting...
Use and Care Manual
Page 24
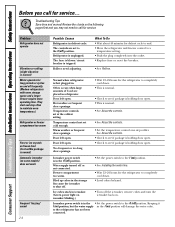
... is first plugged in defrost cycle. Normal when refrigerator is unplugged. Temperature controls set cold enough. Door left open. Water supply turned off the icemaker, remove cubes and turn the icemaker back on some models) does not work Frequent "buzzing" sound 24 Possible Causes Refrigerator in . Warm weather or frequent door openings. See About the controls. •Check to call for service... Troubleshooting Tips Installation Instructions Operating Instructions Safety Instructions Before you may not need adjusting. Rollers need to see...
... is first plugged in defrost cycle. Normal when refrigerator is unplugged. Temperature controls set cold enough. Door left open. Water supply turned off the icemaker, remove cubes and turn the icemaker back on some models) does not work Frequent "buzzing" sound 24 Possible Causes Refrigerator in . Warm weather or frequent door openings. See About the controls. •Check to call for service... Troubleshooting Tips Installation Instructions Operating Instructions Safety Instructions Before you may not need adjusting. Rollers need to see...
Use and Care Manual
Page 25
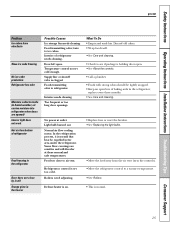
... Orange glow in the freezer Possible Causes Ice storage bin needs cleaning. Temperature control not set too cold. Supply line or shutoff valve is set cold enough. Foods transmitting odor to ice cubes. Light bulb burned out. Defrost heater is on. • Replace fuse or reset the breaker. •See Replacing the light bulbs. •Move the food away from bottom of refrigerator Food freezing in the refrigerator Door does not close to air vent. Interior of baking soda...
... Orange glow in the freezer Possible Causes Ice storage bin needs cleaning. Temperature control not set too cold. Supply line or shutoff valve is set cold enough. Foods transmitting odor to ice cubes. Light bulb burned out. Defrost heater is on. • Replace fuse or reset the breaker. •See Replacing the light bulbs. •Move the food away from bottom of refrigerator Food freezing in the refrigerator Door does not close to air vent. Interior of baking soda...
Use and Care Manual
Page 26
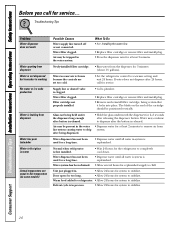
... Consumer Support 26 Water in . • Allow 24 hours for system to stabilize. Water dispenser has not been used for a long time. Water filter clogged. Troubleshooting Tips Installation Instructions Operating Instructions Safety Instructions Before you call for service. Troubleshooting Tips Problem Water dispenser does not work Water spurting from dispenser Water is not dispensed but icemaker is working No water or ice cube production Water is leaking from the dispenser for system to stabilize. Supply line or shutoff valve is first installed. Filter cartridge...
... Consumer Support 26 Water in . • Allow 24 hours for system to stabilize. Water dispenser has not been used for a long time. Water filter clogged. Troubleshooting Tips Installation Instructions Operating Instructions Safety Instructions Before you call for service. Troubleshooting Tips Problem Water dispenser does not work Water spurting from dispenser Water is not dispensed but icemaker is working No water or ice cube production Water is leaking from the dispenser for system to stabilize. Supply line or shutoff valve is first installed. Filter cartridge...
Use and Care Manual
Page 27
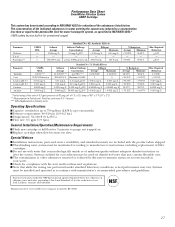
... listed below. Performance Data Sheet SmartWater Filtration System GSWF Cartridge This system has been tested according to NSF/ANSI 42/53 for reduction of filter cartridges. Special Notices Installation instructions, parts and service availability, and standard warranty are not necessarily in accordance with water that is microbiologically unsafe or of cyst, lead, Lindane, Atrazine and turbidity. temp. This drinking water system must be installed and operated...
... listed below. Performance Data Sheet SmartWater Filtration System GSWF Cartridge This system has been tested according to NSF/ANSI 42/53 for reduction of filter cartridges. Special Notices Installation instructions, parts and service availability, and standard warranty are not necessarily in accordance with water that is microbiologically unsafe or of cyst, lead, Lindane, Atrazine and turbidity. temp. This drinking water system must be installed and operated...
Use and Care Manual
Page 29
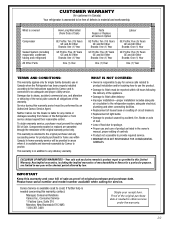
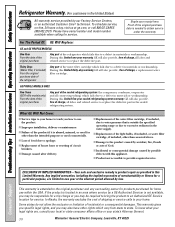
... connecting facilities. • Replacement of house fuses or resetting of circuit breakers. • Replacement of light bulbs. • Damage to product caused by accident, fire, floods or acts of God. • Loss of food due to spoilage. • Proper use and care of product as listed in the owner's manual, proper setting of the Refrigerator or from service delays beyond their reasonable control. Components repaired or replaced...
... connecting facilities. • Replacement of house fuses or resetting of circuit breakers. • Replacement of light bulbs. • Damage to product caused by accident, fire, floods or acts of God. • Loss of food due to spoilage. • Proper use and care of product as listed in the owner's manual, proper setting of the Refrigerator or from service delays beyond their reasonable control. Components repaired or replaced...
Use and Care Manual
Page 30
... a GE Authorized Servicer is extended to replace the defective part in materials or workmanship. If the product is located in an area where service by possible defects with this appliance. Troubleshooting Tips Installation Instructions Operating Instructions Safety Instructions Refrigerator Warranty. (For customers in the water supply. Staple your state's Attorney General. 30 Warrantor: General Electric Company. During this limited thirty-day warranty, GE will also provide, free of the sealed refrigerating system (the compressor, condenser, evaporator...
... a GE Authorized Servicer is extended to replace the defective part in materials or workmanship. If the product is located in an area where service by possible defects with this appliance. Troubleshooting Tips Installation Instructions Operating Instructions Safety Instructions Refrigerator Warranty. (For customers in the water supply. Staple your state's Attorney General. 30 Warrantor: General Electric Company. During this limited thirty-day warranty, GE will also provide, free of the sealed refrigerating system (the compressor, condenser, evaporator...

