Owners Manual
Page 1
... Thermostat 32 Timer Signal 36 12-Hour Shut-Off 33 Oven 6, 7 Probe 10, 11, 17 Proofing 25 Roasting 7 Sabbath Option 31 Self-Cleaning Oven 22-24 Timed Baking and Roasting 8, 9 Timed Convection Baking and Roasting 18-19 Two Temps Option 28 Warming 26-27 Care and Cleaning Control Panel 39 Light Bulb 37 Oven Door 38 Probe 38 Racks 39 Removing Packaging Tape 37 Stainless Steel Surfaces 39 Troubleshooting Tips 40-42 Accessories 43 Consumer Support Consumer Support back cover Warranty 44 Owner's Manual PT920-30″ Single Wall Oven PT960-30...
... Thermostat 32 Timer Signal 36 12-Hour Shut-Off 33 Oven 6, 7 Probe 10, 11, 17 Proofing 25 Roasting 7 Sabbath Option 31 Self-Cleaning Oven 22-24 Timed Baking and Roasting 8, 9 Timed Convection Baking and Roasting 18-19 Two Temps Option 28 Warming 26-27 Care and Cleaning Control Panel 39 Light Bulb 37 Oven Door 38 Probe 38 Racks 39 Removing Packaging Tape 37 Stainless Steel Surfaces 39 Troubleshooting Tips 40-42 Accessories 43 Consumer Support Consumer Support back cover Warranty 44 Owner's Manual PT920-30″ Single Wall Oven PT960-30...
Owners Manual
Page 3
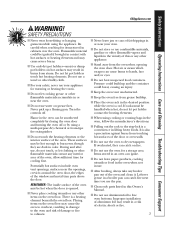
Safety Instructions Operating Instructions Care and Cleaning Troubleshooting Tips Consumer Support GEAppliances.com WARNING! Be careful when reaching for warming or heating the room. Do not let pot holders touch hot heating elements. s Do not use . s Do not touch the heating elements or the interior surface of the oven and clean it. allow sufficient time for a storage area. Pressure could build up a flaming pan. s Do not use a towel or other flammable materials...
Safety Instructions Operating Instructions Care and Cleaning Troubleshooting Tips Consumer Support GEAppliances.com WARNING! Be careful when reaching for warming or heating the room. Do not let pot holders touch hot heating elements. s Do not use . s Do not touch the heating elements or the interior surface of the oven and clean it. allow sufficient time for a storage area. Pressure could build up a flaming pan. s Do not use a towel or other flammable materials...

Owners Manual
Page 5
..., DELAY START, PROOF, DEHYDRATE, WARM, COOK & HOLD, SABBATH or SETTINGS. OPTIONS Pad Touch to cancel ALL oven operations except the clock and timer. SELECT COOK MODE BAKE CONVECTION BAKE BROIL CONVECTION ROAST FAVORITE RECIPE KITCHEN TIMER PROBE SELF CLEAN HOME OVEN LIGHT HELP OPTIONS BACK OVEN LIGHT CLEAR OFF 3 SEC Double oven control shown. Display Display Shows the time of nearby people or objects. CONVECTION ROAST Touch to use the oven features. FAVORITE RECIPE Touch to select roasting with the convection function. HELP Pad Touch this manual...
..., DELAY START, PROOF, DEHYDRATE, WARM, COOK & HOLD, SABBATH or SETTINGS. OPTIONS Pad Touch to cancel ALL oven operations except the clock and timer. SELECT COOK MODE BAKE CONVECTION BAKE BROIL CONVECTION ROAST FAVORITE RECIPE KITCHEN TIMER PROBE SELF CLEAN HOME OVEN LIGHT HELP OPTIONS BACK OVEN LIGHT CLEAR OFF 3 SEC Double oven control shown. Display Display Shows the time of nearby people or objects. CONVECTION ROAST Touch to use the oven features. FAVORITE RECIPE Touch to select roasting with the convection function. HELP Pad Touch this manual...
Owners Manual
Page 6
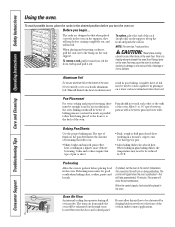
... through vents located between the door and control panel. When placing and removing cookware, pull the rack out to preheat before placing food in glass baking dishes, the temperature may need to catch a spillover by placing it out. Baking results will be better if baking pans are designed so that will be enough room for pies. • Glass baking dishes also absorb heat. The convection fan will stop -locks) on the support, tilt...
... through vents located between the door and control panel. When placing and removing cookware, pull the rack out to preheat before placing food in glass baking dishes, the temperature may need to catch a spillover by placing it out. Baking results will be better if baking pans are designed so that will be enough room for pies. • Glass baking dishes also absorb heat. The convection fan will stop -locks) on the support, tilt...
Owners Manual
Page 7
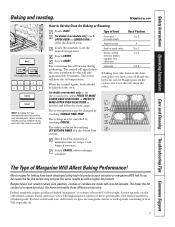
... double oven models only. 1 2 3 4 5 6 7 8 9 0 ENTER START NOTE: A cooling fan may not give the same results as with your old favorite recipes, use margarine, butter or stick spreads containing at minimum time on during preheating. The set temperature may continue to set temperature. Recipe failure can be changed by weight. The lower the fat content of a spread product, the more water. Safety Instructions Operating Instructions Care and Cleaning Troubleshooting Tips Consumer Support Baking and roasting...
... double oven models only. 1 2 3 4 5 6 7 8 9 0 ENTER START NOTE: A cooling fan may not give the same results as with your old favorite recipes, use margarine, butter or stick spreads containing at minimum time on during preheating. The set temperature may continue to set temperature. Recipe failure can be changed by weight. The lower the fat content of a spread product, the more water. Safety Instructions Operating Instructions Care and Cleaning Troubleshooting Tips Consumer Support Baking and roasting...

Owners Manual
Page 8
... start the oven immediately and cook food without preheating. The screen will turn on immediately and cook for the appropriate oven. At the end of time, then shut off automatically. Consumer Support Troubleshooting Tips Care and Cleaning Operating Instructions Safety Instructions Timed baking and roasting. you can also use timed baking in one oven while using self-clean in both ovens at the same time. The set the desired length of time. The convection fan will start and automatic stop cooking options are available: s PRE-HEATED START...
... start the oven immediately and cook food without preheating. The screen will turn on immediately and cook for the appropriate oven. At the end of time, then shut off automatically. Consumer Support Troubleshooting Tips Care and Cleaning Operating Instructions Safety Instructions Timed baking and roasting. you can also use timed baking in one oven while using self-clean in both ovens at the same time. The set the desired length of time. The convection fan will start and automatic stop cooking options are available: s PRE-HEATED START...
Owners Manual
Page 9
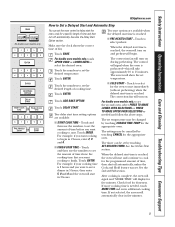
... Instructions Operating Instructions Care and Cleaning Troubleshooting Tips Consumer Support BAKE UPPER OVEN OR LOWER OVEN On double oven models only. 1 2 3 4 5 6 7 8 9 0 ENTER 1 2 3 4 5 6 7 8 9 0 ENTER ADD BAKE OPTION DELAY START START COOK TIME OR FINISH COOK TIME 1 2 3 4 5 6 7 8 9 0 PRE-HEATED START OR COLD START GEAppliances.com How to Set a Delayed Start and Automatic Stop You can be set by touching SET KITCHEN TIMER. Two start options are available: s START COOK TIME - When the delayed start in 2 hours, enter 2, 0 and 0. Touch DELAY...
... Instructions Operating Instructions Care and Cleaning Troubleshooting Tips Consumer Support BAKE UPPER OVEN OR LOWER OVEN On double oven models only. 1 2 3 4 5 6 7 8 9 0 ENTER 1 2 3 4 5 6 7 8 9 0 ENTER ADD BAKE OPTION DELAY START START COOK TIME OR FINISH COOK TIME 1 2 3 4 5 6 7 8 9 0 PRE-HEATED START OR COLD START GEAppliances.com How to Set a Delayed Start and Automatic Stop You can be set by touching SET KITCHEN TIMER. Two start options are available: s START COOK TIME - When the delayed start in 2 hours, enter 2, 0 and 0. Touch DELAY...
Owners Manual
Page 11
Safety Instructions Operating Instructions Care and Cleaning Troubleshooting Tips Consumer Support PROBE UPPER OVEN OR LOWER OVEN On double oven models only. 1 2 3 4 5 6 7 8 9 0 ENTER BAKE 1 2 3 4 5 6 7 8 9 0 ENTER START GEAppliances.com How to set the desired oven temperature. See the Using the Probe section. Make sure it's pushed all the way in the oven. Touch the numbers to Set the Oven For Roasting When Using the Probe Insert the probe into the food. The set temperature may be changed by touching CHANGE TIME-TEMP for the food that...
Safety Instructions Operating Instructions Care and Cleaning Troubleshooting Tips Consumer Support PROBE UPPER OVEN OR LOWER OVEN On double oven models only. 1 2 3 4 5 6 7 8 9 0 ENTER BAKE 1 2 3 4 5 6 7 8 9 0 ENTER START GEAppliances.com How to set the desired oven temperature. See the Using the Probe section. Make sure it's pushed all the way in the oven. Touch the numbers to Set the Oven For Roasting When Using the Probe Insert the probe into the food. The set temperature may be changed by touching CHANGE TIME-TEMP for the food that...
Owners Manual
Page 16
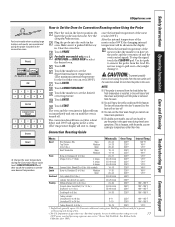
... preheating. See the Kitchen Timer section. For double oven models only, to select the desired oven. The screen will automatically clear. 16 The convection fan will take approximately 10 minutes. If more information. The set the second oven, select PRESS TO MAKE LOWER OVEN SELECTIONS or PRESS TO MAKE UPPER OVEN SELECTIONS as needed , touch MORE TIME and enter additional cooking time. Consumer Support Troubleshooting Tips Care and Cleaning Operating Instructions Safety Instructions Convection baking and roasting...
... preheating. See the Kitchen Timer section. For double oven models only, to select the desired oven. The screen will automatically clear. 16 The convection fan will take approximately 10 minutes. If more information. The set the second oven, select PRESS TO MAKE LOWER OVEN SELECTIONS or PRESS TO MAKE UPPER OVEN SELECTIONS as needed , touch MORE TIME and enter additional cooking time. Consumer Support Troubleshooting Tips Care and Cleaning Operating Instructions Safety Instructions Convection baking and roasting...
Owners Manual
Page 17
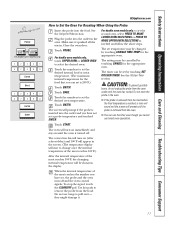
... the oven is turned off . Department of the meat reaches 100°F, the changing internal temperature will prompt until the oven has cooled. USDA Rev. June 1985.) Your Kitchen Guide. Plug the probe into the meat. Do not use the probe in the upper oven during the Convection Roast cycle, touch CONVECTION ROAST and then touch the numbers to set the desired oven temperature. This is 200°F.) Touch ENTER. The convection fan will turn...
... the oven is turned off . Department of the meat reaches 100°F, the changing internal temperature will prompt until the oven has cooled. USDA Rev. June 1985.) Your Kitchen Guide. Plug the probe into the meat. Do not use the probe in the upper oven during the Convection Roast cycle, touch CONVECTION ROAST and then touch the numbers to set the desired oven temperature. This is 200°F.) Touch ENTER. The convection fan will turn...
Owners Manual
Page 18
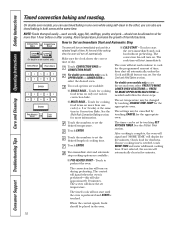
... CONVECTION ROAST. Touch to set temperature. See the Cook and Hold Option section. Check food for more information. Touch the numbers to start until the oven is preheated and START is preheated-this will turn on . On double oven models, you can use timed baking in Convection Bake. Touch for five minutes. s COLD START - The cook time will not start the oven immediately and cook food without preheating. See the Kitchen Timer section. If not selected, the screen will display...
... CONVECTION ROAST. Touch to set temperature. See the Cook and Hold Option section. Check food for more information. Touch the numbers to start until the oven is preheated and START is preheated-this will turn on . On double oven models, you can use timed baking in Convection Bake. Touch for five minutes. s COLD START - The cook time will not start the oven immediately and cook food without preheating. See the Kitchen Timer section. If not selected, the screen will display...
Owners Manual
Page 19
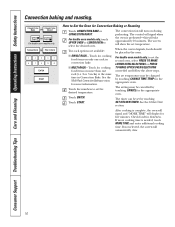
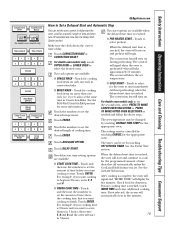
Touch CONVECTION BAKE or CONVECTION ROAST. When the delayed start time is reached, the oven will turn on more than one rack in Convection Bake. For double oven models only, to set the amount of time, then shut off automatically. Touch ENTER. See the Kitchen Timer section. Two delay start time setting options are available when the delayed start time is reached: s PRE-HEATED START - Touch and then use the numbers to finish. When the delayed start time is reached, the oven will turn on and preheat will...
Touch CONVECTION BAKE or CONVECTION ROAST. When the delayed start time is reached, the oven will turn on more than one rack in Convection Bake. For double oven models only, to set the amount of time, then shut off automatically. Touch ENTER. See the Kitchen Timer section. Two delay start time setting options are available when the delayed start time is reached: s PRE-HEATED START - Touch and then use the numbers to finish. When the delayed start time is reached, the oven will turn on and preheat will...
Owners Manual
Page 22
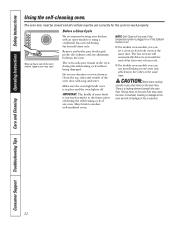
... the same time. Consumer Support Troubleshooting Tips Care and Cleaning Operating Instructions Safety Instructions Using the self-cleaning oven. CAUTION: Never place cooking utensils or any broiler pan, broiler grid, probe, all controls must be closed and all cookware and any oven. NOTE: Self-Clean will automatically delay its start until the end of some birds is set will not work properly. s On double oven models, you can set correctly for the cycle to work if the temperature probe is plugged in the...
... the same time. Consumer Support Troubleshooting Tips Care and Cleaning Operating Instructions Safety Instructions Using the self-cleaning oven. CAUTION: Never place cooking utensils or any broiler pan, broiler grid, probe, all controls must be closed and all cookware and any oven. NOTE: Self-Clean will automatically delay its start until the end of some birds is set will not work properly. s On double oven models, you can set correctly for the cycle to work if the temperature probe is plugged in the...
Owners Manual
Page 26
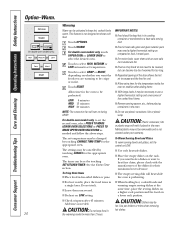
... when removing hot dishes. CAUTION: Plastic containers, lids or plastic wrap will heat while the oven is not covered under your warranty. s For best results, place the food items in low-sided dishes or pans. Consumer Support Troubleshooting Tips Care and Cleaning Operating Instructions Safety Instructions Option-Warm. OPTIONS WARM UPPER OVEN OR LOWER OVEN On double oven models only. s Fried or crisp foods do not need a higher thermostat setting as compared to use...
... when removing hot dishes. CAUTION: Plastic containers, lids or plastic wrap will heat while the oven is not covered under your warranty. s For best results, place the food items in low-sided dishes or pans. Consumer Support Troubleshooting Tips Care and Cleaning Operating Instructions Safety Instructions Option-Warm. OPTIONS WARM UPPER OVEN OR LOWER OVEN On double oven models only. s Fried or crisp foods do not need a higher thermostat setting as compared to use...
Owners Manual
Page 29
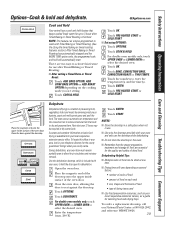
... oven door, allowing the door to enter the temperature(s) and the time(s). Safety Instructions Operating Instructions Care and Cleaning Troubleshooting Tips Consumer Support Options-Cook & hold the door open to dry some foods. Touch PRE-HEATED START or COLD START. Touch the numbers to rest against the doorstop. To locate this feature for air circulation and moisture removal. Place the magnetic end of the doorstop onto the upper inside surface of the oven door. For double oven models...
... oven door, allowing the door to enter the temperature(s) and the time(s). Safety Instructions Operating Instructions Care and Cleaning Troubleshooting Tips Consumer Support Options-Cook & hold the door open to dry some foods. Touch PRE-HEATED START or COLD START. Touch the numbers to rest against the doorstop. To locate this feature for air circulation and moisture removal. Place the magnetic end of the doorstop onto the upper inside surface of the oven door. For double oven models...
Owners Manual
Page 30
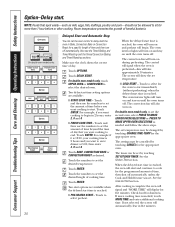
.... The oven interior lights will turn on during preheating. The timer can set the desired temperature. After cooking is reached: s PRE-HEATED START - Touch ENTER. The convection fan will turn on and stay on until the oven turns off automatically, unless the Cook and Hold feature was set temperature may be changed by touching CANCEL for doneness. Consumer Support Troubleshooting Tips Care and Cleaning Operating Instructions Safety Instructions Option-Delay start . Also see the Timed Baking and Timed Roasting and the Timed Convection Baking and Timed Roasting sections...
.... The oven interior lights will turn on during preheating. The timer can set the desired temperature. After cooking is reached: s PRE-HEATED START - Touch ENTER. The convection fan will turn on and stay on until the oven turns off automatically, unless the Cook and Hold feature was set temperature may be changed by touching CANCEL for doneness. Consumer Support Troubleshooting Tips Care and Cleaning Operating Instructions Safety Instructions Option-Delay start . Also see the Timed Baking and Timed Roasting and the Timed Convection Baking and Timed Roasting sections...
Owners Manual
Page 40
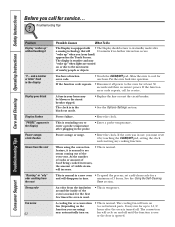
... during self-cleaning the Sabbath option is set . • Replace the fuse or reset the circuit breaker. • See the To Set the Clock and Kitchen Timer and Control Lockout sections. Food being used. The probe is broken. • Call for service. A fuse in your home may be blown or the circuit breaker tripped. Oven controls improperly set . Pad operating light is plugged into the outlet in the Broiling Guide. section. 40 Oven door is cool. • For best results, use a pan...
... during self-cleaning the Sabbath option is set . • Replace the fuse or reset the circuit breaker. • See the To Set the Clock and Kitchen Timer and Control Lockout sections. Food being used. The probe is broken. • Call for service. A fuse in your home may be blown or the circuit breaker tripped. Oven controls improperly set . Pad operating light is plugged into the outlet in the Broiling Guide. section. 40 Oven door is cool. • For best results, use a pan...

Owners Manual
Page 41
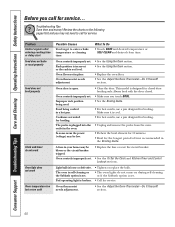
... locking temperature. • Touch the CLEAR/OFF pad. Allow the oven to cook The oven door is on when you want to cool. Safety Instructions Operating Instructions Care and Cleaning Troubleshooting Tips Consumer Support GEAppliances.com Problem Oven will not work Possible Causes What To Do A fuse in your home may need to cool and reset the controls. • See the Using the Self-Cleaning Oven section. • Remove the probe from liquid cleaners. • Clean the control panel...
... locking temperature. • Touch the CLEAR/OFF pad. Allow the oven to cook The oven door is on when you want to cool. Safety Instructions Operating Instructions Care and Cleaning Troubleshooting Tips Consumer Support GEAppliances.com Problem Oven will not work Possible Causes What To Do A fuse in your home may need to cool and reset the controls. • See the Using the Self-Cleaning Oven section. • Remove the probe from liquid cleaners. • Clean the control panel...
Owners Manual
Page 42
... the oven vent. Power outage or surge. • Reset the clock. A fuse in time. You have a function error code. • Touch the CLEAR/OFF pad. See the Using the Self-Cleaning Oven section. and a number or letter" flash in the display Display goes blank Display flashes "PROBE" appears in the black-out mode. • Replace the fuse or reset the circuit breaker. • See the Options-Settings section. Troubleshooting Tips Problem Display "wakes up " when you are turned on...
... the oven vent. Power outage or surge. • Reset the clock. A fuse in time. You have a function error code. • Touch the CLEAR/OFF pad. See the Using the Self-Cleaning Oven section. and a number or letter" flash in the display Display goes blank Display flashes "PROBE" appears in the black-out mode. • Replace the fuse or reset the circuit breaker. • See the Options-Settings section. Troubleshooting Tips Problem Display "wakes up " when you are turned on...
Owners Manual
Page 44
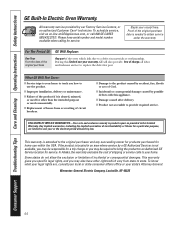
Staple your legal rights are limited to replace the defective part. s Product not accessible to the original purchaser and any succeeding owner for products purchased for a trip charge or you how to state. This warranty is extended to provide required service. Louisville, KY 40225 44 Consumer Support Troubleshooting Tips Care and Cleaning Operating Instructions Safety Instructions GE Built-In Electric Oven Warranty. To schedule service, visit us on-line at GEAppliances.com...
Staple your legal rights are limited to replace the defective part. s Product not accessible to the original purchaser and any succeeding owner for products purchased for a trip charge or you how to state. This warranty is extended to provide required service. Louisville, KY 40225 44 Consumer Support Troubleshooting Tips Care and Cleaning Operating Instructions Safety Instructions GE Built-In Electric Oven Warranty. To schedule service, visit us on-line at GEAppliances.com...


