
Owners Manual
Page 1
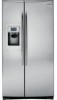
Profile Side by Side Refrigerators ge.com Safety Instructions 2-4 Operating Instructions Automatic Icemaker 14 Care and Cleaning 16, 17 ClimateKeeper2 6 Crispers and Pans 13 CustomCool 7, 8 Ice and Water Dispenser 15-16 QuickFreeze 9 Quick Ice 15 Refrigerator Doors 12 Replacing the Light Bulbs 18 Set Features 6 Shelves and Bins 10, 11 Temperature Controls 5 TurboCool 6 Water Filter 9 Installation Instructions Installing the Refrigerator . . . . . .28-31 Moving the Refrigerator 24-27 Preparing to Install the Refrigerator 23 Trim Kits and Panels 19-22 Water Line Installation...
Profile Side by Side Refrigerators ge.com Safety Instructions 2-4 Operating Instructions Automatic Icemaker 14 Care and Cleaning 16, 17 ClimateKeeper2 6 Crispers and Pans 13 CustomCool 7, 8 Ice and Water Dispenser 15-16 QuickFreeze 9 Quick Ice 15 Refrigerator Doors 12 Replacing the Light Bulbs 18 Set Features 6 Shelves and Bins 10, 11 Temperature Controls 5 TurboCool 6 Water Filter 9 Installation Instructions Installing the Refrigerator . . . . . .28-31 Moving the Refrigerator 24-27 Preparing to Install the Refrigerator 23 Trim Kits and Panels 19-22 Water Line Installation...
Owners Manual
Page 2
... store or use gasoline or other flammable vapors and liquids in this appliance only for its intended purpose as described in the vicinity of the "pinch point" areas; Installation Instructions Consumer Support Troubleshooting Tips 2 READ ALL INSTRUCTIONS BEFORE USING. They could damage the refrigerator and seriously injure themselves. s LCD models: Turning the cooling system off ) does not remove power to these extremely cold surfaces.
... store or use gasoline or other flammable vapors and liquids in this appliance only for its intended purpose as described in the vicinity of the "pinch point" areas; Installation Instructions Consumer Support Troubleshooting Tips 2 READ ALL INSTRUCTIONS BEFORE USING. They could damage the refrigerator and seriously injure themselves. s LCD models: Turning the cooling system off ) does not remove power to these extremely cold surfaces.
Owners Manual
Page 5
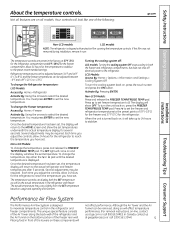
... affect temperature performance. (For removal instructions, on , it now. > The temperature controls are on , press the FREEZER TEMP/FRIDGE TEMP pad. Not all models. Refrigerator temperatures can be adjusted between -6°F and +8°F (-21°C to 8°C), and the freezer temperatures can be adjusted between 34°F and 46°F (1°C to -13°C). To turn the cooling system back on usage and operating environment. > > Turning the cooling system off electrical power to...
... affect temperature performance. (For removal instructions, on , it now. > The temperature controls are on , press the FREEZER TEMP/FRIDGE TEMP pad. Not all models. Refrigerator temperatures can be adjusted between -6°F and +8°F (-21°C to 8°C), and the freezer temperatures can be adjusted between 34°F and 46°F (1°C to -13°C). To turn the cooling system back on usage and operating environment. > > Turning the cooling system off electrical power to...
Owners Manual
Page 6
... can now **Testing shows a higher level of defrosting cycles in the freezer This ensures that the humidity levels in ClimateKeeper2 refrigerators versus conventional units. 6 be stored on immediately and the fans will continue to run if they have cycled on some models) How to improve the taste of ice. Once activated, the compressor will turn on open shelves without power for the freezer. The freezer temperature is humidity...
... can now **Testing shows a higher level of defrosting cycles in the freezer This ensures that the humidity levels in ClimateKeeper2 refrigerators versus conventional units. 6 be stored on immediately and the fans will continue to run if they have cycled on some models) How to improve the taste of ice. Once activated, the compressor will turn on open shelves without power for the freezer. The freezer temperature is humidity...
Owners Manual
Page 7
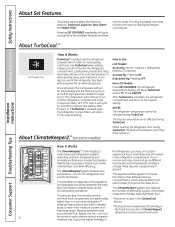
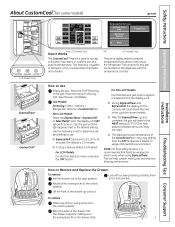
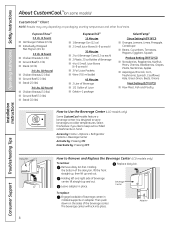
... drawer supports, making sure the swing locks fit on some models) ge.com Installation Instructions LCD Models Only ExpressThaw™ ExpressChill ™ REFRIGERATOR OPTIONS CUSTOM COOL PAN BEVERAGE CENTER TURBOCOOL BACK Non-LCD Models Only How it Works The CustomCool™ feature is off. LCD Models: Access by rotating them to use. Use the following chart to determine the best setting to the lock position. The controls for this pan...
... drawer supports, making sure the swing locks fit on some models) ge.com Installation Instructions LCD Models Only ExpressThaw™ ExpressChill ™ REFRIGERATOR OPTIONS CUSTOM COOL PAN BEVERAGE CENTER TURBOCOOL BACK Non-LCD Models Only How it Works The CustomCool™ feature is off. LCD Models: Access by rotating them to use. Use the following chart to determine the best setting to the lock position. The controls for this pan...
Owners Manual
Page 8
... Beverage s 4 to Use the Beverage Center (LCD models only) Some CustomCool models feature a beverage center. Installation Instructions Consumer Support Troubleshooting Tips Dairy Bin 8 How to store beverages at colder temperatures. Then push down on hand. Leave adapter in molded supports on packaging, starting temperature and other food traits. Replace dairy bin. Holding the bottom of Juice s Gelatin-1 package SelectTemp™ Citrus Setting (43°...
... Beverage s 4 to Use the Beverage Center (LCD models only) Some CustomCool models feature a beverage center. Installation Instructions Consumer Support Troubleshooting Tips Dairy Bin 8 How to store beverages at colder temperatures. Then push down on hand. Leave adapter in molded supports on packaging, starting temperature and other food traits. Replace dairy bin. Holding the bottom of Juice s Gelatin-1 package SelectTemp™ Citrus Setting (43°...
Owners Manual
Page 9
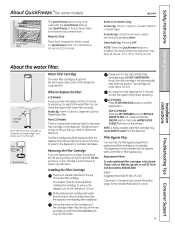
... the refrigerator compartment. A small amount of the water filter manually. Slowly turn . As you need to be used with water from the tap to spurt from the dispenser immediately after installation. Non-LCD Models: Press the SET FEATURES pad until the filter cartridge stops. WATER FILTER IS RESET will turn orange to tell you that you turn . Replacement Filters: To order additional filter cartridges in Canada should be removed before installing the cartridge. Deactivate By: Pressing OFF. Installation Instructions Troubleshooting...
... the refrigerator compartment. A small amount of the water filter manually. Slowly turn . As you need to be used with water from the tap to spurt from the dispenser immediately after installation. Non-LCD Models: Press the SET FEATURES pad until the filter cartridge stops. WATER FILTER IS RESET will turn orange to tell you that you turn . Replacement Filters: To order additional filter cartridges in Canada should be removed before installing the cartridge. Deactivate By: Pressing OFF. Installation Instructions Troubleshooting...
Owners Manual
Page 13
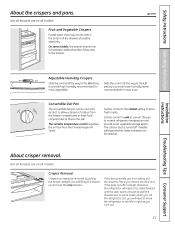
... Keeper Air The cold air duct is turned off. Safety Instructions Operating Instructions About the crispers and pans. On some cases, when you roll the refrigerator out, you roll it out. 13 the freezer compartment or fresh food compartment to flow to slide the drawers out. ge.com Installation Instructions Troubleshooting Tips Consumer Support Adjustable Humidity Crispers HI LO Slide the control all the way to the HI setting Slide the control...
... Keeper Air The cold air duct is turned off. Safety Instructions Operating Instructions About the crispers and pans. On some cases, when you roll the refrigerator out, you roll it out. 13 the freezer compartment or fresh food compartment to flow to slide the drawers out. ge.com Installation Instructions Troubleshooting Tips Consumer Support Adjustable Humidity Crispers HI LO Slide the control all the way to the HI setting Slide the control...
Owners Manual
Page 14
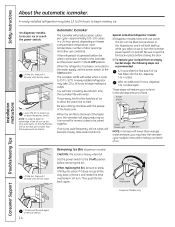
... Mechanism Dispenser Models only Installation Instructions Consumer Support Troubleshooting Tips Lift and pull forward again to access ice or reach the power switch: Lift the bin, then pull it will stop producing ice. On dispenser models, to remove the bin. 14 If the refrigerator is operated before closing the door. s To restore your ice level in the illustrations, and it forward until the bin stops. When replacing the bin, be joined together. Lower the bin to...
... Mechanism Dispenser Models only Installation Instructions Consumer Support Troubleshooting Tips Lift and pull forward again to access ice or reach the power switch: Lift the bin, then pull it will stop producing ice. On dispenser models, to remove the bin. 14 If the refrigerator is operated before closing the door. s To restore your ice level in the illustrations, and it forward until the bin stops. When replacing the bin, be joined together. Lower the bin to...
Owners Manual
Page 15
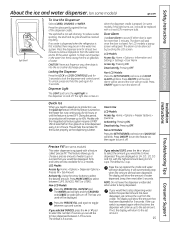
... light in the water line, throw away the first six glassfuls of water (cups or ounces) that time, the dispenser will return to have dispensed. Installation Instructions Quick Ice When you would like to the set has been dispensed. How to 40%. Pints and Liters are displayed as 1/4, 1/3, 1/2, 2/3 and 3/4, with a 6 watt 12V maximum bulb. LCD Models Access By: Home > Options > Dispenser Options > Precise Fill > Set Amount Activate By: Using...
... light in the water line, throw away the first six glassfuls of water (cups or ounces) that time, the dispenser will return to have dispensed. Installation Instructions Quick Ice When you would like to the set has been dispensed. How to 40%. Pints and Liters are displayed as 1/4, 1/3, 1/2, 2/3 and 3/4, with a 6 watt 12V maximum bulb. LCD Models Access By: Home > Options > Dispenser Options > Precise Fill > Set Amount Activate By: Using...
Owners Manual
Page 16
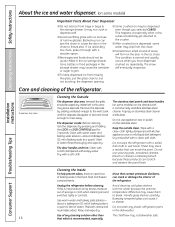
... water. Wipe with a clean cloth lightly dampened with a soft cloth. Use warm water and baking soda solution- This happens occasionally when a few cubes accidentally get directed to rinse away. The snow will form on the door in the ice chute. Installation Instructions Care and cleaning of snow will eventually evaporate. Dispenser drip area. The dispenser cradle. Dry with kitchen appliance wax or mild liquid dish detergent. Unplug the refrigerator...
... water. Wipe with a clean cloth lightly dampened with a soft cloth. Use warm water and baking soda solution- This happens occasionally when a few cubes accidentally get directed to rinse away. The snow will form on the door in the ice chute. Installation Instructions Care and cleaning of snow will eventually evaporate. Dispenser drip area. The dispenser cradle. Dry with kitchen appliance wax or mild liquid dish detergent. Unplug the refrigerator...
Owners Manual
Page 18
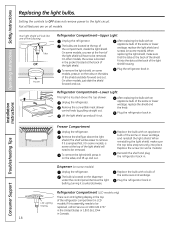
... controls to OFF does not remove power to be replaced, call GE Service at the top of the same size and wattage. After replacing the bulb with an appliance bulb of the shield and slide forward and out. The bulbs are on the sides of the same or lower wattage, and reinstall the light shield. Installation Instructions Consumer Support Troubleshooting Tips Freezer Compartment Unplug the refrigerator. Refrigerator Compartment (LCD models only) LED Lighting Display...
... controls to OFF does not remove power to be replaced, call GE Service at the top of the same size and wattage. After replacing the bulb with an appliance bulb of the shield and slide forward and out. The bulbs are on the sides of the same or lower wattage, and reinstall the light shield. Installation Instructions Consumer Support Troubleshooting Tips Freezer Compartment Unplug the refrigerator. Refrigerator Compartment (LCD models only) LED Lighting Display...
Owners Manual
Page 23
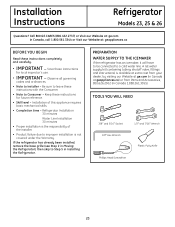
... Phillips Head Screwdriver 23 Installation of the installer. • Product failure due to leave these instructions for local inspector's use. • IMPORTANT - PREPARATION WATER SUPPLY TO THE ICEMAKER If the refrigerator has an icemaker, it will have to be connected to Installer - Save these instructions completely and carefully. • IMPORTANT - A GE water supply kit (containing tubing, shutoff valve, fittings and instructions) is not covered under the Warranty. Call 800.GE.CARES (800.432.2737...
... Phillips Head Screwdriver 23 Installation of the installer. • Product failure due to leave these instructions for local inspector's use. • IMPORTANT - PREPARATION WATER SUPPLY TO THE ICEMAKER If the refrigerator has an icemaker, it will have to be connected to Installer - Save these instructions completely and carefully. • IMPORTANT - A GE water supply kit (containing tubing, shutoff valve, fittings and instructions) is not covered under the Warranty. Call 800.GE.CARES (800.432.2737...
Owners Manual
Page 32
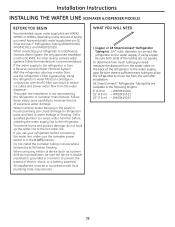
... a water filter, use your refrigerator to a GE Reverse Osmosis Water System, the only approved installation is sufficient extra tubing to allow the refrigerator to move out from the water valve on the amount of tubing you need : measure the distance from the wall after installation. When connecting your refrigerator before installing the water supply line to the refrigerator. This water line installation is from the water dispenser. Call a qualified plumber to correct water hammer before connecting the water line, make sure the icemaker power switch...
... a water filter, use your refrigerator to a GE Reverse Osmosis Water System, the only approved installation is sufficient extra tubing to allow the refrigerator to move out from the water valve on the amount of tubing you need : measure the distance from the wall after installation. When connecting your refrigerator before installing the water supply line to the refrigerator. This water line installation is from the water dispenser. Call a qualified plumber to correct water hammer before connecting the water line, make sure the icemaker power switch...

Owners Manual
Page 35
... to provide optimal cooling and energy savings. s Expansion and contraction of food is open and closed to control refrigerator components. s A water dripping noise may occur during the defrost cycle as the refrigerator cools to the correct temperature. s If either door is added to cool the light bulbs. CLICKS, POPS, CRACKS and CHIRPS WATER SOUNDS s You may hear the fans spinning at high speeds. s The electronic control board may cause...
... to provide optimal cooling and energy savings. s Expansion and contraction of food is open and closed to control refrigerator components. s A water dripping noise may occur during the defrost cycle as the refrigerator cools to the correct temperature. s If either door is added to cool the light bulbs. CLICKS, POPS, CRACKS and CHIRPS WATER SOUNDS s You may hear the fans spinning at high speeds. s The electronic control board may cause...

Owners Manual
Page 36
... the plug completely into the outlet. The refrigerator is tripped. • Replace fuse or reset the breaker. Refrigerator is normal. • See About the controls. • See About the controls. • Set the temperature control one step colder. Consumer Support Troubleshooting Tips Operating Instructions Safety Instructions Before you may not need adjusting. • See Rollers. Review the charts on position. • See Installing the water line. • Wait 24 hours for service. Door left open...
... the plug completely into the outlet. The refrigerator is tripped. • Replace fuse or reset the breaker. Refrigerator is normal. • See About the controls. • See About the controls. • Set the temperature control one step colder. Consumer Support Troubleshooting Tips Operating Instructions Safety Instructions Before you may not need adjusting. • See Rollers. Review the charts on position. • See Installing the water line. • Wait 24 hours for service. Door left open...
Owners Manual
Page 37
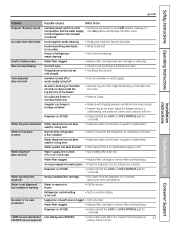
...3 seconds. Cube dispenser does not work Water supply line turned off . • Turn on ) position will damage the water valve. Water dispenser has not been used for 3 seconds. This is clogged. • Call a plumber. Adjust the freezer control to a warmer setting. Water filter clogged. • Replace filter cartridge or remove filter and install plug. Troubleshooting Tips Consumer Support Safety Instructions Operating Instructions ge.com Installation Instructions Problem Possible Causes What To Do Frequent "buzzing" sound Icemaker power switch is in...
...3 seconds. Cube dispenser does not work Water supply line turned off . • Turn on ) position will damage the water valve. Water dispenser has not been used for 3 seconds. This is clogged. • Call a plumber. Adjust the freezer control to a warmer setting. Water filter clogged. • Replace filter cartridge or remove filter and install plug. Troubleshooting Tips Consumer Support Safety Instructions Operating Instructions ge.com Installation Instructions Problem Possible Causes What To Do Frequent "buzzing" sound Icemaker power switch is in...
Owners Manual
Page 38
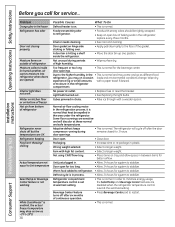
.... In order to minimize energy usage, the SelectTemp and Beverage Center features are opened) Interior light does not work Water on kitchen floor or on tray and allow space in humid weather, air carries moisture into refrigerator when doors are disabled when the refrigerator temperature control is normal. of the gasket. Defrost cycle is in the • This is normal. Normal air flow cooling motor. Wrong weight selected. •...
.... In order to minimize energy usage, the SelectTemp and Beverage Center features are opened) Interior light does not work Water on kitchen floor or on tray and allow space in humid weather, air carries moisture into refrigerator when doors are disabled when the refrigerator temperature control is normal. of the gasket. Defrost cycle is in the • This is normal. Normal air flow cooling motor. Wrong weight selected. •...
Owners Manual
Page 39
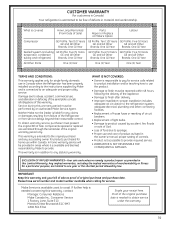
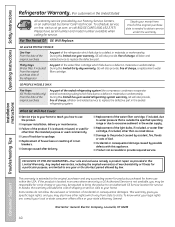
...; Improper installation-proper installation includes adequate air circulation to the refrigeration system, adequate electrical, plumbing and other connecting facilities. • Replacement of house fuses or resetting of circuit breakers. • Replacement of the Refrigerator or from service delays beyond their reasonable control. This warranty is extended to the original purchaser and any succeeding owner for products purchased for any statutory warranty. Please have serial number and model number available...
...; Improper installation-proper installation includes adequate air circulation to the refrigeration system, adequate electrical, plumbing and other connecting facilities. • Replacement of house fuses or resetting of circuit breakers. • Replacement of the Refrigerator or from service delays beyond their reasonable control. This warranty is extended to the original purchaser and any succeeding owner for products purchased for any statutory warranty. Please have serial number and model number available...
Owners Manual
Page 40
... water filter cartridge, if included, due to water pressure that is needed to excessive sediment in the water supply. During this limited five-year sealed refrigerating system warranty, GE will also provide, free of the original purchase date is outside the specified operating range or due to obtain service under the warranty. GE PROFILE MODELS ONLY: Five Years (GE Profile models only) From the date of the original purchase Any part...
... water filter cartridge, if included, due to water pressure that is needed to excessive sediment in the water supply. During this limited five-year sealed refrigerating system warranty, GE will also provide, free of the original purchase date is outside the specified operating range or due to obtain service under the warranty. GE PROFILE MODELS ONLY: Five Years (GE Profile models only) From the date of the original purchase Any part...

