

Use and Care Manual
Page 1
... Ice 15 Refrigerator Doors 12 Replacing the Light Bulbs 18 Set Features 6 Shelves and Bins 10, 11 Temperature Controls 5 TurboCool 6 Water Filter 9 Installation Instructions Installing the Refrigerator 28-31 Moving the Refrigerator 24-27 Preparing to Install the Refrigerator 23 Trim Kits and Panels 19-22 Water Line Installation 32-34 Troubleshooting Tips . . . . . .36-38 Normal Operating Sounds 35 Consumer Support Consumer Support Back Cover Performance Data Sheet 41 Product Registration 43, 44 State of California Water Treatment Device Certificate 42 Warranty (Canadian...
... Ice 15 Refrigerator Doors 12 Replacing the Light Bulbs 18 Set Features 6 Shelves and Bins 10, 11 Temperature Controls 5 TurboCool 6 Water Filter 9 Installation Instructions Installing the Refrigerator 28-31 Moving the Refrigerator 24-27 Preparing to Install the Refrigerator 23 Trim Kits and Panels 19-22 Water Line Installation 32-34 Troubleshooting Tips . . . . . .36-38 Normal Operating Sounds 35 Consumer Support Consumer Support Back Cover Performance Data Sheet 41 Product Registration 43, 44 State of California Water Treatment Device Certificate 42 Warranty (Canadian...

Use and Care Manual
Page 2
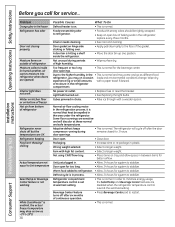
... careful closing doors when children are necessarily small. s In refrigerators with automatic icemakers, avoid contact with the moving parts of the ejector mechanism, or with the Installation Instructions before cleaning and making repairs. s Keep fingers out of the "pinch point" areas; s Unplug the refrigerator before it is plugged in the refrigerator. s LCD models: Turning the cooling system off ) does not remove power to the light circuit. Installation Instructions Consumer Support Troubleshooting Tips 2 Use this Owner's Manual...
... careful closing doors when children are necessarily small. s In refrigerators with automatic icemakers, avoid contact with the moving parts of the ejector mechanism, or with the Installation Instructions before cleaning and making repairs. s Keep fingers out of the "pinch point" areas; s Unplug the refrigerator before it is plugged in the refrigerator. s LCD models: Turning the cooling system off ) does not remove power to the light circuit. Installation Instructions Consumer Support Troubleshooting Tips 2 Use this Owner's Manual...

Use and Care Manual
Page 5
... refrigerator and freezer compartments. The SET light will not affect performance. The temperature controls can be required. To change the Freezer temperature: Access By: Home > Freezer Activate By: Using the arrows to the preset recommended settings. LCD Models: Access By: Home > Options > Information and Settings > Cooling System Off To turn the unit back on the bottom portion of the following: ge.com Installation Instructions Non-LCD models LCD models NOTE: The refrigerator...
... refrigerator and freezer compartments. The SET light will not affect performance. The temperature controls can be required. To change the Freezer temperature: Access By: Home > Freezer Activate By: Using the arrows to the preset recommended settings. LCD Models: Access By: Home > Options > Information and Settings > Cooling System Off To turn the unit back on the bottom portion of the following: ge.com Installation Instructions Non-LCD models LCD models NOTE: The refrigerator...

Use and Care Manual
Page 6
Installation Instructions About TurboCool.™ LCD Models Only How it will cycle on and off at room temperature or when putting away warm leftovers. The compressor will cycle on occasion most advanced refrigeration system, experience fog or small amounts of ice. Press ON/OFF. The freezer temperature is the industry's the refrigerator, you may come and go as needed for eight hours. change. evaporators-one...
Installation Instructions About TurboCool.™ LCD Models Only How it will cycle on and off at room temperature or when putting away warm leftovers. The compressor will cycle on occasion most advanced refrigeration system, experience fog or small amounts of ice. Press ON/OFF. The freezer temperature is the industry's the refrigerator, you may come and go as needed for eight hours. change. evaporators-one...

Use and Care Manual
Page 7
... and press the OFF button. The controls for this pan are in plastic wrap when using ExpressThaw. Rotate all four swing locks are located on some models) ge.com Installation Instructions LCD Models Only ExpressThaw™ ExpressChill ™ REFRIGERATOR OPTIONS CUSTOM COOL PAN BEVERAGE CENTER TURBOCOOL BACK Non-LCD Models Only How it is a system of dampers, a fan, a temperature thermistor and a heater. To replace: Make sure all four swing...
... and press the OFF button. The controls for this pan are in plastic wrap when using ExpressThaw. Rotate all four swing locks are located on some models) ge.com Installation Instructions LCD Models Only ExpressThaw™ ExpressChill ™ REFRIGERATOR OPTIONS CUSTOM COOL PAN BEVERAGE CENTER TURBOCOOL BACK Non-LCD Models Only How it is a system of dampers, a fan, a temperature thermistor and a heater. To replace: Make sure all four swing...

Use and Care Manual
Page 9
... the replacement indicator light turns red or if the flow of water to the dispenser or icemaker decreases. Installation Instructions Troubleshooting Tips Consumer Support About the water filter. Line up inside the cartridge holder and slowly turn it will turn . Press and hold the ON/OFF pad for 5 minutes to clear the system and prevent sputtering. ge.com Some LCD Models Only: Access By: Home > Options > Freezer Options > QuickFreeze Activate By: Using...
... the replacement indicator light turns red or if the flow of water to the dispenser or icemaker decreases. Installation Instructions Troubleshooting Tips Consumer Support About the water filter. Line up inside the cartridge holder and slowly turn it will turn . Press and hold the ON/OFF pad for 5 minutes to clear the system and prevent sputtering. ge.com Some LCD Models Only: Access By: Home > Options > Freezer Options > QuickFreeze Activate By: Using...

Use and Care Manual
Page 13
... control to cold to convert the pan to the pan. Variable Tower. ge.com Installation Instructions Troubleshooting Tips Consumer Support Adjustable Humidity Crispers HI LO Slide the control all the way to the HI setting Slide the control all the way to the LO to provide lower humidity levels most fruits. the air flow from taking out the drawers, first try to slide the drawers out. Crisper Removal Crispers can be removed...
... control to cold to convert the pan to the pan. Variable Tower. ge.com Installation Instructions Troubleshooting Tips Consumer Support Adjustable Humidity Crispers HI LO Slide the control all the way to the HI setting Slide the control all the way to the LO to provide lower humidity levels most fruits. the air flow from taking out the drawers, first try to slide the drawers out. Crisper Removal Crispers can be removed...

Use and Care Manual
Page 14
... the water supply, set the power switch in the illustrations, and it forward until the bin stops. s To restore your ice level in the shortest amount of the feeler arm. Lift the bin, then pull it will hear a buzzing sound each time the icemaker fills with the sweep of time. When the refrigerator has been connected to the level of door openings and other use conditions. The icemaker...
... the water supply, set the power switch in the illustrations, and it forward until the bin stops. s To restore your ice level in the shortest amount of the feeler arm. Lift the bin, then pull it will hear a buzzing sound each time the icemaker fills with the sweep of time. When the refrigerator has been connected to the level of door openings and other use conditions. The icemaker...

Use and Care Manual
Page 15
... to lock the dispenser and control panel. Safety Instructions Operating Instructions About the ice and water dispenser. (on some models) This water dispenser is equipped with the highest amount being dispensed. Dispenser Light The LIGHT pad turns the night light in the water line, throw away the first six glassfuls of ounces you to stop once the door is better. The alarm will return to Use LCD Models: Access by: Home > Options > Freezer Options > Quick Ice Activate by...
... to lock the dispenser and control panel. Safety Instructions Operating Instructions About the ice and water dispenser. (on some models) This water dispenser is equipped with the highest amount being dispensed. Dispenser Light The LIGHT pad turns the night light in the water line, throw away the first six glassfuls of ounces you to stop once the door is better. The alarm will return to Use LCD Models: Access by: Home > Options > Freezer Options > Quick Ice Activate by...

Use and Care Manual
Page 16
... to the storage drawer. The door handles and trim. Dry with a clean, soft cloth. Keep the outside clean. Dry and polish with a soft cloth. Consumer Support Troubleshooting Tips Cleaning the Inside To help prevent odors, leave an open box of baking soda in the chute to a quart (1 liter) of baking soda to freeze shut. Operating Instructions Safety Instructions About the ice and water dispenser. (on some models) Important Facts...
... to the storage drawer. The door handles and trim. Dry with a clean, soft cloth. Keep the outside clean. Dry and polish with a soft cloth. Consumer Support Troubleshooting Tips Cleaning the Inside To help prevent odors, leave an open box of baking soda in the chute to a quart (1 liter) of baking soda to freeze shut. Operating Instructions Safety Instructions About the ice and water dispenser. (on some models) Important Facts...

Use and Care Manual
Page 18
.... control knob by turning it out. Dispenser (on the dispenser under the control panel. Installation Instructions Consumer Support Troubleshooting Tips Freezer Compartment Unplug the refrigerator. Remove the light bulb by pulling straight out. Plug the refrigerator back in . Remove the shelf just above the top drawer. Not all models. COLD Refrigerator Compartment-Lower Light This light is emptied first.) On some models). Replace the bulb with an appliance bulb of the light shield. Plug the refrigerator back in . When replacing the light shield, make...
.... control knob by turning it out. Dispenser (on the dispenser under the control panel. Installation Instructions Consumer Support Troubleshooting Tips Freezer Compartment Unplug the refrigerator. Remove the light bulb by pulling straight out. Plug the refrigerator back in . Remove the shelf just above the top drawer. Not all models. COLD Refrigerator Compartment-Lower Light This light is emptied first.) On some models). Replace the bulb with an appliance bulb of the light shield. Plug the refrigerator back in . When replacing the light shield, make...

Use and Care Manual
Page 23
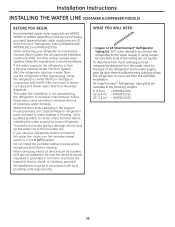
... WATER SUPPLY TO THE ICEMAKER If the refrigerator has an icemaker, it will have to be connected to Installer - Installation Instructions Refrigerator Models 23, 25, 26, 27 and 29 Questions? Observe all governing codes and ordinances. • Note to a cold water line. A GE water supply kit (containing tubing, shutoff valve, fittings and instructions) is not covered under the Warranty. Installation of the installer. • Product failure due to leave these instructions for future reference. • Skill level - If the refrigerator...
... WATER SUPPLY TO THE ICEMAKER If the refrigerator has an icemaker, it will have to be connected to Installer - Installation Instructions Refrigerator Models 23, 25, 26, 27 and 29 Questions? Observe all governing codes and ordinances. • Note to a cold water line. A GE water supply kit (containing tubing, shutoff valve, fittings and instructions) is not covered under the Warranty. Installation of the installer. • Product failure due to leave these instructions for future reference. • Skill level - If the refrigerator...
Use and Care Manual
Page 28
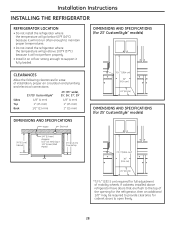
Installation Instructions INSTALLING THE REFRIGERATOR REFRIGERATOR LOCATION • Do not install the refrigerator where the temperature will go below 60°F (16°C) because it will not run often enough to maintain proper temperatures. • Do not install the refrigerator where the temperature will go above refrigerator have doors that are flush to support it fully loaded. DIMENSIONS AND SPECIFICATIONS (for 23' CustomStyle™ models) CLEARANCES Allow the following clearances for...
Installation Instructions INSTALLING THE REFRIGERATOR REFRIGERATOR LOCATION • Do not install the refrigerator where the temperature will go below 60°F (16°C) because it will not run often enough to maintain proper temperatures. • Do not install the refrigerator where the temperature will go above refrigerator have doors that are flush to support it fully loaded. DIMENSIONS AND SPECIFICATIONS (for 23' CustomStyle™ models) CLEARANCES Allow the following clearances for...
Use and Care Manual
Page 32
..., make sure the icemaker power switch is battery powered. WX08X10015 25′ (7.6 m) - Approved plastic water supply lines are cut square. To prevent burns and product damage, do not hook up the water line to the hot water line. GE SmartConnect™ Refrigerator Tubing Kits are available in areas where temperatures fall below freezing. Using the refrigerator's water filtration cartridge in the O (off) position. Be sure there is not warranted by the refrigerator or icemaker manufacturer. Installation Instructions INSTALLING THE WATER LINE (ICEMAKER & DISPENSER MODELS...
..., make sure the icemaker power switch is battery powered. WX08X10015 25′ (7.6 m) - Approved plastic water supply lines are cut square. To prevent burns and product damage, do not hook up the water line to the hot water line. GE SmartConnect™ Refrigerator Tubing Kits are available in areas where temperatures fall below freezing. Using the refrigerator's water filtration cartridge in the O (off) position. Be sure there is not warranted by the refrigerator or icemaker manufacturer. Installation Instructions INSTALLING THE WATER LINE (ICEMAKER & DISPENSER MODELS...
Use and Care Manual
Page 35
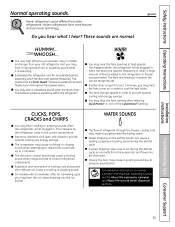
... to cool the light bulbs. These sounds are opened frequently or when a large amount of the CustomCool™ settings. s Water dropping on the defrost heater can cause a cracking or popping sound. s A water dripping noise may hear the ice cubes dropping into the drain pan. s You may hear the fans come on normal icemaker and dispenser operating sounds, see the About the automatic icemaker and About the ice and water dispenser sections...
... to cool the light bulbs. These sounds are opened frequently or when a large amount of the CustomCool™ settings. s Water dropping on the defrost heater can cause a cracking or popping sound. s A water dripping noise may hear the ice cubes dropping into the drain pan. s You may hear the fans come on normal icemaker and dispenser operating sounds, see the About the automatic icemaker and About the ice and water dispenser sections...
Use and Care Manual
Page 36
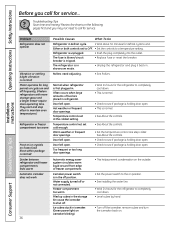
... storage bin cause the icemaker to a temperature setting. Door left open . • This helps prevent condensation on the outside. • Set the power switch to the on position. • See Installing the water line. • Wait 24 hours for service... Icemaker power switch is in icemaker. (Green power light on icemaker blinking). • Wait 24 hours for the refrigerator to completely cool down . • Level cubes by hand. • Turn off the icemaker, remove cubes and turn the icemaker back...
... storage bin cause the icemaker to a temperature setting. Door left open . • This helps prevent condensation on the outside. • Set the power switch to the on position. • See Installing the water line. • Wait 24 hours for service... Icemaker power switch is in icemaker. (Green power light on icemaker blinking). • Wait 24 hours for the refrigerator to completely cool down . • Level cubes by hand. • Turn off the icemaker, remove cubes and turn the icemaker back...

Use and Care Manual
Page 37
... inside the top door bin of refrigerator needs cleaning. • See Care and cleaning. Slow ice cube freezing Door left in the crusher from the dispenser for service. Temperature control not set cold enough. • See About the controls. An item is blocking or has fallen into the chute. Adjust the freezer control to a colder setting, one and a half gallons). Air may be too warm. Refrigerator control setting is normal. Keeping it in I (on) position, but the water supply the I (on icemaker...
... inside the top door bin of refrigerator needs cleaning. • See Care and cleaning. Slow ice cube freezing Door left in the crusher from the dispenser for service. Temperature control not set cold enough. • See About the controls. An item is blocking or has fallen into the chute. Adjust the freezer control to a colder setting, one and a half gallons). Air may be too warm. Refrigerator control setting is normal. Keeping it in I (on) position, but the water supply the I (on icemaker...
Use and Care Manual
Page 38
... a larger weight. Not using Chill/Thaw tray. • Place items on bottom of freezer Hot air from bottom of refrigerator Refrigerator never shuts off after six months of refrigerator Moisture collects inside the refrigerator. • Move the door bin up one position. Door open . • Close door. Warm food added to refrigerator. • Allow 24 hours for service... Refrigerator compartment temperature control is set at warmest setting. • This is set at the warmest...
... a larger weight. Not using Chill/Thaw tray. • Place items on bottom of freezer Hot air from bottom of refrigerator Refrigerator never shuts off after six months of refrigerator Moisture collects inside the refrigerator. • Move the door bin up one position. Door open . • Close door. Warm food added to refrigerator. • Allow 24 hours for service... Refrigerator compartment temperature control is set at warmest setting. • This is set at the warmest...
Use and Care Manual
Page 39
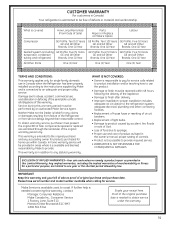
.... If further help is needed to coast. CUSTOMER WARRANTY (for customers in Canada) Your refrigerator is warranted to an adequate and proper utility service. What is covered How Long Warranted (From Date of Sale) Parts Repair or Replace at Mabe's Option Labour Compressor GE Profile: Ten (10) Years GE Profile: Ten (10) Years GE Profile: Five (5) Years GE and All Other GE and All Other GE and All Other Brands...
.... If further help is needed to coast. CUSTOMER WARRANTY (for customers in Canada) Your refrigerator is warranted to an adequate and proper utility service. What is covered How Long Warranted (From Date of Sale) Parts Repair or Replace at Mabe's Option Labour Compressor GE Profile: Ten (10) Years GE Profile: Ten (10) Years GE Profile: Five (5) Years GE and All Other GE and All Other GE and All Other Brands...
Use and Care Manual
Page 40
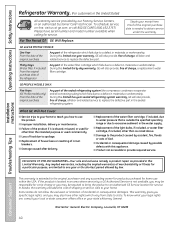
... compressor, condenser, evaporator and all labor and related service to replace the defective part. Operating Instructions Safety Instructions Refrigerator Warranty. (For customers in the United States) All warranty service provided by a GE Authorized Servicer is extended to the original purchaser and any succeeding owner for products purchased for home use the product. Proof of charge, all connecting tubing) which fails due to a defect in materials or workmanship. Thirty Days (Water filter...
... compressor, condenser, evaporator and all labor and related service to replace the defective part. Operating Instructions Safety Instructions Refrigerator Warranty. (For customers in the United States) All warranty service provided by a GE Authorized Servicer is extended to the original purchaser and any succeeding owner for products purchased for home use the product. Proof of charge, all connecting tubing) which fails due to a defect in materials or workmanship. Thirty Days (Water filter...


