
Owners Manual
Page 1
Profile Side by Side Refrigerators ge.com Safety Instructions 2-4 Operating Instructions Automatic Icemaker 14 Care and Cleaning 16, 17 ClimateKeeper2 6 Crispers and Pans 13 CustomCool 7, 8 Ice and Water Dispenser 15-16 QuickFreeze 9 Quick Ice 15 Refrigerator Doors 12 Replacing the Light Bulbs 18 Set Features 6 Shelves and Bins 10, 11 Temperature Controls 5 TurboCool 6 Water Filter 9 Installation Instructions Installing the Refrigerator . . . . . .28-31 Moving the Refrigerator 24-27 Preparing to Install the Refrigerator 23 Trim Kits and Panels 19-22 Water Line Installation...
Profile Side by Side Refrigerators ge.com Safety Instructions 2-4 Operating Instructions Automatic Icemaker 14 Care and Cleaning 16, 17 ClimateKeeper2 6 Crispers and Pans 13 CustomCool 7, 8 Ice and Water Dispenser 15-16 QuickFreeze 9 Quick Ice 15 Refrigerator Doors 12 Replacing the Light Bulbs 18 Set Features 6 Shelves and Bins 10, 11 Temperature Controls 5 TurboCool 6 Water Filter 9 Installation Instructions Installing the Refrigerator . . . . . .28-31 Moving the Refrigerator 24-27 Preparing to Install the Refrigerator 23 Trim Kits and Panels 19-22 Water Line Installation...
Owners Manual
Page 2
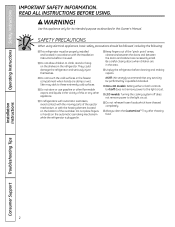
... not remove power to the light circuit. s Unplug the refrigerator before it is plugged in the freezer compartment when hands are damp or wet. Installation Instructions Consumer Support Troubleshooting Tips 2 s Do not allow children to these extremely cold surfaces. READ ALL INSTRUCTIONS BEFORE USING. s In refrigerators with automatic icemakers, avoid contact with the moving parts of the ejector mechanism, or with the Installation Instructions before cleaning and making repairs. s Always clean the...
... not remove power to the light circuit. s Unplug the refrigerator before it is plugged in the freezer compartment when hands are damp or wet. Installation Instructions Consumer Support Troubleshooting Tips 2 s Do not allow children to these extremely cold surfaces. READ ALL INSTRUCTIONS BEFORE USING. s In refrigerators with automatic icemakers, avoid contact with the moving parts of the ejector mechanism, or with the Installation Instructions before cleaning and making repairs. s Always clean the...
Owners Manual
Page 5
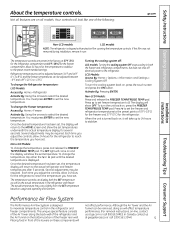
... the freezer and refrigerator compartments, but does not shut off electrical power to set , the temperature display will look like one of the louvers on usage and operating environment. > > Turning the cooling system off: LCD models: Turning the cooling system OFF stops cooling in both the SET temperature as well as the actual temperature in front of the following: ge.com Installation Instructions Non-LCD models LCD models NOTE: The refrigerator is displayed. Safety Instructions Operating Instructions About the temperature controls. Refrigerator temperatures...
... the freezer and refrigerator compartments, but does not shut off electrical power to set , the temperature display will look like one of the louvers on usage and operating environment. > > Turning the cooling system off: LCD models: Turning the cooling system OFF stops cooling in both the SET temperature as well as the actual temperature in front of the following: ge.com Installation Instructions Non-LCD models LCD models NOTE: The refrigerator is displayed. Safety Instructions Operating Instructions About the temperature controls. Refrigerator temperatures...
Owners Manual
Page 6
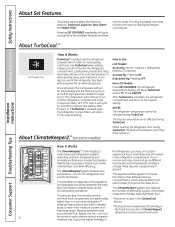
... refrigerator temperature cannot be stored on immediately and the fans will continue to run until the refrigerator compartment cools to approximately 34°F (1°C), then it Works TurboCool™ rapidly cools the refrigerator compartment in evaporator, thereby reducing freezer burn. Once activated, the compressor will turn on open shelves without power for the freezer. Operating Instructions Safety Instructions About Set Features. Moisture sensitive foods such as needed for eight hours. When opening the refrigerator door...
... refrigerator temperature cannot be stored on immediately and the fans will continue to run until the refrigerator compartment cools to approximately 34°F (1°C), then it Works TurboCool™ rapidly cools the refrigerator compartment in evaporator, thereby reducing freezer burn. Once activated, the compressor will turn on open shelves without power for the freezer. Operating Instructions Safety Instructions About Set Features. Moisture sensitive foods such as needed for eight hours. When opening the refrigerator door...
Owners Manual
Page 7
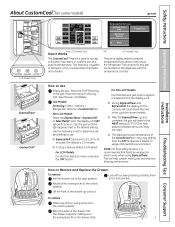
... wrapped in the cycle (on some models) ge.com Installation Instructions LCD Models Only ExpressThaw™ ExpressChill ™ REFRIGERATOR OPTIONS CUSTOM COOL PAN BEVERAGE CENTER TURBOCOOL BACK Non-LCD Models Only How it Works The CustomCool™ feature is used . s During ExpressThaw and ExpressChill,the display on the controls will reset to the MEAT setting (32°F [0°C]) to Use Empty the pan. Lock all four swing locks...
... wrapped in the cycle (on some models) ge.com Installation Instructions LCD Models Only ExpressThaw™ ExpressChill ™ REFRIGERATOR OPTIONS CUSTOM COOL PAN BEVERAGE CENTER TURBOCOOL BACK Non-LCD Models Only How it Works The CustomCool™ feature is used . s During ExpressThaw and ExpressChill,the display on the controls will reset to the MEAT setting (32°F [0°C]) to Use Empty the pan. Lock all four swing locks...
Owners Manual
Page 8
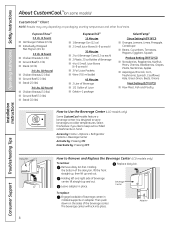
Select this feature if you like to Remove and Replace the Beverage Center (LCD models only) To remove: Remove dairy bin first. Installation Instructions Consumer Support Troubleshooting Tips Dairy Bin 8 How to keep extra-chilled refreshments on...Setting (32°F [0°C]) s Raw Meat, Fish and Poultry How to store beverages at colder temperatures. Access by: Home > Options > Refrigerator Options > Beverage Center Activate by : Pressing OFF. Holding the bottom of beverage center in place. Adapter Operating Instructions Safety Instructions About CustomCool.™(on some models...
Select this feature if you like to Remove and Replace the Beverage Center (LCD models only) To remove: Remove dairy bin first. Installation Instructions Consumer Support Troubleshooting Tips Dairy Bin 8 How to keep extra-chilled refreshments on...Setting (32°F [0°C]) s Raw Meat, Fish and Poultry How to store beverages at colder temperatures. Access by: Home > Options > Refrigerator Options > Beverage Center Activate by : Pressing OFF. Holding the bottom of beverage center in place. Adapter Operating Instructions Safety Instructions About CustomCool.™(on some models...
Owners Manual
Page 9
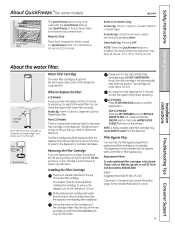
... the filter soon. Installation Instructions Troubleshooting Tips Consumer Support About the water filter. Removing the Filter Cartridge If you need to remind you turn it will not operate without the filter or filter bypass plug. The adapter must use the filter bypass plug when a replacement filter cartridge is lit. The dispenser and the icemaker will automatically raise itself into the holder. Replacement Filters: To order additional filter cartridges in Canada should be removed before installing the cartridge. This is enabled, the actual freezer temperature may...
... the filter soon. Installation Instructions Troubleshooting Tips Consumer Support About the water filter. Removing the Filter Cartridge If you need to remind you turn it will not operate without the filter or filter bypass plug. The adapter must use the filter bypass plug when a replacement filter cartridge is lit. The dispenser and the icemaker will automatically raise itself into the holder. Replacement Filters: To order additional filter cartridges in Canada should be removed before installing the cartridge. This is enabled, the actual freezer temperature may...
Owners Manual
Page 13
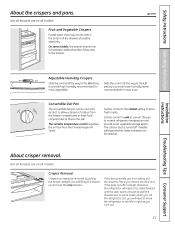
... levels most fruits. Fruit and Vegetable Crispers Excess water that allow a stream of the drawers should be removed by pulling the drawer straight out and lifting the drawer up and over the stop location. ge.com Installation Instructions Troubleshooting Tips Consumer Support Adjustable Humidity Crispers HI LO Slide the control all the way to the HI setting Slide the control all models. Convertible Deli Pan C The convertible deli pan has its own cold Set...
... levels most fruits. Fruit and Vegetable Crispers Excess water that allow a stream of the drawers should be removed by pulling the drawer straight out and lifting the drawer up and over the stop location. ge.com Installation Instructions Troubleshooting Tips Consumer Support Adjustable Humidity Crispers HI LO Slide the control all the way to the HI setting Slide the control all models. Convertible Deli Pan C The convertible deli pan has its own cold Set...
Owners Manual
Page 14
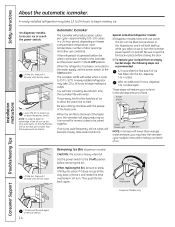
... removing the bin. When the bin fills to clear. Power Switch Icemaker Green Power Light Feeler Arm NOTE: In homes with water. A newly installed refrigerator may take 12 to 24 hours to access ice or reach the power switch. Be sure nothing interferes with water when it firmly into the bin, dispense 3 to 15°F (-10°C). The bin can be joined together. Rotate Drive Mechanism Dispenser Models only Installation Instructions Consumer Support Troubleshooting...
... removing the bin. When the bin fills to clear. Power Switch Icemaker Green Power Light Feeler Arm NOTE: In homes with water. A newly installed refrigerator may take 12 to 24 hours to access ice or reach the power switch. Be sure nothing interferes with water when it firmly into the bin, dispense 3 to 15°F (-10°C). The bin can be joined together. Rotate Drive Mechanism Dispenser Models only Installation Instructions Consumer Support Troubleshooting...
Owners Manual
Page 15
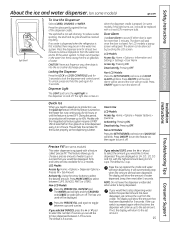
... and DOOR ALARM will be set has been dispensed. How to lock the dispenser and control panel. Troubleshooting Tips Consumer Support Precise Fill (on some models) ge.com Spill Shelf To Use the Dispenser Select CUBED, CRUSHED or WATER. This feature allows you to have dispensed. Press MORE UNITS to toggle between cups and ounces. The last unit used will blink. They are also available for 3 seconds. The display...
... and DOOR ALARM will be set has been dispensed. How to lock the dispenser and control panel. Troubleshooting Tips Consumer Support Precise Fill (on some models) ge.com Spill Shelf To Use the Dispenser Select CUBED, CRUSHED or WATER. This feature allows you to have dispensed. Press MORE UNITS to toggle between cups and ounces. The last unit used will blink. They are also available for 3 seconds. The display...
Owners Manual
Page 16
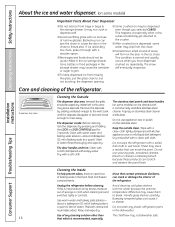
... ice chute. s Avoid overfilling glass with hot water because the extreme temperature difference may cause the icemaker or auger to jam. Cleaning the Outside The dispenser drip area, beneath the grille, should not be wiped dry. Rinse thoroughly and wipe dry. The stainless steel panels and door handles (on some models) can erode the paint. Installation Instructions Care and cleaning of sponge or cloth when cleaning around switches, lights or controls. Remove...
... ice chute. s Avoid overfilling glass with hot water because the extreme temperature difference may cause the icemaker or auger to jam. Cleaning the Outside The dispenser drip area, beneath the grille, should not be wiped dry. Rinse thoroughly and wipe dry. The stainless steel panels and door handles (on some models) can erode the paint. Installation Instructions Care and cleaning of sponge or cloth when cleaning around switches, lights or controls. Remove...
Owners Manual
Page 18
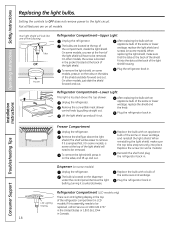
... GE Service at the back of the shield fit into place. Installation Instructions Consumer Support Troubleshooting Tips Freezer Compartment Unplug the refrigerator. When reinstalling the light shield, make sure that the tabs at the back of the light shield housing. Dispenser (on some models, press in the top of the same or lower wattage, replace the shield and Remove the convertible meat drawer the knob. Refrigerator Compartment (LCD models...
... GE Service at the back of the shield fit into place. Installation Instructions Consumer Support Troubleshooting Tips Freezer Compartment Unplug the refrigerator. When reinstalling the light shield, make sure that the tabs at the back of the light shield housing. Dispenser (on some models, press in the top of the same or lower wattage, replace the shield and Remove the convertible meat drawer the knob. Refrigerator Compartment (LCD models...
Owners Manual
Page 23
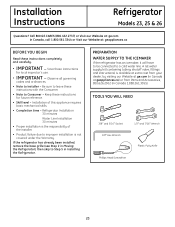
... Canada 1.888.261.3055). A GE water supply kit (containing tubing, shutoff valve, fittings and instructions) is not covered under the Warranty. Keep these instructions completely and carefully. • IMPORTANT - PREPARATION WATER SUPPLY TO THE ICEMAKER If the refrigerator has an icemaker, it will have to be connected to Installer - If the refrigerator has already been installed, remove the base grille (see Step 2 in Installing the Refrigerator. Save these instructions with the Consumer. • Note...
... Canada 1.888.261.3055). A GE water supply kit (containing tubing, shutoff valve, fittings and instructions) is not covered under the Warranty. Keep these instructions completely and carefully. • IMPORTANT - PREPARATION WATER SUPPLY TO THE ICEMAKER If the refrigerator has an icemaker, it will have to be connected to Installer - If the refrigerator has already been installed, remove the base grille (see Step 2 in Installing the Refrigerator. Save these instructions with the Consumer. • Note...
Owners Manual
Page 32
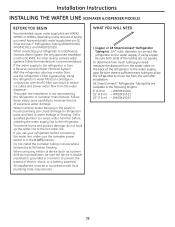
... not warranted by the refrigerator or icemaker manufacturer. GE SmartConnect™ Refrigerator Tubing Kits are WX8X2, WX8X3 or WX8X4, depending on the back of the refrigerator to prevent the hazard of expensive water damage. To determine how much tubing you use the refrigerator's filter bypass plug. Do not install the icemaker tubing in areas where temperatures fall below freezing. Installation Instructions INSTALLING THE WATER LINE (ICEMAKER & DISPENSER MODELS) BEFORE YOU BEGIN Recommended copper water supply kits are available in the...
... not warranted by the refrigerator or icemaker manufacturer. GE SmartConnect™ Refrigerator Tubing Kits are WX8X2, WX8X3 or WX8X4, depending on the back of the refrigerator to prevent the hazard of expensive water damage. To determine how much tubing you use the refrigerator's filter bypass plug. Do not install the icemaker tubing in areas where temperatures fall below freezing. Installation Instructions INSTALLING THE WATER LINE (ICEMAKER & DISPENSER MODELS) BEFORE YOU BEGIN Recommended copper water supply kits are available in the...

Owners Manual
Page 35
... the correct temperature. These sounds are opened frequently. s If either door is added to provide optimal cooling and energy savings. s On models with an icemaker, after selecting QuickFreeze™ or one of refrigerant through the freezer cooling coils may hear the ice cubes dropping into the drain pan. Installation Instructions Troubleshooting Tips Consumer Support 35 s Sometimes the refrigerator runs for over 3 minutes, you may make a gurgling noise like boiling water. Newer refrigerators sound...
... the correct temperature. These sounds are opened frequently. s If either door is added to provide optimal cooling and energy savings. s On models with an icemaker, after selecting QuickFreeze™ or one of refrigerant through the freezer cooling coils may hear the ice cubes dropping into the drain pan. Installation Instructions Troubleshooting Tips Consumer Support 35 s Sometimes the refrigerator runs for over 3 minutes, you may make a gurgling noise like boiling water. Newer refrigerators sound...

Owners Manual
Page 36
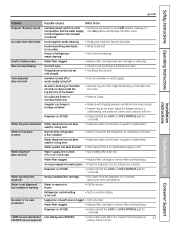
... even temperatures.) Refrigerator or freezer compartment too warm Frost or ice crystals on icemaker blinking). • Wait 24 hours for service... Hot weather or frequent door openings. Piled up cubes in . Consumer Support Troubleshooting Tips They start and stop often to completely cool down . • Level cubes by hand. • Turn off the icemaker, remove cubes and turn the icemaker back on and off position. Temperature controls set cold enough. Warm weather or frequent door openings. Ice cubes...
... even temperatures.) Refrigerator or freezer compartment too warm Frost or ice crystals on icemaker blinking). • Wait 24 hours for service... Hot weather or frequent door openings. Piled up cubes in . Consumer Support Troubleshooting Tips They start and stop often to completely cool down . • Level cubes by hand. • Turn off the icemaker, remove cubes and turn the icemaker back on and off position. Temperature controls set cold enough. Warm weather or frequent door openings. Ice cubes...
Owners Manual
Page 37
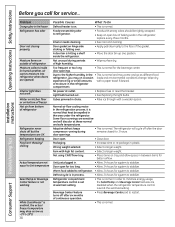
... drained. • Allow several hours for 3 seconds. Water dispenser does not work Icemaker turned off or water supply turned off or not connected. • See Installing the water line. Dispenser is first installed. • Wait 24 hours for 3 seconds. Refrigerator control setting is blocking or has fallen into the ice chute inside the top door bin of refrigerator needs cleaning. • See Care and cleaning. No water or ice cube production Supply line or shutoff valve is normal. Water filter clogged. • Replace filter cartridge or remove filter and install plug...
... drained. • Allow several hours for 3 seconds. Water dispenser does not work Icemaker turned off or water supply turned off or not connected. • See Installing the water line. Dispenser is first installed. • Wait 24 hours for 3 seconds. Refrigerator control setting is blocking or has fallen into the ice chute inside the top door bin of refrigerator needs cleaning. • See Care and cleaning. No water or ice cube production Supply line or shutoff valve is normal. Water filter clogged. • Replace filter cartridge or remove filter and install plug...
Owners Manual
Page 38
... Beverage Center pad to stabilize. Light bulb burned out. • See Replacing the light bulbs. Normal air flow cooling motor. The refrigerator will discolor at outlet. • Replace fuse or reset the breaker. Operating Instructions Safety Instructions Before you may drop as low as different food refrigerator, you call for service... Interior needs cleaning. • See Care and cleaning. Wrong weight selected. • Select a larger weight. Door open for too long. • Allow...
... Beverage Center pad to stabilize. Light bulb burned out. • See Replacing the light bulbs. Normal air flow cooling motor. The refrigerator will discolor at outlet. • Replace fuse or reset the breaker. Operating Instructions Safety Instructions Before you may drop as low as different food refrigerator, you call for service... Interior needs cleaning. • See Care and cleaning. Wrong weight selected. • Select a larger weight. Door open for too long. • Allow...
Owners Manual
Page 39
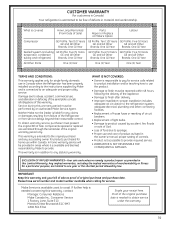
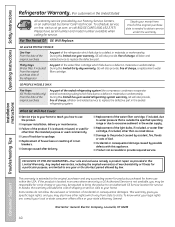
... GE Profile: Five (5) Years GE Profile: Five (5) Years evaporator, condenser GE and All Other GE and All Other GE and All Other tubing and refrigerant) Brands: One (1) Year Brands: One (1) Year Brands: One (1) Year All Other Parts One (1) Year One (1) Year One (1) Year TERMS AND CONDITIONS: This warranty applies only for single family domestic use and care of product as listed in the owner's manual, proper setting of controls...
... GE Profile: Five (5) Years GE Profile: Five (5) Years evaporator, condenser GE and All Other GE and All Other GE and All Other tubing and refrigerant) Brands: One (1) Year Brands: One (1) Year Brands: One (1) Year All Other Parts One (1) Year One (1) Year One (1) Year TERMS AND CONDITIONS: This warranty applies only for single family domestic use and care of product as listed in the owner's manual, proper setting of controls...
Owners Manual
Page 40
... this Limited Warranty. GE PROFILE MODELS ONLY: Five Years (GE Profile models only) From the date of the original purchase Any part of the light bulbs, if included, or water filter cartridge, if included, other than the intended purpose or used for a trip charge or you may be responsible for other rights which fails due to spoilage. s Replacement of the sealed refrigerating system (the compressor, condenser, evaporator and...
... this Limited Warranty. GE PROFILE MODELS ONLY: Five Years (GE Profile models only) From the date of the original purchase Any part of the light bulbs, if included, or water filter cartridge, if included, other than the intended purpose or used for a trip charge or you may be responsible for other rights which fails due to spoilage. s Replacement of the sealed refrigerating system (the compressor, condenser, evaporator and...

