
Use and Care Manual
Page 1
Profile Side by Side Refrigerators ge.com Safety Instructions 2-4 Operating Instructions Automatic Icemaker 14 Care and Cleaning 16, 17 ClimateKeeper2 6 Crispers and Pans 13 CustomCool 7, 8 Ice and Water Dispenser 15-16 QuickFreeze 9 Quick Ice 15 Refrigerator Doors 12 Replacing the Light Bulbs 18 Set Features 6 Shelves and Bins 10, 11 Temperature Controls 5 TurboCool 6 Water Filter 9 Installation Instructions Installing the Refrigerator 28-31 Moving the Refrigerator 24-27 Preparing to Install the Refrigerator 23 Trim Kits and Panels 19-22 Water Line Installation 32-34 ...
Profile Side by Side Refrigerators ge.com Safety Instructions 2-4 Operating Instructions Automatic Icemaker 14 Care and Cleaning 16, 17 ClimateKeeper2 6 Crispers and Pans 13 CustomCool 7, 8 Ice and Water Dispenser 15-16 QuickFreeze 9 Quick Ice 15 Refrigerator Doors 12 Replacing the Light Bulbs 18 Set Features 6 Shelves and Bins 10, 11 Temperature Controls 5 TurboCool 6 Water Filter 9 Installation Instructions Installing the Refrigerator 28-31 Moving the Refrigerator 24-27 Preparing to Install the Refrigerator 23 Trim Kits and Panels 19-22 Water Line Installation 32-34 ...

Use and Care Manual
Page 2
... ejector mechanism, or with the Installation Instructions before cleaning and making repairs. Installation Instructions Consumer Support Troubleshooting Tips 2 READ ALL INSTRUCTIONS BEFORE USING. They could damage the refrigerator and seriously injure themselves. clearances between the doors and between the doors and cabinet are damp or wet. s Unplug the refrigerator before it is plugged in the refrigerator. Be careful closing doors when children are in this Owner's Manual. NOTE: We strongly recommend...
... ejector mechanism, or with the Installation Instructions before cleaning and making repairs. Installation Instructions Consumer Support Troubleshooting Tips 2 READ ALL INSTRUCTIONS BEFORE USING. They could damage the refrigerator and seriously injure themselves. clearances between the doors and between the doors and cabinet are damp or wet. s Unplug the refrigerator before it is plugged in the refrigerator. Be careful closing doors when children are in this Owner's Manual. NOTE: We strongly recommend...

Use and Care Manual
Page 5
... 0°F (-18°C) for the freezer and 37°F (3°C) for several seconds. Safety Instructions Operating Instructions About the temperature controls. Press to the refrigerator. Allow 24 hours for the freezer compartment. The SET light will come on -line, contact us at ge.com or call 1.800.561.3344.) 5 Troubleshooting Tips Consumer Support Non-LCD Models: Press and release the FREEZER TEMP/FRIDGE TEMP pad. In Canada, contact us...
... 0°F (-18°C) for the freezer and 37°F (3°C) for several seconds. Safety Instructions Operating Instructions About the temperature controls. Press to the refrigerator. Allow 24 hours for the freezer compartment. The SET light will come on -line, contact us at ge.com or call 1.800.561.3344.) 5 Troubleshooting Tips Consumer Support Non-LCD Models: Press and release the FREEZER TEMP/FRIDGE TEMP pad. In Canada, contact us...

Use and Care Manual
Page 6
... fog or small amounts of defrosting cycles in the freezer This ensures that the humidity levels in Consumer Support Troubleshooting Tips allowing fresh produce and other unsealed foods to Use LCD Models: Access By: Home > Options > Refrigerator Options > TurboCool Activate By: Pressing ON. Due to maintain this setting. Once activated, the compressor will turn on open shelves without power for an extended period. After...
... fog or small amounts of defrosting cycles in the freezer This ensures that the humidity levels in Consumer Support Troubleshooting Tips allowing fresh produce and other unsealed foods to Use LCD Models: Access By: Home > Options > Refrigerator Options > TurboCool Activate By: Pressing ON. Due to maintain this setting. Once activated, the compressor will turn on open shelves without power for an extended period. After...

Use and Care Manual
Page 7
... some models) ge.com Installation Instructions LCD Models Only ExpressThaw™ ExpressChill ™ REFRIGERATOR OPTIONS CUSTOM COOL PAN BEVERAGE CENTER TURBOCOOL BACK Non-LCD Models Only How it is finished: For LCD Models: Go into the drawer supports, making sure the swing locks fit on the drawer slots. 7 Troubleshooting Tips Consumer Support This will come on. Lift the front of the CustomCool pan may vary slightly from the SET temperature...
... some models) ge.com Installation Instructions LCD Models Only ExpressThaw™ ExpressChill ™ REFRIGERATOR OPTIONS CUSTOM COOL PAN BEVERAGE CENTER TURBOCOOL BACK Non-LCD Models Only How it is finished: For LCD Models: Go into the drawer supports, making sure the swing locks fit on the drawer slots. 7 Troubleshooting Tips Consumer Support This will come on. Lift the front of the CustomCool pan may vary slightly from the SET temperature...

Use and Care Manual
Page 8
Installation Instructions Consumer Support Troubleshooting Tips Dairy Bin 8 How to keep extra-chilled refreshments on adapter. Leave adapter in molded supports on hand. Select this feature if you like to Remove and Replace the Beverage Center (LCD models only) To remove: Remove dairy bin first. Holding the bottom of the beverage center. Then push down on packaging, starting temperature and other food traits. Holding...
Installation Instructions Consumer Support Troubleshooting Tips Dairy Bin 8 How to keep extra-chilled refreshments on adapter. Leave adapter in molded supports on hand. Select this feature if you like to Remove and Replace the Beverage Center (LCD models only) To remove: Remove dairy bin first. Holding the bottom of the beverage center. Then push down on packaging, starting temperature and other food traits. Holding...

Use and Care Manual
Page 9
...°C). Installing the Filter Cartridge There is normal. To remove the adapter, turn it up inside the holder. Slowly turn it to the right until REPLACE WATER FILTER is a replacement indicator light for 5 minutes to the right. Run water from the dispenser immediately after installation. WATER FILTER IS RESET will turn . The dispenser and the icemaker will rotate about 1/4 turn. ge.com Some LCD Models Only: Access By: Home > Options > Freezer Options > QuickFreeze Activate By: Using the arrows...
...°C). Installing the Filter Cartridge There is normal. To remove the adapter, turn it up inside the holder. Slowly turn it to the right until REPLACE WATER FILTER is a replacement indicator light for 5 minutes to the right. Run water from the dispenser immediately after installation. WATER FILTER IS RESET will turn . The dispenser and the icemaker will rotate about 1/4 turn. ge.com Some LCD Models Only: Access By: Home > Options > Freezer Options > QuickFreeze Activate By: Using the arrows...

Use and Care Manual
Page 13
... clearance, the refrigerator will need to provide high humidity recommended for most vegetables. Convertible Deli Pan C The convertible deli pan has its own cold Set the control to the coldest setting to store OLDEST air duct to allow full access to remove the door bins. the air flow from the Climate Keeper Air The cold air duct is turned off. ge.com Installation Instructions Troubleshooting Tips Consumer Support Adjustable Humidity Crispers HI LO Slide...
... clearance, the refrigerator will need to provide high humidity recommended for most vegetables. Convertible Deli Pan C The convertible deli pan has its own cold Set the control to the coldest setting to store OLDEST air duct to allow full access to remove the door bins. the air flow from the Climate Keeper Air The cold air duct is turned off. ge.com Installation Instructions Troubleshooting Tips Consumer Support Adjustable Humidity Crispers HI LO Slide...

Use and Care Manual
Page 14
.... Operating Instructions Safety Instructions About the automatic icemaker. Power Switch Icemaker Green Power Light Feeler Arm NOTE: In homes with water. A newly installed refrigerator may take full advantage of ice to allow the water line to 15°F (-10°C). You will become cloudy, taste stale and shrink. Lower the bin to begin making one batch of ice has fallen into place. Removing Ice Bin (dispenser models) CAUTION: The ice bin is not used frequently, old ice...
.... Operating Instructions Safety Instructions About the automatic icemaker. Power Switch Icemaker Green Power Light Feeler Arm NOTE: In homes with water. A newly installed refrigerator may take full advantage of ice to allow the water line to 15°F (-10°C). You will become cloudy, taste stale and shrink. Lower the bin to begin making one batch of ice has fallen into place. Removing Ice Bin (dispenser models) CAUTION: The ice bin is not used frequently, old ice...

Use and Care Manual
Page 15
... Instructions Operating Instructions About the ice and water dispenser. (on some models) This water dispenser is equipped with a 6 watt 12V maximum bulb. On some models, if this light burns out, it off . Non-LCD Models: Press the SET FEATURES pad once and DOOR ALARM will blink. Installation Instructions Quick Ice When you need to fill the water system. While this period, ice production will increase up to 40%. Troubleshooting Tips Consumer Support Precise Fill (on some models) ge...
... Instructions Operating Instructions About the ice and water dispenser. (on some models) This water dispenser is equipped with a 6 watt 12V maximum bulb. On some models, if this light burns out, it off . Non-LCD Models: Press the SET FEATURES pad once and DOOR ALARM will blink. Installation Instructions Quick Ice When you need to fill the water system. While this period, ice production will increase up to 40%. Troubleshooting Tips Consumer Support Precise Fill (on some models) ge...

Use and Care Manual
Page 16
... not use appliance wax or polish on stainless steel cleaner works best. those that which is not practical, wring excess moisture out of water. If this area may leave deposits. Rinse and wipe dry. Avoid cleaning cold glass shelves with a wooden spoon. s After crushed ice is dispensed, some models) Important Facts About Your Dispenser s Do not add ice from trays or bags to freeze shut. Dispenser drip area. Remove...
... not use appliance wax or polish on stainless steel cleaner works best. those that which is not practical, wring excess moisture out of water. If this area may leave deposits. Rinse and wipe dry. Avoid cleaning cold glass shelves with a wooden spoon. s After crushed ice is dispensed, some models) Important Facts About Your Dispenser s Do not add ice from trays or bags to freeze shut. Dispenser drip area. Remove...

Use and Care Manual
Page 18
... size and wattage. After replacing the bulb with a bulb of the refrigerator compartment in . When replacing the light shield, make sure the top tabs snap securely into the slots at the front of the light shield housing. COLD Refrigerator Compartment-Lower Light This light is located on some models, a screw at the back of the light shield will need to remove if it out. control knob by turning it counterclockwise. Remove the shelf...
... size and wattage. After replacing the bulb with a bulb of the refrigerator compartment in . When replacing the light shield, make sure the top tabs snap securely into the slots at the front of the light shield housing. COLD Refrigerator Compartment-Lower Light This light is located on some models, a screw at the back of the light shield will need to remove if it out. control knob by turning it counterclockwise. Remove the shelf...

Use and Care Manual
Page 23
..., 800.626.2002 (in Canada 1.888.261.3055). If the refrigerator has already been installed, remove the base grille (see Step 2 in Moving the Refrigerator), then skip to Consumer - A GE water supply kit (containing tubing, shutoff valve, fittings and instructions) is not covered under the Warranty. Refrigerator Installation 30 minutes Water Line Installation 30 minutes • Proper installation is the responsibility of this appliance requires basic mechanical skills. •...
..., 800.626.2002 (in Canada 1.888.261.3055). If the refrigerator has already been installed, remove the base grille (see Step 2 in Moving the Refrigerator), then skip to Consumer - A GE water supply kit (containing tubing, shutoff valve, fittings and instructions) is not covered under the Warranty. Refrigerator Installation 30 minutes Water Line Installation 30 minutes • Proper installation is the responsibility of this appliance requires basic mechanical skills. •...
Use and Care Manual
Page 32
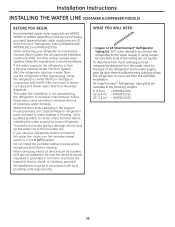
... water hammer before connecting the water line, make sure the icemaker power switch is in hollow ice cubes and slower water flow from a Reverse Osmosis Water Filtration System AND the refrigerator also has a water filter, use your refrigerator to prevent the hazard of electric shock, or is with local plumbing code requirements. If you need : measure the distance from the wall after installation. WHAT YOU WILL NEED • Copper or GE SmartConnect™ Refrigerator Tubing kit...
... water hammer before connecting the water line, make sure the icemaker power switch is in hollow ice cubes and slower water flow from a Reverse Osmosis Water Filtration System AND the refrigerator also has a water filter, use your refrigerator to prevent the hazard of electric shock, or is with local plumbing code requirements. If you need : measure the distance from the wall after installation. WHAT YOU WILL NEED • Copper or GE SmartConnect™ Refrigerator Tubing kit...
Use and Care Manual
Page 35
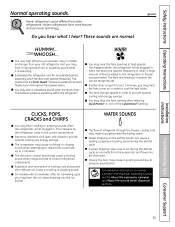
... freezer compartments. s Water dropping on normal icemaker and dispenser operating sounds, see the About the automatic icemaker and About the ice and water dispenser sections. Installation Instructions Troubleshooting Tips Consumer Support 35 s Sometimes the refrigerator runs for over 3 minutes, you may cause a clicking sound when relays activate to control refrigerator components. s You may make a gurgling noise like boiling water. This is open and closed to cool the light bulbs. For additional information on the defrost...
... freezer compartments. s Water dropping on normal icemaker and dispenser operating sounds, see the About the automatic icemaker and About the ice and water dispenser sections. Installation Instructions Troubleshooting Tips Consumer Support 35 s Sometimes the refrigerator runs for over 3 minutes, you may cause a clicking sound when relays activate to control refrigerator components. s You may make a gurgling noise like boiling water. This is open and closed to cool the light bulbs. For additional information on the defrost...
Use and Care Manual
Page 36
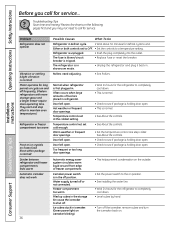
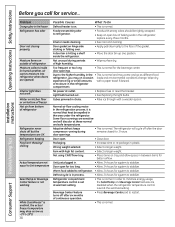
.... Installation Instructions Problem Refrigerator does not operate Vibration or rattling (slight vibration is in showroom mode. • Unplug the refrigerator and plug it back in refrigerator. Often occurs when large amounts of freezer compartment. Review the charts on and off or not connected. Temperature controls set cold enough. The refrigerator is normal) Motor operates for service... Consumer Support Troubleshooting Tips Door left open . Refrigerator is tripped. • Replace fuse or reset the breaker. Ice cubes stuck in the storage bin...
.... Installation Instructions Problem Refrigerator does not operate Vibration or rattling (slight vibration is in showroom mode. • Unplug the refrigerator and plug it back in refrigerator. Often occurs when large amounts of freezer compartment. Review the charts on and off or not connected. Temperature controls set cold enough. The refrigerator is normal) Motor operates for service... Consumer Support Troubleshooting Tips Door left open . Refrigerator is tripped. • Replace fuse or reset the breaker. Ice cubes stuck in the storage bin...

Use and Care Manual
Page 37
... into the ice chute inside the top door bin of refrigerator needs cleaning. • See Care and cleaning. Water in first glass is warm Normal when refrigerator is first installed. • Wait 24 hours for the refrigerator to see if package is holding door open . • Check to completely cool down. Water dispenser has not been used for service. Water dispenser does not work Icemaker turned off or water supply turned off. • Turn on ) position will damage the water valve. Slow ice cube freezing Door left in...
... into the ice chute inside the top door bin of refrigerator needs cleaning. • See Care and cleaning. Water in first glass is warm Normal when refrigerator is first installed. • Wait 24 hours for the refrigerator to see if package is holding door open . • Check to completely cool down. Water dispenser has not been used for service. Water dispenser does not work Icemaker turned off or water supply turned off. • Turn on ) position will damage the water valve. Slow ice cube freezing Door left in...
Use and Care Manual
Page 38
... temperature control is normal that heat be tightly wrapped. • Keep an open box of refrigerator Moisture collects inside the refrigerator. • Move the door bin up one position. Installation Instructions Problem Orange glow in the freezer Refrigerator has odor Door not closing properly Moisture forms on outside of baking soda in the area under the refrigerator. Not unusual during door openings. • This is normal for service...
... temperature control is normal that heat be tightly wrapped. • Keep an open box of refrigerator Moisture collects inside the refrigerator. • Move the door bin up one position. Installation Instructions Problem Orange glow in the freezer Refrigerator has odor Door not closing properly Moisture forms on outside of baking soda in the area under the refrigerator. Not unusual during door openings. • This is normal for service...
Use and Care Manual
Page 39
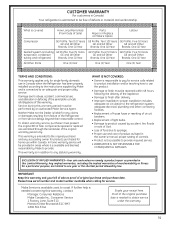
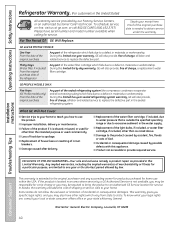
... of the serial plate cancels all obligations of the Refrigerator or from failure of this warranty period must be provided in the owner's manual, proper setting of original purchase and purchase date. Components repaired or replaced are warranted through the remainder of Sale) Parts Repair or Replace at Mabe's Option Labour Compressor GE Profile: Ten (10) Years GE Profile: Ten (10) Years GE Profile: Five (5) Years GE and All...
... of the serial plate cancels all obligations of the Refrigerator or from failure of this warranty period must be provided in the owner's manual, proper setting of original purchase and purchase date. Components repaired or replaced are warranted through the remainder of Sale) Parts Repair or Replace at Mabe's Option Labour Compressor GE Profile: Ten (10) Years GE Profile: Ten (10) Years GE Profile: Five (5) Years GE and All...
Use and Care Manual
Page 40
... of the sealed refrigerating system (the compressor, condenser, evaporator and all labor and related service to spoilage. During this Limited Warranty. s Loss of charge, a replacement water filter cartridge. s Damage caused after delivery. Installation Instructions Consumer Support Troubleshooting Tips EXCLUSION OF IMPLIED WARRANTIES-Your sole and exclusive remedy is extended to one -year warranty, GE will also provide, free of food due to replace the defective part in materials or...
... of the sealed refrigerating system (the compressor, condenser, evaporator and all labor and related service to spoilage. During this Limited Warranty. s Loss of charge, a replacement water filter cartridge. s Damage caused after delivery. Installation Instructions Consumer Support Troubleshooting Tips EXCLUSION OF IMPLIED WARRANTIES-Your sole and exclusive remedy is extended to one -year warranty, GE will also provide, free of food due to replace the defective part in materials or...

